Desktop, Continued
Here's how
We recommend using the special installer created by Omar. It is based on the current Litestep version 0.24.7 Beta 4, but is much easier to use than the original. Begin the installation by double-clicking on the file called "litestep_installer-3.0.2.exe", choose the default settings as they are offered by the installer, and restart your computer after the installation has completed. After the reboot, the system will sport a new look, using a theme called Austerity.

Litestep: A facelift for Windows. The start menu follows a completely different structure.
The new start menu is especially striking. It uses six little golden orbs stacked upon each other as its symbol, and in some cases uses a completely different structure than its standard Windows counterpart. Take some time to explore the various branches of the Litestep start menu. Fundamental functions such as shutting down the computer or logging off a user, as well as accessing the registry editor, can be found under the "system" branch. The so-called "Gripper" can be found to the left of the start menu. When it is clicked, the start menu jumps to the top right-hand corner of the screen and back. To the right of the start menu there is an inconspicuous elongated grey area that allows direct switching between the three virtual desktops. Right click into the left, middle or right parts of this area to switch between them.
Moving further to the right we get to the icons for the standard browser, the text editor and the "My Documents" directory. Also very convenient is the fact that a right click on the "My Documents" icon opens the Windows command shell. One more step to the right brings us to the buttons for Winamp, which let you control this popular music player from the start bar. However, during our testing, this only worked if Winamp was installed before Litestep.
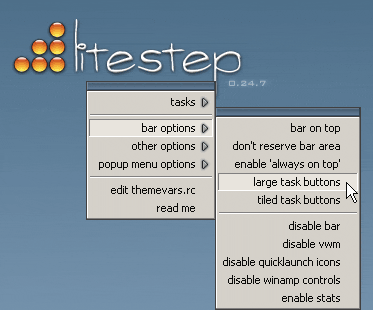
Configuring Litestep: The configuration menu appears when you left click anywhere on the desktop while pressing the shift key.
Another element of the Litestep desktop environment is the Taskbar, which is reminiscent of its Windows namesake, but gives you several options for displaying the buttons. Simply click the left mouse button anywhere on the desktop while simultaneously holding down the shift key to open Austerity's configuration menu. Now select "bar options" and then "large task buttons" for large icons, or "tiled task buttons" for purely graphical symbols.
Using the same combination of shift + left-click followed by "bar options, enable stats" turns on a clear summary of the system's workload and utilization in the Taskbar. It informs you at a glance about current CPU load, as well as memory utilization and swap file usage.
Other changes to the configuration can be made manually through a text file called "themevars.rc", which is extensively documented. It can be opened by shift-left-clicking the desktop and selecting "edit themevars.rc". Once you're finished making changes, save the file and restart Litestep by selecting "Start, litestep, recycle".
One example of the optional Litestep modules that comes with Austerity is the open-source calendar, rainlendar. You can activate it by opening the configuration menu (shift + left-click) and selecting "other options, enable rainlendar".
If you ever want to return to the familiar look and feel of Windows, simply double click on the new desktop icon called "Set explorer as shell". The next time you reboot your computer, you will find yourself right back in the conventional Windows user interface. Returning to Litestep is just as easy - all you need to do is double click the "Set Litestep as shell" icon that is also on the desktop.
You can install other themes as well, although we wouldn't recommend it during your first few weeks with Litestep, because not all of the themes offer the same ease-of-use as Austerity. Besides, this can lead to problems during the installation and subsequent configuration.