Pepping Up Windows
Editor
The text editor that is integrated in Windows is humble indeed. Only the newest versions are able to open larger files, and none of them offer any special features.
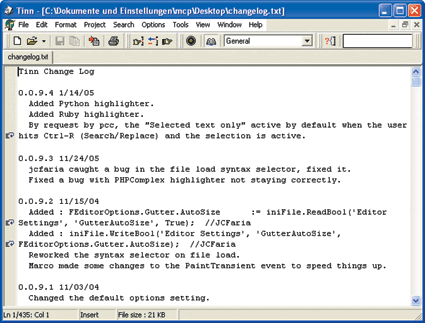
The better Editor: There are numerous open-source solutions for editing text documents. We'd like to name only a few relatively simple variants, such as Tinn (freeware), the more developer- and programmer-oriented Programmers Notepad (freeware) or the very versatile Keynote (freeware).
Text Editor Tinn: This tool offers car more functionality than its Windows counterpart, Notepad.
Here's how: Tinn does not require an installation. Just open the Zip file and extract its contents to a location of your choice. You can start Tinn by simply double-clicking on the file "tinn.exe". The program offers enormous functionality, but is unfortunately lacks adequate documentation. An explanation of how to associate Tinn with TXT files is nowhere to be found, for example. So here's what you do: Open the Windows Explorer and go to "Extras, Folder Options". Select the tab called "File Types". Scroll down in the window labeled "Registered File Types" until you find the entry "TXT Text file". Select this entry and click "Change". In the new window that opens, click on "Browse" and find the directory to which you unzipped "tinn.exe". Select the executable, click on "Open" and then "OK". From now on, Tinn will automatically launch whenever you double-click on a TXT file.
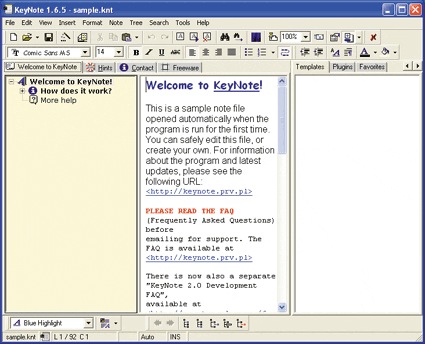
Text Editor Keynote: The program uses a tripartite main window.
A good alternative to Tinn is Keynote, which offers even more functionality. For example, it allows the creation of nested documents that contain information on several levels. The setup routine for Keynote is very simple and therefore doesn't require a walk-through. After the installation completes, you can launch it from "Start, (All) Programs, Keynote". You will be greeted by a three-part window. In the yellow area on the left, you'll see a kind of tree that shows the various planes of the document. The middle partition is the main window that contains the actual text. On the right there is a special element called the "Resource Panel". It contains specialized utilities, such as a search function, various macros or templates. You can toggle this panel on and off using the [F9] key.
Create a new file by selecting "File, New". Keynote will now prompt you to enter a file name immediately to ensure that the autosave feature will work properly. This is an important benefit compared to the original Windows Notepad - which doesn't even offer an autosave feature - but you do need to activate this feature manually. To do so, open the configuration window by pressing [F5] and select the section "Keynote Files". Now, check the box in front of "Autosave, Energy" and select the frequency with which an opened file should be saved. The standard setting is ten minutes. Click "OK" to return to the main view of Keynote.
Get Tom's Hardware's best news and in-depth reviews, straight to your inbox.
In the left window, you can see the individual nodes of your document. Left-click on "New Node" and give the new node a name. Now, click the same node again, but with the right mouse button this time, and you will be given several options. "Add Node" adds another node on the same level, while "Add Child" adds a node one level down in the tree hierarchy. Go ahead and create a couple of nodes. Next, move them around from one point on the tree to another using your mouse. You can add new content to any of the nodes using the middle window. Thus, you are left with an elegantly structured document within which you can organize huge amounts of information and still keep an overview.
Keynote offers so many features that we could fill an entire article with them. Our recommendation is to take the time to try things out or to check out the (English-only) help file.
Window Cleaning: In principle, once you've installed an open-source editor, you could simply delete the file "notepad.exe", which is usually found three times on most Windows systems. However, you'll only gain a measly 51 kB.
Graphics Editor
Paint, the very simple graphics editor that is included in every version of Windows, doesn't exactly offer a rich feature set. Most commonly, it is used to save screenshots if there are no other graphics programs installed on the system. Yet for a long time, Microsoft limited the number of supported file formats. Only since the XP version does Paint come with filters for TIFF files, as well as the PNG format, which is in widely used on the Internet.
The better Graphics Program: The most well-known alternative to Paint is definitely Gimp (freeware). With its extensive set of features, it can even be used for professional projects.
Here's how: Gimp requires the GTK+ runtime environment; it is imperative that you install it before launching the Gimp setup routine. When you launch the program for the first time, the graphics program will ask you for a personal directory. Among other things, this is where the software will store configuration files. The remaining settings can be left as they are suggested. When the installation is complete, the program is ready to go, and you can begin creating or editing your images and graphics. You'll quickly find that the Gimp is a very versatile program.
Window Cleaning: Go to "Start, Settings, Control Panel, Add or Remove Programs", then select "Add/Remove Windows Components" in the left part of this window. Scroll down until you find the entry "Accessories and Utilities". Select it and click "Details". A new window will open in which you have to select "Accessories" and then "Details" again. Uncheck the box for "Paint" and then confirm your selection by clicking "OK" on the next two windows. One final click on "Next" removes Windows Paint from your system.

