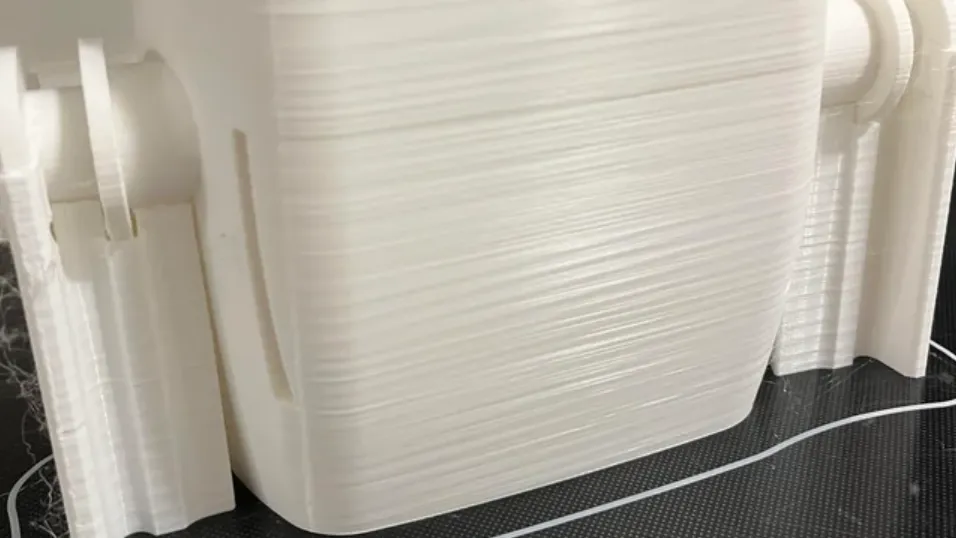
If you see horizontal lines running through the surfaces of your model, you might be experiencing Z banding. It’s frustrating after putting a lot of time and effort into designing a model and 3D printing it, only to have your model have visible, bumpy patterns and textures on its surfaces, completely ruining it. Z banding can be caused by various factors, including misaligned or loose Z-axis components, inconsistent temperature, and even issues with Z-axis stepper motors. Thankfully, just like in any other 3D printing issue, there are various methods you can use to solve this issue, as highlighted below.
Method 1: Tighten the Screws and Belts on the Z-Axis

When the components of the Z-axis are not correctly secured, it can lead to slight shifts or wobbling during printing, resulting in visible banding on the vertical surfaces of the printed object. To fix this:
1. Check lead screws and brass nuts and ensure they are firmly attached, but be careful not to overtighten them as they may lead to other issues.
Article continues below2. Inspect Z-axis rods or rails and ensure they are securely mounted and not loose. You can also check for any signs of bending and misalignment and carefully adjust its position to ensure it runs straight and parallel to the printer's frame. You can also lubricate it to see if there are any changes.
3. Check the z-axis stepper motor and ensure it is not jolting or shaking when the 3D printer moves. Also, ensure you appropriately tighten the rod coupler, which connects the Z-axis lead screw to the stepper motor shaft. If the rod coupler is loose, it can cause slippage or misalignment.
4. Tighten the belts but ensure you don’t tighten much.
Method 2: Use the Correct Layer Height
Even if you have one of the best 3D printers, too high or too low layer height can result in Z banding, and you can adjust it on your 3D printer slicer. Smaller nozzle sizes are often used with finer layer heights to achieve better detail and smoother surfaces.
For example, a printer with a 0.4mm nozzle might be used with a layer height of 0.2mm for standard prints, while you can use a smaller layer height of 0.1mm for more detailed or high-quality 3D prints.
In Cura, you can go to Print settings > Quality, then choose Layer Height and adjust it.

In addition to changing the layer height, it is essential to balance layer height and print speed to avoid issues due to changes in acceleration and deceleration.
Method 3: Have Consistent Extrusion

Variations in the amount of filament that the nozzle extrudes because of over or under-extrusion affects the overall quality of your 3D print, especially on the vertical surfaces along the Z-axis. Inconsistent extrusion can also impact the retraction settings, and this can cause filament inconsistencies at the beginning of each new layer, contributing to Z banding. You can ensure consistent extrusion by regularly cleaning your 3D printer nozzle and correctly setting your 3D printer slicer.
For example, you can adjust the flow rate as it’s one of the settings that determine the volume of material flowing through the nozzle. The default flow rate percentage is usually 100%, indicating that the printer will extrude the expected amount of filament based on the slicer's settings. If you increase it to above 100, more filament will be extruded, leading to over-extrusion, and reducing it will cause under-extrusion. You can get the settings on Print settings > Experimental.

You should also use proper 3D printing temperatures as it affects extrusion too. If it is too low for your filament, the material may not be heated well. This will make it difficult for the filament to flow smoothly through the nozzle, resulting in inconsistent extrusion. High temperatures, on the other hand, will make the filament too fluid, leading to excessive material flow. You can set the temperatures correctly by going to Print settings > Material.

If the nozzle settings in the slicer are not in line with the one for your 3D printer, it will also cause issues. You can adjust the nozzle by going to Settings > Printer > Manage Printers.

In the new window that launches, click Machine settings and then choose Extruder 1, and you will see an option to change the nozzle diameter.

In addition to the nozzle size, ensure you set your filament diameter accurately. You can find this in Compatible material diameter section.

Method 4: Calibrate the E-Steps
This is where you adjust the number of steps the printer's stepper motor needs to take to extrude a specific filament length. Properly setting up E-steps ensures that the printer accurately extrudes the expected amount of filament.
You adjust this by extruding a small filament, measuring the actual extruded length, and then changing the E-steps value in the printer's firmware until the extruded size matches the commanded length.
Method 5: Store Your Filament Correctly

Wet and poor-quality filament, even if it's among the best filaments, can contribute to Z banding issues, and you should make sure that the one you are using is of high quality and that you always store it in a moisture-free place. When the filament absorbs moisture, it may not extrude smoothly.
Also, moisture trapped within the filament can turn into steam when heated inside the hotend, and this can cause bubbling and irregular extrusion. So you should keep your filament in a dry, airtight container with desiccant to prevent moisture absorption. If the filament becomes wet, you can dry it using a filament dryer.
In addition, low-quality filament may have inconsistent diameters, causing irregular extrusion rates and visible banding along the Z-axis. If you suspect your filament has a varying diameter, use calipers or a filament gauge to measure and ensure it’s consistent and the same as the values you have specified on the slicer. Also, you should inspect it and ensure it has no impurities, as they can cause clogs in the nozzle.
Even though this issue doesn’t affect the structural integrity of your 3D print, it affects the visual appeal of your print, and you should apply the above methods to fix it.
MORE: Best 3D Printers
MORE: Best Budget 3D Printers
MORE: Best Resin 3D Printers