Do-It-Yourself Solar-Powered PC: Hardware
Power Delivery: Conventional A/C (120/230V) Or 16 Volts DC?
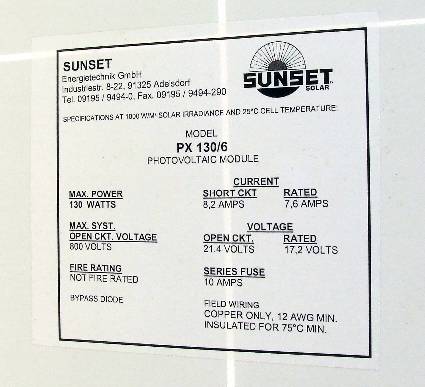
When it comes to delivering solar power to a PC, the input voltage levels and the type of power supply used play the most important roles. A conventional solar power module puts out the equivalent of 16 V DC.
Specifications label from one of the solar panels we used for this build
There are two ways to route electricity from our solar modules to our solar-powered PC. Both approaches come with their own pros and cons, as we will see.
Conventional Input Voltage: Too Much Power Goes To Waste
If the decision is to use conventional A/C input to the PC, lots of energy-efficient standard components may be used. This approach requires the use of a transformer that converts the 16 V DC output from the solar modules into conventional alternating current (110/120 V in North America, 230 V in Europe). That enables use of a standard power supply in the PC itself, which then converts back from A/C to DC, and adjusts voltage levels once again.
Transformers required when using conventional A/C input to the PC
If you look at this sequence of power transforms, it's easy to see that it doesn't make much sense to switch from DC to A/C from the solar module to the PC's power supply, which then switches back from A/C to DC a second time. This type of double power transformation could result in the loss of as much as 25% of the output energy in the form of waste heat, thereby boosting power requirements to service the PC.
16V DC Input Voltage Requires A Special Power Supply
It's much more effective to stick to direct current, and to take the 16 V DC output from the solar modules straight into the PC. But this requires a special power supply.
Get Tom's Hardware's best news and in-depth reviews, straight to your inbox.
Transformer required when handling 16 V DC input to the PC
By directly connecting the power outputs from the solar modules to the PC's power supply, only a single transformer is required, which greatly lowers the amount of energy wasted in that transfer. Using 16 V DC input directly does have a disadvantage as compared to using conventional A/C power, though: in transporting energy from the solar modules to the PC, a lot of current is wasted in overcoming resistance in the cables that tie them together. The reason is that the voltage levels are low, which means the current levels are high, and loss is proportional to current. We knew we could take certain steps to offset these energy losses, so we decided to go the 16 V DC route anyway. How we managed energy delivery to the PC, and built the necessary supporting equipment, chose our solar modules and storage batteries, and so forth, is covered in the third installment of this solar-powered PC saga.
Current page: Power Delivery: Conventional A/C (120/230V) Or 16 Volts DC?
Prev Page A New Desktop PC Power Consumption World Record: 61 Watts Next Page Delivering 16 V DC From A Solar PanelTom's Hardware is the leading destination for hardcore computer enthusiasts. We cover everything from processors to 3D printers, single-board computers, SSDs and high-end gaming rigs, empowering readers to make the most of the tech they love, keep up on the latest developments and buy the right gear. Our staff has more than 100 years of combined experience covering news, solving tech problems and reviewing components and systems.
-
Raigedas i bought this M2-ATX PSU (actually to of them). but i was unable to start it.Reply
1. first quick question: is it possible to start (for testing purposes) the PSU without connecting it to the computer? is it enough to short circuit J8 only to start?
2. docummentation is unclear about 10 (J6). it looks like J6 is purely for controlling stereo amplifier. but other place of the manual says "if J6 is cnnected to the motherboard". where to motherboard?
3. how should PSU be connected?
for testing i have taken 12V 7Ah lead acid battery fully charged.
connected battery "-" to J4.
battery "+" to J1.
J3: tried to leave not connected and tried to connect battery "+".
disconnected power switch cable from motherboard and connected it to J9.
connected J8 with motheboard (using little cable included in the package) where power switch was originally connected.
left J6 not connected.
J10 not connected (P0 mode). also tried P1 mode.
connected ATX and P4 (J2).
pressed power on my pc but nothing happened and no voltage on MOLEX cable.
could authors of the article (or maybe other owner of the PSU) describe how did they start the PSU?


