Do-It-Yourself Solar-Powered PC: Hardware
The Monitor Is A Real Energy Hog: 23 Watts When In Use, Continued
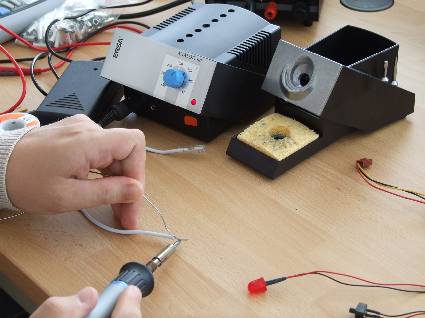
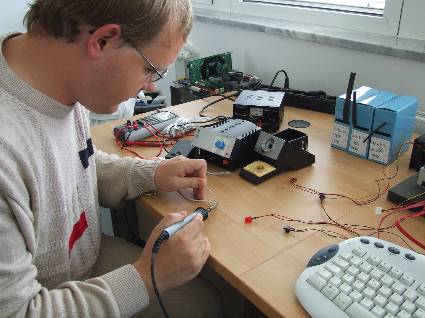
Soldering of the cables
Soldering the connection
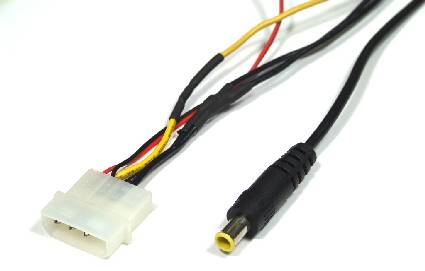
Resoldering the 12 V Monitor cable
Using our rebuilt monitor cable, we were able to attach directly to the PC's power supply
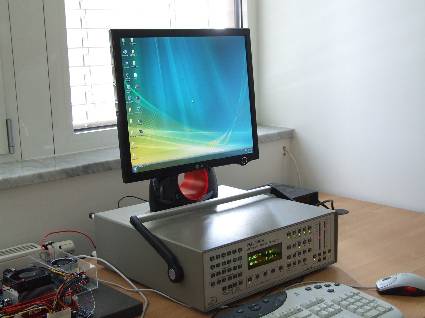
The LG1900R-BF attached to our solar-powered PC
Our redesign let us omit the use of the monitor's own power supply, so we eliminated the energy losses associated with its use, and lowered overall energy consumption significantly.
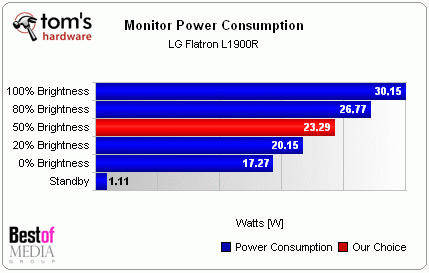
Energy Consumption: LG FlatronL1900R-BF
Get Tom's Hardware's best news and in-depth reviews, straight to your inbox.
At maximum brightness and a resolution of 1280x1024, our 18" monitor draws 30.15 W. As we reduced brightness levels, energy consumption went down as low as 17.27 W. We decided to go with 50% brightness, at which setting the monitor consumes 23.29 W. In standby mode, however, this monitor consumes just 1.1 W!
| 12 Volt Solar-PC-System | ||
|---|---|---|
| Component | Idle | Max load |
| PSU | 5.00 W | 14.20 W |
| CPU | 8.49 W | 38.66 W |
| Cooler | 1.00 W | 1.00W |
| Motherboard | 7.78 W | 19.71 W |
| RAM | 6.06 W | 6.23 W |
| HD | 5.93 W | 7.59 W |
| DVD | 3.68 W | 4.92 W |
| Monitor | 23.29 W | 23.29 W |
| Total: | 61.23 W | 115.60 W |
| max. 160 Watt Custom PSU |
This particular monitor comes equipped only with a DVI interface, so that's what we used to connect it up to our Gigabyte motherboard.
Total Cost for the Solar-Powered PC: $1,011
| Pricing for Solar-Powered PC Components | |
|---|---|
| Power Supply | $80 |
| Processor | $95 |
| Motherboard | $85 |
| RAM | $215 |
| Hard disk | $56 |
| DVD player | $45 |
| Monitor | $400 |
| Keyboard & mouse | $35 |
| TOTAL | $1,011 |
There are other, much higher costs involved in putting an all-solar rig together, of course. We provide those details in the third installment of this article series.
Current page: The Monitor Is A Real Energy Hog: 23 Watts When In Use, Continued
Prev Page The Monitor Is A Real Energy Hog: 23 Watts When In Use Next Page 61-Watt Solar-Powered PC: Storage Batteries Allow Operation In The DarkTom's Hardware is the leading destination for hardcore computer enthusiasts. We cover everything from processors to 3D printers, single-board computers, SSDs and high-end gaming rigs, empowering readers to make the most of the tech they love, keep up on the latest developments and buy the right gear. Our staff has more than 100 years of combined experience covering news, solving tech problems and reviewing components and systems.
-
Raigedas i bought this M2-ATX PSU (actually to of them). but i was unable to start it.Reply
1. first quick question: is it possible to start (for testing purposes) the PSU without connecting it to the computer? is it enough to short circuit J8 only to start?
2. docummentation is unclear about 10 (J6). it looks like J6 is purely for controlling stereo amplifier. but other place of the manual says "if J6 is cnnected to the motherboard". where to motherboard?
3. how should PSU be connected?
for testing i have taken 12V 7Ah lead acid battery fully charged.
connected battery "-" to J4.
battery "+" to J1.
J3: tried to leave not connected and tried to connect battery "+".
disconnected power switch cable from motherboard and connected it to J9.
connected J8 with motheboard (using little cable included in the package) where power switch was originally connected.
left J6 not connected.
J10 not connected (P0 mode). also tried P1 mode.
connected ATX and P4 (J2).
pressed power on my pc but nothing happened and no voltage on MOLEX cable.
could authors of the article (or maybe other owner of the PSU) describe how did they start the PSU?
