


Tom's Hardware Verdict
The Lotmaxx Shark V2 has an impressive set of hardware features and includes enough accessories to outfit a small makerspace, but the software feels unpolished and detracts from the experience.
Pros
- +
+ Dual extruders allow for colorful and creative prints
- +
+ Included laser engraver module is strong enough to etch wood
- +
+ Silent stepper drivers and whisper-quiet fans allow for quiet printing
Cons
- -
Dual extruders require additional calibration
- -
Laser engraver can be dangerous without an enclosure
- -
Laser engraver settings are frustratingly slow
Why you can trust Tom's Hardware Our expert reviewers spend hours testing and comparing products and services so you can choose the best for you. Find out more about how we test.
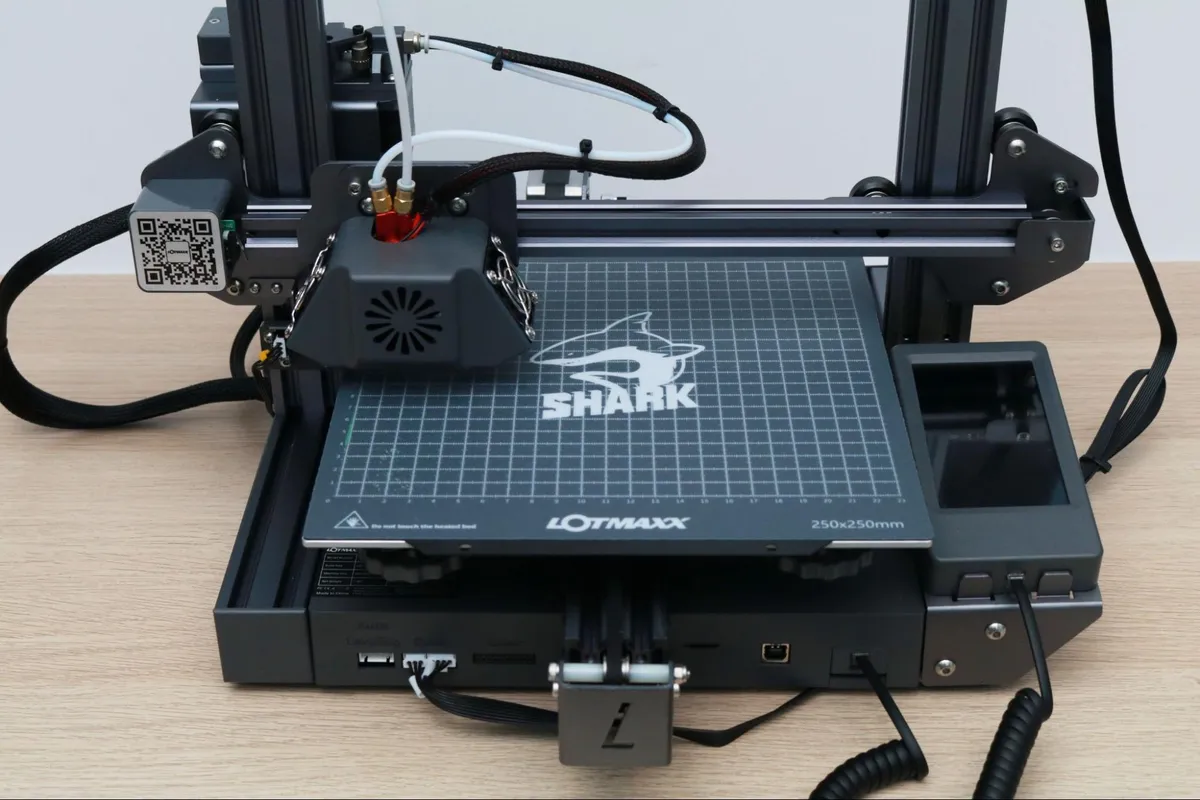
The Lotmaxx Shark V2, selling for a retail price of $499, stands out among the competition by not only offering dual extruders for 3D printing multiple colors or materials, but also providing a laser engraver module that ships with the printer and can be installed in under 5 minutes. The build volume of the Shark is slightly larger than other printers in this price range (235 x 235 x 265mm) and the 290W power supply heats both the extruder and heated bed rapidly. The included 1600mW laser engraver works well when engraving wood, but the frustratingly slow speed will likely turn off most users.
Printing with dual extruders can be a challenge due to the enhanced level of calibration required to ensure the offset between nozzles is correct. Lotmaxx has solved this problem by having a pair of extruders both feed into a single nozzle; allowing the printer to swap between material colors during a print without needing a second hot end assembly. While this is a novel idea in theory, in practice it made models that suffered from color bleed from the material purging process. Also note that both filaments must be of the same type so you can’t use PVA, which dissolves in water, for your support material and PLA for the rest.
The lofty goals of the Shark V2 and the somewhat disappointing reality of the machine keep this printer from being one of the best 3D printers, but it’s still an excellent deal for anyone interested in printing with two extruders or using a low-cost laser engraver.
Specifications of Lotmaxx Shark V2
| Machine Footprint | 17.4 x 18.3 x 19.2 inches (443mm x 466 x 488mm) |
| Build Volume | 9.3 x 9.3 x 10.4 inches (235mm x 235mm x 265mm) |
| Material | 1.75mm PLA, PLA+, ABS |
| Nozzle | .4mm |
| Build Platform | Heated Removable Textured Flexible Platform |
| Connectivity | USB, microSD |
| Interface | 4.3-inch Color Touchscreen LCD |
| Laser Power | 1600mW |
| Laser Materials | Leather, Paper, Wood |
Unpacking and Assembling the Lotmaxx Shark V2

The Lotmaxx Shark V2 includes all the accessories you would expect from a printer in this price range including a metal scraper, a set of Allen keys, a screwdriver, a microSD card and USB reader, a USB cable, and a pair of 200g spools of filament. The Shark V2 includes the second extruder as well as the laser engraver module in two separate boxes, along with a set of tinted safety goggles to wear while the laser engraver is running.

The Lotmaxx Shark V2 is somewhere between a fully assembled printer and a DIY kit and took me about 20 minutes to completely put together. The frame has already been wired, and there are only a few electrical connections to make on the printer to get it up and running. This is a much faster process than assembling a DIY kit printer like the Voxelab Aquila X2, which takes about an hour to fully assemble from a box of parts.
The Shark V2 is a dual extruder 3D printer, which means it is capable of printing two materials simultaneously by using a pair of extruder mechanisms to feed material to the hot end. The first extruder is mounted to the X-axis gantry, which is the typical mounting point for an extruder and comes pre-installed on the Shark V2. The second extruder is included in a box that contains the extruder motor, extruder module, filament run-out sensor, and a cable to connect to the front of the printer.

The second extruder attaches to the top of the frame, and feeds filament down the dual-input hot end. Unfortunately, the PTFE tube included with the printer was too short to connect from the top extruder to the hot end coupler, which restricts the movement of the extruder module. This is an easy problem to solve (I had an extra PTFE tube that was long enough to use), but it’s a clear quality issue to ship the machine with an improperly-cut tube. I reached out to Lotmaxx to request a replacement, and they were able to provide a replacement that was long enough to use with the second extruder.

Design of Lotmaxx Shark V2

The Lotmaxx Shark V2 stands out from almost every other i3-frame 3D printer I’ve ever seen thanks to the cool grey aluminum extrusions used for the frame, as opposed to the much more common black aluminum extrusions found on printer like the Elegoo Neptune 2. It’s a unique look, and it also fits with the ‘Shark’ motif of the printer.

The hot end module on the Shark V2 is another unique design; featuring dual part cooling fans on both sides of the hot end as well as a heatbreak cooling fan mounted to the front. These fans are low-noise, an ideal match for the TMC2208 silent stepper drivers which allow the Shark V2 to print at a comfortable volume that will be acceptable in most environments.
The hot end itself has two filament inputs and a single output nozzle, and uses only one heating element and thermistor. This unique nozzle allows for multi-color printing using two extruders without requiring a separate nozzle assembly, which cuts down dramatically on the amount of calibration required between nozzles.

The belts on the X and Y axis on the Shark V2 are adjustable, but this adjustment requires loosening a few bolts, putting tension on the idler bracket, and then tightening everything back up. This is a difficult process that feels like it would be easier with three hands, and adding a tensioning knob to each axis like the ones found on the Voxelab Aquila X2 would make this a much easier process. These adjustments typically don’t need to be done often, but the Shark V2 arrived with the Y belt almost entirely slack due to the bracket coming loose during shipping.


When I went to load filament through the primary extruder, I could see the extruder motor turning but the filament wasn’t advancing. This was because the drive gear had come loose from the motor shaft and the teeth weren’t making contact with the filament. Fixing this required removing the idler arm from the extruder, tightening the grub screw on the gear flush against the machined flat face on the shaft, and replacing the idler arm. This isn’t an impossible fix for most users, but someone not familiar with 3D printers would likely have issues identifying, diagnosing, and reseating the drive gear.
User Interface on Lotmaxx Shark V2

The 4.3-inch color touchscreen LCD used by the Lotmaxx Shark V2 as an interface is a unique one that seems like it would be more at home on a piece of commercial office equipment than a 3D printer. The LCD is housed in a plastic enclosure that can be removed from the printer without interrupting the prints. The display sits on an angled bracket on the right side of the Shark V2 and features a clean (if not somewhat underwhelming) user interface.

The LCD is connected to the Shark V2 via a curly cord with an RJ-11 terminal, similar to what you would find on a landline telephone. At first, I didn’t understand the benefit of having a removable LCD, but after holding it in my right hand while I make adjustments to the printer with my left I can see that it’s going to be hard to go back to using a fixed display. In the grand scheme of this machine, it’s just another feature that makes the Shark V2 stand out from other FDM 3D printers in this price range.
Build Platform on Lotmaxx Shark V2

The build platform on the Lotmaxx Shark V2 is a steel sheet with a textured surface that is held in place with magnets underneath the heated build plate. This style of platform is ideal for removing parts, as it can be bent to allow parts to detach effortlessly after cooling and it’s one of my favorite styles of build platform on any kind of 3D printer.

Unfortunately, the build platform on my review unit arrived seriously warped, with the edges curling up as well as a significant dip in the center. This meant that calibrating the printer was a challenge, as the uneven peaks and valleys of the build platform needed to be anticipated when preparing files for printing. The heated aluminum plate that the platform attaches to is flat, but the magnets installed underneath were not strong enough to pull the platform flush with the surface. I reached out to Lotmaxx, and the company shipped me a replacement bed that was perfectly flush with the build platform, confirming that the issues I had were from a defect.
Calibrating and Leveling Lotmaxx Shark V2

Calibrating the build plate on an FDM printer can be a time-consuming ordeal, and Lotmaxx has created a semi-automated process to help reduce the amount of time required. The build platform has four thumbscrews that are used to adjust the height of each corner of the bed. Calibrating the Shark V2 simply requires moving the print head to each corner and adjusting the height until a piece of paper has a light drag when held between the nozzle and the platform.

Using the touchscreen LCD, the Shark V2 will automatically move the print head to a specified location and trigger the Z endstop, effectively bottoming out the nozzle. Once the print head has been parked, each corner can be adjusted before moving on to the next one.
This process usually takes two or three cycles to get a perfect calibration, but the defective, warped build platform on our Shark V2 made this a difficult task at first. However, once the company sent us a replacement build platform, the leveling process was simple. As with most defects on review units we test, we have no way of knowing whether this is a common problem that affects many other consumers or just our bad luck.
Single Extruder Printing on the Lotmaxx Shark V2

The Lotmaxx Shark V2 includes multiple test files on the microSD card, including multiple single extruder prints, dual extruder prints, and prepared .gcode files for the laser engraver. I wanted to verify the functionality of the primary extruder and the motion system of the machine, so I started with the single extruder demo prints included with the printer. I used one of the included 200g spools of material, a PLA filament in a bright green color.

The ‘LSC10S_Lucky Cat.gcode’ file printed in 1 hour and 12 minutes, and used 20 grams of filament. This is a reasonable amount of time and material for a test, and the Shark V2 successfully completed without any mechanical issues. Unfortunately, the layers had multiple bubbles and voids throughout as well as stringing between the ears, both typical indicators of filament that has absorbed moisture or is otherwise inconsistent in diameter.

The ‘LSC10S_dog.gocde’ printed in about the same amount of time and used a similar amount of material, and had the same material-related issues as the cat model. Lotmaxx did an excellent job selecting the test prints, and I’m satisfied with the slicer settings used to generate these two models.
Dual Extruder Printing on the Lotmaxx Shark V2


One of the primary selling points of the Lotmaxx Shark V2 is the ability to print two materials simultaneously using the included dual extruder setup. After installing the second extruder, I ran the ‘LSC10S_bicolor-dragon.gcode’ file, which produces a two color model of a dragon clutching a cartoon heart. Using Prusa Silver PLA material in the primary extruder and ttyt3D rainbow PLA in the secondary extruder, this model printed out without any of the material-related issues of the single extruder prints.

The dual extruder mechanism used by the Shark V2 pushes both materials through the same nozzle, so the printer has to purge any excess material before loading the next filament, and then must prime the nozzle to avoid any air bubbles from causing issues with the following extrusion. To solve both of these problems simultaneously, the printer creates a purge tower at the front right of the build platform, which it uses to switch between materials. This may seem like a waste of material, but for context, the weight of the purge tower is 13 grams, while the weight of the dragon model is 30 grams.
Slicing Software for Lotmaxx Shark V2

Instead of creating their own proprietary slicer app for the Shark V2, Lotmaxx has opted to create a profile for Ultimaker Cura, a popular and widely-adopted app that offers advanced functionality as well as native dual extruder support. This is a smart move from Lotmaxx; it is able to benefit from the large community of Cura users to fine-tune the provided profiles without needing to create an entire app from scratch.

In addition to the basic single extruder slicer controls offered by Cura, the app also includes robust dual extruder support which is ideal for the unique ‘two-in-one-out’ approach used by Lotmaxx. The latest build of Cura (4.11.0 as of the writing of this article) includes a profile for the Shark with all of the settings dialed in for the machine. The dual extrusion settings have already been set by Lotmaxx, but you can dial them in for speciality applications (assigning one extruder to print infill only, for example).
Ultimaker Cura Draft Settings for Lotmaxx Shark V2

| Layer Height | 0.2 mm |
| Infill Percentage | 15%, Grid |
| Print Speed | 45mm/second |
| Extruder Temperature | 200 degrees Celsius (392 degrees Fahrenheit) |
| Heated Bed Temp | 50 degrees Celsius (122 degrees Fahrenheit) |
| Print Time | 2 Hours, 36 Minutes |
A perennial favorite for testing out the functionality of 3D printers, the 3DBenchy model is available in both single, dual, and multicolor versions for testing out the functionality of a machine. I used the dual color version of the Benchy from Thingiverse, and used Printed Solid Beige 500 PLA as the primary color and Prusa Jet Black PLA as the secondary color. I didn’t make any adjustments to the provided profile from Lotmaxx and used a .2mm ‘Draft’ profile, which prints at a speed of 45mm/sec.


It became clear during printing that the model had some color bleed; the amount of material being purged wasn’t enough to completely clean out the nozzle, resulting in layers that had a visible amount of the previous color in them. This meant the light layers on the hull had a dark tint to them, and the dark layers on the trim had some visible beige material on the seams. At about 2 hours into the print, the nozzle became clogged and the print stopped. It can be hard to diagnose issues like this, but my first thought was the amount of material being purged wasn’t sufficient to fully clear the nozzle before loading the next color.

Considering that this was a test using the default settings, it stands to reason that Lotmaxx has created a Cura profile with a conservatively sized purge tower. This purge tower was designed to print without using too much time or material, at the expense of layers that don’t have a clean separation between them. The geometry of the Benchy itself looks good; the details are visible and sharp, but the color bleed is distracting from the quality of the print itself.

This color bleed is also noticeable on the included butterfly test print; notice the orange becomes lighter as you move from left to right. The extruder initially still has some blue material left in the nozzle, and it is gradually purged as the extruder moves from body to body. The dragon model doesn’t suffer from this issue, because the print is simply two large bodies instead of several smaller ones. The benchy has multiple small features that need to be extruded separately, so there isn’t enough time to fully purge the filament between features.
Ultimaker Cura Normal Settings for Lotmaxx Shark V2

| Layer Height | 0.15mm |
| Infill Percentage | 10%, Line |
| Print Speed | 45mm/second |
| Extruder Temperature | 200 degrees Celsius (392 degrees Fahrenheit) |
| Heated Bed Temp | 50 degrees Celsius (122 degrees Fahrenheit) |
| Print Time | 5 Hours, 59 Minutes |
The 2-color tree frog from Nervous System is a perfect example of the type of complex geometry that can be created with a dual extruder system. At first glance, it appears the lines on the print are drawn on organically, but the model is made the same as any other FDM 3D printed model; one layer at a time. I used the ‘Normal’ print profile in Cura for this model, which prints models at a layer height of .15mm (150 microns).
Because the Benchy model had some color bleed between layers, I increased the size of the prime tower from 20mm to 35mm and increased the minimum volume from 30 to 50 mm3, which will purge more material after swapping between filaments. This increases the amount of material used in the print as well as the print time, but should create a cleaner transition between colors.

The larger prime tower seemed to help the color transitions, and it was hard to find any layers that appeared to be a blend of colors. However, the .15mm layer height appeared to be a little finer than the Shark V2 was able to print when swapping colors so many times, and there were some blobs and small retraction marks spread throughout the model. Printing this part using a .2mm layer height would have most likely resulted in a higher quality model, which might seem counterintuitive. The thicker layers would be more forgiving of small blobs and defects, while they jump out and are more readily visible at the thinner .15mm layer height.


Generally speaking, this is a pretty good print for a dual extruder 3D printer that is using a mostly-stock profile. Dual extruder printers tend to be difficult to dial in because all the problems you would normally have (wet filament, inconsistent extrusions, retraction blobs) are not only all still present, but have been doubled due to the addition of a second full extruder. The two-in-one-out hot end used by Lotmaxx is a good way to avoid the calibration issues usually present in machines with independent hot ends, but there will also be some tweaking involved depending on your specific application.
Laser Engraver Attachment for Lotmaxx Shark V2

Another unique feature of the Lotmaxx Shark V2 is the included laser engraver module. This engraver features a 24V 1600mW 445nm laser which is capable of engraving wood, leather, paper and more. Lotmaxx has also included a pair of safety goggles with this laser, so it’s worth taking a moment to explain how important safety is when using the laser attachment on the Shark V2.
Lasers create a radiation hazard that can cause instant eye damage if the user is exposed directly to a beam. Using the included goggles is a good way to prevent damage to the eyes of the user wearing them, but the hazard is persistent to anyone who may also be within visible range of the machine. Typically, laser engravers will ship with a lid that must remain closed during the engraving process that uses a filtering panel to prevent any radiation from leaking out.
When using the engraver module, it’s critical to wear the goggles at all times to prevent damage to your eyes. In addition, only use the laser module in a ventilated room to prevent a build-up of smoke or other particulates from the material being engraved.
Laser Engraver Test Prints for Lotmaxx Shark V2

To test out the functionality of the laser engraver module, Lotmaxx has included three prepared files on the microSD card. Unfortunately, there is no way to preview these models without actually running them, which means it’s impossible to tell where they will print on the platform or how much space they will take up. Considering that the Lotmaxx Shark V2 only includes two sheets of plywood, I was concerned about ruining them both with test prints.


The laser engraver moves agonizingly slowly, and the travel speed is the same as the snail's pace experienced during engraving. For reference, the above test engraving took 4 hours and 50 minutes, and it measured just over 5 inches by 4 inches. Analyzing the .gcode file revealed an engraving speed of 0.833mm/s, a far cry from the 45mm/sec reached during 3D printing. I reached out to Adam Haile, an engineer who works on the LightBurn laser engraving software, and he confirmed a laser of this wattage should take closer to 20 minutes or so to create an engraving of this size.
Laser Engraver Software for Lotmaxx Shark V2

Lotmaxx includes an app for preparing images for the laser engraver, but it’s pretty bare-bones and has some concerning errors (Lotmaxx even spelled its own name incorrectly in the title of the app). The app allows you to import an image in either black and white or grayscale, and also includes a text editor that will let you create your own text. The documentation in the user manual is pretty sparse, so fields like “Energy” and “Work” (which seem pretty important) aren’t clearly defined.

The UI of this software is incredibly frustrating; clicking on the picture you import will occasionally cause it to turn completely black, which requires you to reload it. There doesn’t seem to be a way to generate a toolpath preview, and it’s not clear when you are creating a file whether or not the image will be an outline, hatched, or filled.

The ‘Error Distribution’ field includes a number of names that might not jump out to most users, but they are named after various dithering algorithms used by image processors. “Floy” is most likely the Floyd-Steinberg dithering algorithm, a common algorithm used for this style of work. These processors convert images into patterns that can be created with the laser engraver, but offering six of them with no explanation of their effects will be of limited use to most users.
Bottom Line
The Lotmaxx Shark V2 is a wildly ambitious machine on paper; it features dual extruders, a laser engraver, a rigid aluminum frame in a unique color and more for under $500. Unfortunately, the machine failed to live up to its potential during testing, and it seemed like a machine that gave acceptable results for each mode and didn’t seem to excel at any one thing in particular.
The dual extruders of the Shark V2 provided colorful parts, but the software profile for the printer will require some adjusting to get the most out of this hardware. The laser engraver is a potentially dangerous accessory that operates at a much lower-than-expected speed, and I suspect that it will not see heavy use from most users.
The issues I had with the hardware of the machine were all resolved relatively easily, but a new user may not have the spare parts or knowledge required to fix these problems, and an experienced user may feel that a $499 machine that ships assembled shouldn’t require any adjusting out of the box.
For the price, the Shark V2 provides an excellent entry-level dual extruder machine for users interested in application-specific printing who need to print multiple colors or materials in a single print or users interested in exploring laser engraving who don’t want to invest a significant amount of money into a larger unit. For anyone interested in exploring the best 3D printers like the Creality Ender 3 Pro or the Prusa SL1S, be sure to read our full list to learn more.
