Tom's Hardware Verdict
The Phanteks Eclipse P400A, is a nice evolutionary update to an old classic, it packs in better airflow, some solid RGB fans, and a good build experience, but does little to innovate outside of that front panel.
Pros
- +
Strong airflow performance
- +
RGB fans look impeccable
- +
Good internal layout for hardware
- +
Easy to build in
Cons
- -
Same internal frame as 2016’s model
- -
Front I/O a bit dated
- -
No Vertical GPU mount
- -
No support for roof mounted 240mm AIO
Why you can trust Tom's Hardware
When it first debuted its Eclipse lineup, Phanteks had masterfully melded a tight price-point and heavy featureset to deliver a very appealing mid-tower chassis. More than three and a half years on, we’re finally seeing an airflow variant make its way to market. Phanteks’s P400A is available both as a case (with two variants in two different colors), and as a standalone replacement front panel, for if you already own the original P400, P400S, or either of the tempered glass versions.
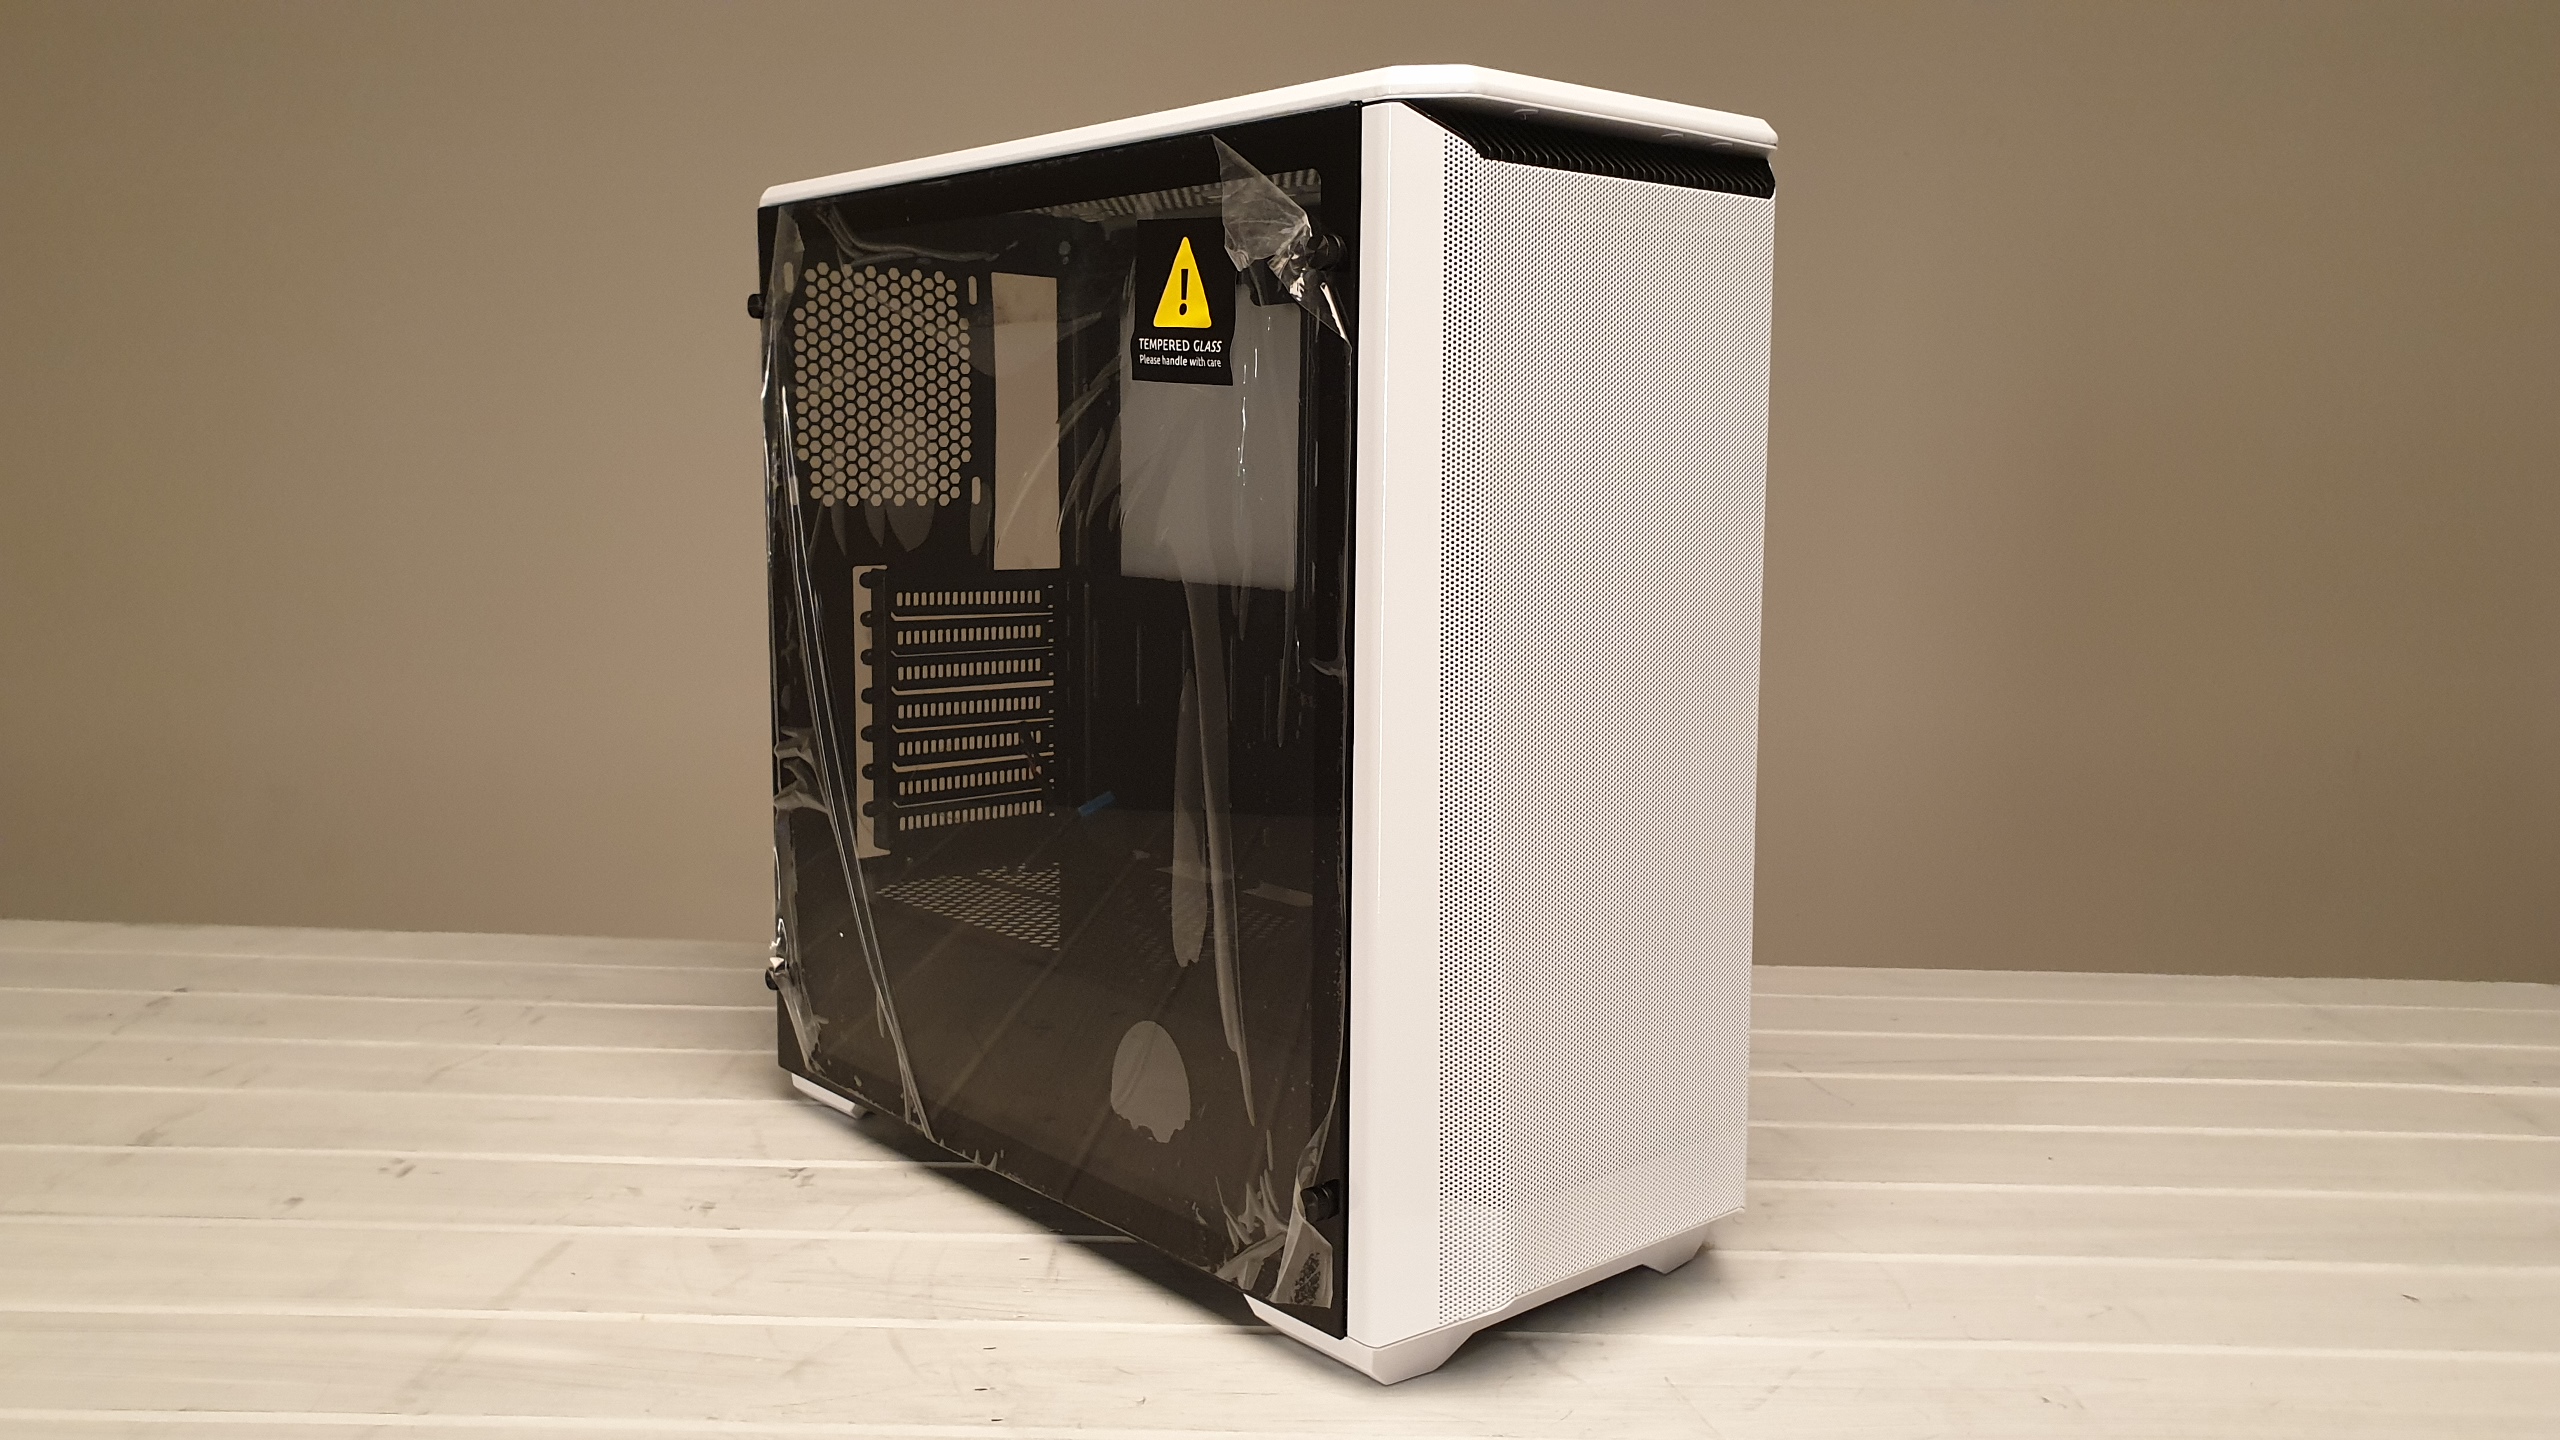
Based loosely on a stripped down variant of the Evolv’s internal platform, the original Eclipse P400 featured a lot of the same quality of life improvements as Phanteks’ fabled flagship, yet with some notable cutbacks made here and there to ensure that the company could still hit that $80 mark. Overall roof space and the removable radiator bracket was removed, the front panel was now a thick solid unit with ventilation only located top and bottom, the paint job was far more basic, and the aluminum panels absent entirely compared to the that of the Phanteks Evolv.
Since then, we’ve seen the Eclipse lineup expand and cater to almost all segments of the price spectrum, whilst still retaining that overall clean, sharp aesthetic look with various improvements and new models along the way. With the P300, and P350X aimed at the budget end of the market, the more premium P400S appealing to those looking for the original Eclipse with sound dampening and a fan controller, and of course the latest, the P600S, being a complete redesign of the styling and featuring the new Evolv X internal frame and layout.
With the P400A, Phanteks isn’t looking necessarily for any revolutionary change in overall design. However they are leaning on fixing one of the case’s biggest criticisms, aka its lack of front access to external air.
Specifications
| Form Factor | Mid Tower |
| Motherboard Support | E-ATX (up to 272mm), ATX, Micro-ATX, ITX |
| Colors Available | White & Black |
| Window Available | Windowed Only |
| 3.5" Support | 6 (2 included) |
| 2.5" Support | 6 (2 included) |
| Radiator Support | 360mm front, 120mm rear |
| Fan Support | Up to 3x120mm Front, 2x 140mm Roof, 1x 120mm Rear |
| Dimensions (WxHxD) | 210x465x470mm (8.3x18.3x18.5 inches) |
| Graphics Card Clearance | 420mm (16.7 inches) |
| CPU Tower Clearance | 160mm (6.3 inches) |
| Weight | 7kg / 15.43lbs |
The P400A comes in two main variants, each with two separate color skus (black or white). The first, the P400A D-RGB model, includes 3x Phanteks D-RGB case fans, controlled either via internal USB motherboard connector or an integrated RGB controller embedded into the front I/O. The second, the more budget oriented of the two, lacks any RGB at all. You lose out on the 3x front D-RGB fans, and are given 2x standard non-illuminated case fans instead. On top of that, the integrated front I/O RGB controller is replaced with a standard 3-speed fan controller, a curious decision, given neither case has both (unlike the older Eclipse P400S). But more on that later.
That said, this level of choice is nice to see. With Phanteks introducing two separate models at two different price points, one with, and one without RGB, not only does it give the company valuable insight into just how much the RGB craze has its fingertips in the marketplace, but it also gives consumers the option to invest in a slightly more affordable chassis one light free, or of course to indulge all of their RGB fantasies and opt for the slightly pricier RGB variant instead.
Front Panel Intake
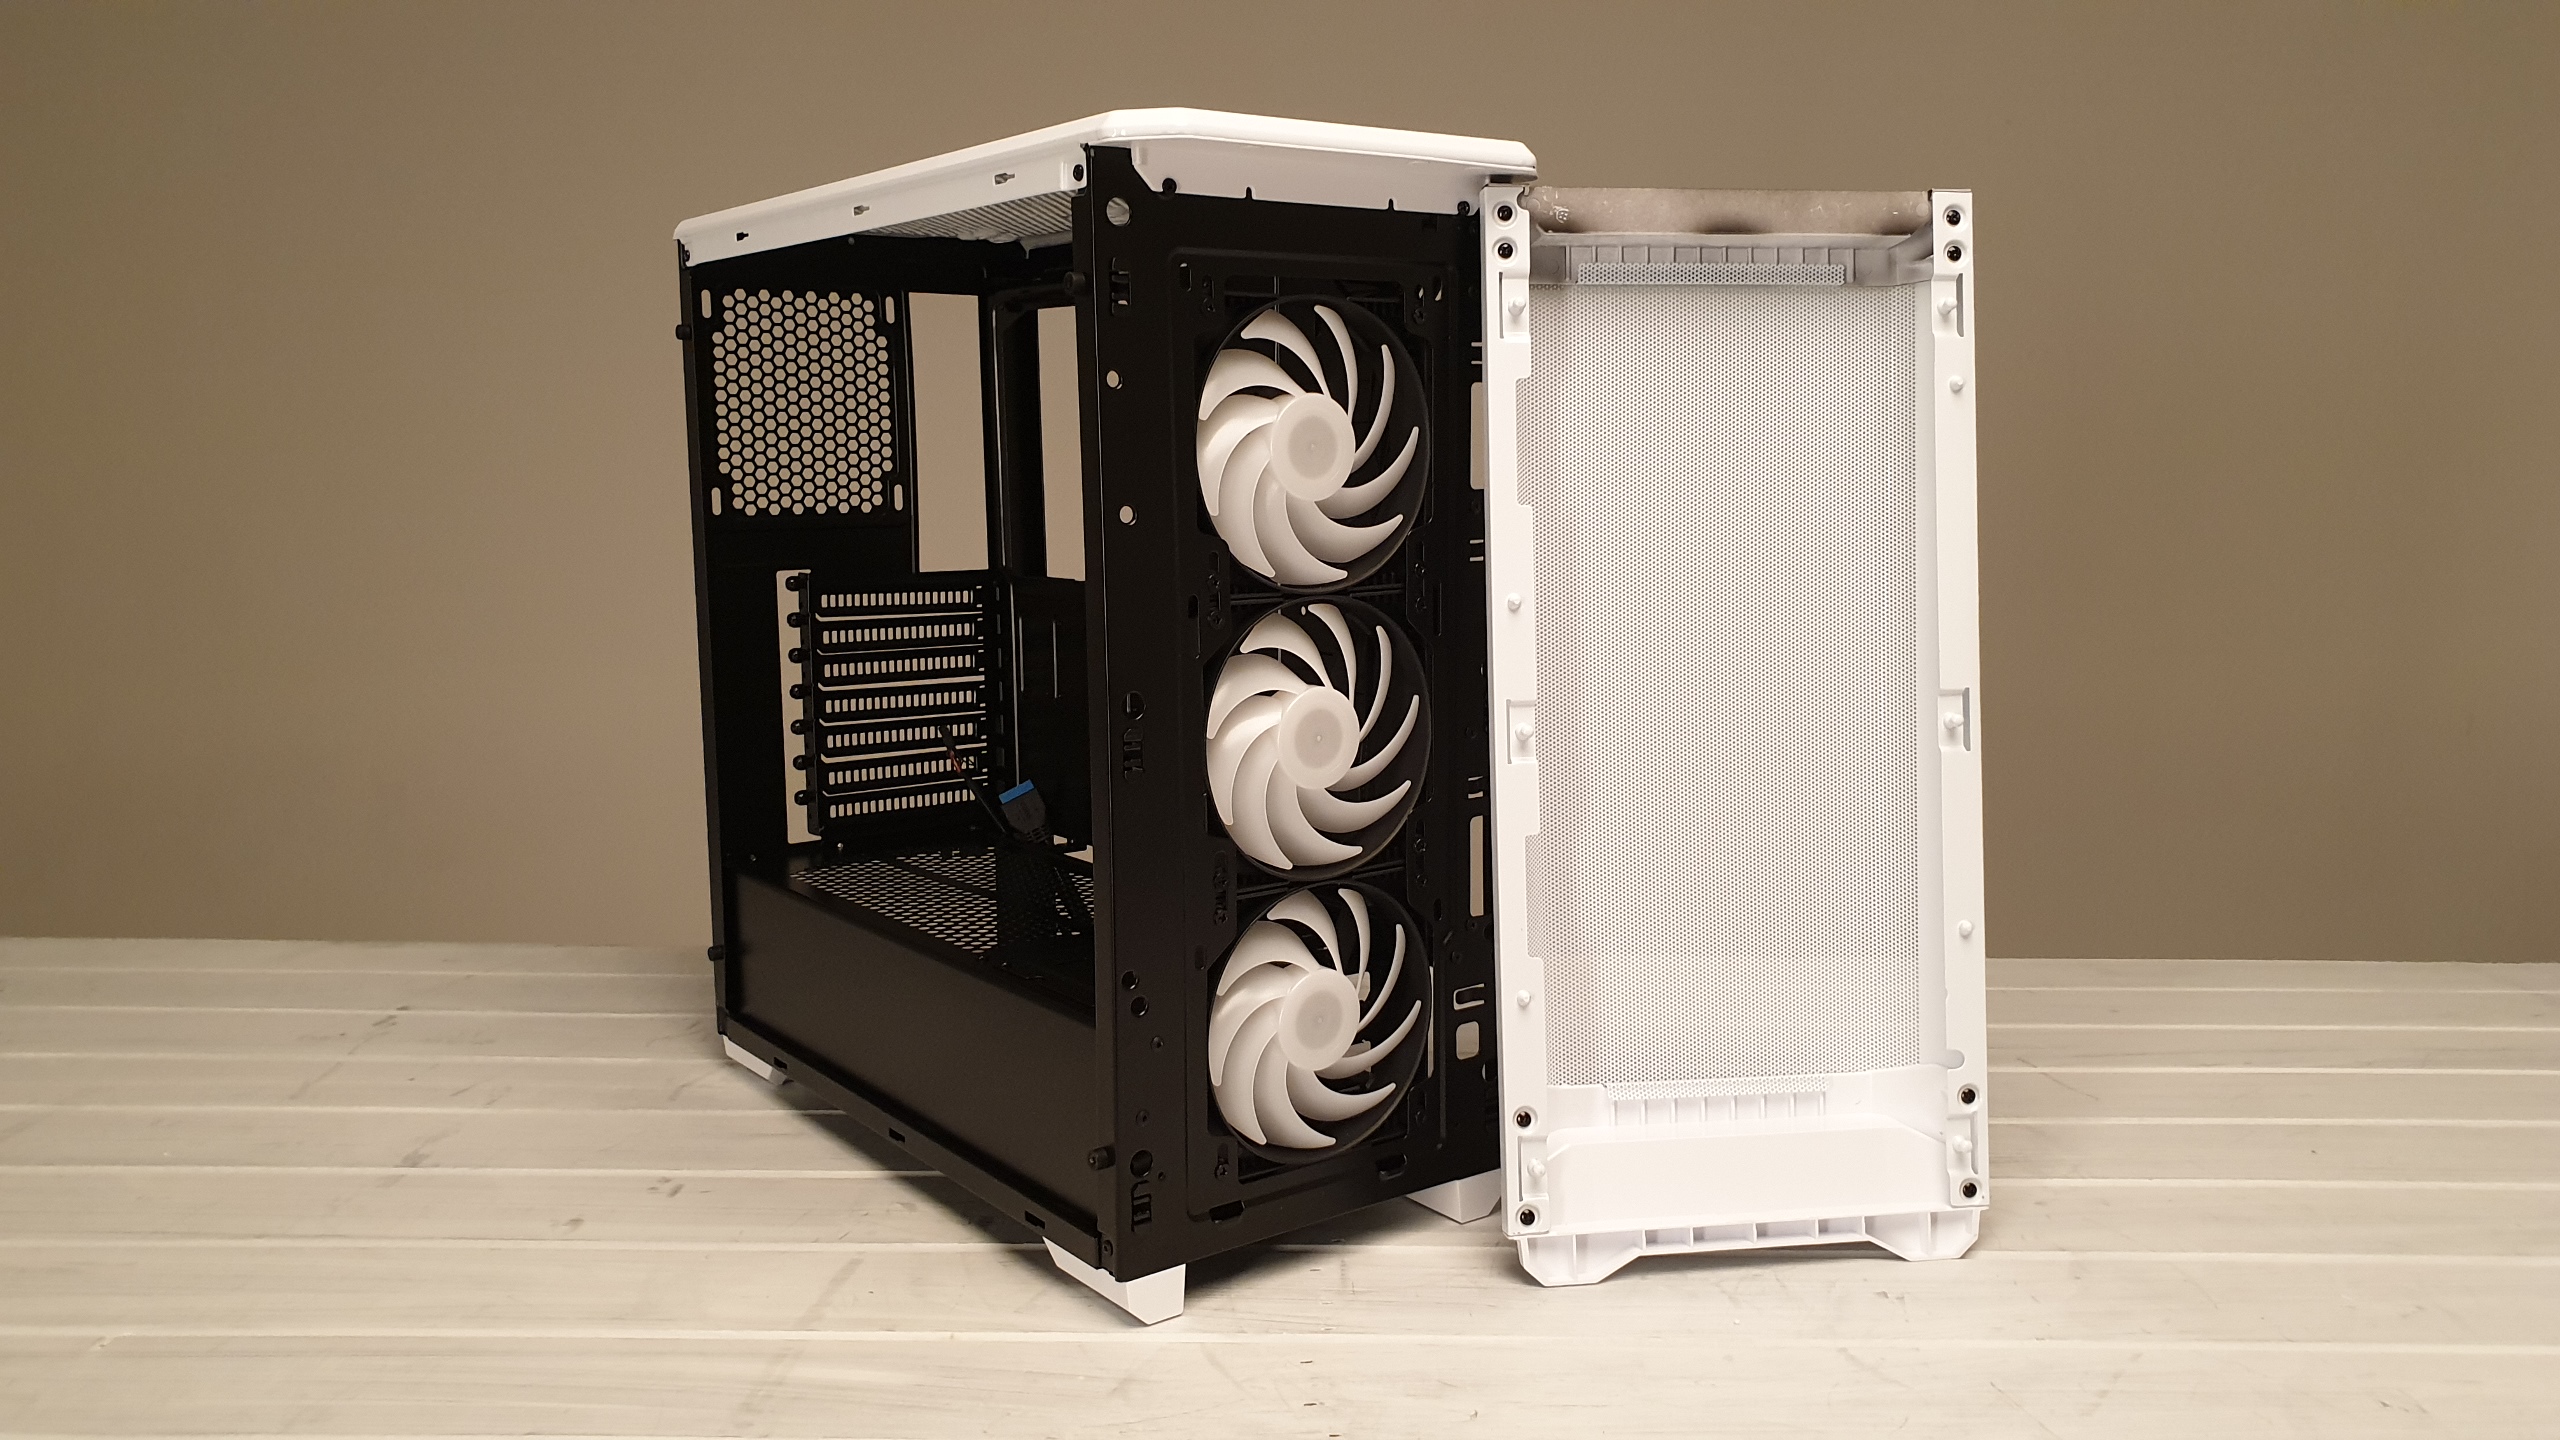
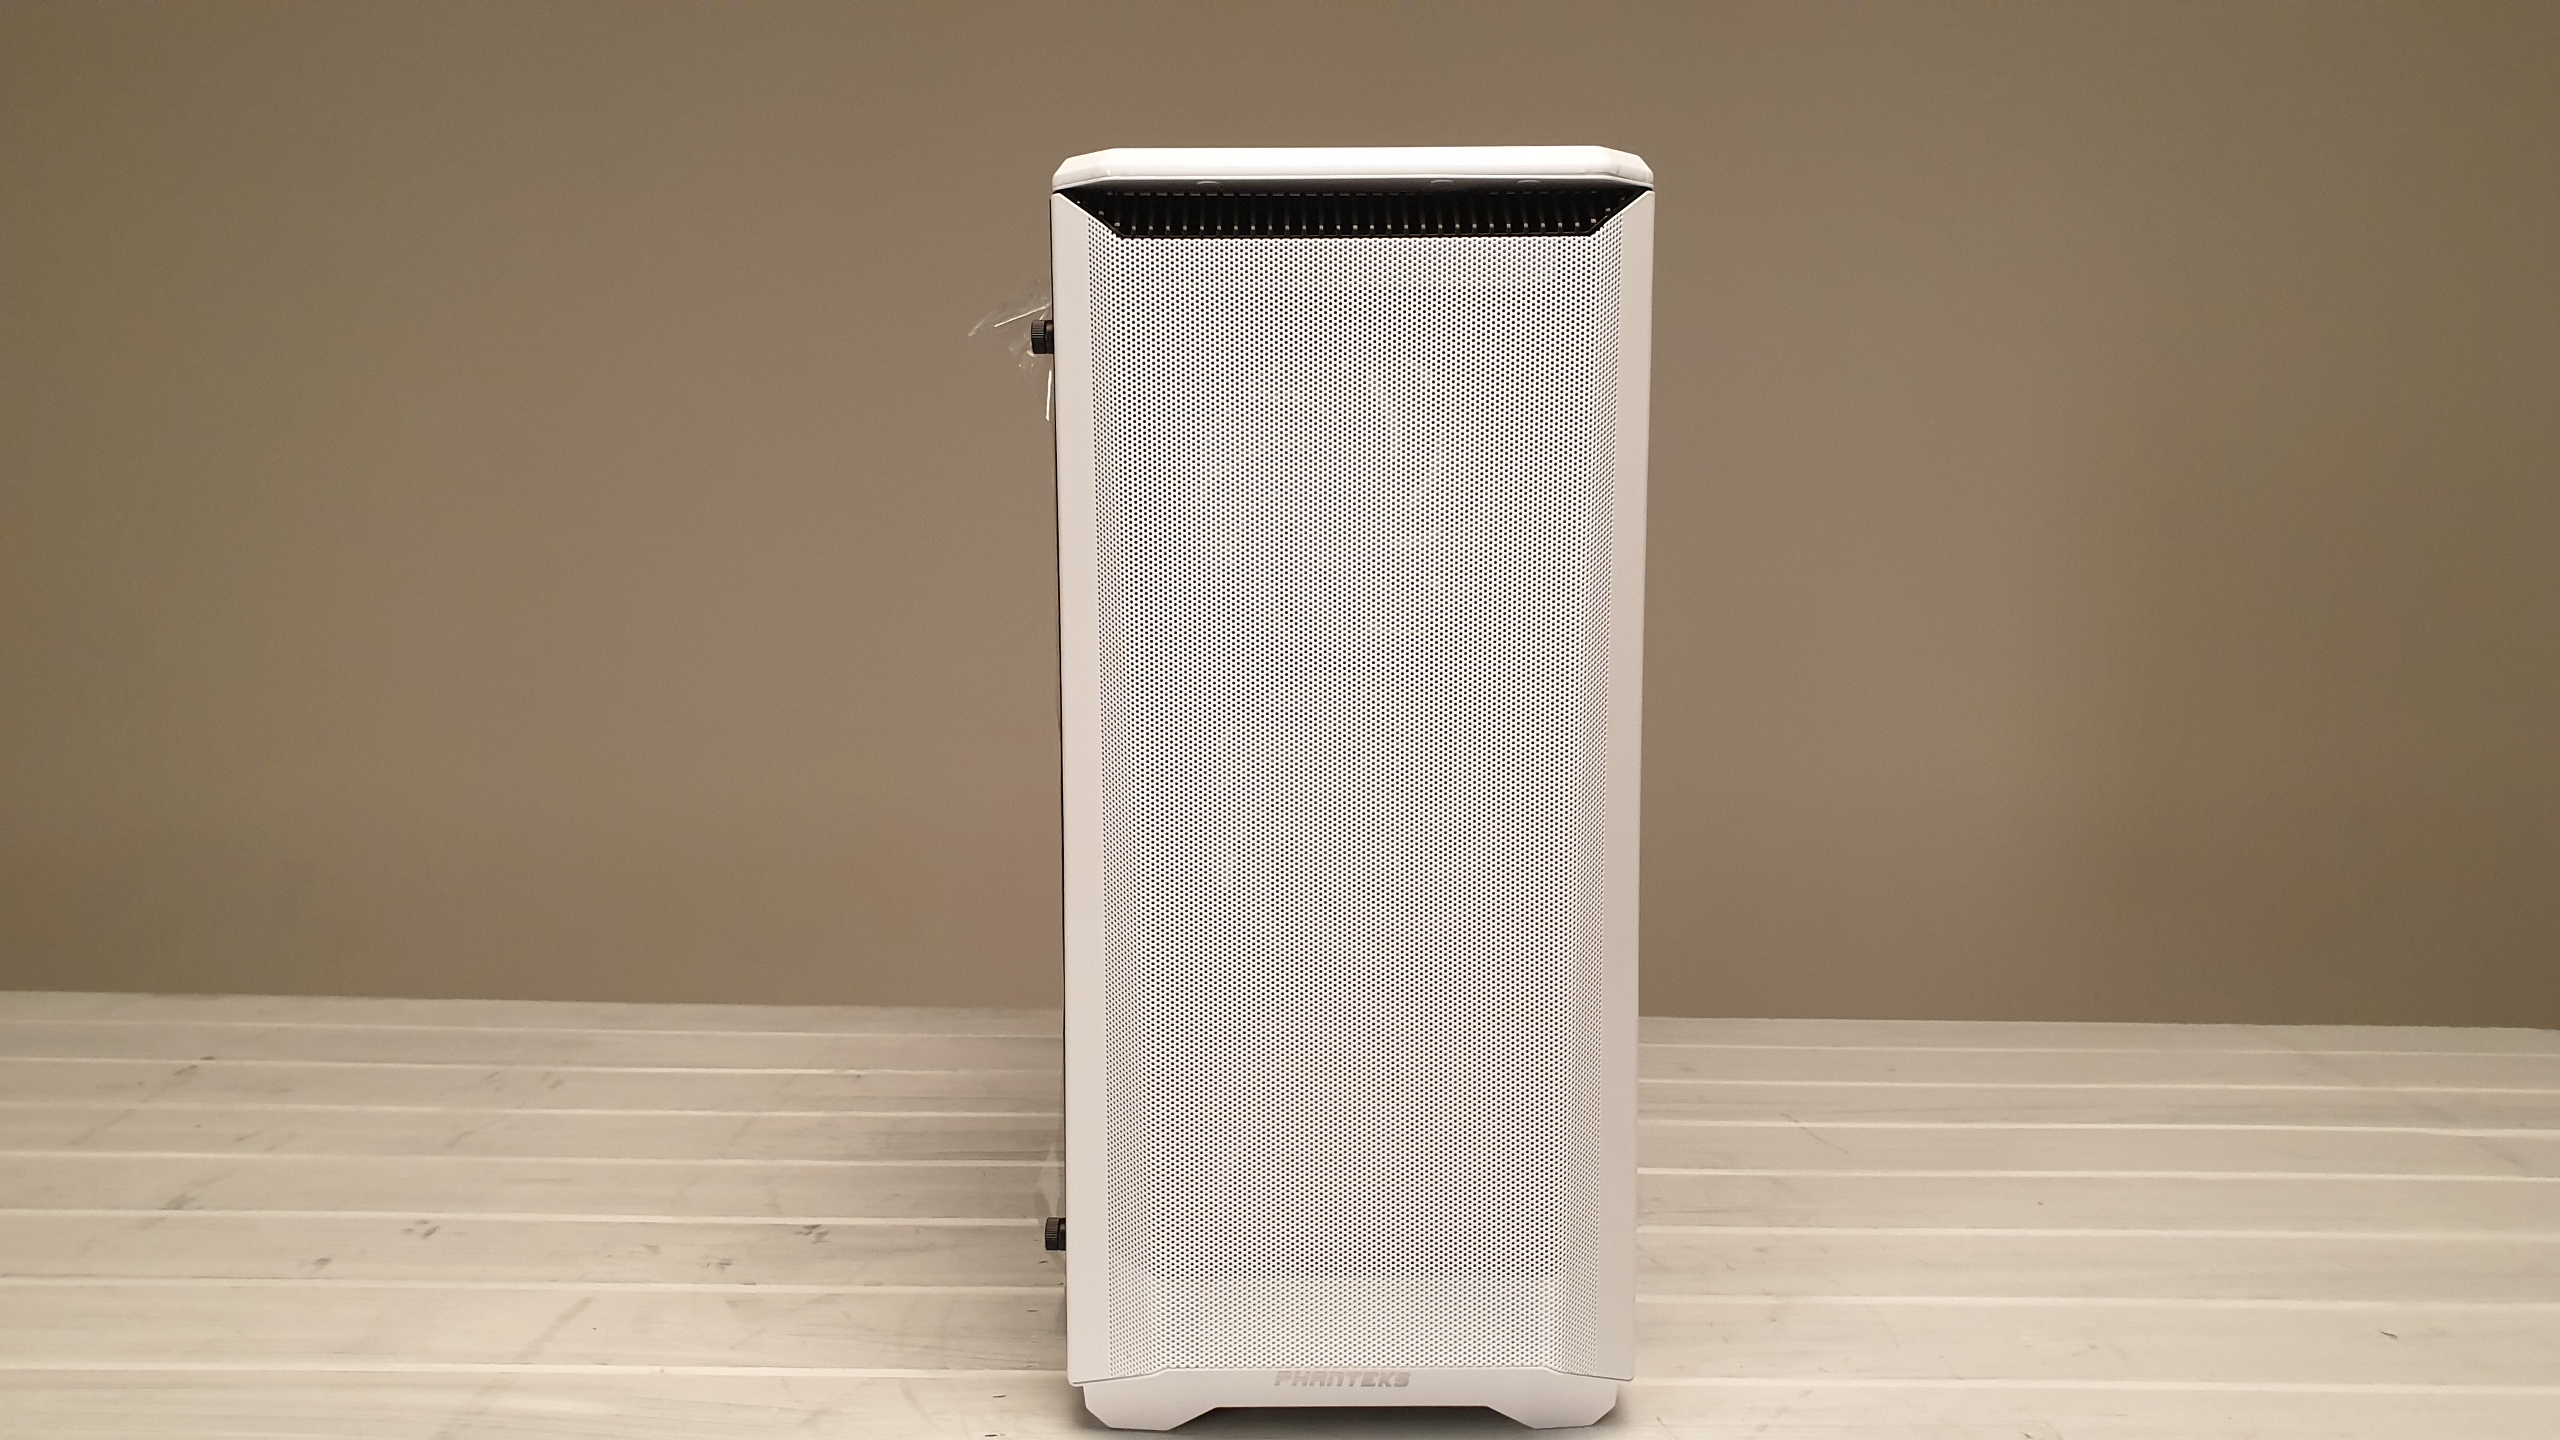
Remove the mesh front panel, and you’ll note that there’s no included dust filter. This is a smart design choice as far as airflow is concerned. By adding another layer of mesh weave in front of those three intake fans, you’re more likely to introduce turbulence, increasing noise and restricting the amount of air driven into the chassis by those fans. Given LED fans almost always lack the static pressure and airflow pushing grunt of their non-illuminated cousins, reducing the amount of material in front of them is a fantastic solution to ensure you’re not stifling the hardware within, which arguably would defeat the point of an “airflow” oriented chassis.
Get Tom's Hardware's best news and in-depth reviews, straight to your inbox.
To remove the front panel, simply pull it away from the bottom, and 10 push-pins will release from latches running up the front of the case, revealing the three fans installed behind it (or two 120mms if you’ve gone for the standard version). There’s no connected I/O or RGB circuitry located on the mesh front panel itself, so you can easily remove the entire thing and clean it under a tap, when dust buildup becomes an issue.
Top Mounted I/O
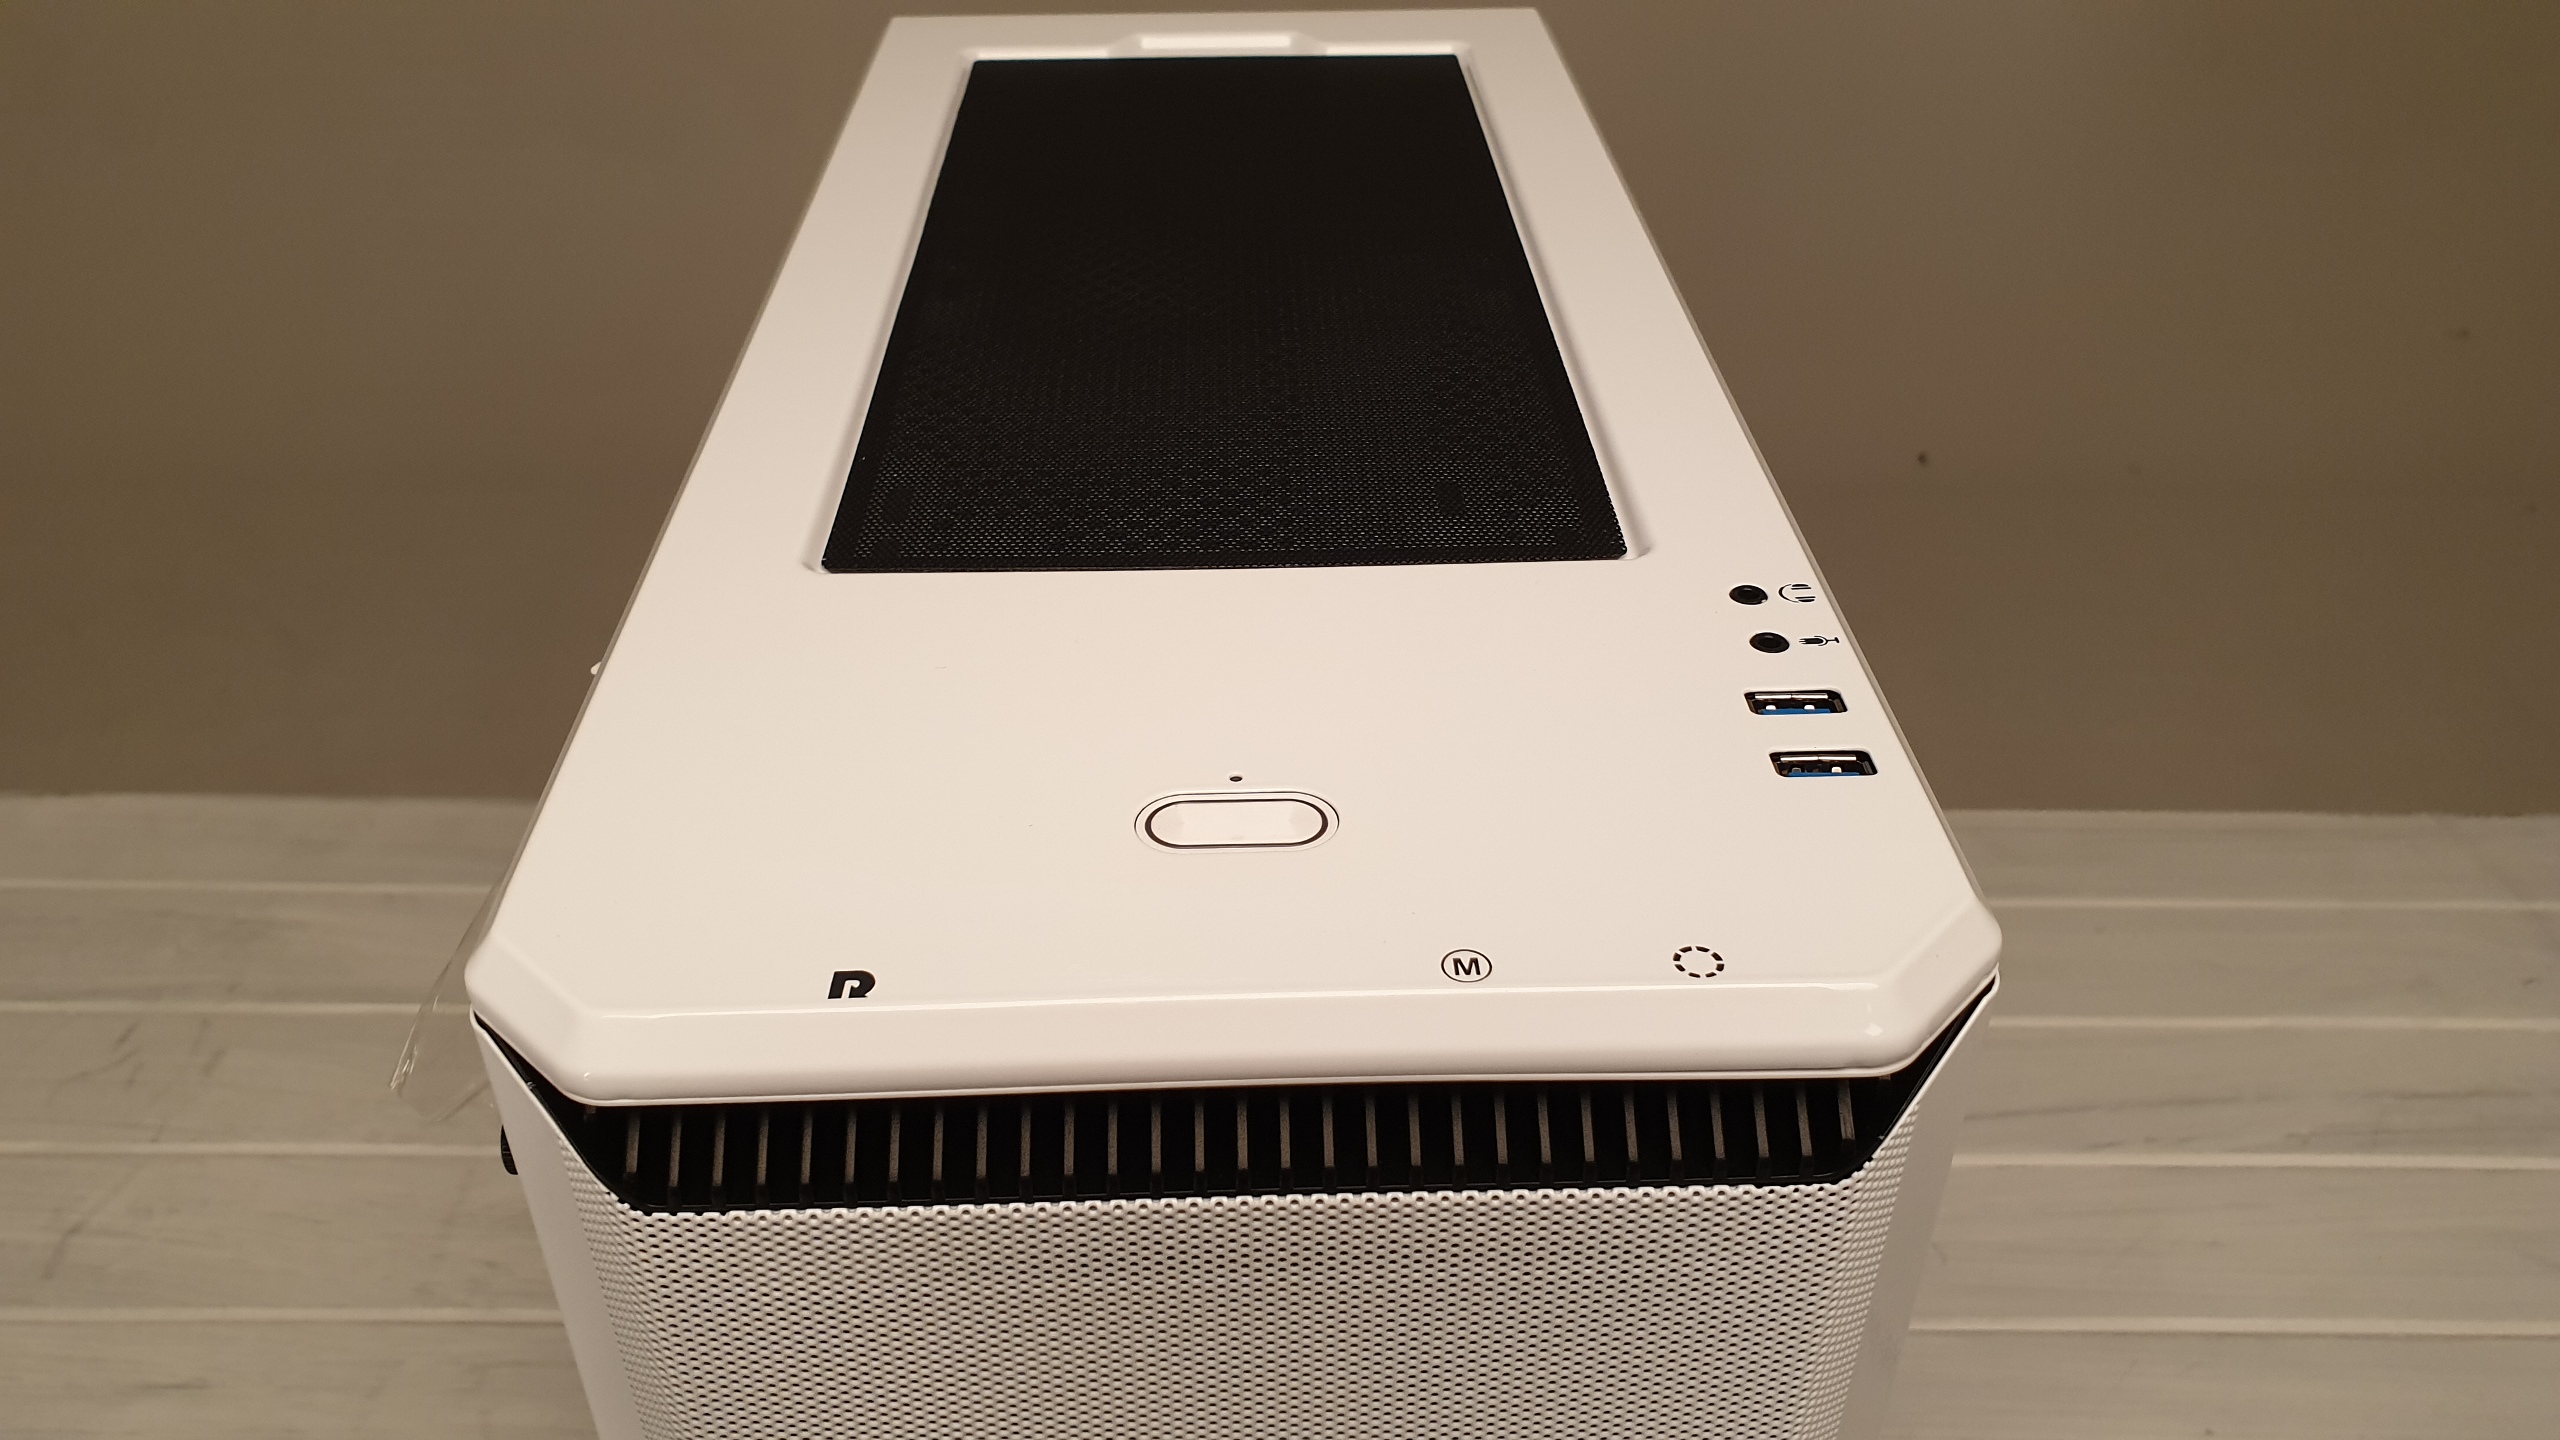
As you can see here, the top I/O remains relatively unchanged compared to the original Eclipse. You get 2x USB 3.0 ports, headphone and microphone passthroughs and a large illuminated power button on top, and that’s it. Located at the front, on the underside of that top panel, you’ll find push buttons for both reset, and illumination control (or fan control on the non-RGB version).
It’s that lack of inclusion of both the fan controller and the RGB controller, that just doesn’t make sense, especially as the already old Eclipse P400S has both. If you have the capacity to make both, and the space to support both, why not include them in a single chassis design? After all, do RGB supporters not want a manual fan controller? Are those purchasing the stock version absolutely not going to install RGB at a later date? It’s an odd decision, as having a single design and manufacture process instead of two would save Phanteks money, and potentially reduce the price of these two cases further. Additionally justifying a $20 price hike on three included RGB fans wouldn’t exactly be something new or intolerable from a customer facing perspective.
Internal Layout
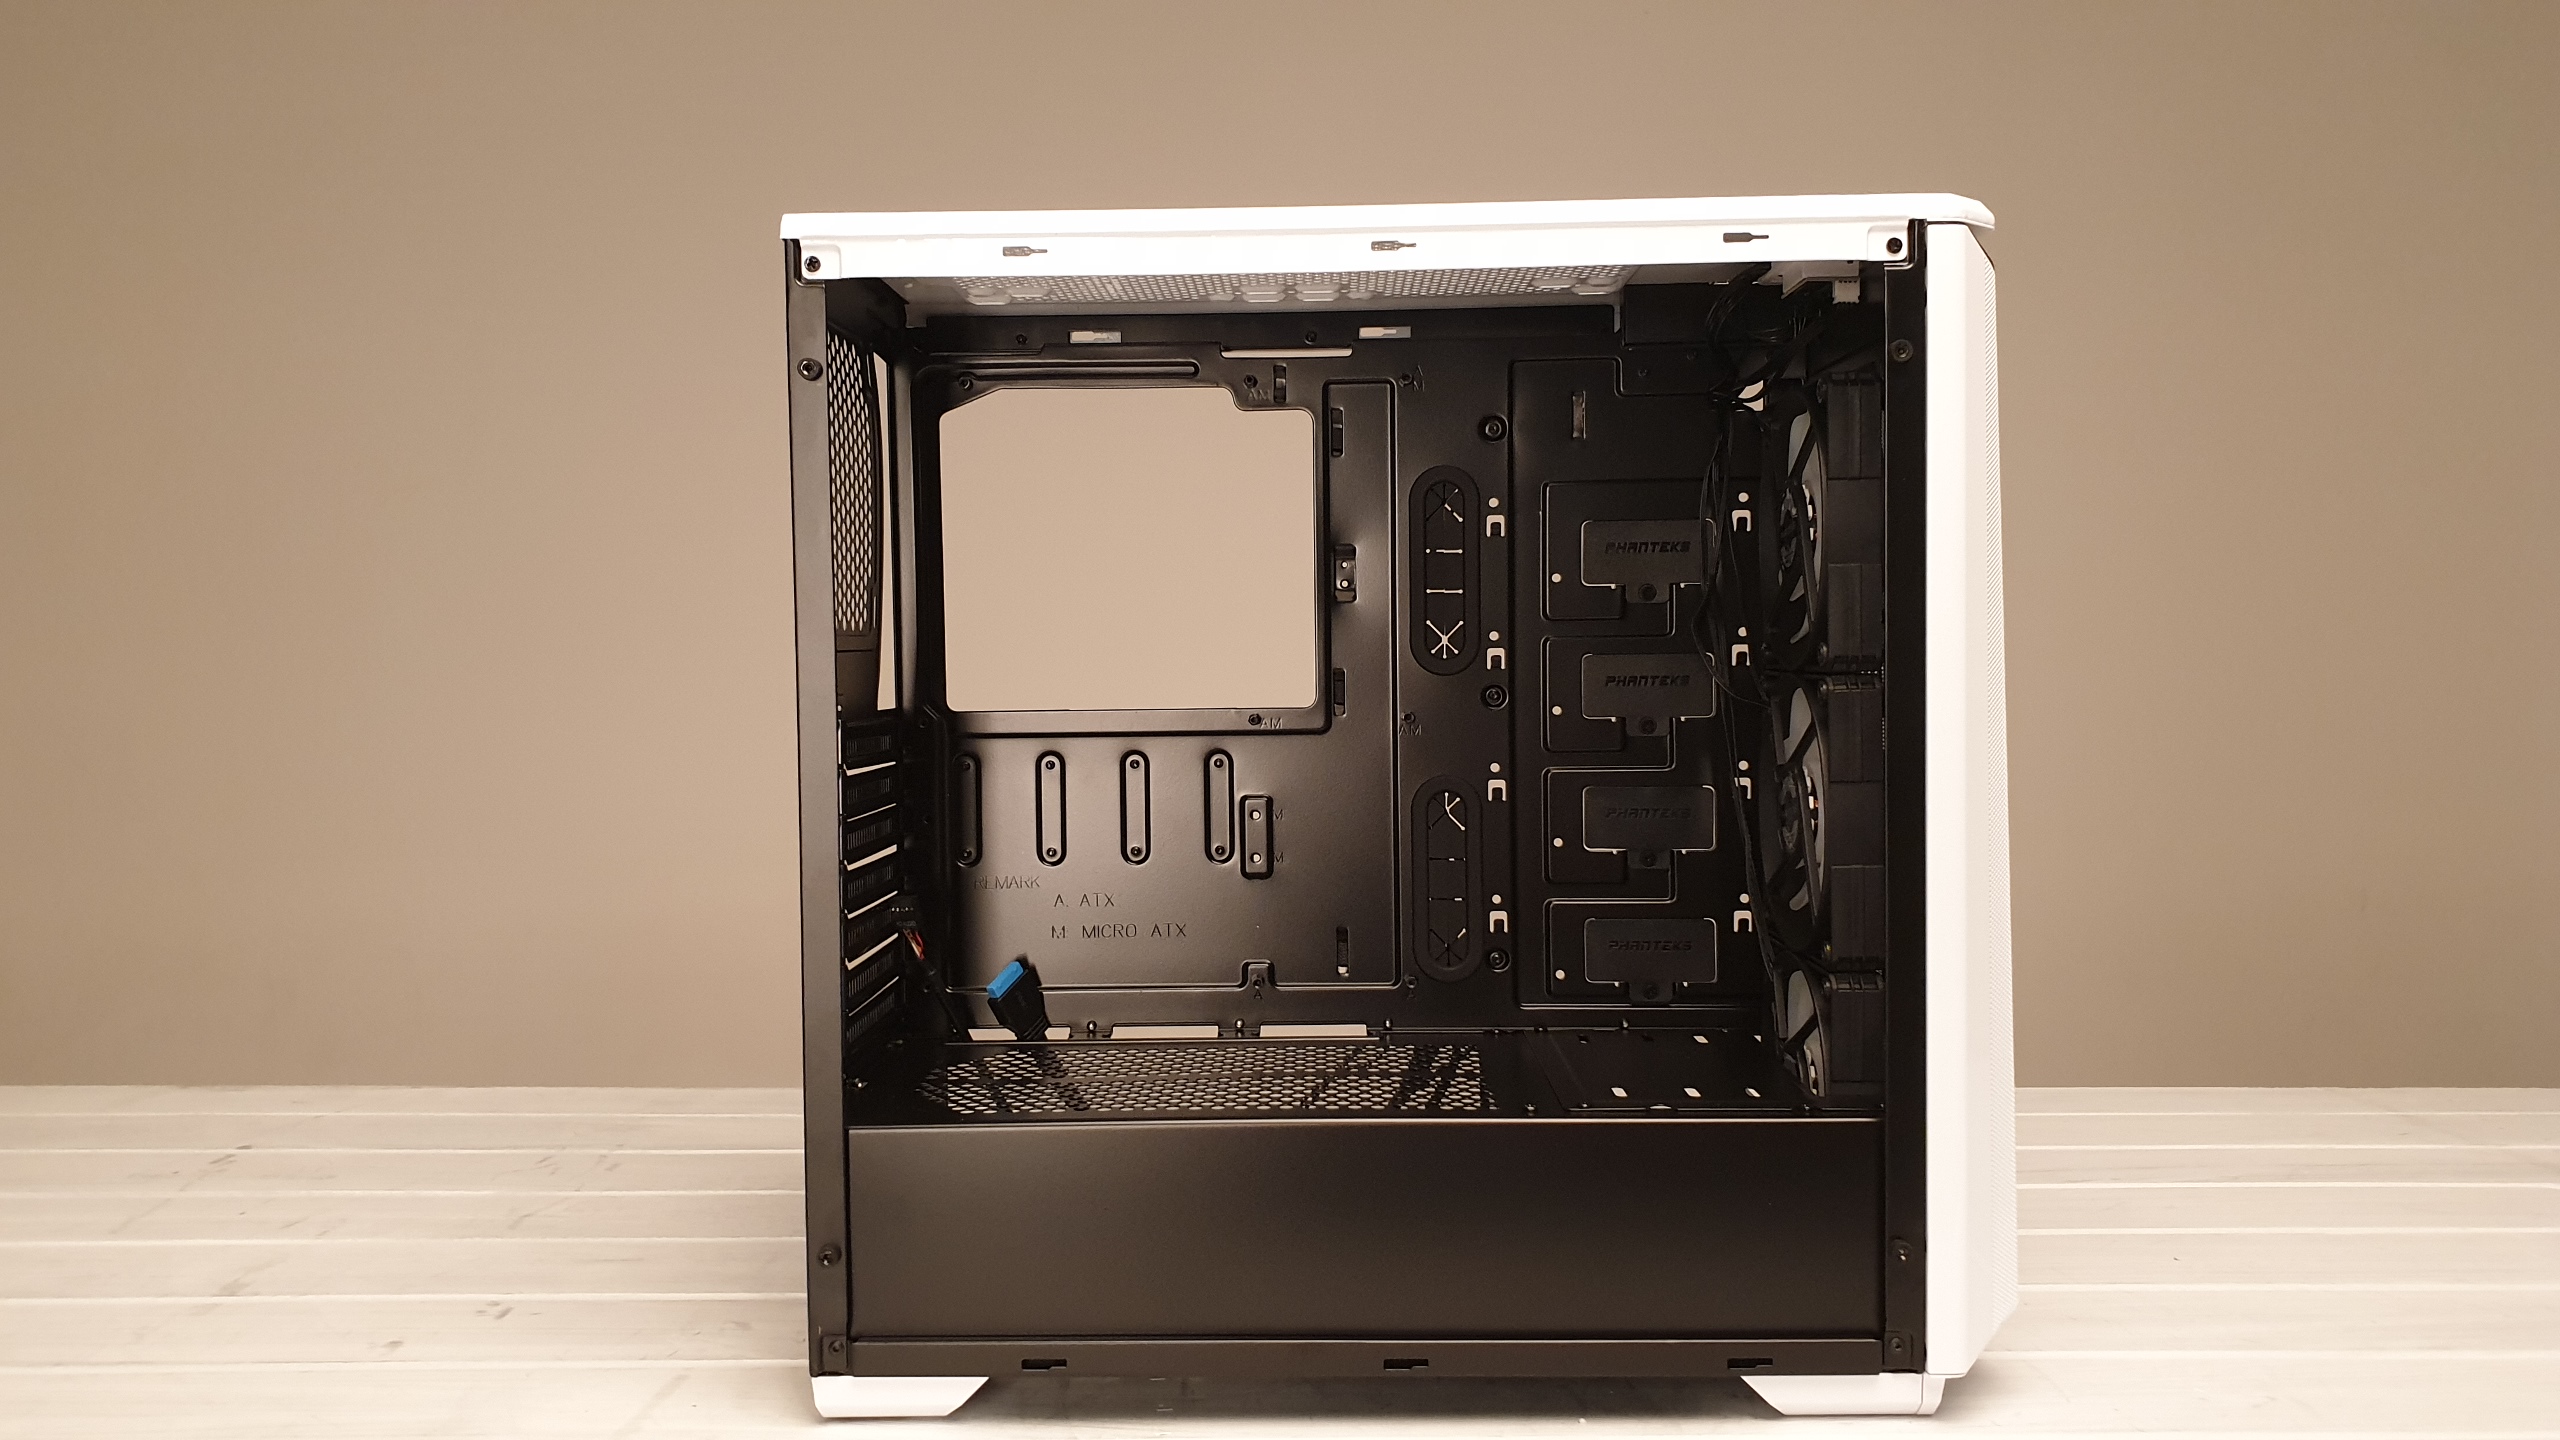
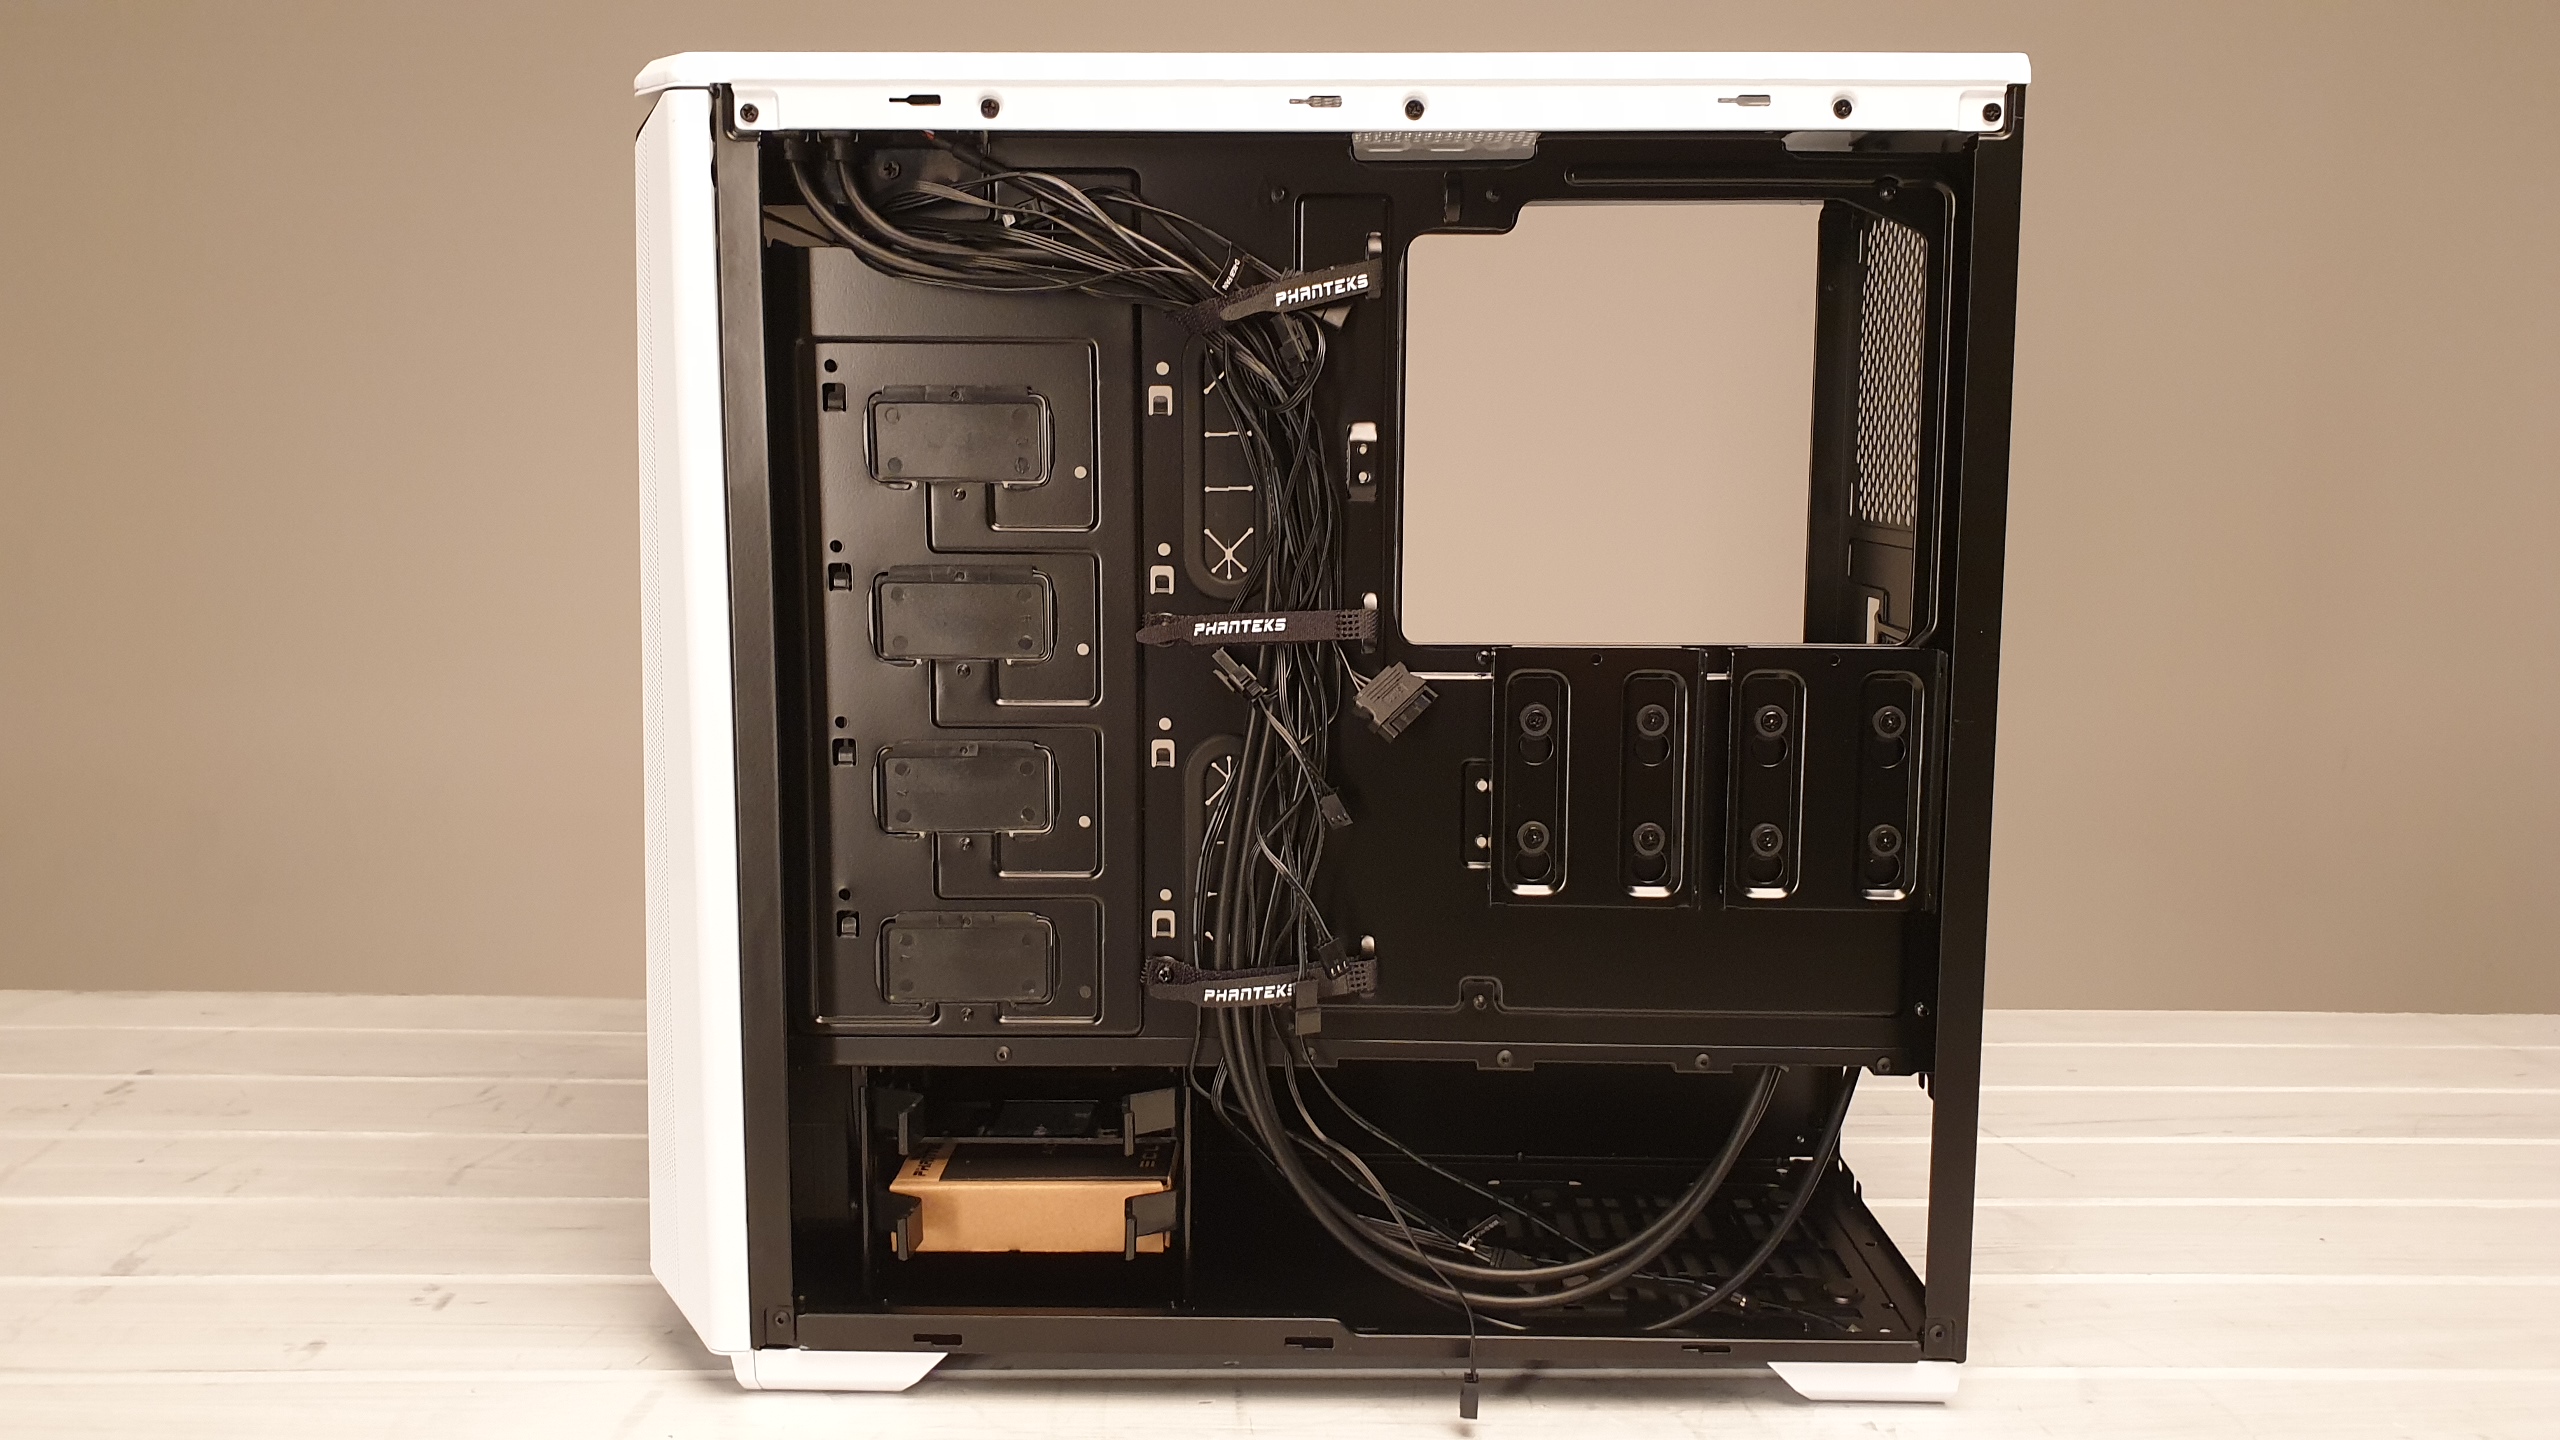
For those already acquainted with the Phanteks Evolv (or the old Eclipse P400 for that matter), the interior will look very familiar. That’s not necessarily a bad thing. Phanteks landed on a winning formula back when the Evolv first launched and the internal structure template the two models share (albeit with slight differences between the two), features strong support for cable management, fan mounting, and more. There’s plenty of cable management grommets, and holes located in all the key places for all of your cables, and support straight out of the gate, for 2x 2.5-inch drives, and 2x 3.5-inch drives. With additional drive space available when you purchase extra caddies for those Phanteks badged plastic covers in the front of the case.
Cable management in the rear is supported with plenty of cable tie points, along with velcro straps, to help secure the cables down (which you can remove if they’re in the way as they’re secured with Phillips head screws).
The PSU cover itself is perforated with plenty of ventilation holes to allow you to mount your PSU with the fan facing either up or down, and at the front of the cover closest to the front panel, there’s a removable plate that allows you to install thicker or longer radiators up to 360mm in size, and 60mm in thickness, although with it in place, you’ll still be able to install a 280mm radiator or AIO without issue.
Cooling Support
Unlike the Evolv and despite its name the Eclipse P400A actually supports less cooling than we’d like it to. The P400A RGB variant features those three 120mm fans in the front that we mentioned earlier, and there’s of course that substantial room for up to a 360mm, 60mm thick, AIOm too (albeit with the hard drive cage removed to facilitate).
You can also fit 2x 140mm fans in the front, 1x 120mm fan in the rear (plus radiator), and 2x 120mm fans in the roof (or 2x 140mm fans), although no radiator there, as the mounting points aren’t offset enough to not conflict with the motherboard or memory. Also as mentioned there’s no removable radiator bracket up top unlike the fully fledged Enthoo Evolv ATX, although that’s to be expected.
Although this isn’t the end of the world, for those utilising an AIO, it does limit your fan setup options. For an optimal setup we’d recommend running a 360mm AIO in the front of the case, with 3x static pressure optimized 120mm fans, followed by two of those airflow fans in the roof, and one in the rear of the case acting as exhausts. This should give you a fairly balanced setup, and provide plenty of internal airflow for additional components such as twin graphics cards, and hotter PCIe 4.0 SSDs.
Aging Internals?
As much as the Eclipse P400A updates an already well established design with that front panel and RGB fan combo, because of that aged internal layout, the chassis does lack some of those modern creature comforts and style choices we’ve all come to love in recent years, even in contrast to the latest Evolv X chassis.
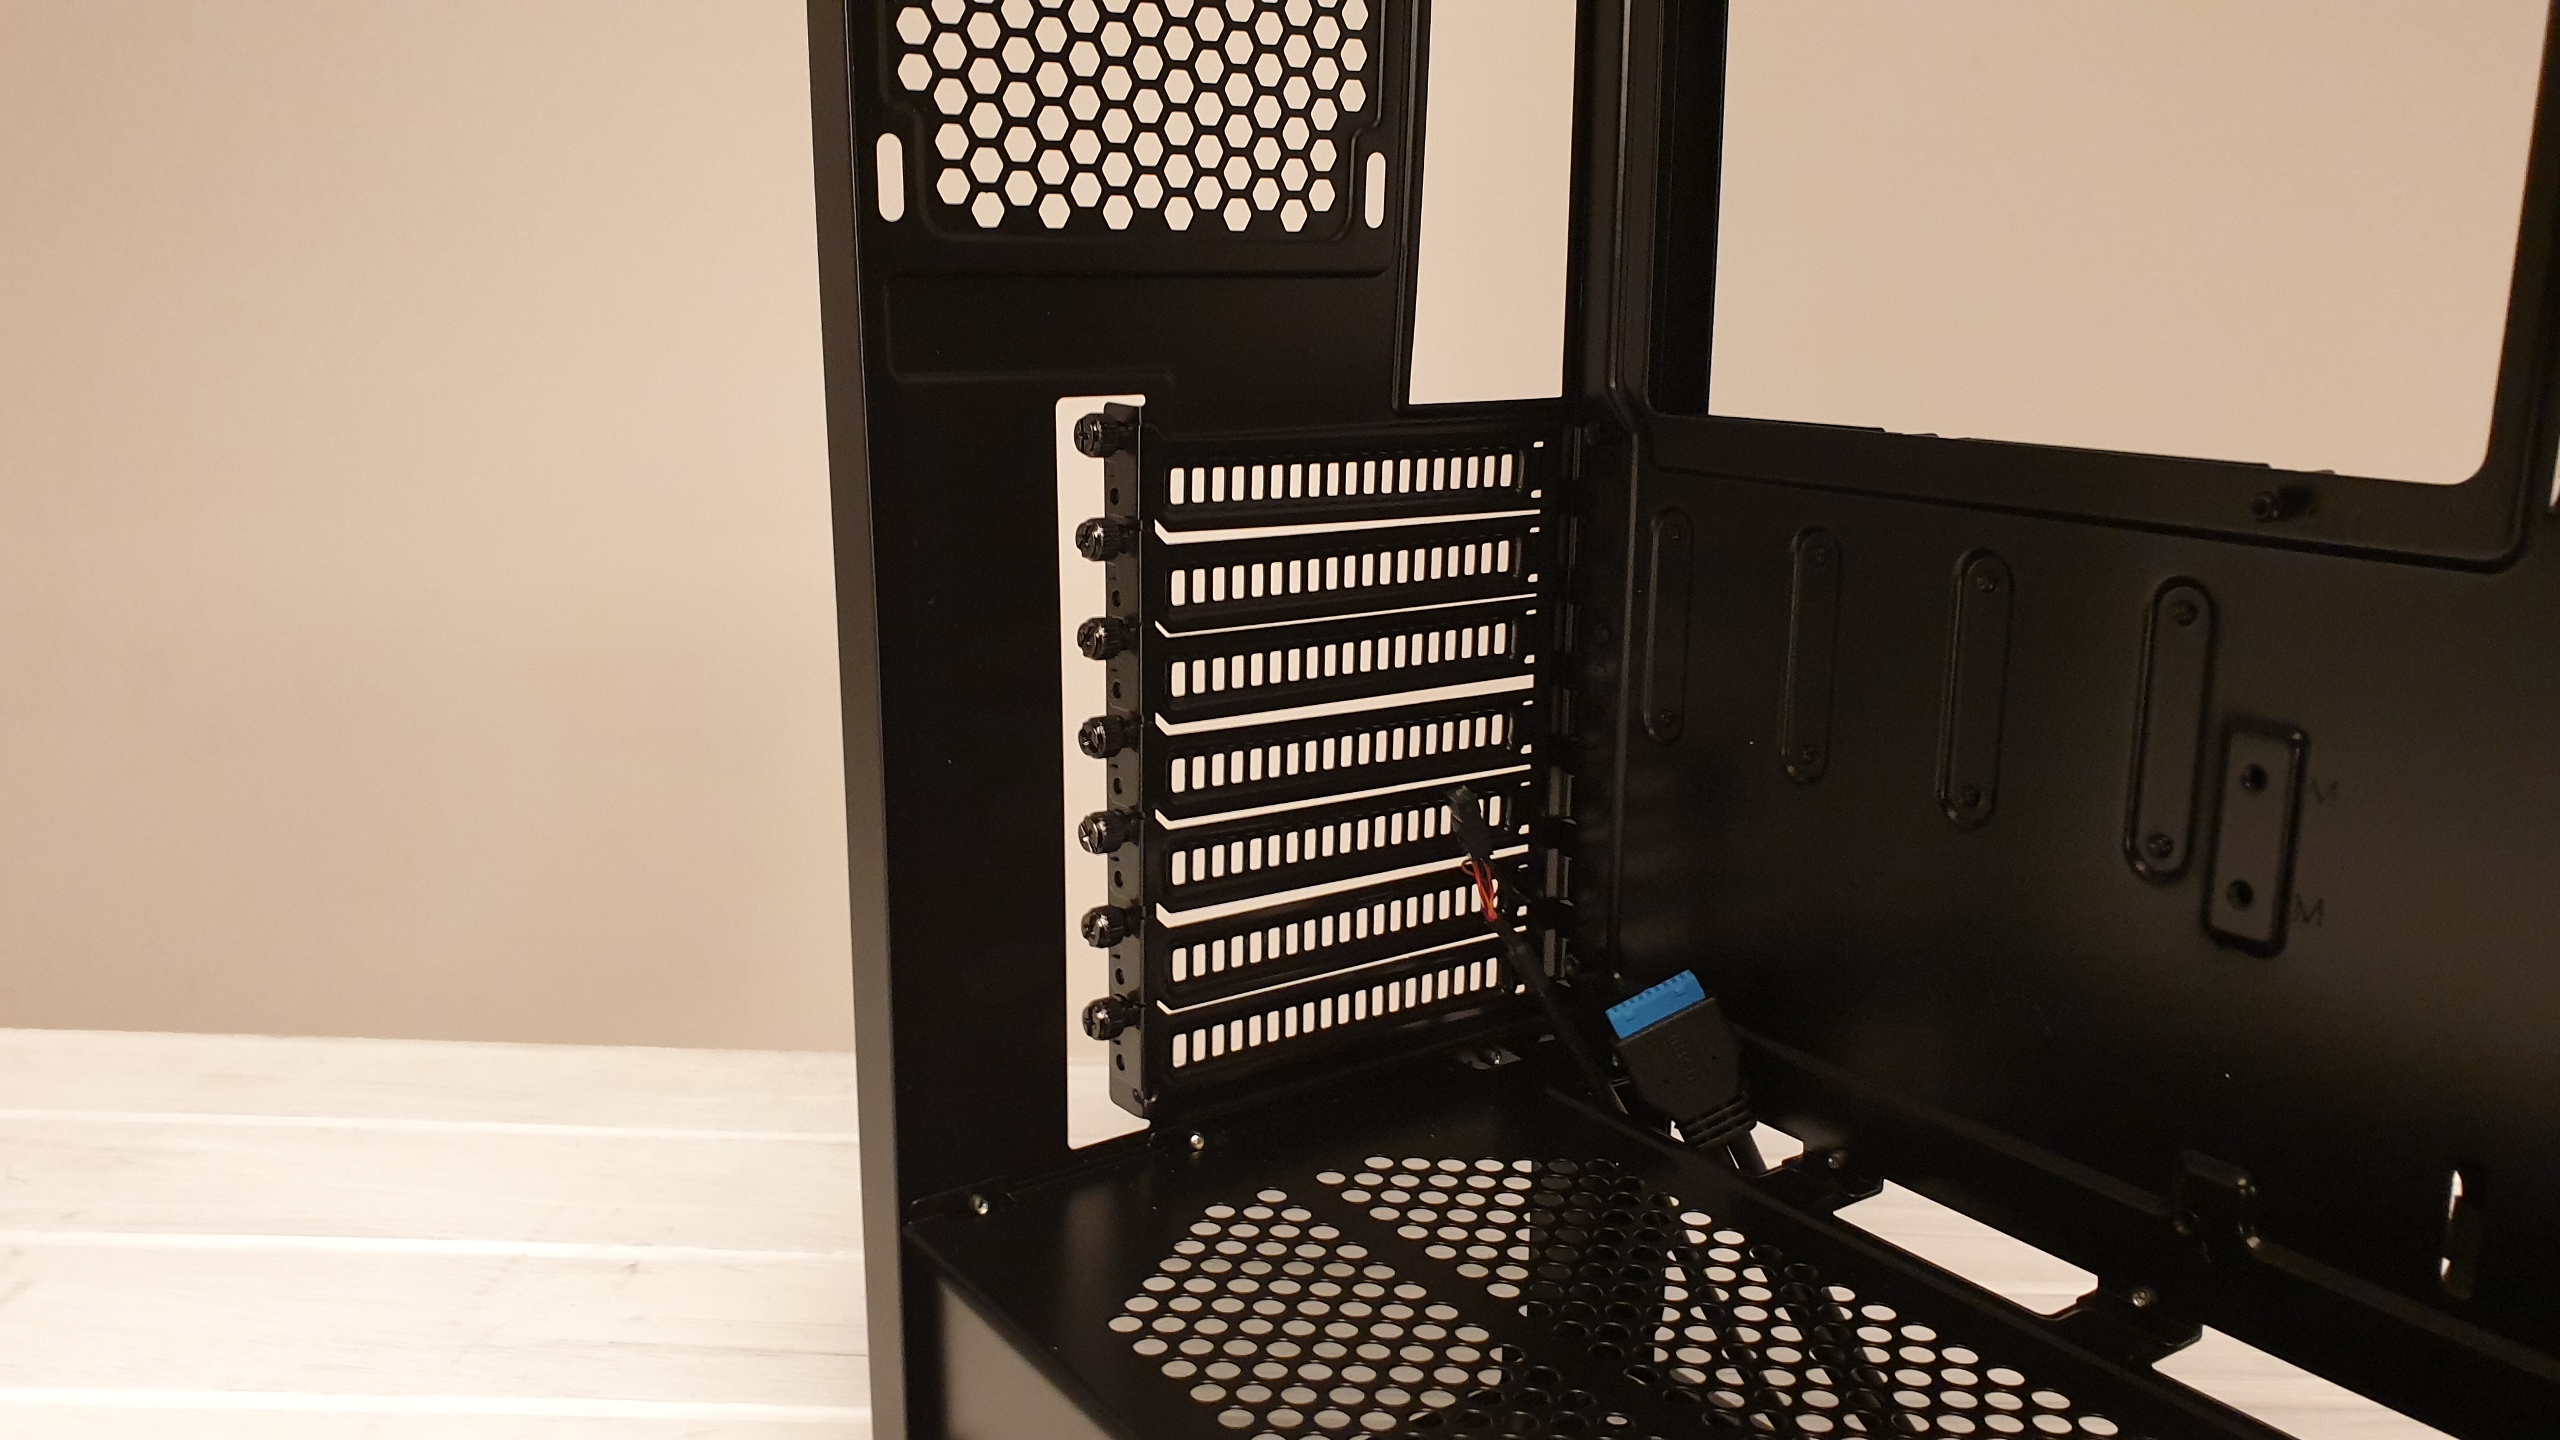
Unfortunately there’s no support for vertical GPU mounts (although a bracket is available on purchase as an additional accessory), no internally integrated RGB, and no PCIe power cable cutout in the PSU cover itself. Also to cut costs the company’s leaned on an internal paint finish that lacks some of the eloquence that some of its latest offerings feature, with fingerprints being particularly rife within if you don’t attack them with a microfiber asap.
Test Build
With that out of the way, it’s time to find out how well the Phanteks Eclipse P400A performs in our test build segment. Our ATX test “build” for cases consists of the following:
| CPU | Intel Core i9-9900K |
| Motherboard | Gigabyte Z390 Aorus Pro |
| RAM | 16GB (2x8GB) T-Force Pro Dark @ 3600 MT/s |
| GPU | Nvidia GeForce RTX 2070 Super |
| SSD | 240GB PNY CS1311 2.5-inch SSD |
| PSU | Corsair HX750 80+ Platinum Power Supply |
| Cables | Corsair Sleeved PSU Cables Pro Kit Type 4 |
| Cooler | Corsair H100X 240mm AIO + 2x Corsair ML120 Pro Fans |
Motherboard Installation
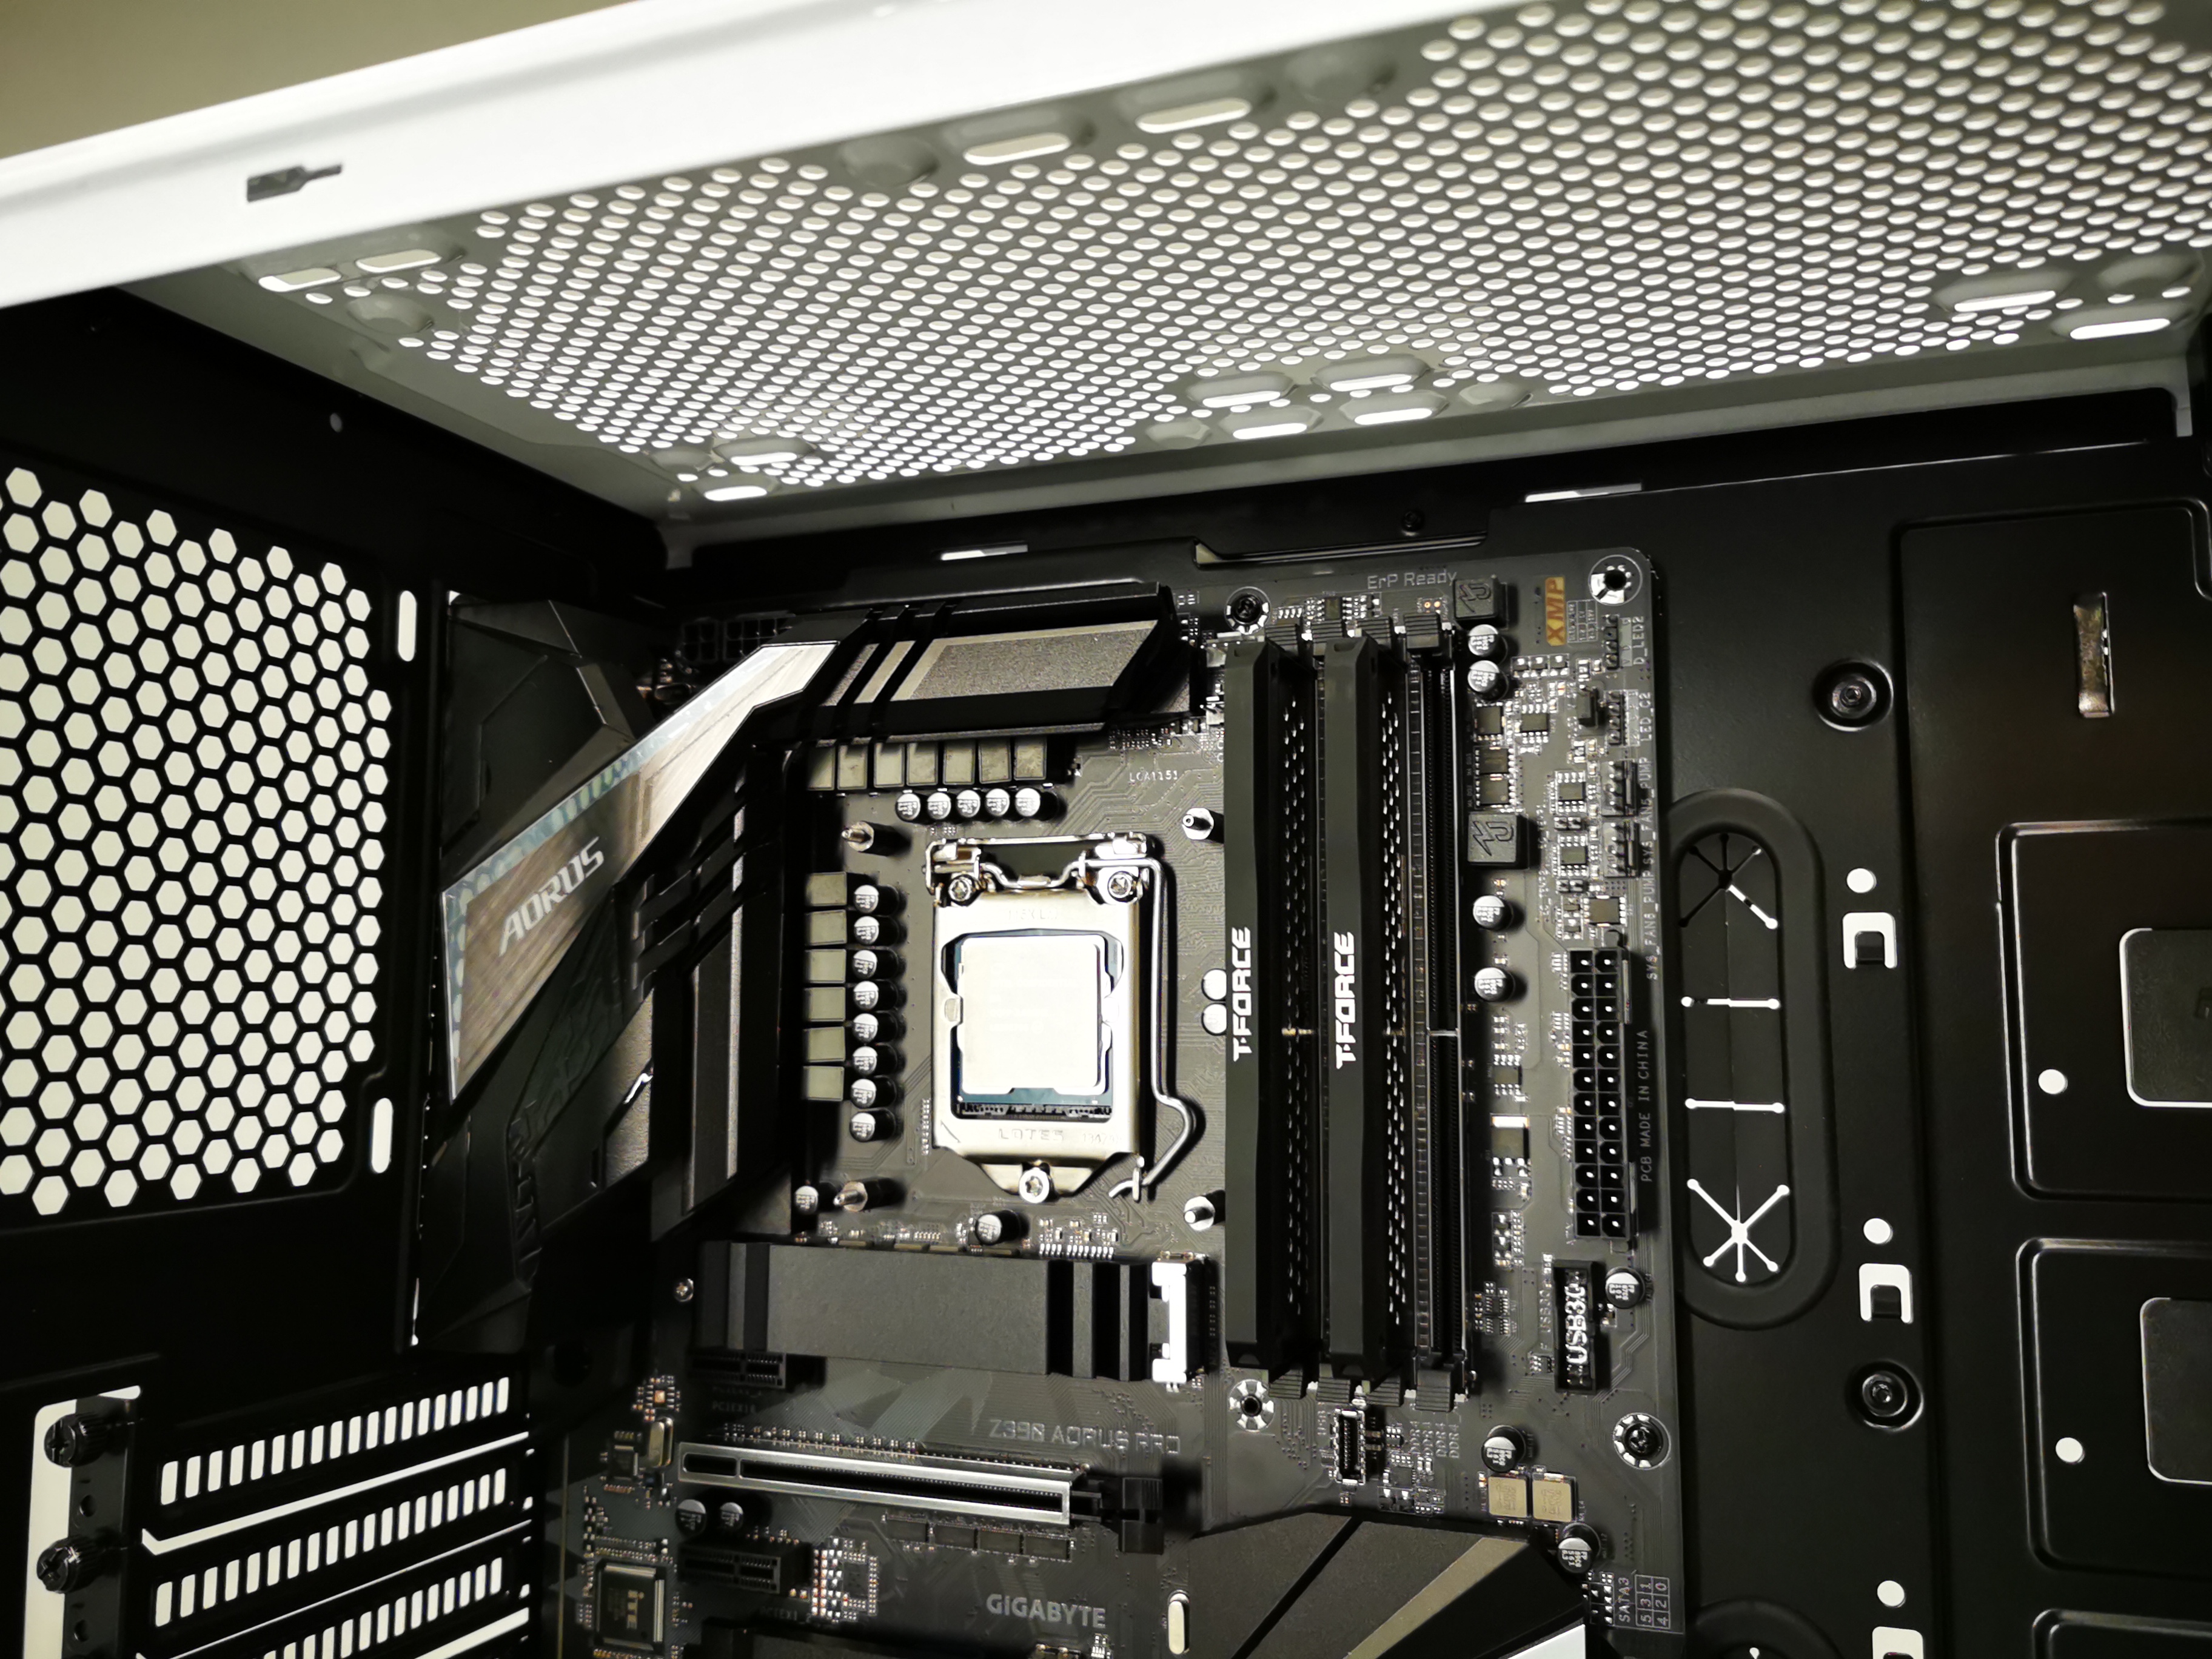
The motherboard went in rather smoothly, and you can see that we do have plenty of cable cutouts located at the top there to route or CPU power and fan cables. Additionally if you do decide to run 140mm fans in the roof that does reduce the overall space you have to run the cables. We recommend plugging in all of your upper most cables (including those for your CPU fan headers, before installing top mounted fans.
AIO Installation
Much like the Corsair iCUE 220T we reviewed earlier this year, the Phanteks P400A doesn’t support roof mounted AIOs, you’re going to need to install it in the front of the chassis if you’re after that liquid-cooled goodness. That can be quite frustrating, especially for those who are fond of that complement of triple 120mm RGB fans in the front. Although theoretically you could run a 240mm (or even a 360mm) AIO with them, you’d be sacrificing a huge amount of static pressure by doing so. That’s less than advisable as radiator fin density on off-the-shelf AIOs are typically far denser than their liquid-cooled cousins, to counter the slim thickness and to balance surface area. The higher the static pressure, the better your AIO is going to perform.
For our build instead of running the stock fans where they are, we’ve opted to forsake aesthetics for cooling maximum, relocating the front three fans to act as exhausts instead. That way our 240mm AIO and the 2x Corsair ML 120 Pros powering it can be used as cold-air intakes for the CPU, and the rest of the chassis. This actually works out quite nicely in the end aesthetically, as the three RGB fans produce a significant amount of light, illuminating the hardware within.
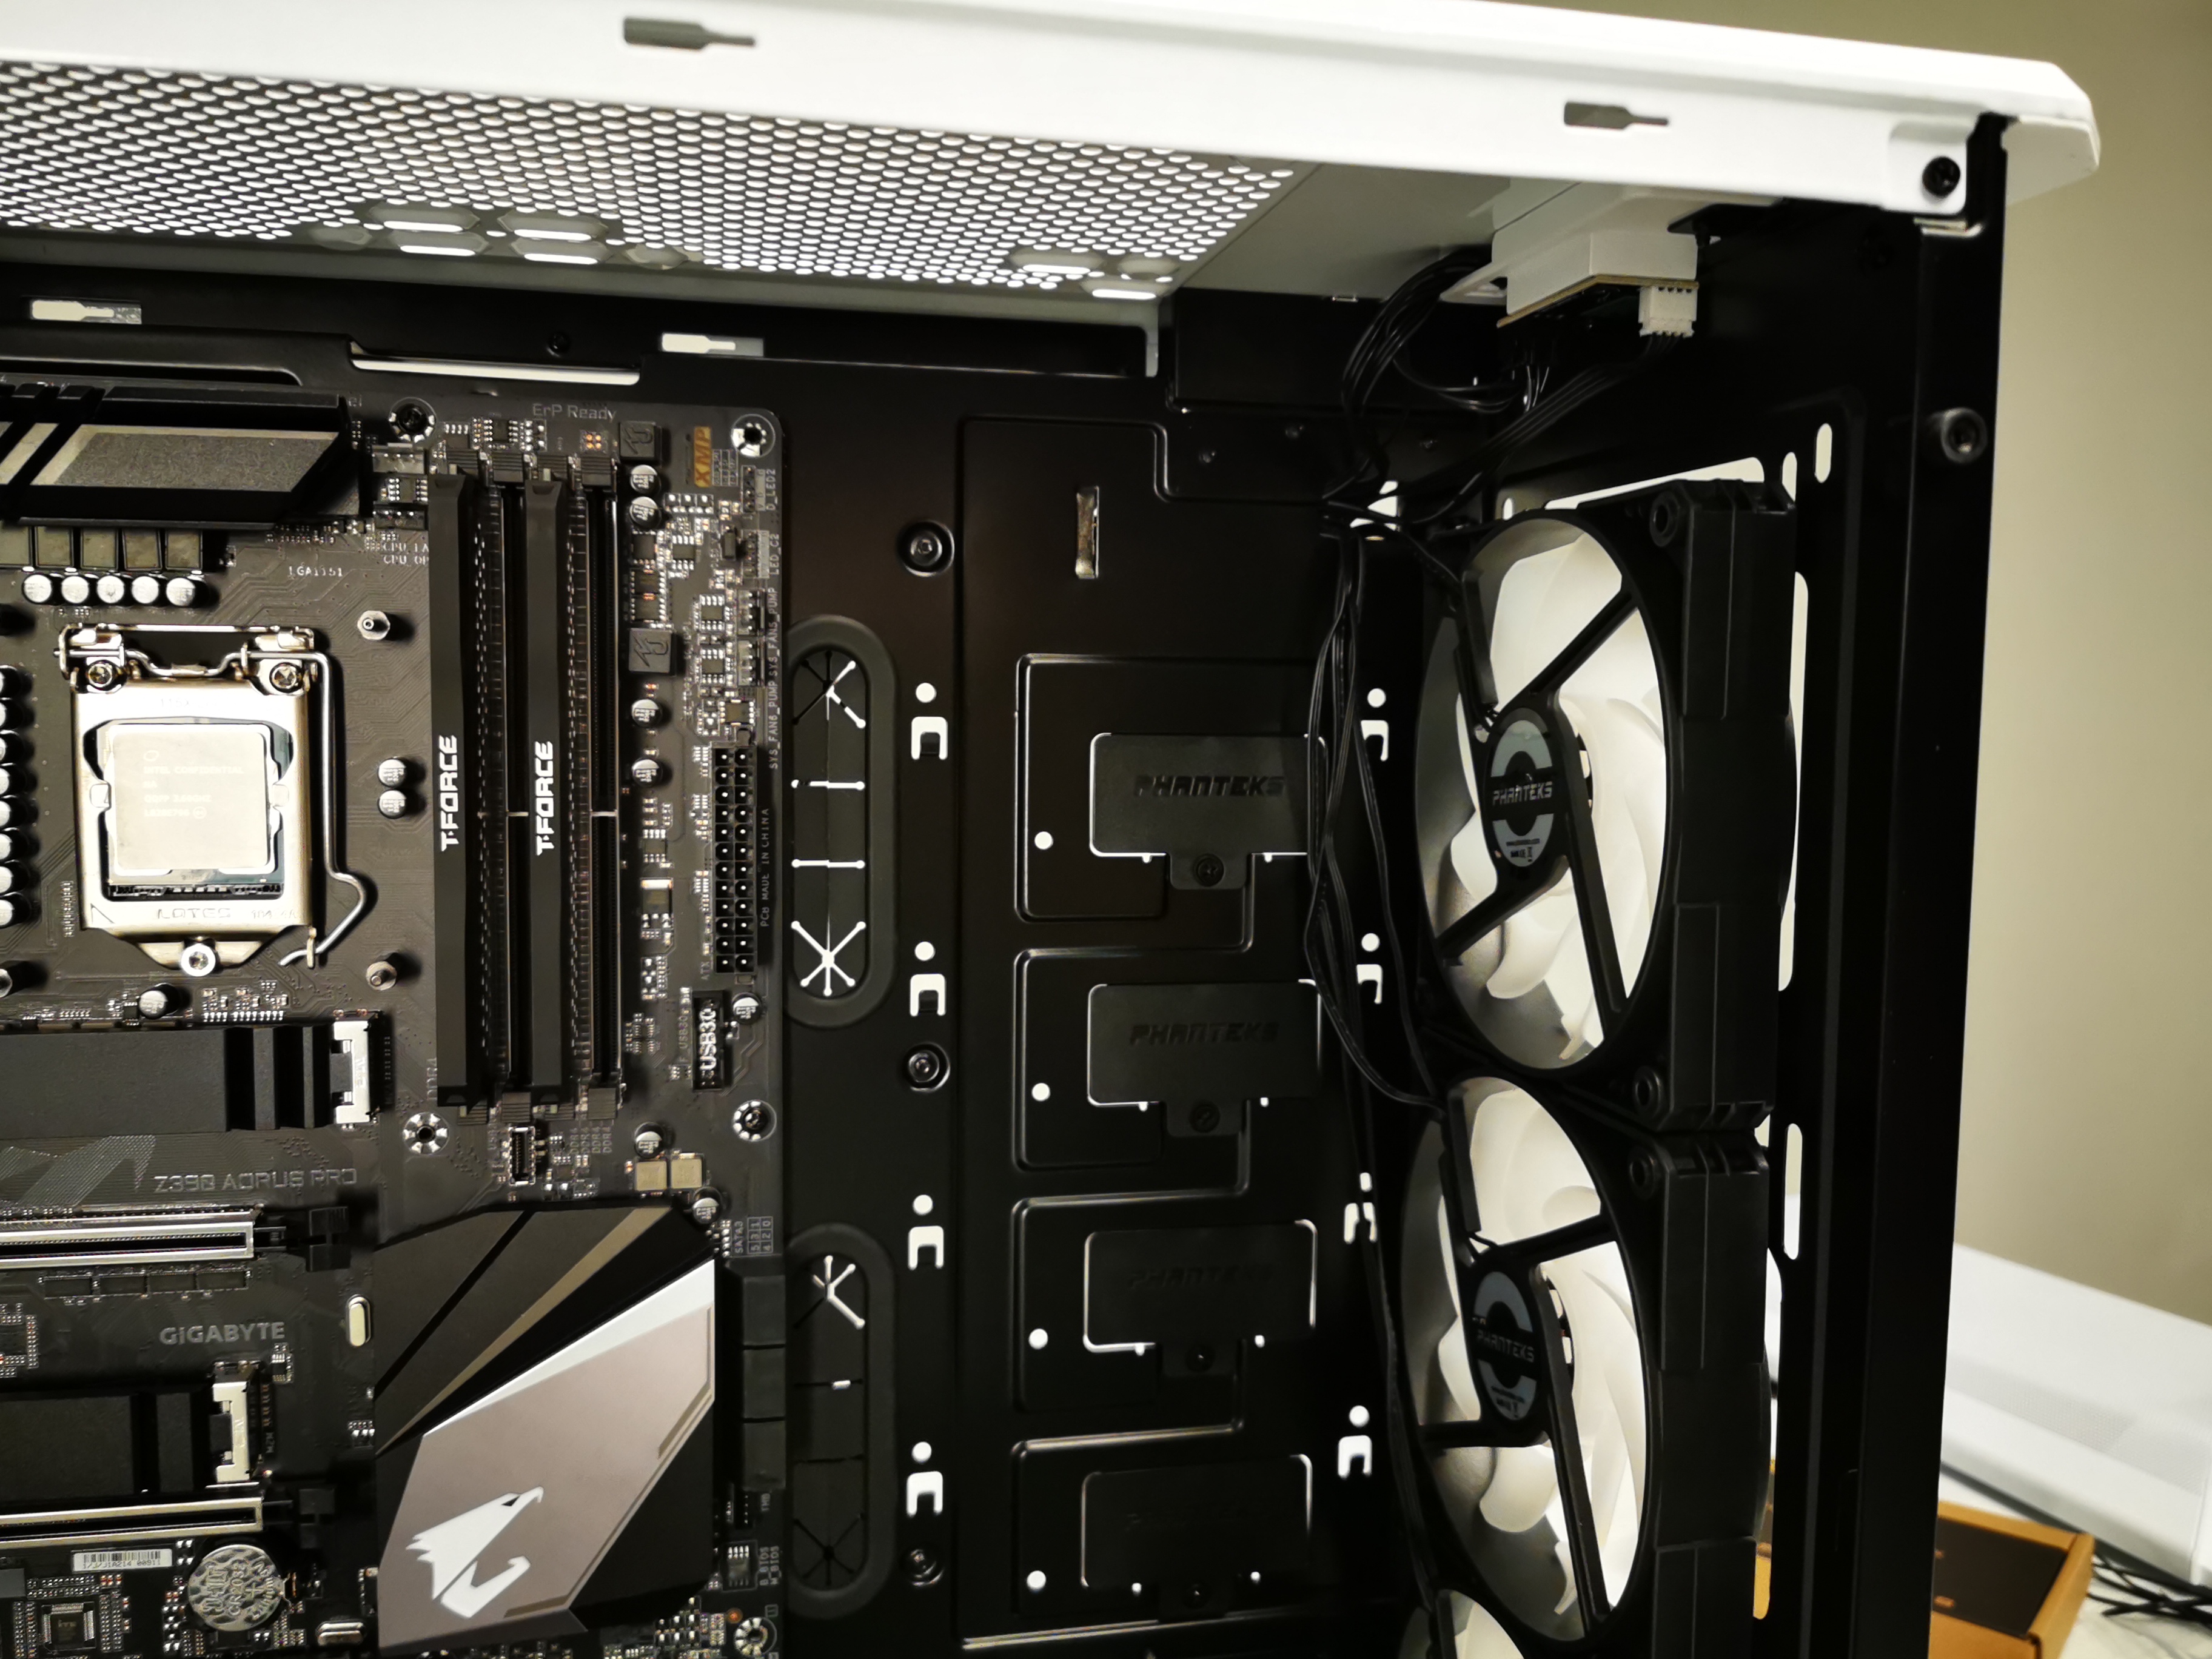
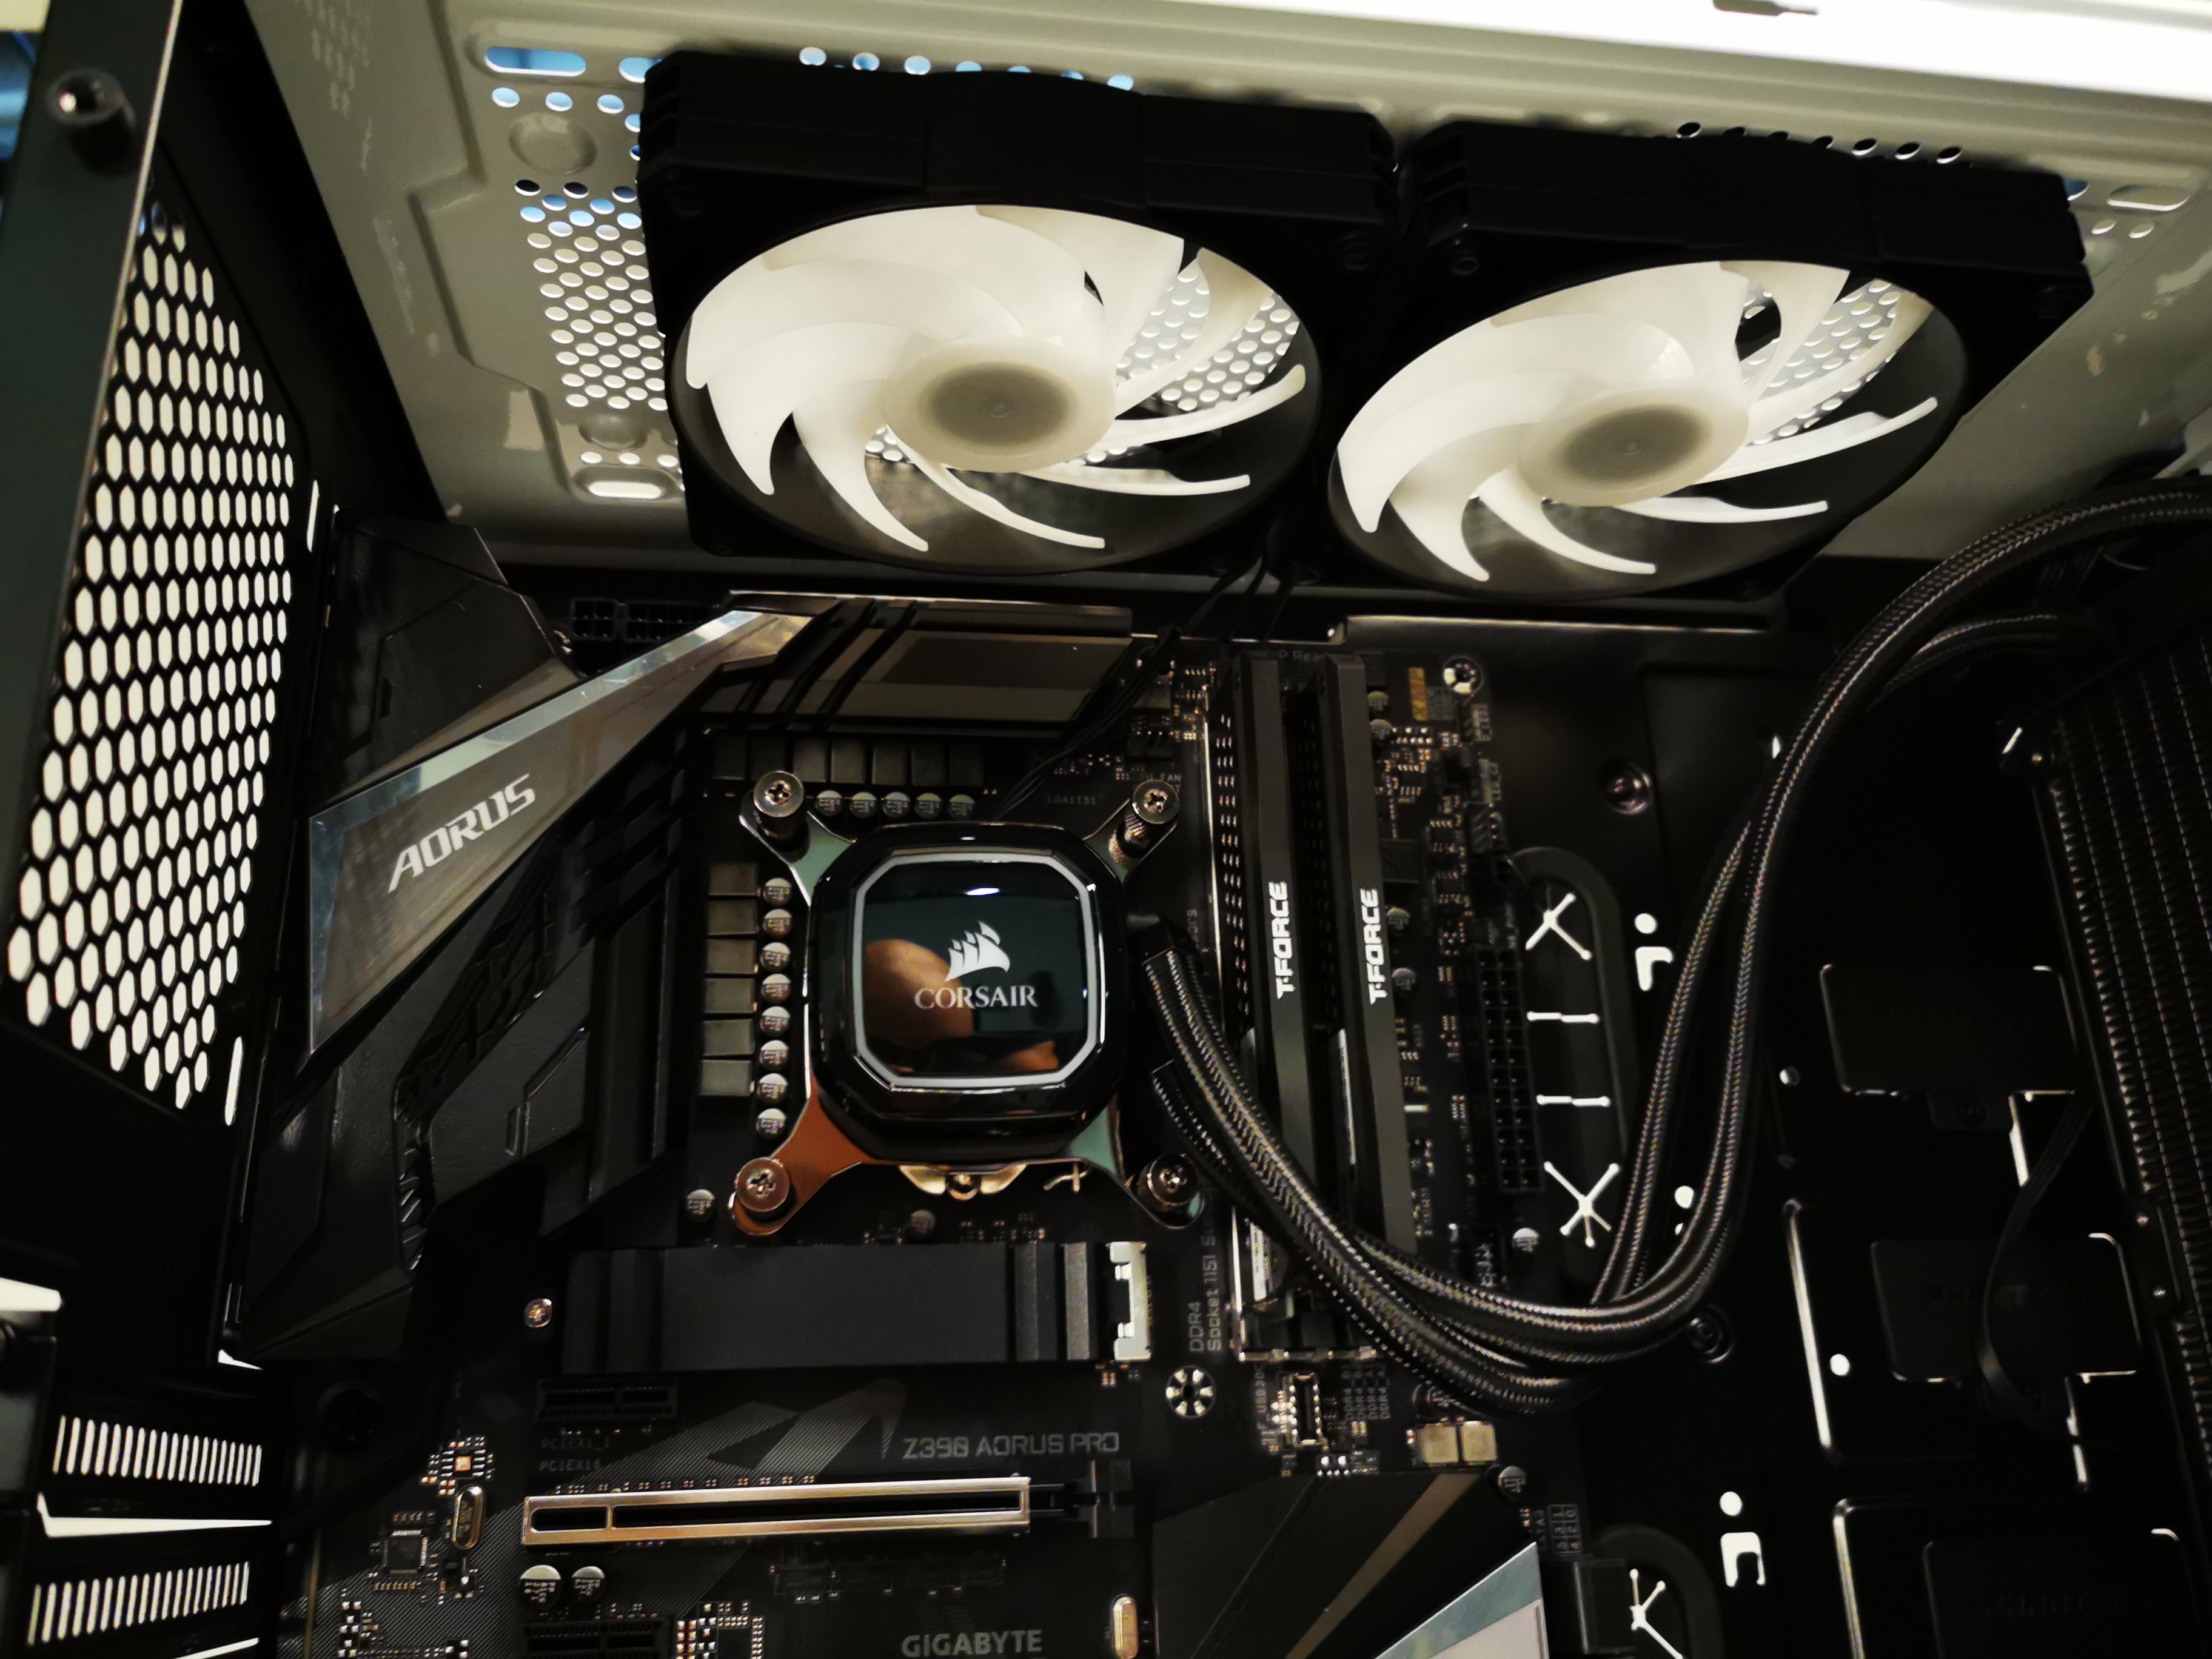
GPU Installation
Once that’s out of the way, we installed our GPU into the case. Now there’s not a huge amount to comment on here, aside from the lack of support for a vertical GPU as standard. Although admittedly we wouldn’t have opted for that solution anyway, as running a vertical GPU up against a tempered glass side panel is asking for trouble, especially with an open-air cooling solution on your graphics card. To be fair to Phanteks, as mentioned earlier, you can buy a bespoke bracket that allows you to do this, but it’s a rather clumsy looking accessory, and we’d much prefer to see a vertical GPU mount integrated into the design of the case itself.
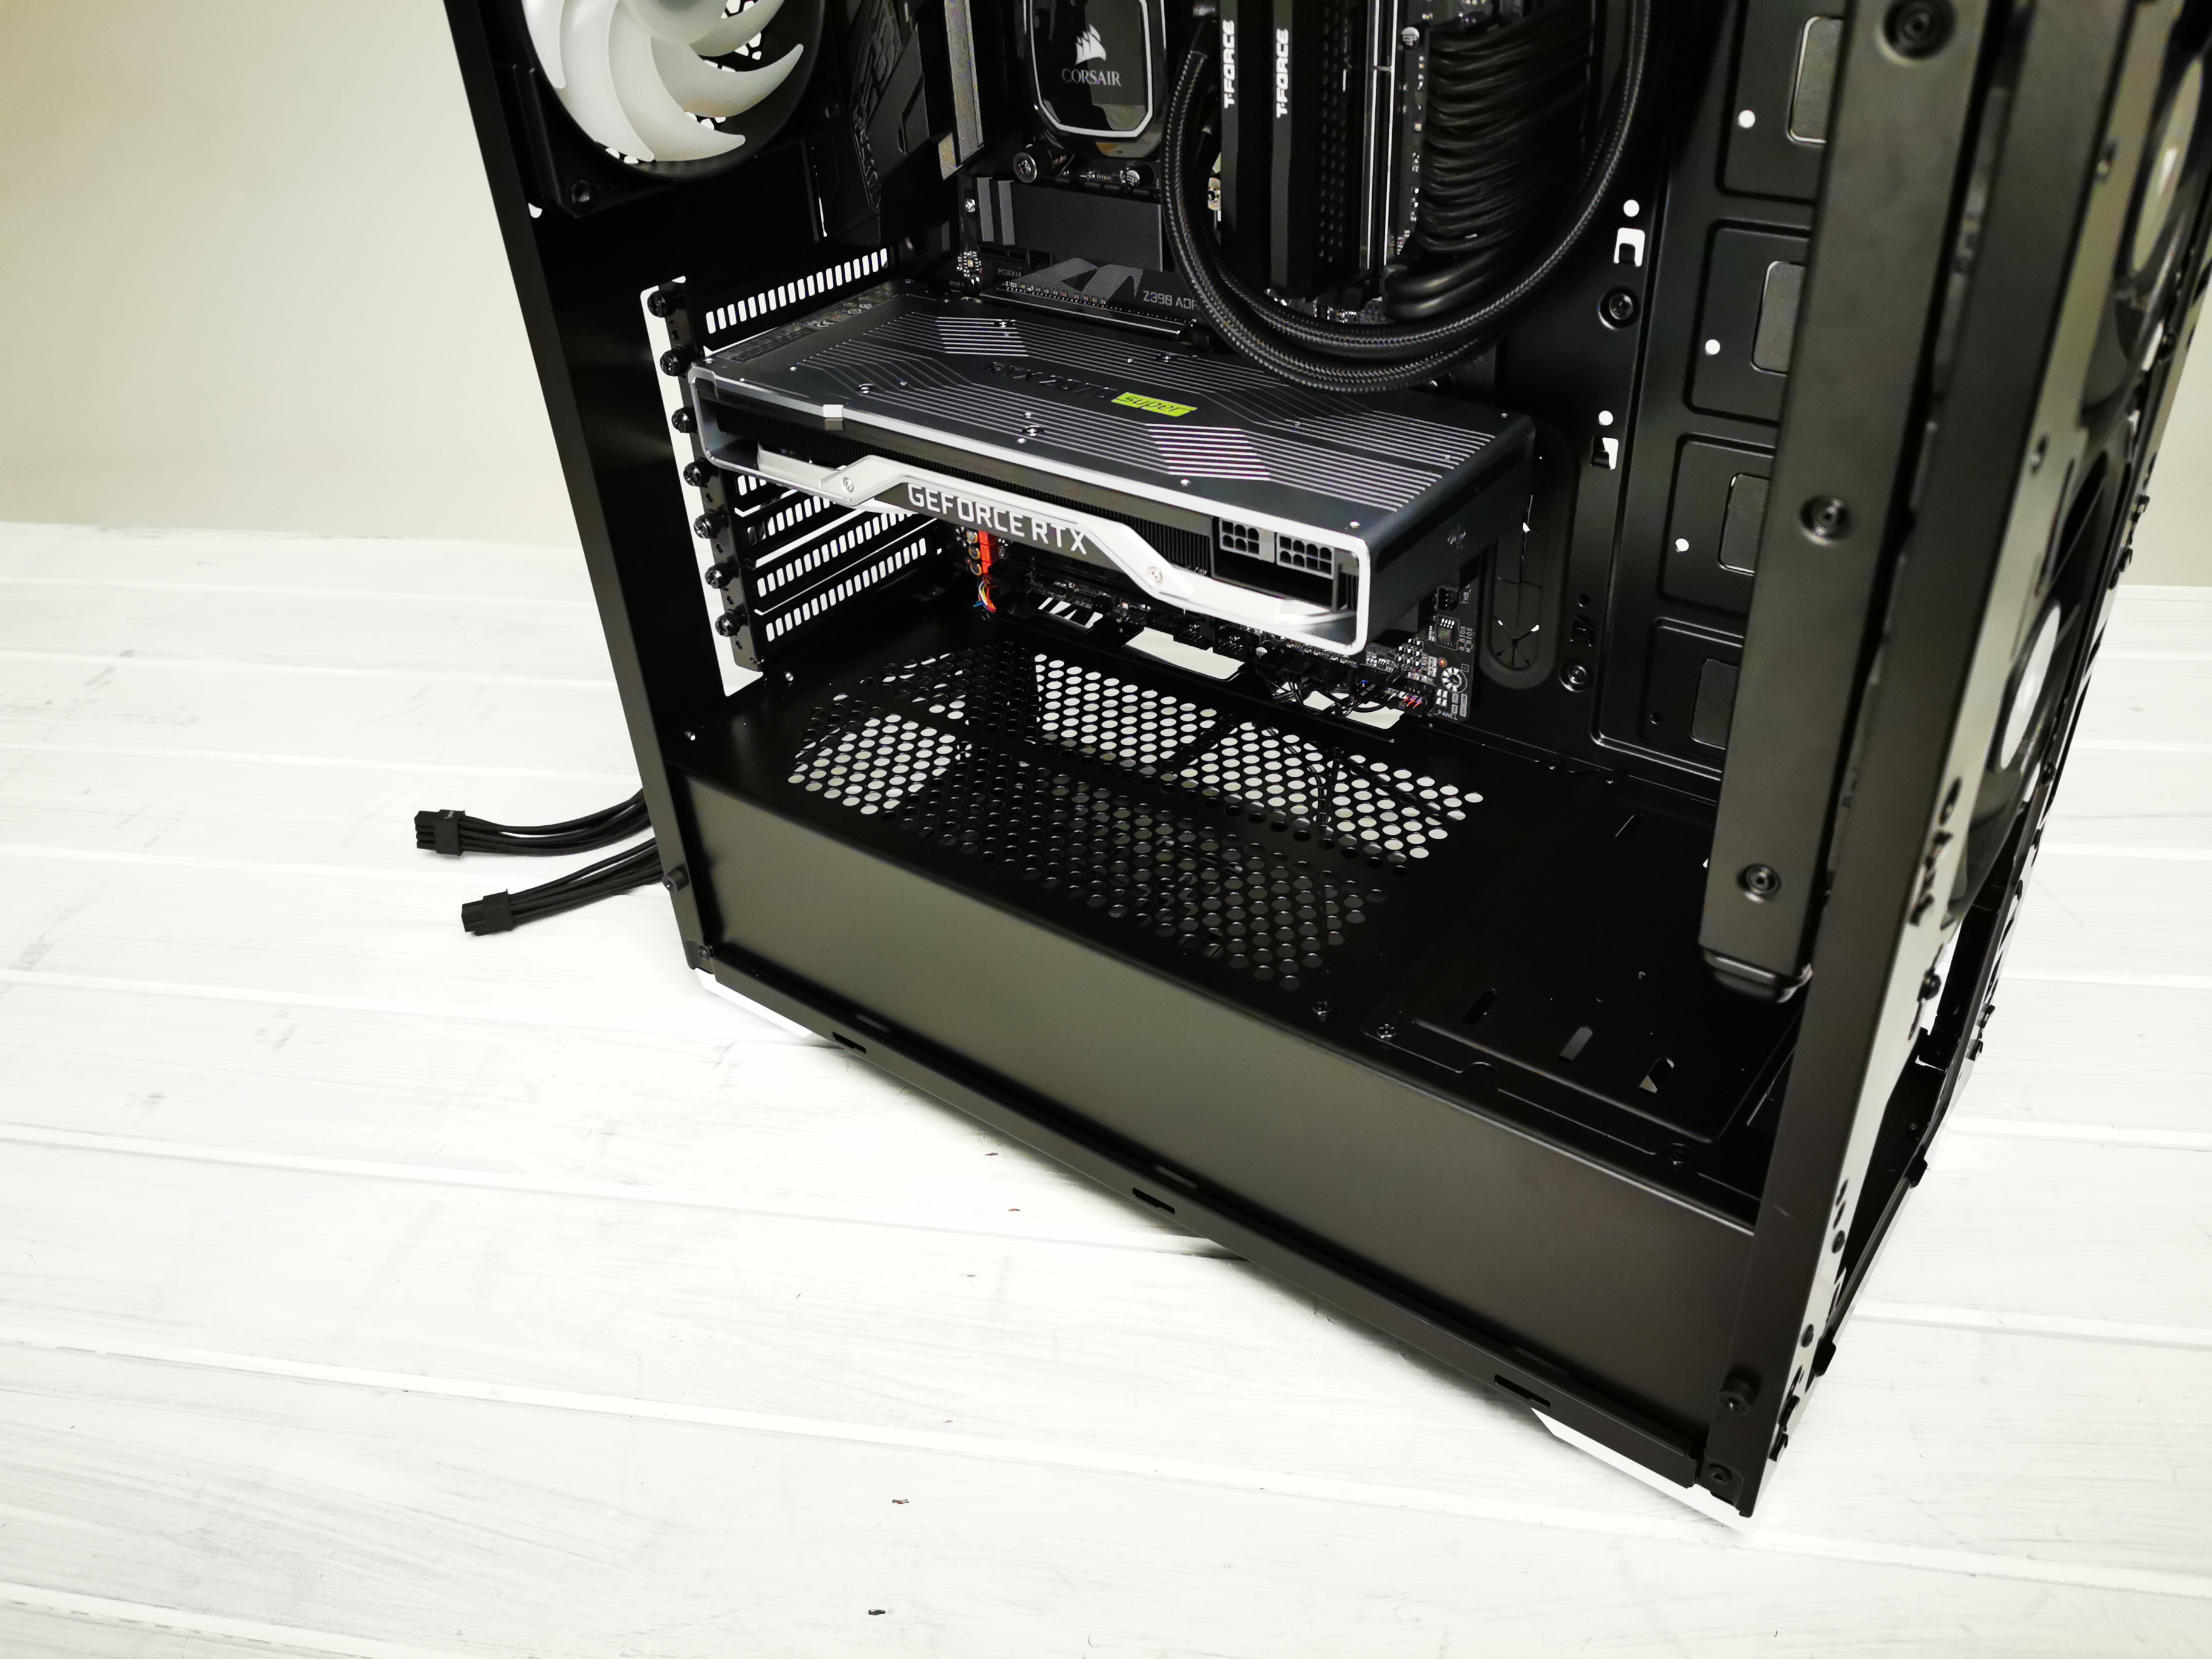
Power Supply In and Cables
With the last piece of hardware installed we moved on to our PSU. Fortunately the Phanteks Eclipse P400A is more than roomy enough underneath that PSU cover, and there’s plenty of space for both the hard drive caddy, and a full-sized ATX power supply complete with modular cables.
We did have our reservations about the lack of PCIe power cutout in the PSU cover itself, but after running them through that bottom right cable grommet, and up into the graphics card, it doesn’t actually look that bad, in fact, it showcases just how some of the old ways still hold their weight in this world of ever advancing chassis fashions.
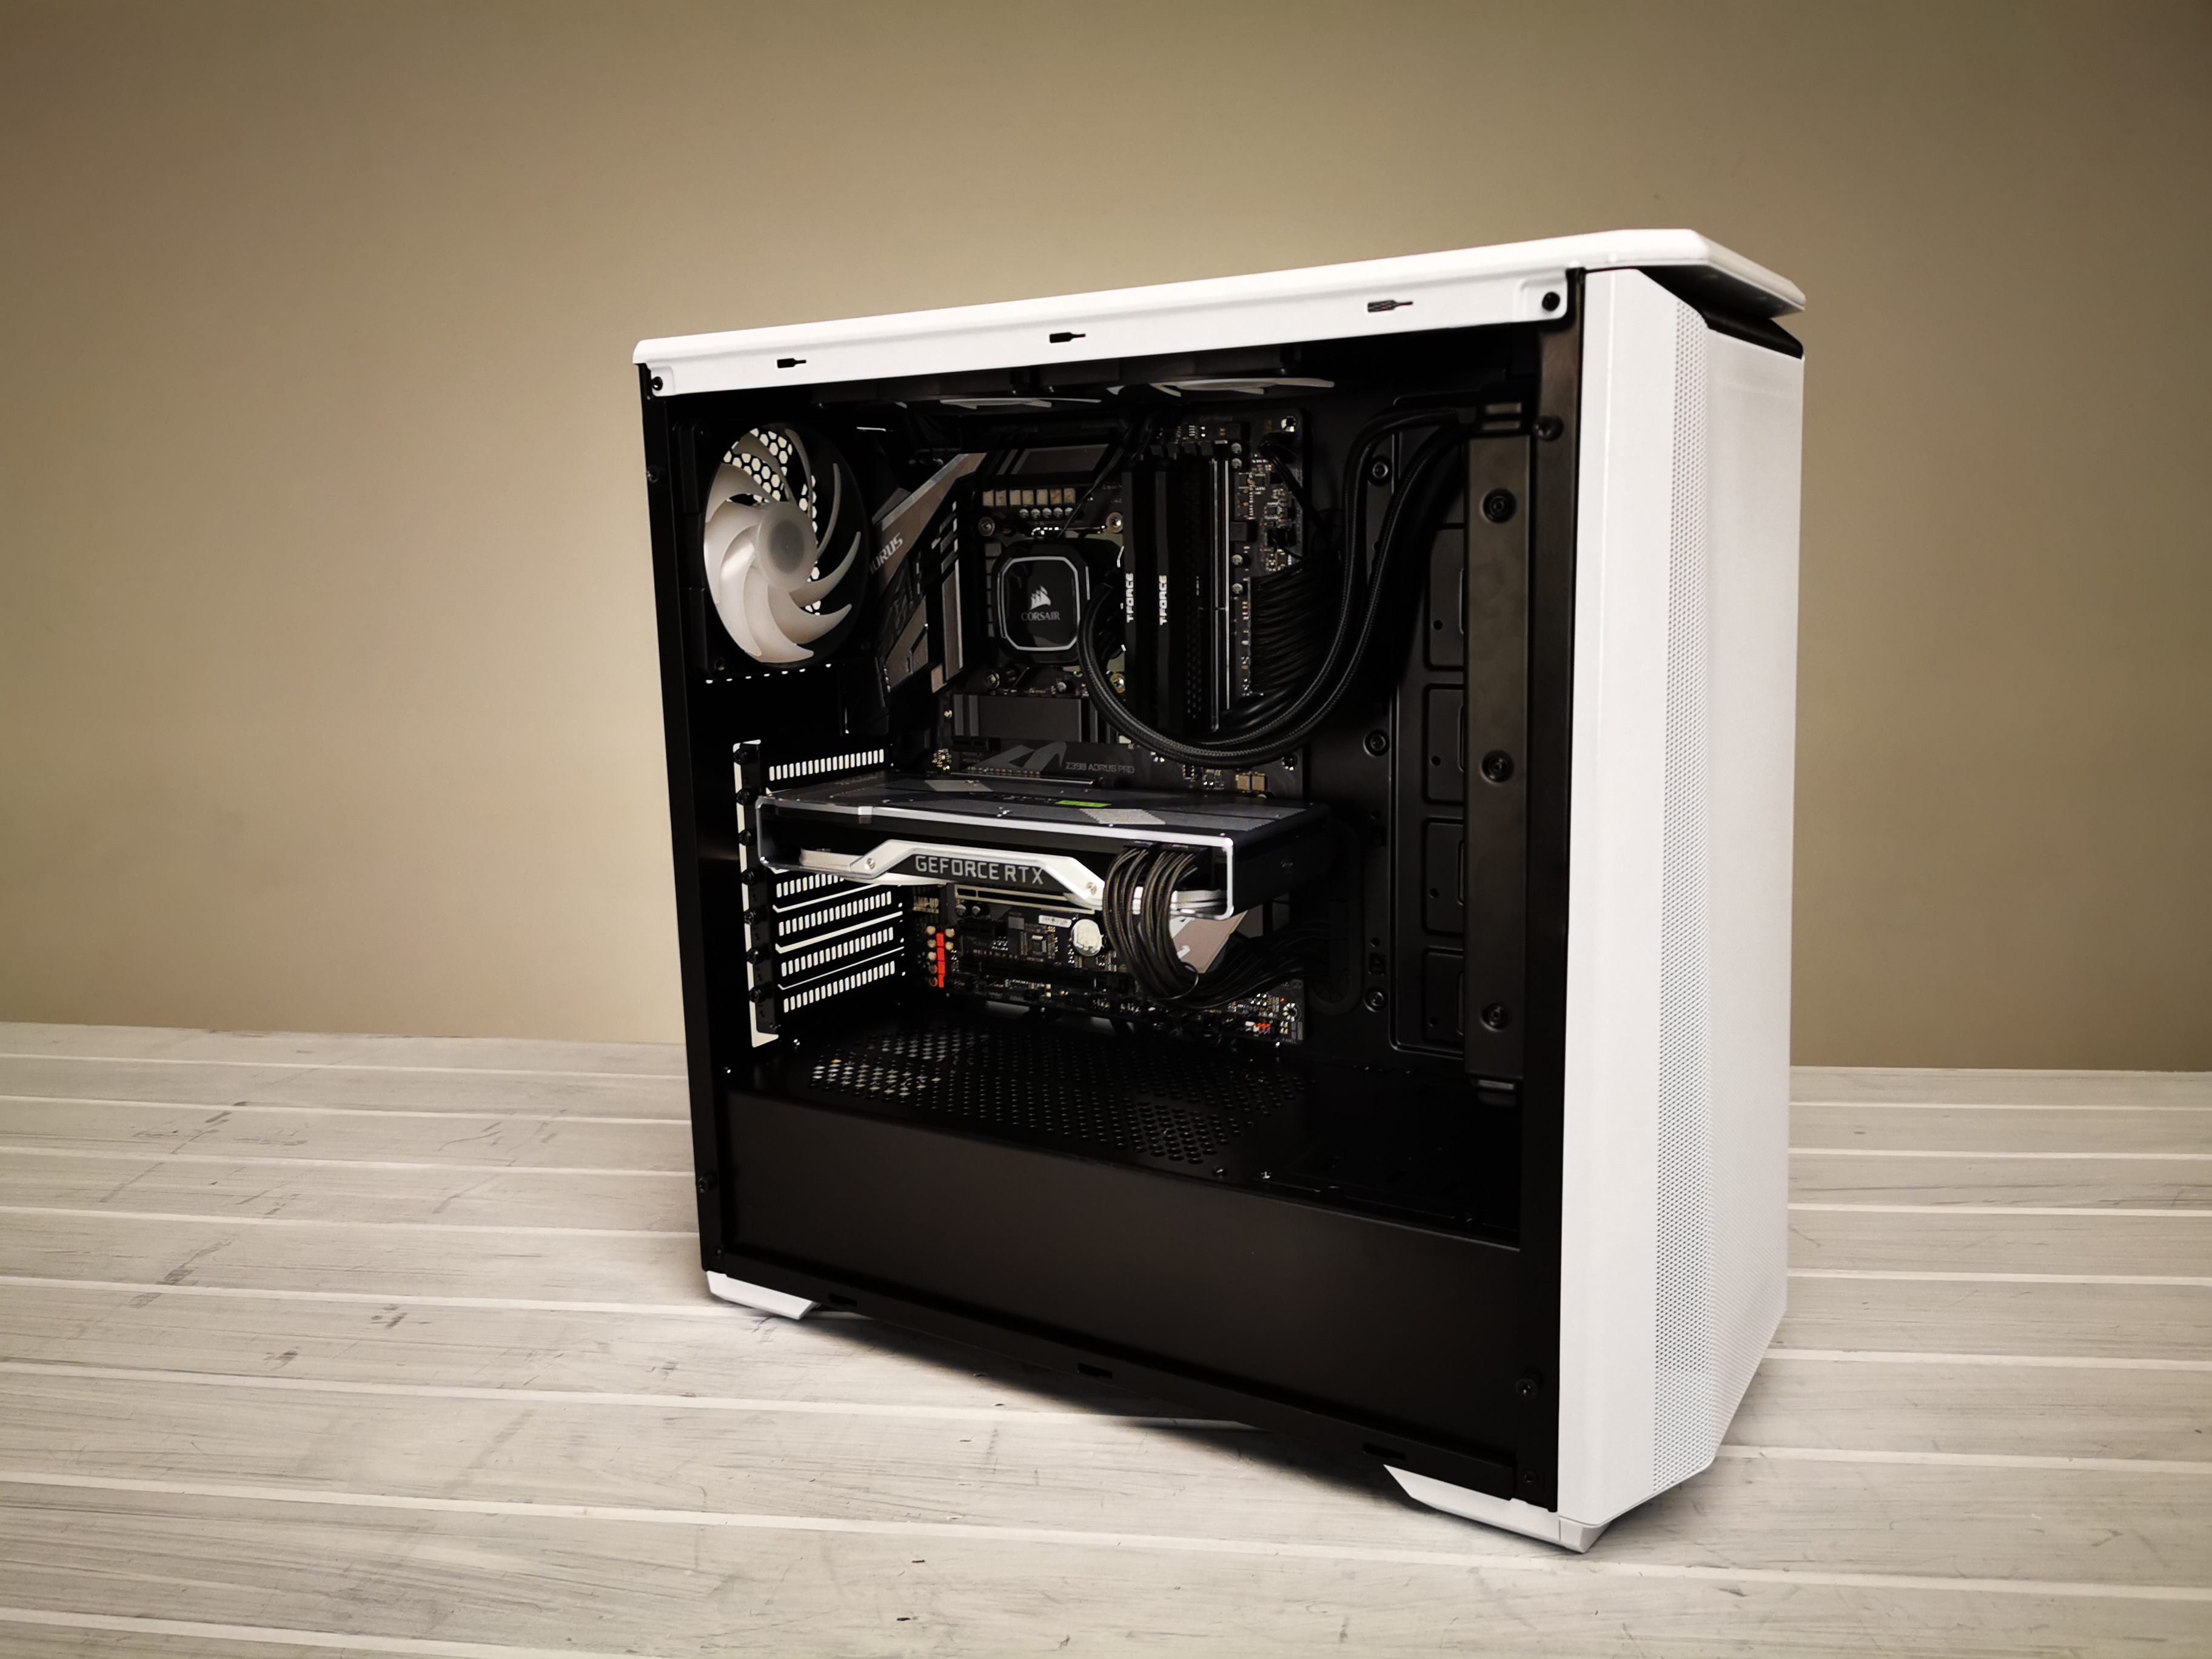
Performance
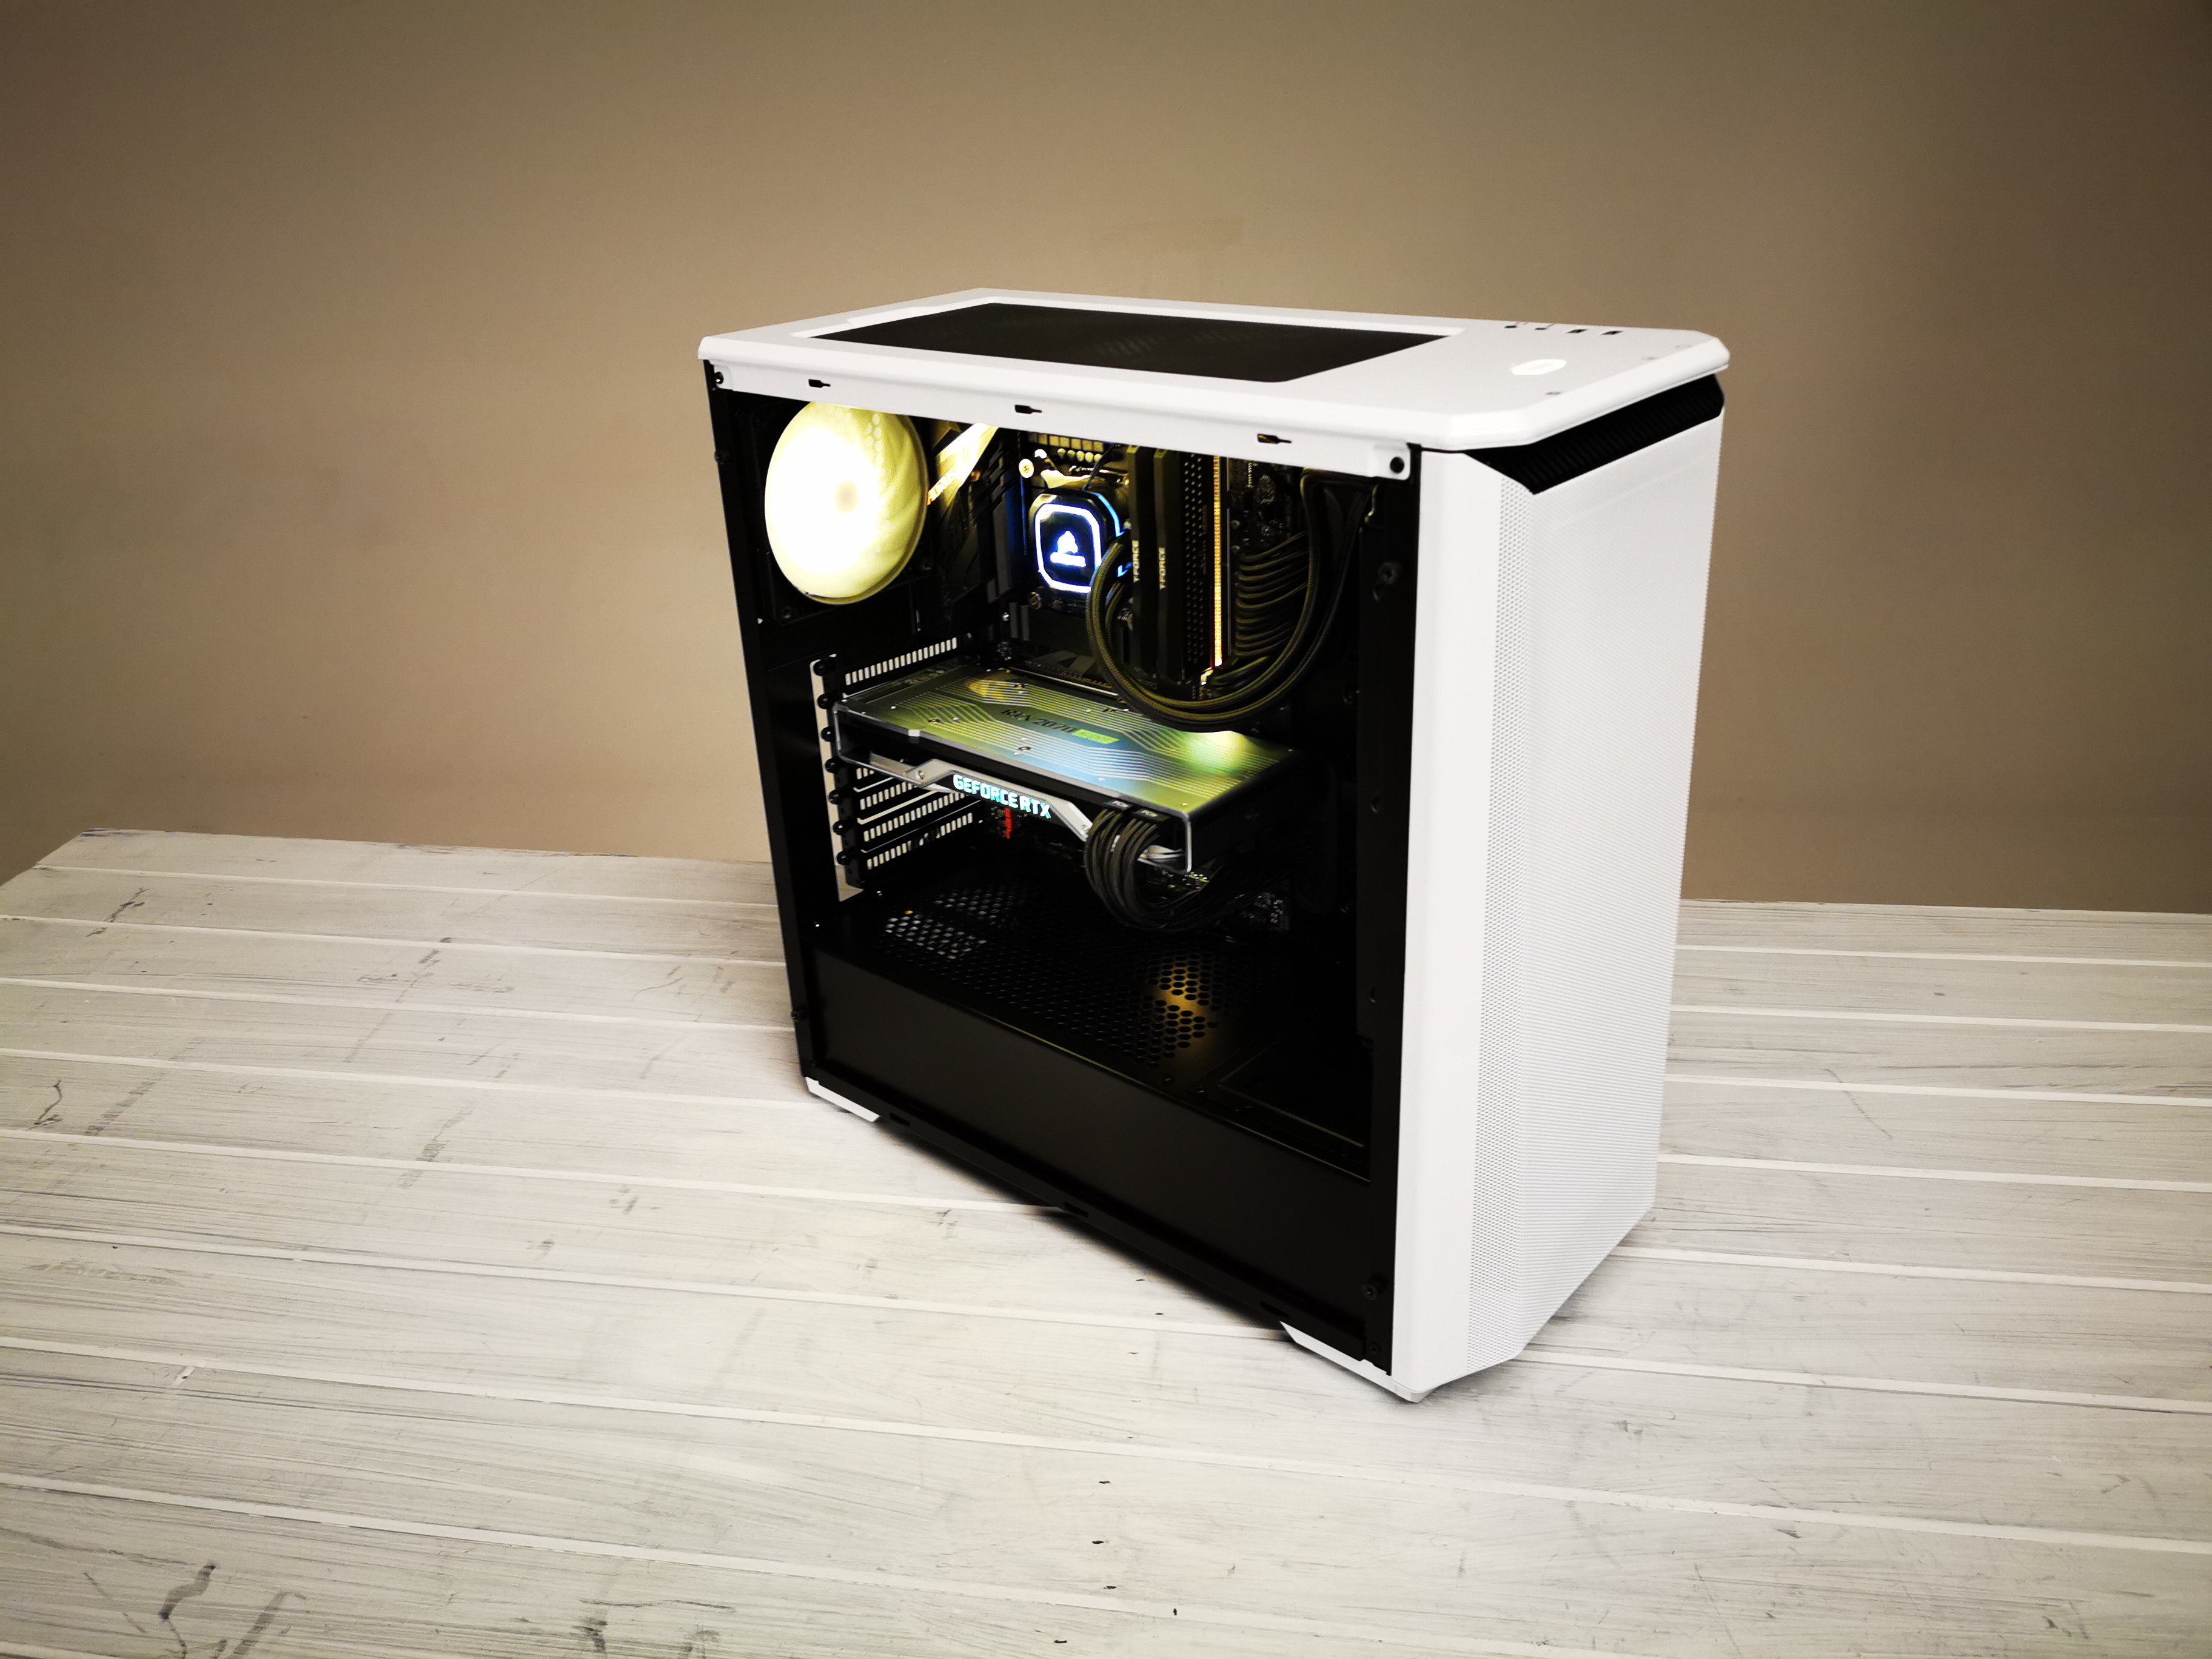
Now our AIO build is out of the way, it’s time to get down to the thermal performance testing. For this we perform two rounds of tests.
The first set of benchmarks take advantage of an air tower (notably Noctua’s NH-U12A), equipped with 2x Corsair ML120 Pros. This allows us to keep the included case fans in their factory installed locations during testing, without running into compatibility issues, and is an ideal insight for those looking to just plug and play their kit into the case.
The second set of benchmarks, utilize what we consider to be the most optimal installation setup when it comes to both the included chassis fans, and a 240mm AIO liquid-cooler. The cooler again featuring those same 2x Corsair ML 120 Pros. This way we can showcase just what each chassis is capable of in a “best-case” scenario, without necessarily investing in additional fans, just purely by moving the ones provided around inside with the help of an AIO.
Stock Fan Testing
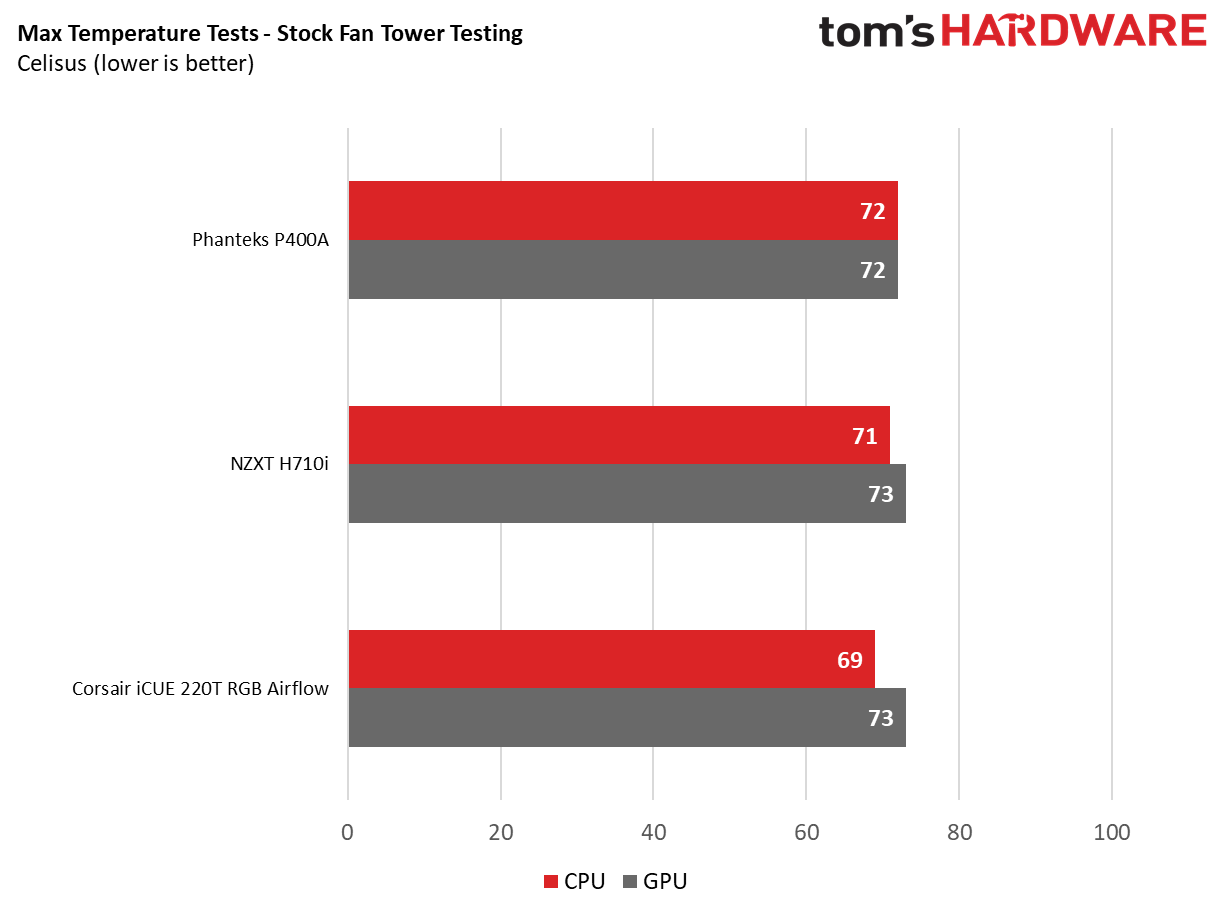
In it’s stock configuration, the Phanteks P400A performs admirably, achieving 72 degrees celsius across both the CPU and the GPU. We’re not seeing any crazy results here under load, likely suggesting that the stock fans are working sufficiently in contrast to other chassis. It sits well balanced between the likes of Corsair’s iCUE 220T and NZXT’s H710i.
Perhaps not as impressive as we’d like, given the fact it’s an “airflow” optimised chassis, however the bigger gains do lie with the optimal configuration.
Optimal Fan Testing
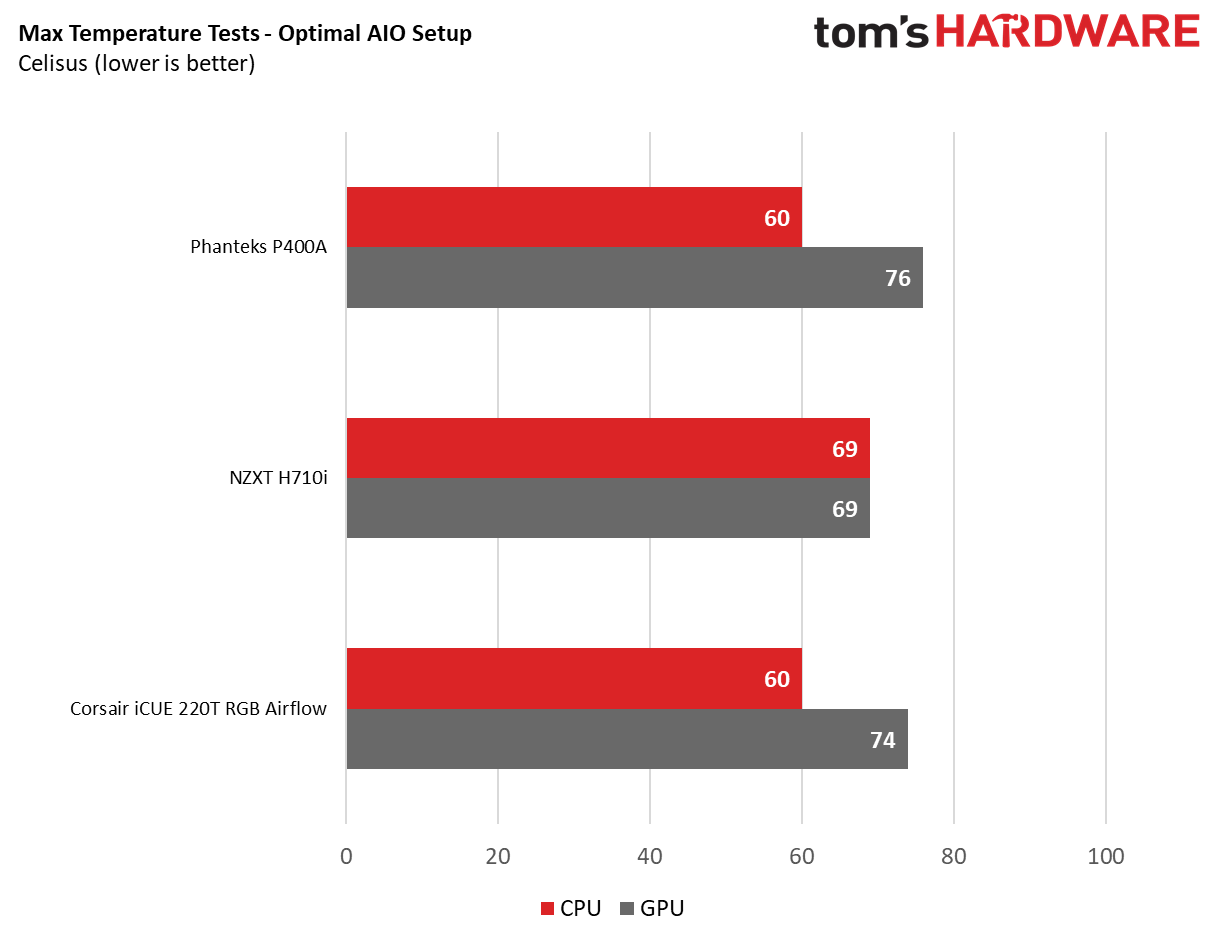
It’s only when we reorient those fans, do we see significant improvements to overall thermal performance across the board. Moving the AIO to the front of the chassis and the three RGB fans to the rear of the rig, nets us an impressive 12 celsius drop on the processor, at the loss of four degrees gain on the GPU, for a total of 8 degrees improved temps internally. That’s certainly not as bad.
Compare that to the NZXT H710i with its solid front panel, and the 240mm AIO running as exhaust in its optimal configuration, and you’ll see that the gains aren’t anywhere near as dramatic.
The Corsair iCUE 220T RGB on the other-hand still pulls ahead by a small margin. This is likely due to the fact that it features a smaller internal footprint than the Eclipse P400A, allowing those front fans to draw cool air across to the GPU quicker before the air heats up. That said, the difference is a marginal 2 degrees on the GPU at best under load.
Conclusion
Ultimately the P400A is a bit hard to place. The airflow improvements are certainly there, you’ll have no worry when it comes to that front intake performance anymore, and it looks better too than the original Phanteks Eclipse P400.
That in itself is fine. However there really isn’t anything new here outside of the inclusion of those three fans, and an assortment of different front I/O options dependent on the version you buy.
Although the Phanteks P400A is a good chassis, the level of included features are the same as what launched in 2016 with no exciting improvements: no USB C, vertical GPU mount, smarter cable management solutions, better paint finishes or even a dual fan/RGB controller. That’s not to say that it's a bad case, just that it could do with an update. Unless you’re a die hard Phanteks fan, or you don’t mind about the missing modern features, the Phanteks P400A just doesn’t quite hit the mark. After all performance is only one metric as to which you should measure a good case.
MORE: Best Cases
MORE: All Case Content

As Associate Editor of Tom's Hardware's prestigous British division, Zak specializes in system building, case reviews and peripherals, and has a particular penchant for liquid-cooling. He's also a lover of all things Viking/Scandinavian (thus the poor attempt at a beard).
-
ItsZ If I move the pre-installed front fans to the top and to the back, can I daisy chain those fans together and connect only one to the motherboard?Reply -
v71 Just read it now in 2020 - I am a bit cautious to compare the CPU&GPU temps when using two different coolers, even in the same P400A case (the Noctua12A and a 240mm AIO). Sure, it's also a comparative between the three cases in the same conditions, not only a comparative between fan placement and coolers. Still, I had an impression that an Asetek 240 AIO and Noctua 12a though not too far away from each other in terms of general performance, might still be in favor of the AIO by 2-4 degrees C (that's we're talking about in a review like that). Hence the comparison btwn a 240 AIO and Noctua12a might not be so representative for the CPU in the first place.Reply
Who knows what would've happened with CPU temps if it was possible to place the AIO on top and compare 240AIOfront vs 240AIOtop, different placement. And, as a side note, with front placement we also have the AIO blowing warmer air into GPU too.
Now, yeah, the case doesn't allow a top AIO placement and there is nothing you/us could do about it, except to test it as is, but on a more general matter of front vs top placement, that discussion has more nuances.
Anyway, I am prepping for a build fort someone and the P400A with stock performs fine compared to iCue that requires proprietary fan connectors/hub(!!!), and additional Corsair fans are expensive. That's worth noting, as well as the fact that some standard 3-4pin RGB fans can be found for a reasonable amount and the airflow can be augmented. Here is where the P400A wins vs Corsair - a similar airflow&temps and no need for proprietary fans and hubs. -
abdessamed10 Reply
please sir i have question i'am looking to buy the phanteks p400a this week but i have a question i want to buy another fan to make it as exhaust but i don't know fans that are compatible with hub of phanteks p400a ? and if i buy another fan can i plug it directly to motherboard instead of the hub?v71 said:Just read it now in 2020 - I am a bit cautious to compare the CPU&GPU temps when using two different coolers, even in the same P400A case (the Noctua12A and a 240mm AIO). Sure, it's also a comparative between the three cases in the same conditions, not only a comparative between fan placement and coolers. Still, I had an impression that an Asetek 240 AIO and Noctua 12a though not too far away from each other in terms of general performance, might still be in favor of the AIO by 2-4 degrees C (that's we're talking about in a review like that). Hence the comparison btwn a 240 AIO and Noctua12a might not be so representative for the CPU in the first place.
Who knows what would've happened with CPU temps if it was possible to place the AIO on top and compare 240AIOfront vs 240AIOtop, different placement. And, as a side note, with front placement we also have the AIO blowing warmer air into GPU too.
Now, yeah, the case doesn't allow a top AIO placement and there is nothing you/us could do about it, except to test it as is, but on a more general matter of front vs top placement, that discussion has more nuances.
Anyway, I am prepping for a build fort someone and the P400A with stock performs fine compared to iCue that requires proprietary fan connectors/hub(!!!), and additional Corsair fans are expensive. That's worth noting, as well as the fact that some standard 3-4pin RGB fans can be found for a reasonable amount and the airflow can be augmented. Here is where the P400A wins vs Corsair - a similar airflow&temps and no need for proprietary fans and hubs.