


Using Your USB Flash Drive
There are many uses for your USB flash drive with Windows XP in emergency situations. Here are a few of the most important examples:
Virus Recognition And Elimination
Boot Bart PE from the USB flash drive, then start the virus scanner Stinger by selecting "Go, Programs, McAfee Stinger" from the menu. Use the "Add" and "Browse" controls to define the scanner's search targets. By repeatedly clicking on "Add", you can add additional path designations. To make sure Stinger checks the boot sectors, activate the "Boot sectors" option.
Stinger attempts to disinfect any infected files, if you elect the "Repair" option in the "On virus detection" field. If you elect the "Scan self extracting executables" option in the "Detection" field, you can also make sure the program will detect any compressed viruses hidden in executable files.
Back Up Disk Partitions
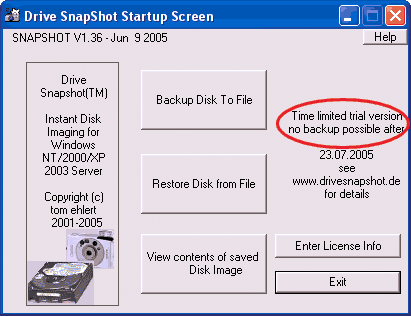
Drive-Snapshot: The trial version offers limited functionality, and can only capture disk images in the first 30 days after installation.
One uses Drive Snapshot to back up entire drives. The first time you start this program, it checks the calendar date. When the installed version ages past the trial use period, the tool's functionality becomes more limited. But you can install the commercial version any time you like. Grab the latest release from www.drivesnapshot.de/en/ . Copy the file named "snapshot.exe" into the folder named "C:\Program Files\pebuilder313\plugin\snapshot". Then, run the "peinst.cmd" batch file from the "C:\Program Files\pebuilder313\plugin\peinst" to write Barts PE Builder onto the USB flash drive.
Launch Drive Snapshot using menu entries "Go, Programs, Drive ShapShot" and click on the entry that reads "Backup Disk to File". That way you can capture a snapshot of the contents of one drive onto another. In the upper window, mark the partition you'd like to back up, then click "Next". In the next window, specify a storage location for the image file - for example, on an external USB drive. Enter a filename, then click on "Browse" to select a designation folder where the image file should be placed.
Click on "Advanced Options". In the field labeled "Maximum image single file size" you can set the maximum size for individual data parcels from the image file. For example, if you pick a size of 700 MB, it then becomes possible to distribute the image across multiple CDs.
Click on "Start Copy" to kick off the backup process. Test the completed image file: it should appear as a virtual disk drive, complete with drive letter. Then, click the main menu entry labeled "View contents of saved Disk Image" and pick a drive letter. Open the Total Command utility and use its "Map and Explore Virtual Drive" to inspect its contents.
The complete backup take the form of one or more SNA files, that you can even use with Nero to burn to a CD or DVD. Should a system crash ever occur, you can use the "Restore Disk from File" command to recreate the contents of that drive at the time the snapshot was taken.