Windows In Your Pocket
Install Windows
With a pre-defined collection of plug-ins copied into the "C:\Program Files\pebuilder313\plugin" folder and the setup files for Windows XP in the "C:\sp2\winxp" folder, you've got everything you need to install Windows and additional utilities on the USB flash drive. Your next step is to generate the files for that drive. Here's how:
Generating Files
Launch this process by selecting "Start, All Programs, PE Builder, PE Builder". For the value of the Source field provide the Main window with the path to the XP Setup files at: C:\sp2\winxp. Leave the Custom: field blank, and leave the default value in the Output file (BartPE) intact. That will be the name of the folder that contains the USB flash drive files, in "C:\Program Files\pebuilder313\BartPE" in other words.
Click on the "Plugins" button at the bottom of the Main window, and check the resulting "Plugins" window to make sure that all the newly-added plug-ins covered in this article show a "Yes" value in the "Enabled" column. If that's not the case, highlight the name of that plug-in in the list, then click the "Enable/Disable" button to turn it on. PE Builder will check your settings, to make sure all of the necessary data is available, and will change the final status accordingly. At this point, you can include more plug-ins using the "Add" button, if you've downloaded more of them from the Internet. Click on the "Close" button when you're finished. Upon returning to the Main windows, make sure that the checkboxes next to "Create ISO image" and "Burn to CD" remain unchecked, then click the "Build" button. The necessary files will be generated at that point.
Load The USB Flash Drive
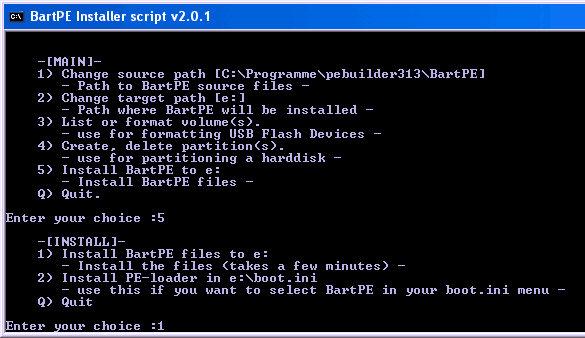
Using the Bart PE program: This command-line tool copies the configured version of Windows to the USB flash drive
Start the batch file named "peinst.cmd." You'll find it in the "C:\Program Files\pebuilder313\plugin\peinst" folder. It copies the files you generated using PE Builder onto the USB flash drive, as well as the Windows boot files. Open Windows Explorer and erase all files on the USB flash drive. Type 1 at the command line, then in response to the "Enter Source Path" prompt type the location of the generated Windows files: "C:\Program Files\pebuilder313\bartpe". Enter 2 at the command line, and provide the drive letter for the USB flash drive (for example E:). Start the installation by typing 5, then 1. The notification "Installation completed" appears when that process is complete. The USB flash drive is ready for use. If the PC won't boot from this drive, install a RAM disk as explained under the heading "RAM Disk for boot problems" that appears later in this article.
Get Tom's Hardware's best news and in-depth reviews, straight to your inbox.
-
you should try puppy linux on a usb stick, its not windows, but its got its benefits, its free, secure and we,, you'll might enjoy one of the fastest linnux distros aboutReply
-
follow above link, it works!!! only comment, in Step 3 it refers you to step 1, instead it should be referring you to Step 2 command prompt window. Also, there is no need to download their software, i haven't used it to create a boot key, just start with step 2 right away! Best of luck and Thanks for the link post!!!Reply
-
looking for a"FREE" Mini Windows XP ISO for install on a Mini Netbook with only 3Gb HD .. PLease AdviseReply
-
dvijaydev46 Have you tried SARDU? You can create a multi OS USD drive with that tool. It's not only limited to Wondows, but also can you add Linus, antiviruses and other troubleshooting tools.Reply -
dvijaydev46 Have you tried SARDU? You can create a multi OS USD drive with that tool. It's not only limited to Wondows, but also can you add Linus, antiviruses and other troubleshooting tools. http://mytechencounters.wordpress.com/2012/02/27/create-a-multi-bootable-usb-drive-with-linux-and-windows/Reply
-
gosim05 Step "Install Windows" the sentence "Open Windows Explorer and erase all files on the USB flash drive."Reply
DO NOT erase all files, leave BOOT.INI, NTLDR, and NTDETECT. Otherwise peinst.bat won't start the installation.
