Wandering Strands

While the blue wire got cleanly threaded through its metal strip for soldering, the same courtesy wasn't extended to the brown wire, which had a handful of strands snag on the hole’s jagged edge and crumple there.
Although a few strands may not make much of a difference, I’d still count that as a reason to aim for cleanliness. Threading wires through holes isn't rocket science. Twist and tin the wires first if you have to.
Article continues belowGround Strip

Here’s a ground strip style I hadn’t seen before. Instead of rectangular flaps or pinch fingers, we have flat springs with guide tabs that slot into channels along the prong wells to limit their travel. Curiously enough, the two side contacts have a dimple to improve their chances of making multiple contacts, while the middle one doesn’t.
How about the ground prong’s attachment? The hollow pin does not appear to protrude on the other side.
Weak Spot

Zooming in much closer, we can barely discern the hollow prong’s outline making it through the metal strip. Solder holds it by little more than the pin’s immediate perimeter. Was this meant to be an expansion crimp joint? It would still require enough of a lip through the metal strip to retain it. This doesn’t make sense.
With so little overlap between the two joined pieces, it is no wonder that some people in Amazon’s reviews have reported ground prongs ripping out of their units. This should have been welded, or at least visibly flared before soldering. Unfortunately, our findings get worse before they get better.
Contact Patch – Or Lack Thereof

Here, the ground prong would enter the socket from the frame's bottom, hit the contact strip's midsection, force it down, then slip over it. The horizontal parts that go out of frame are guides that hold the finger against the well’s wall so the prong cannot get under it.
Based on the cracked ground channel in the front cover and what looked like gouge marks on the exterior, I expected telltale friction marks up the middle of this contact finger. There are none, though. I did, however, find all three fingers with similar elliptical marks along the upward bend not present anywhere else.
Seeking Validation

I put the ground strip back in the shell and plugged a cord in to verify how much of a mark that would make.
My guess about where contact with the prong would happen was low by about one millimeter. It left behind a distinctly polished spot that definitively wasn’t there before. Conclusion? It is improbable that I received a returned unit. The origin of damage to the ground pin hole remains a mystery.
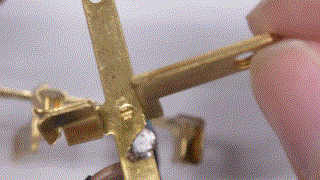
Neutral And Live Slugs

Here’s another angle of that jumper with crumpled strands. We also see heat-damaged insulation (darker brown) below the area that got scraped by the board due to solder wicking into the wire, rendering it too stiff to bend during (dis)assembly.
Can you guess how the live and neutral prongs (thick metal slug on the right) are attached to the metal strips from this angle? Since these are electrical and mechanical connections, they should ideally be welded or brazed...
Stake-On

The two main prongs of interest are attached to their respective contact strips using a single square stake, punched down the middle to expand and lock it in place. While this does a great job of ensuring that the slugs don't get left behind if the adapter is ripped from the wall outlet, a single point only eliminates three out of six degrees of freedom. It is locked in for the x, y, and z axes, but given any slack or force, it will still pitch, yaw, and roll by some amount. Movement from normal use will inevitably wear it down and work it loose.
A loose connection becomes a nuisance at best when it causes your devices to randomly lose power. However, it's a fire hazard at worst under non-trivial load.
Wiggle-Wiggle-Wiggle-Nope.
There's no party in Amazon’s house tonight; the CU23011W is not having such a good time. Stuff like this should make you lose your mind. Shake that.
How did this get through QC? We'll never know. But any Amazon customer receiving a unit with this issue would certainly ask for a refund after dealing with connected appliances and gadgets randomly losing power.
Would you trust this to pass 15A from the wall outlet to its three outlets? I certainly wouldn’t. Let’s stop shuffling.
Zero Degrees Of Freedom

Although soldering isn't ideal for mechanical joining, it is the only thing I have on-hand to work with. The stake bears all of the pulling and pushing (the dominant forces), while the solder needs to lock up the remaining degrees of freedom to prevent wear on the stake and guarantee electrical continuity. What sort of solder did I use? Tin-based/lead-free for its relatively high melting point and better mechanical strength than lead-based solder (Sn96.5Ag3Cu0.5 if you really want to know; that’s the only other alloy I have aside from Pb60Sn40).
With a solder joint securing both sides of each prong across the strips’ width, these aren’t going anywhere.
Board Bottom

What are the notable features on the circuit board’s bottom? There's an input fuse for the AC-DC converter, spark gaps and the input diode bridge in the bottom-right corner, a strange pad configuration where an SO-8 package straddles the D3 and D4 footprints in the bottom-left, and one of those SOT23-5 chips near a USB port's pins.
From a safety perspective, the two most significant components we can see are the L-shaped isolation slot and what is slotted into it.
Am I under-appreciating the fuse? Perhaps, though a sacrificial trace flanked by anti-tracking slots would be similarly effective.