How to Make a Full System Image Backup in Windows

Get Tom's Hardware's best news and in-depth reviews, straight to your inbox.
You are now subscribed
Your newsletter sign-up was successful
There are many ways to backup Windows, and some of those ways are better at certain things than they are at others. For many users – including yours truly – the best kind of backup is an image backup. Such a backup includes a copy of the Windows boot/system drive, including its various partitions. This captures the OS, your settings, your applications and your data files all at once. An image backup is saved inside a single file called an image, and may be of type .IMG, .WIM (Windows Image format), VHD(X) for Hyper-V virtual machines, or .ESD (a compressed Windows image file format optimized for Internet download), among others.
What’s in a Boot/System Image?
Like the answer to any good question, a listing of image file contents or constituents starts with “It depends.” The image backup only needs to capture the contents of what is called the C: or boot/system drive by default in Windows 10 and 11.
But for maximum utility and restore flexibility, an image backup will ideally include all of the partitions on the drive being backed up. A map of a typical modern C: drive appears in Figure 1, shot from within the Disk Management tool (diskmgmt.msc).
These three partitions appear in the same order on most newer Windows 10 and all Windows 11 installations. The EFI partition is where the boot loader and other device and OS installation capability resides. It’s what a PC reads first when it’s booting up and getting ready to run an operating system (most likely, Windows from this layout). The C: Volume partition is where Windows runs, and where all the OS, application, and related settings, preferences, and so forth reside. The Recovery Partition offers an alternate set of boot and OS files that can be used to start up and repair a damaged system/boot (C:) drive, restore a backup, and much, much more.
Older Windows 10 installation used to put the Recovery File between the EFI and the C: partitions. But recent changes to the Windows installer allow it to adjust the size of the C: partition. It can make that partition a little smaller to accommodate a larger Recovery partition from one Windows version or upgrade to the next. That way, the disk layout stays unaltered, instead of getting littered with additional new Recovery partitions as sometimes used to happen on Windows 10. Figure 2 shows what this can look like from my 2017 vintage Windows 10 production PC:
What Is a “Whole-Drive” Image Good For?
Imaging the entire boot/system drive means the whole contents of that drive can be wiped out, and restored from a backup. A whole drive image can also be turned into a virtual disk, or even a virtual machine. The Recovery Partition (3rd from left on Figure 1, 1st from left on Figure 2) provides an alternate boot environment for Windows based on Microsoft’s Windows Pre-installation Environment (WinPE) runtime used for the Windows installer and for other purposes.
The Windows Recovery Environment (WinRE, as you might expect) is a specialized runtime environment that boots a slimmed-down version of Windows. It supports command-line access via Command Prompt, and can incorporate a variety of Windows applications and repair tools – such as boot repair utilities, disk or driver scanners, partition managers, data recovery tools, anti-virus programs, update and install/uninstall utilities, and a whole lot more – to run against a damaged or inoperable Windows installation.
Get Tom's Hardware's best news and in-depth reviews, straight to your inbox.
The most basic and important use for a whole-drive image is to replace a balky, damaged or non-working Windows installation (and its supporting boot/system disk infrastructure) in one simple, relatively speedy operation. But there’s a lot more one can do with such images, including:
- Performing repair and recovery operations on a broken or questionable Windows installation. This usually involves booting to alternate media, and running rescue and repair from there. Thus most good image backup utilities include some kind of “rescue media” or “bootable recovery” capability. You’ll boot your PC to the alternate media, and then perform rescue or restore operations on the primary but wonky version of Windows you want to fix (or replace). The same approach also works to support a so-called “clean install” of Windows which involves wiping the existing boot/system disk, repartitioning and reformatting, and then creating an entirely new (“clean”) Windows boot\system drive partition structure and contents.
- Mount an image as a virtual drive or even as a virtual machine (VM). Many good image backup utilities will let you mount an image backup in the form of one or more virtual drives (one for each disk partition in the image). This lets you open and navigate the contents of the backup as if it were another Windows drive, or run the image as just another Windows VM to explore, work on, or retrieve some or all of its contents.
- “Bare metal restore” means you can take an image backup and restore it onto a PC that has no OS currently installed. This is a way to take a formerly running installation from a PC that’s no longer usable or available, and get it running on a different PC. This can be a lifesaver when a downed or damaged PC can be used, but its image backup can still be installed and run on another machine.
Image Backup and Image Restore
Creating an image backup essentially means making a snapshot of each partition on the boot/system drive, then recording that snapshot in some heavily compressed (and possibly even encrypted) format on a storage device of some kind. Modern image backup tools are fast and efficient and can work with speedy external media.
Choosing the Right Backup Target
For maximum portability, it’s most sensible to use an external storage device for backups. Then, even if your PC becomes completely unusable, you can simply detach the external backup device and restore your chosen image to another PC. In fact, I strongly recommend using an NVMe SSD enclosure that is USB4 or Thunderbolt 4 capable of housing a PCIe x3 (or better) SSD of at least 512GB capacity as your backup device (see our list of best SSD enclosures).
Why do this? Because such a device is at least 100X faster than a flash drive, 40X faster than a hard disk, and between 20 and 30X faster than older SSDs (e.g. M.2 flash drives). I routinely create backups of my test Windows PCs in under 4 minutes on such devices; restoring such backups takes a little longer (5-6 minutes; uncompressed backup size 6-10 GB). Backing up even my storage-laden production PC, from which I make a daily 60-plus GB backup image that includes two data drives as well as my system/boot drive, takes less than 20 minutes to back up (5 minutes longer to restore, give or take).
Using Rescue Media to Restore
Most capable image backup utilities (see next section) include file-by-file restore capabilities. Use these to restore accidentally deleted or damaged files. An image restore is something you’ll do when a drive has been damaged, corrupted, or when OS or application changes make it easier and less time-consuming to start afresh from your latest image backup rather than trying to fix what’s wrong. As a case in point, I tried a Windows filesystem experiment with changing ownership on certain protected OS files last month. After spending 15-20 minutes trying unsuccessfully to bind my self-inflicted wounds, I simply restored that morning’s backup and left that mess behind me.
To perform an image restore on the boot/system drive, you must boot to alternate media. From there, you’ll run a utility that finds your chosen backup image, then copies onto the target storage device of your choosing. Again: this completely wipes out the existing contents, and creates a new set of partitions on the target drive using the snapshots in the image backup for each partition that needs to be restored. Hopefully the reason for alternate media is clear: you can’t replace an OS and supporting infrastructure on a drive while using the OS and its services from that same drive. It just doesn’t work!
Choosing a Suitable Image Backup Solution
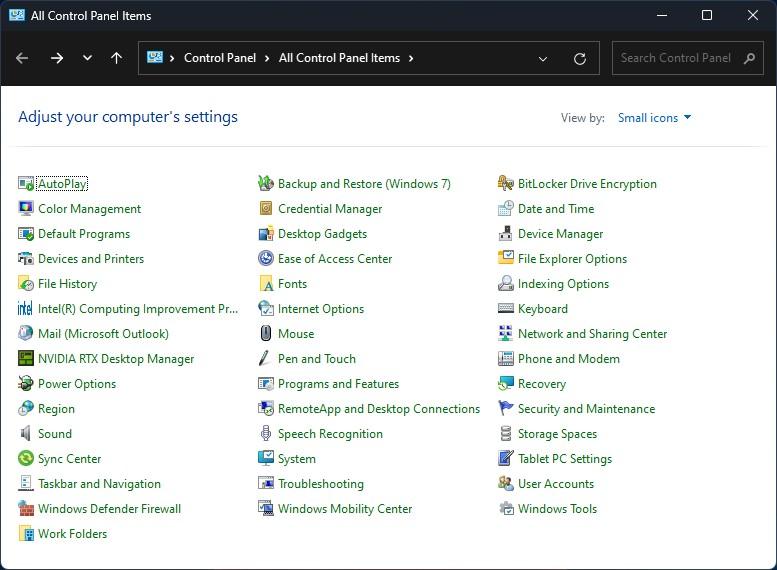
There are dozens of software packages that can perform Windows image backups on either Windows 10 or 11 currently available. Neither I – nor Microsoft, for that matter – recommends the old tool that persists in the Control Panel under the name “Backup and Restore (Windows 7)” as shown in Figure 3.
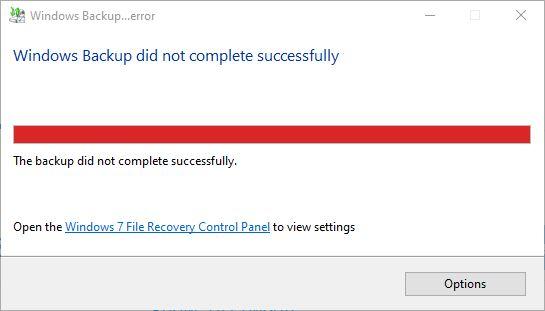
On the Microsoft.Answers pages, an October 22 post reads as follows: “Windows 7 Backup is only included in Windows 10 and 11 to transfer files over from Windows 7. It is way too old to work reliably for regular backup.” It’s much smarter and less risky to use a more modern backup/restore tool for Windows 10 or 11 instead. And indeed, when I tried to back up a Windows 10 system using this tool just now, it failed to create a successful backup, as shown in Figure 4 (it didn’t run to completion, or completed with skipped files, on a couple of Windows 11 laptops, either). It ran for upwards of 2.5 hours (157 minutes) before throwing this error message, too. For best results, please don’t use this tool. Try one of those mentioned in the next section instead.
Table of Potential Candidates
The table below shows a list of leading Windows backup tools that regularly show up in “best of” lists across a wide range of sources. I’ll use that table to compare and contrast their capabilities and limitations across some important features already discussed. For a truly exhaustive list of such tools see the June 2023 Lifewire story “32 Best Free Backup Software Tools.”
| · | EasUS Todo Backup |
| Free version available | Yes |
| Mount backup image as drive or VM | Yes (drive) VM (No) |
| Build rescue media | Yes |
| File&folder backup | Yes |
| Image backup | Yes |
| Free version link | https://www.easeus.com/backup-software/tb-free.html |
| · | AOMEI Backupper Standard |
| Free version available | Yes |
| Mount backup image as drive or VM | No |
| Build rescue media | Yes |
| File&folder backup | Yes |
| Image backup | Yes |
| Free version link | https://www.aomeitech.com/llyy/download/aomei-backupper.html |
| · | DriveImage XML |
| Free version available | Yes |
| Mount backup image as drive or VM | No |
| Build rescue media | No, but works with Standard WindowsPE |
| File&folder backup | Yes |
| Image backup | Yes |
| Free version link | https://www.runtime.org/driveimage-xml.htm |
| · | MiniTool ShadowMaker |
| Free version available | Yes |
| Mount backup image as drive or VM | Drive (Yes) VM (No) |
| Build rescue media | Yes |
| File&folder backup | Yes |
| Image backup | Yes |
| Free version link | https://www.minitool.com/backup/system-backup.html |
| · | Redo Rescue |
| Free version available | Yes |
| Mount backup image as drive or VM | No |
| Build rescue media | Yes |
| File&folder backup | Yes |
| Image backup | Yes |
| Free version link | http://redorescue.com/ |
| · | Macrium Reflect Free (Free version goes off-market on January 1, 2024) |
| Free version available | Yes |
| Mount backup image as drive or VM | Yes |
| Build rescue media | Yes |
| File&folder backup | Yes |
| Image backup | Yes |
| Free version link | https://www.macrium.com/reflectfree |
As a long-time user of Macrium Reflect, it is the package I use to back up my production systems daily, and both test and family member PCs weekly. I routinely see data rates upwards of 2 GBps when backing up to or restoring from USB 3.2 or Thunderbolt 4 NVMe SSD enclosures, and the source of the timing information earlier in this story. I have tried all of the aforementioned packages, and will be settling on one of the others (probably AOMEI Backupper or MiniTool ShadowMaker) after Reflect ceases support for its free version on the last day of 2023. In the past three years, Macrium Reflect restores have allowed me to recover from the following potential catastrophes with minimal disruption and loss of time and productivity:
- A botched experiment in taking ownership of files in the C:\Windows\System32 file hierarchy
- Failure of an older data drive (a 1TB Seagate 2.5” HDD purchased in 2011)
- Boot configuration data (BCD) damage or loss that rendered 3 systems unbootable
- Recovery of up to half-a-dozen Windows Insider Windows 10 and 11 preview installs that experienced driver difficulties during or immediately after installation
Access to a known good working image backup with proven tools, skills and knowledge to restore systems to working condition is a key capability that lets me stay comfortable as a Windows Insider MVP. I download, install, and experiment with Insider Previews across all channels (Canary, Dev, Beta and Release Preview) whenever they’re released. I’ve not yet encountered a situation from which I couldn’t recover, though I have had to resort to restoring a previous release image, then skipping one or more interim releases, to keep some of those test systems running.
One Last But Vital Backup/Restore Trick
If you restore any image backup to a PC, you will lose access to any new files or changed settings, preferences, registry tweaks, app or application installs, and so forth, that occurred after the backup was made. But image backup offers a possible band-aid to address this. If you’re going to restore an image backup to a still functioning system, you can capture an image backup of the current image before restoring your last backed up one.
Most image backup packages will let you mount an image as a virtual drive. That means when you restore the old image, you can mount the new one to copy (or document) changes that occurred after the old image was captured. That should prevent loss of data files (for me that means documents, spreadsheets, and so forth) at a minimum. As long as you can grab a file, create a registry snapshot (.reg file), or otherwise capture settings and preferences, you can get them from the soon-to-be abandoned installation back into the known good working image that will carry you forward. Don’t forget!
Ed Tittel is a long-time IT writer, researcher and consultant, and occasional contributor to Tom’s Hardware. A Windows Insider MVP since 2018, he likes to cover OS-related driver, troubleshooting, and security topics.
-
rumplestilts ...or you just buy Casper from fssdev and it gets done with 99% less effort. You also get a bootable USB clone which may be cloned back to a differently sized HD. Yes, it works perfectly. Worth every penny.Reply -
GeorgeRen I use Macrium's Rapid Delta Clone for this. Never heard of Casper.Reply
There is no guarantee that the clone will boot with USB even if Windows to Go is applied when using Macrium. I will test Casper to see if it is more reliable than Macrium at booting a cloned copy. -
USAFRet Reply
I tried Casper.rumplestilts said:...or you just buy Casper from fssdev and it gets done with 99% less effort. You also get a bootable USB clone which may be cloned back to a differently sized HD. Yes, it works perfectly. Worth every penny.
Gave it up in favor of Macrium Reflect, which actualy worked.
I could never get Casper to adhere to the schedule I set. -
newtechldtech in old times we had hardware one to one cloning machines for hdd without the need for any pc or even OS... I wonder if such machine is available for M2 SSDReply -
USAFRet Reply
Why would we need one?newtechldtech said:in old times we had hardware one to one cloning machines for hdd without the need for any pc or even OS... I wonder if such machine is available for M2 SSD -
newtechldtech ReplyUSAFRet said:Why would we need one?
is great for PC builders of the same hardware , and for people who dont know how to use cloning software right. cloning software is not dummy proof . -
USAFRet Reply
I imagine the market for such a device is tiny.newtechldtech said:is great for PC builders of the same hardware , and for people who dont know how to use cloning software right. cloning software is not dummy proof .
For SATA drives, they exist. NVMe, not yet. -
kscott45 Reply
Just be aware that if you buy EaseUs (the free version won't do a clone) that when it does not work properly (It did not for me) then you will have to fight tooth and nail to get the "30 day money back guarantee" honored. I am on my third attempt and if it fails then I will have to contact my credit card company and protest the charge.Admin said:Make a disk image file that can give you a perfect restore or even mount as its own drive in Windows.
How to Make a Full System Image Backup in Windows : Read more -
dheijl Should Veeam Agent for Windows free not be included in that list of image backup tools?Reply


