How to Save Space on Windows 11
Reclaim some of the storage on your Windows 11 device by following these steps.
Storage is more affordable than ever, at least when it’s not at the center of the latest cryptocurrency sensation, but that doesn’t mean all those bits and bytes need to go to waste. There are several ways to maximize your storage in Windows 11: Removing unnecessary files, disabling the Hibernate feature, and reclaiming some space from the operating system itself.
None of these methods are without drawbacks. The easiest to manage are the ones associated with removing unnecessary files. Most of the time it’s easy to get these documents, photos, and other files back onto your device via an external drive or a cloud-based service. This only becomes a problem if you lose access to that drive or service when you need them most.
Disabling the Hibernate feature can have a more profound impact on your day-to-day experience of using Windows 11, though, and reclaiming the so-called “reserved storage” from the operating system can lead to more serious problems than a few seemingly wasted gigabytes of storage. But as long as you’re aware of the risks going in, the features can be nixed to maximize space.
By far the most straightforward way to maximize your storage on Windows 11 (and Windows 10) is to remove unnecessary files. This can include everything from large files you don’t need anymore, such as a video you downloaded from YouTube in 2017 that you haven’t watched since, well, 2017, to a variety of temporary files automatically created by the apps you use. Here’s how to remove some of these files so you can make room for new ones.
How to remove unnecessary apps and files in Windows 11
If you know you are no longer using an application, removing it will save some space.
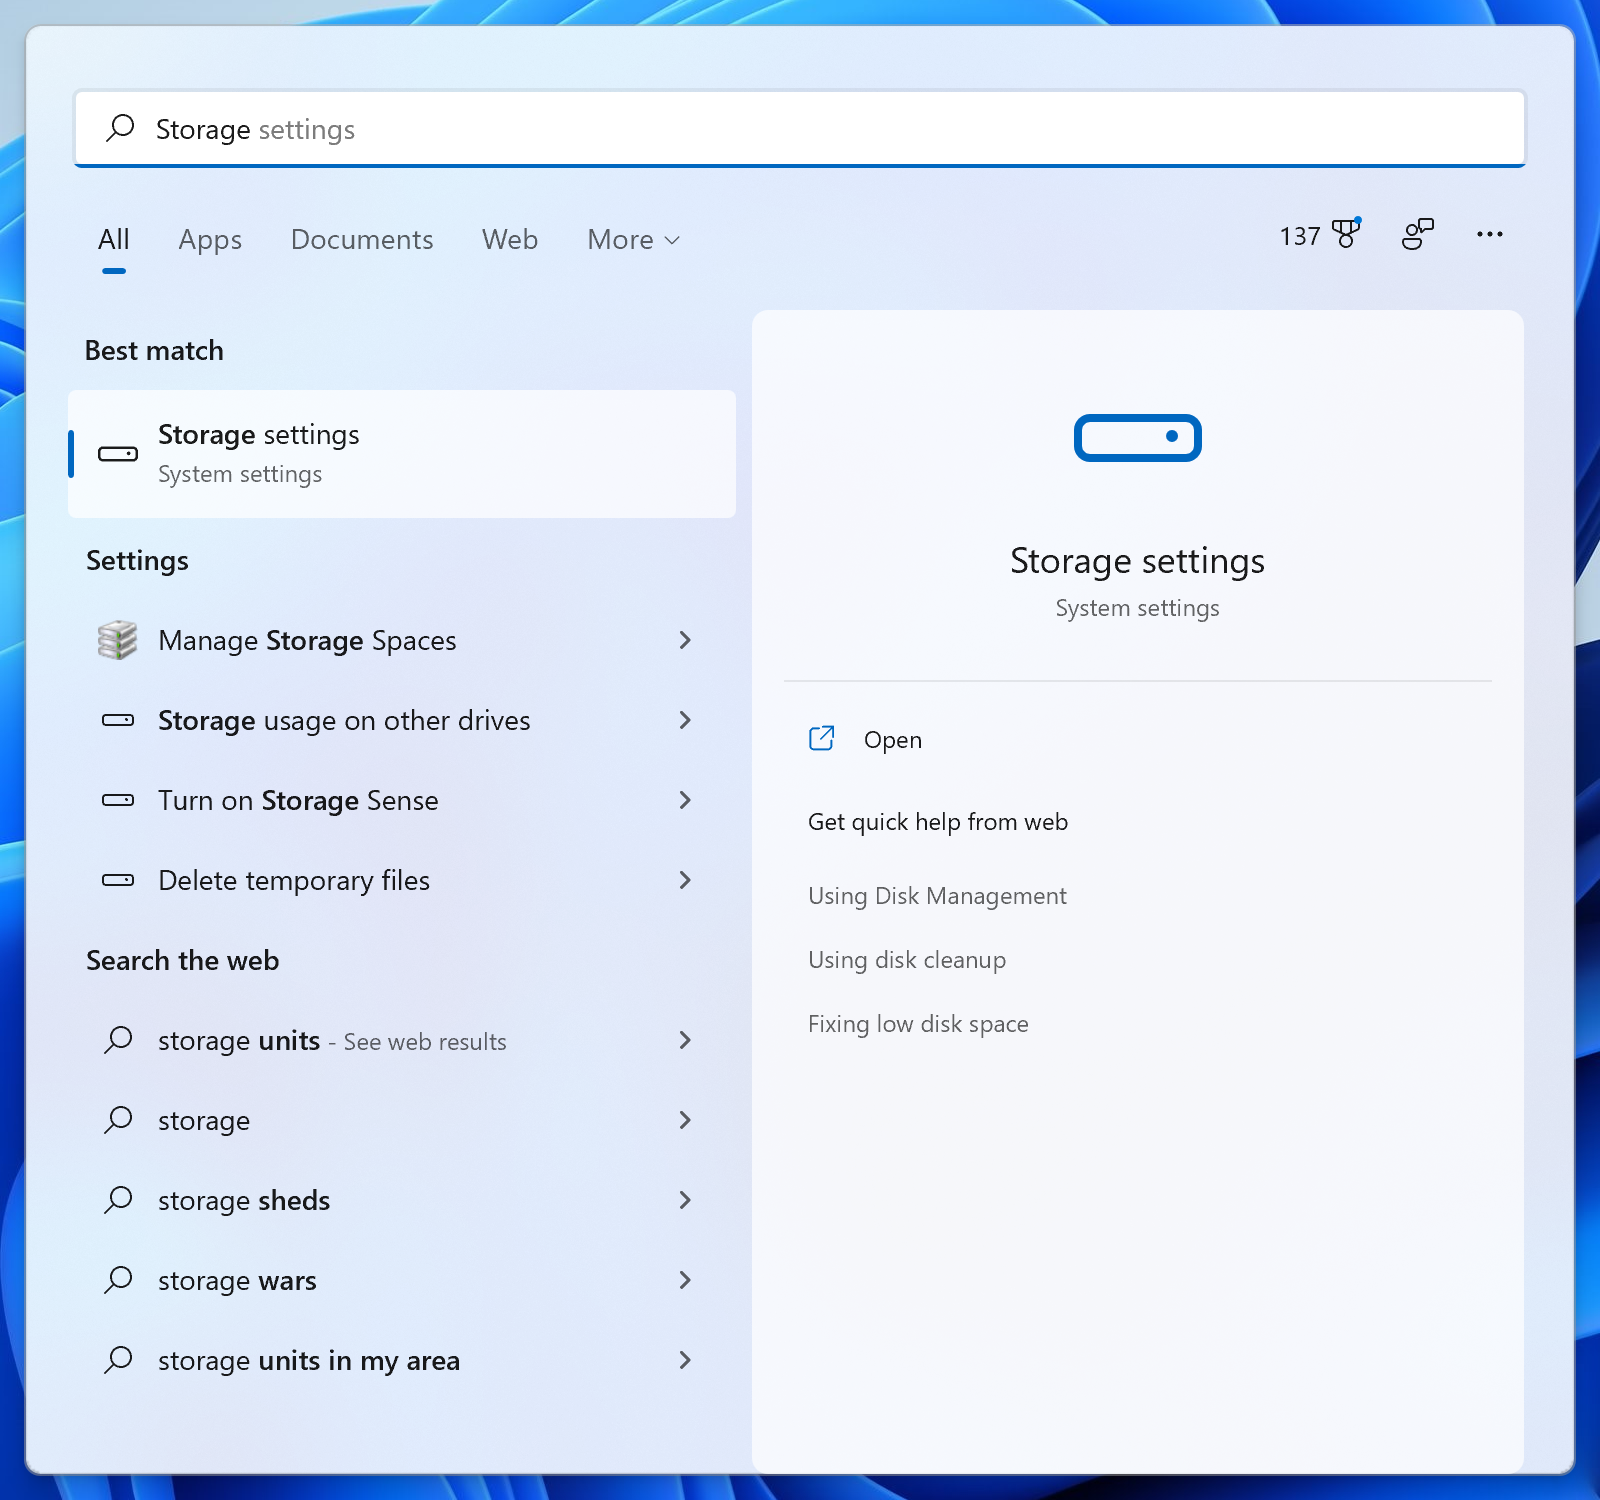
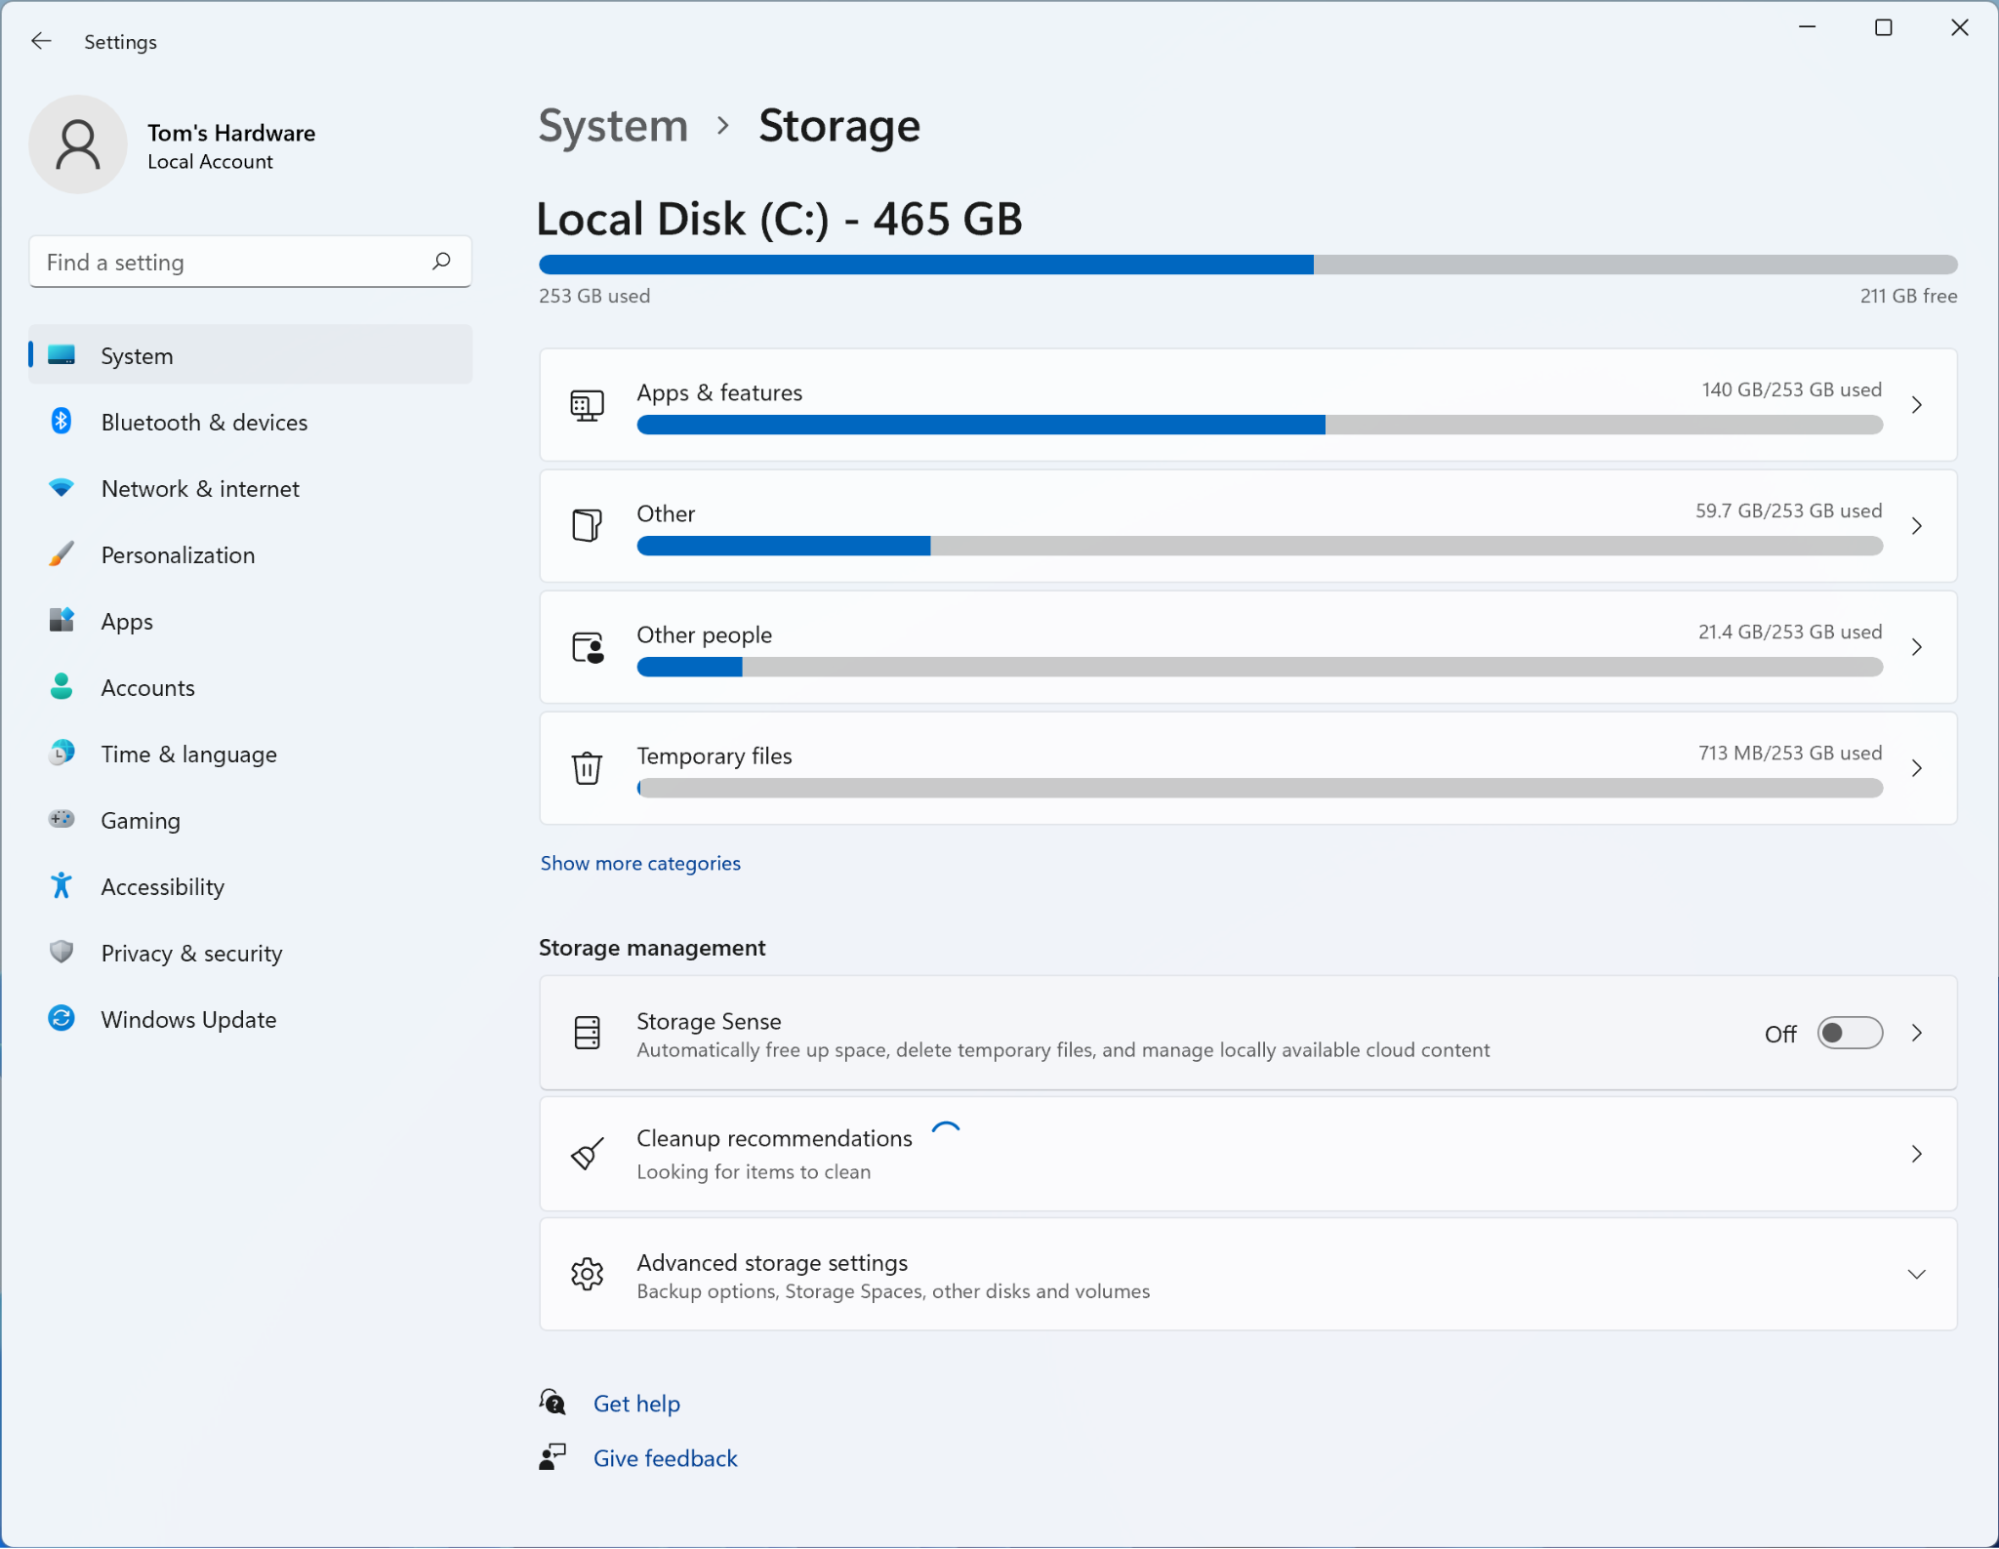
1. Navigate to the Storage page in the Settings app. The quickest way to do this is to open the Start menu, search for “Storage” and choose “Storage settings,” but you can also launch the Settings app, select the “System” page in the sidebar and then click “Storage” from that page.
2. Click one of the categories at the top of the page. Most of the storage on our system is devoted to the “Apps & features” category, for example, but there’s also a significant amount devoted to “Other.” Select the category you’re most concerned about; we’ll look at some apps and features we can remove to free up space on our test system.
Get Tom's Hardware's best news and in-depth reviews, straight to your inbox.
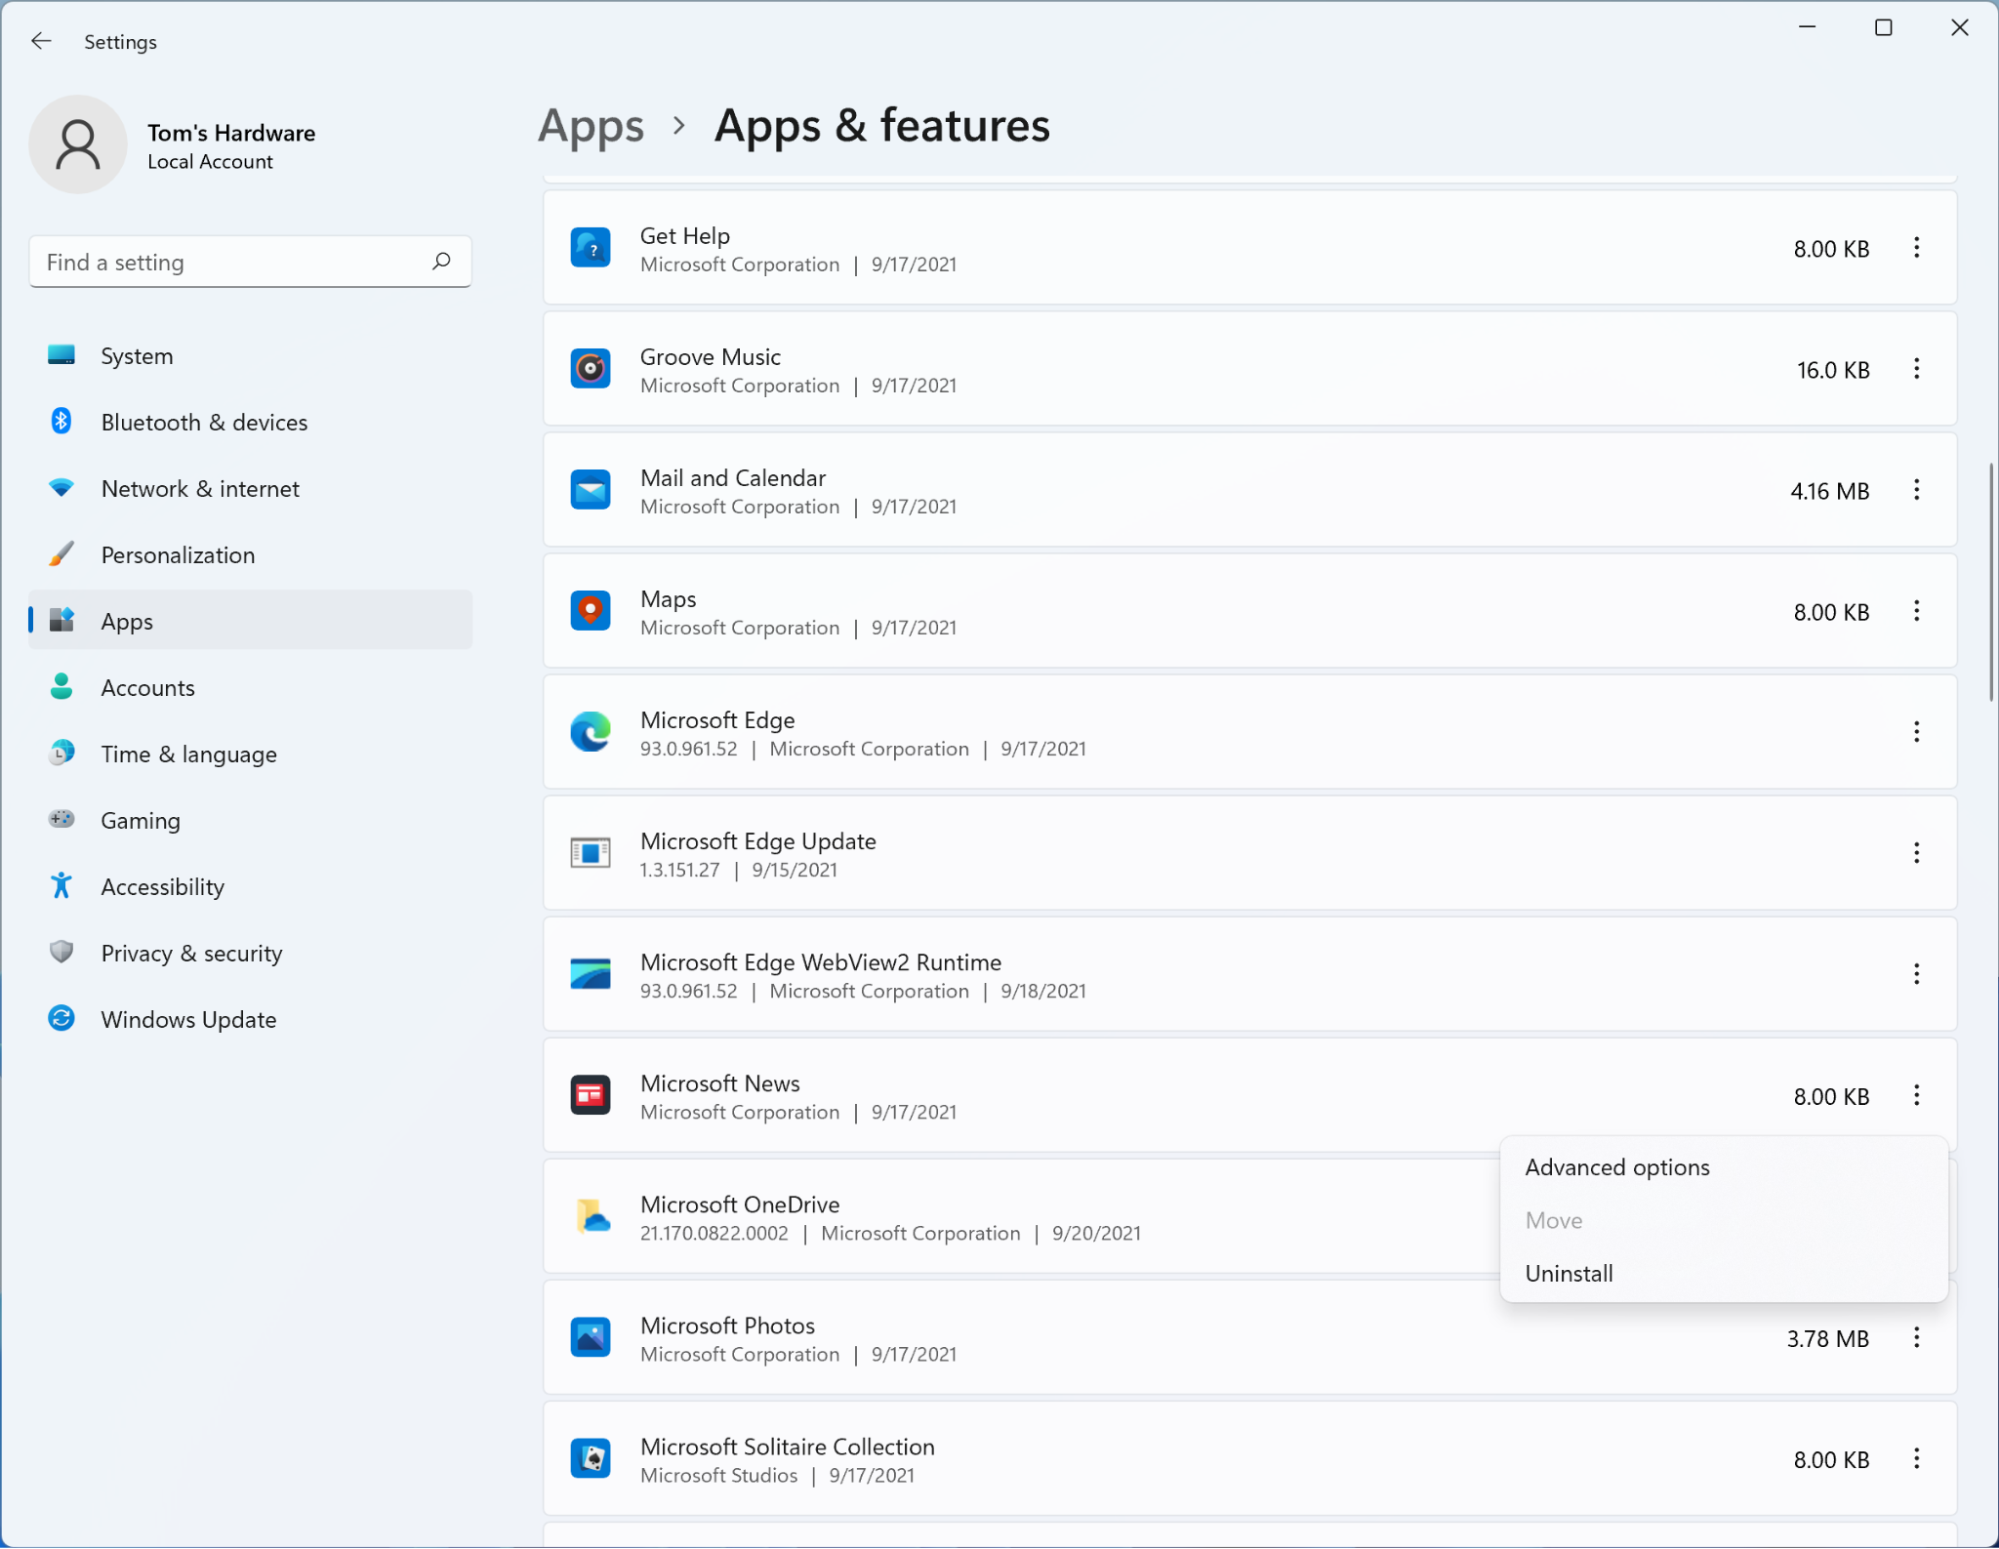
3. Click the app you’d like to remove, then click ‘Uninstall.’ This will automatically remove the app from your system if it’s a first-party app or start the uninstallation process if it’s third-party software. Windows 11 already devotes minimal storage to apps that were pre-installed on previous versions of the operating system, but if you have more space-hungry apps that you aren’t using, this is a quick way to reclaim a bit of storage.
Archiving apps automatically in Windows 11
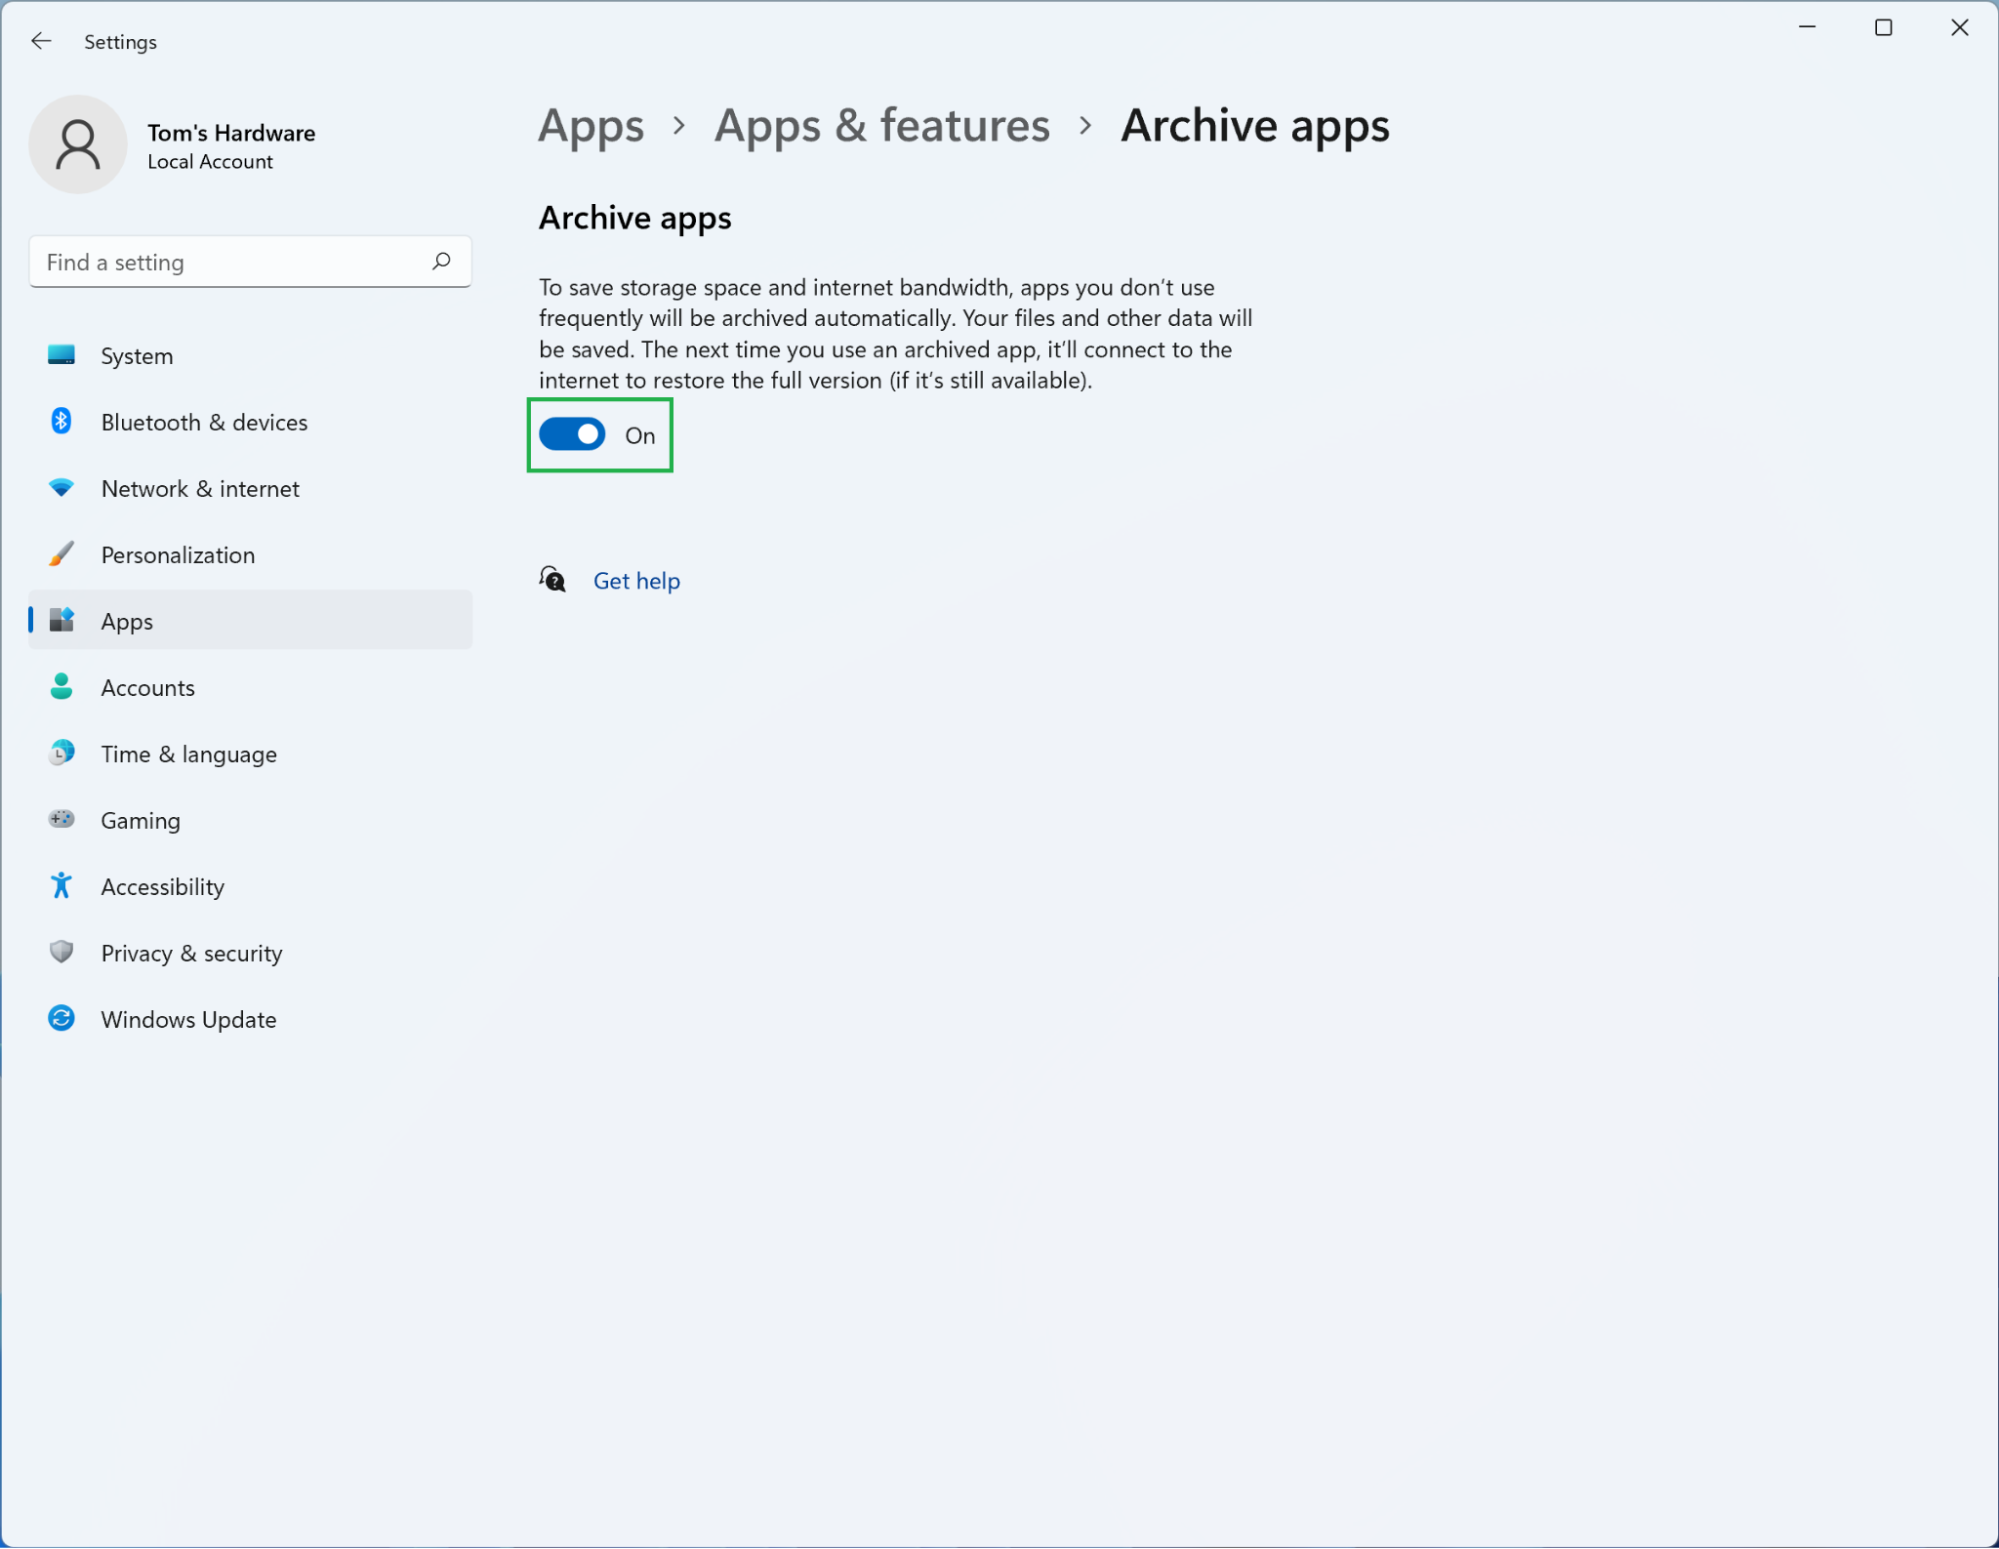
Windows 11 can automatically “archive” apps you don’t use very often to reduce the amount of storage (and network bandwidth) devoted to them. If you’re comfortable letting the OS decide, here’s how to enable this feature.
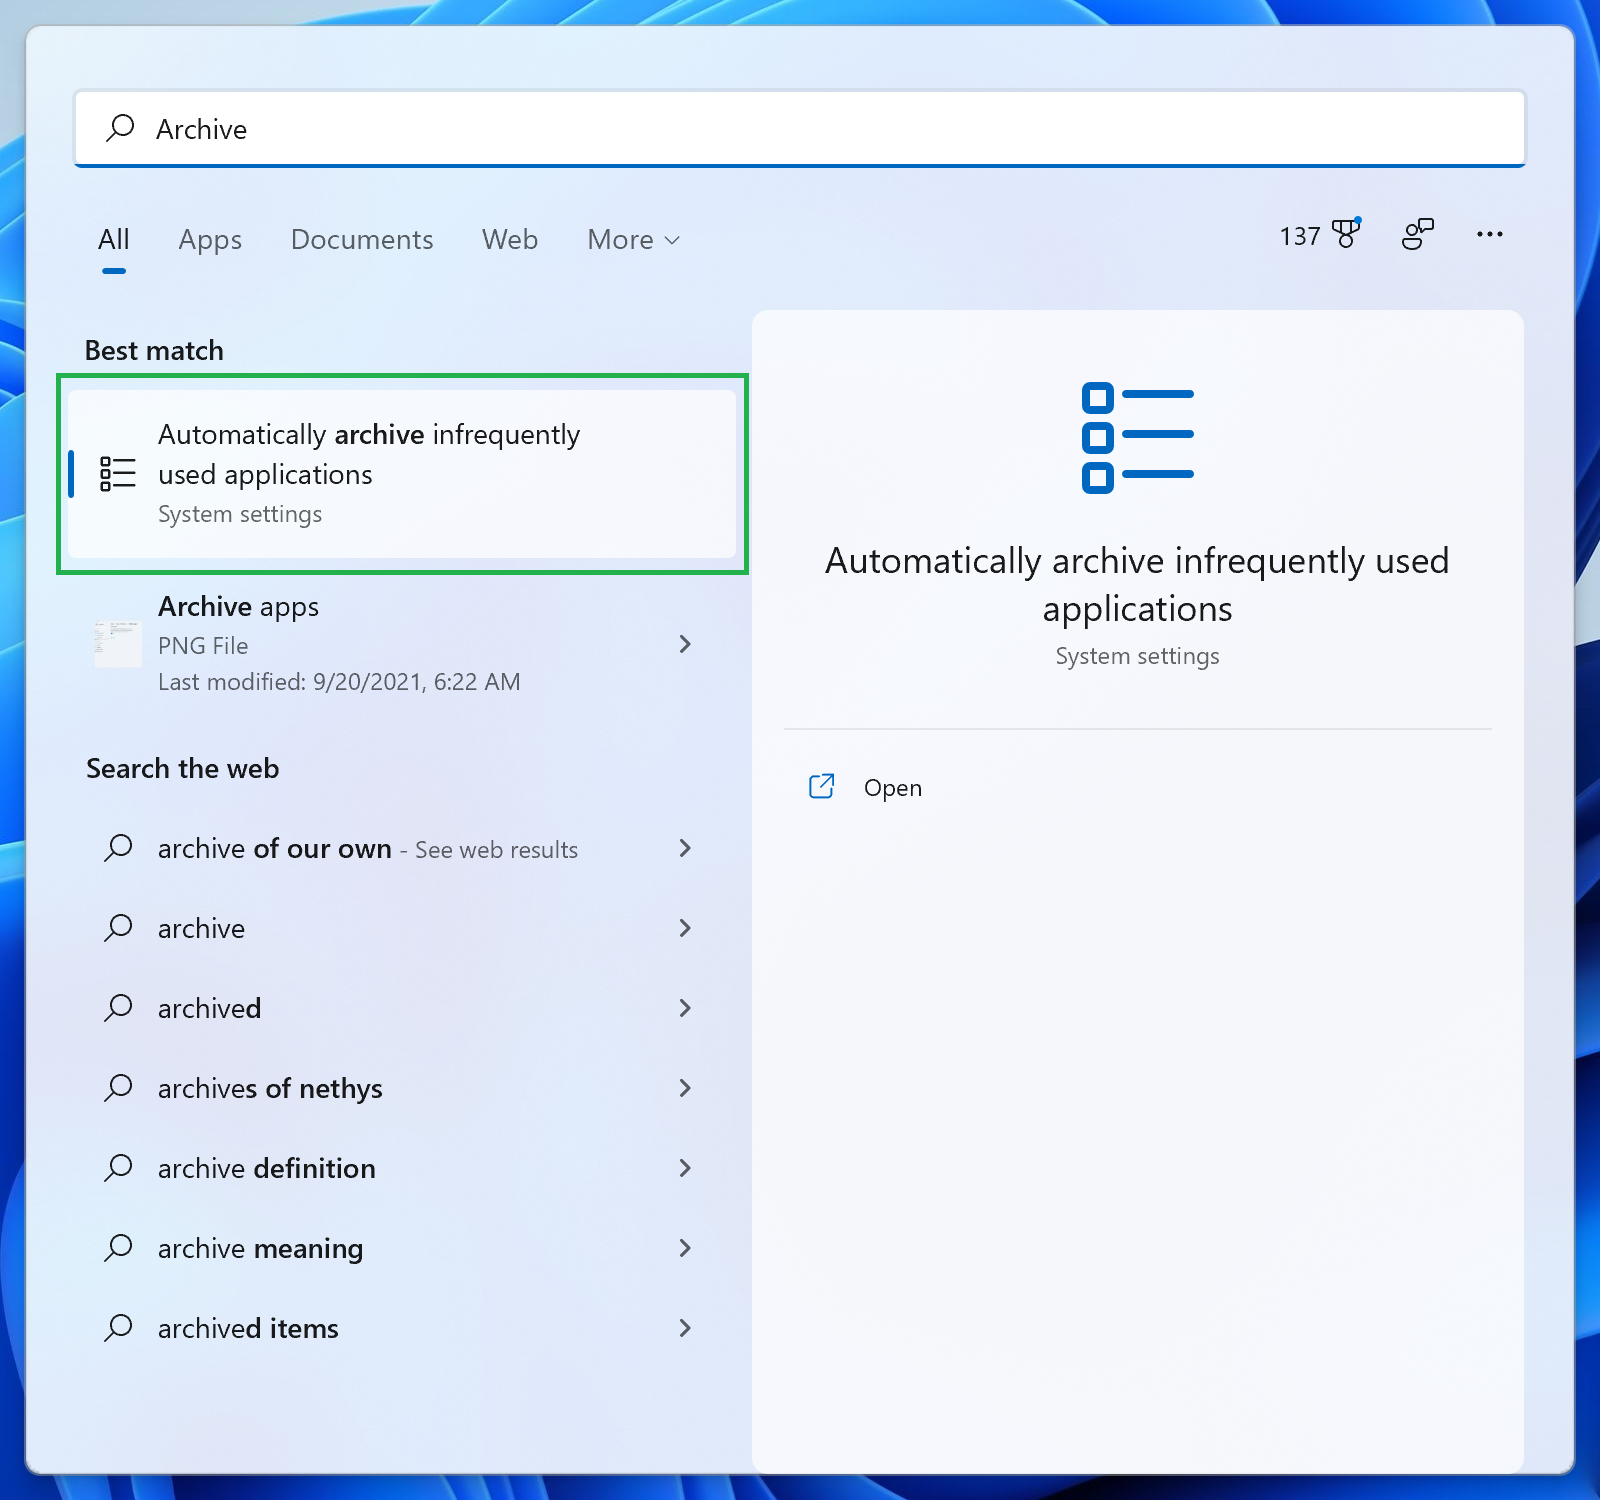
1. Search for archive in Windows search and click “Automatically archive infrequently used applications.”
2. Toggle the feature to on.
How to enable Storage Sense on Windows 11
On the most basic level, Storage Sense can automatically remove temporary files generated by various apps as well as Windows 11 itself. But it can also be set to remove some of your files, namely those languishing in the Recycle Bin or sitting unused in the Downloads folder, if you’d like, which can make it an easy way to maximize disk space.
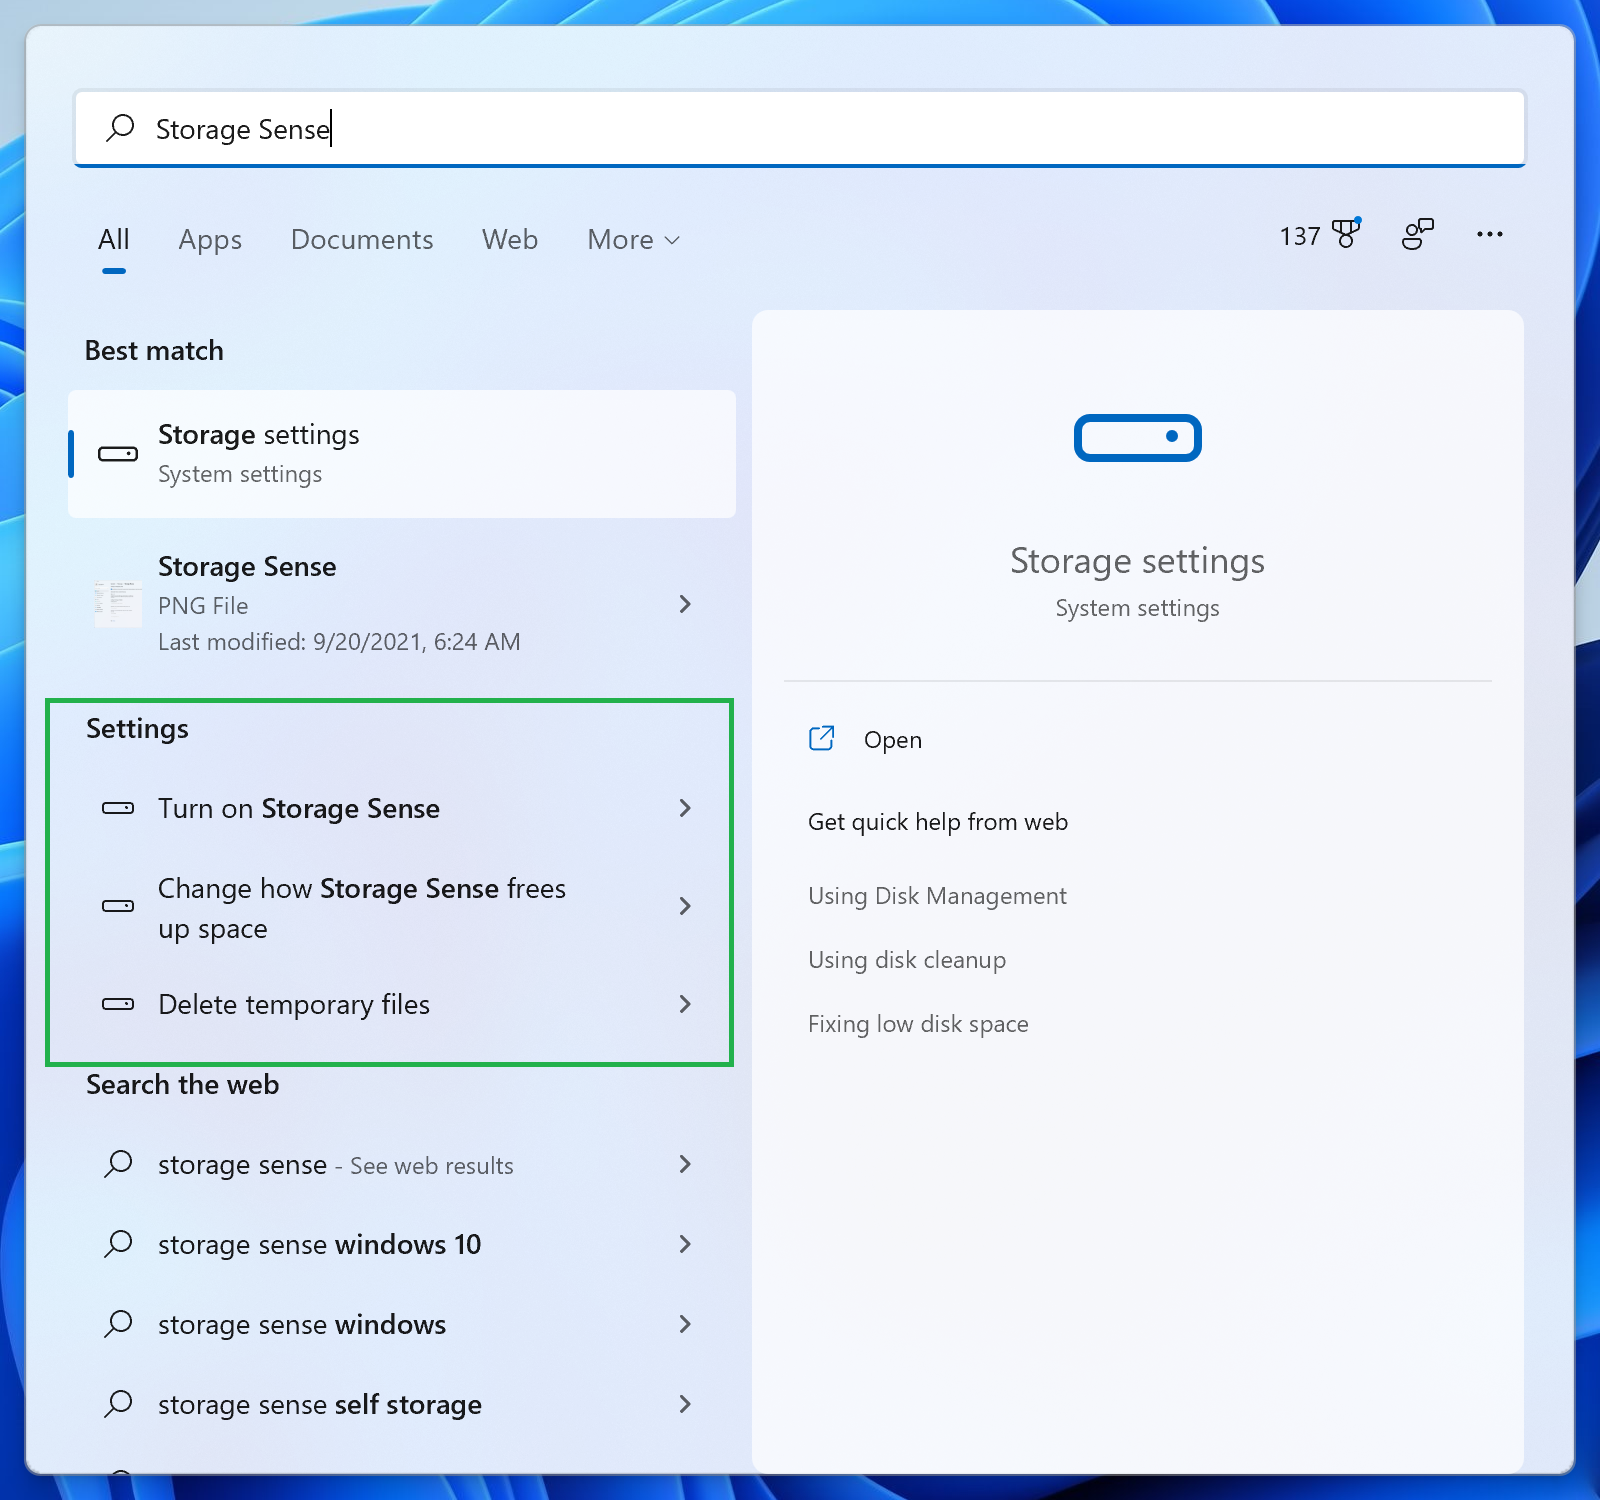
1. Search for ‘Storage Sense’ from the Start menu. There should be two options under the “Settings” header within the results: “Turn on Storage Sense” or “Change how Storage Sense frees up space.” You can select either one.
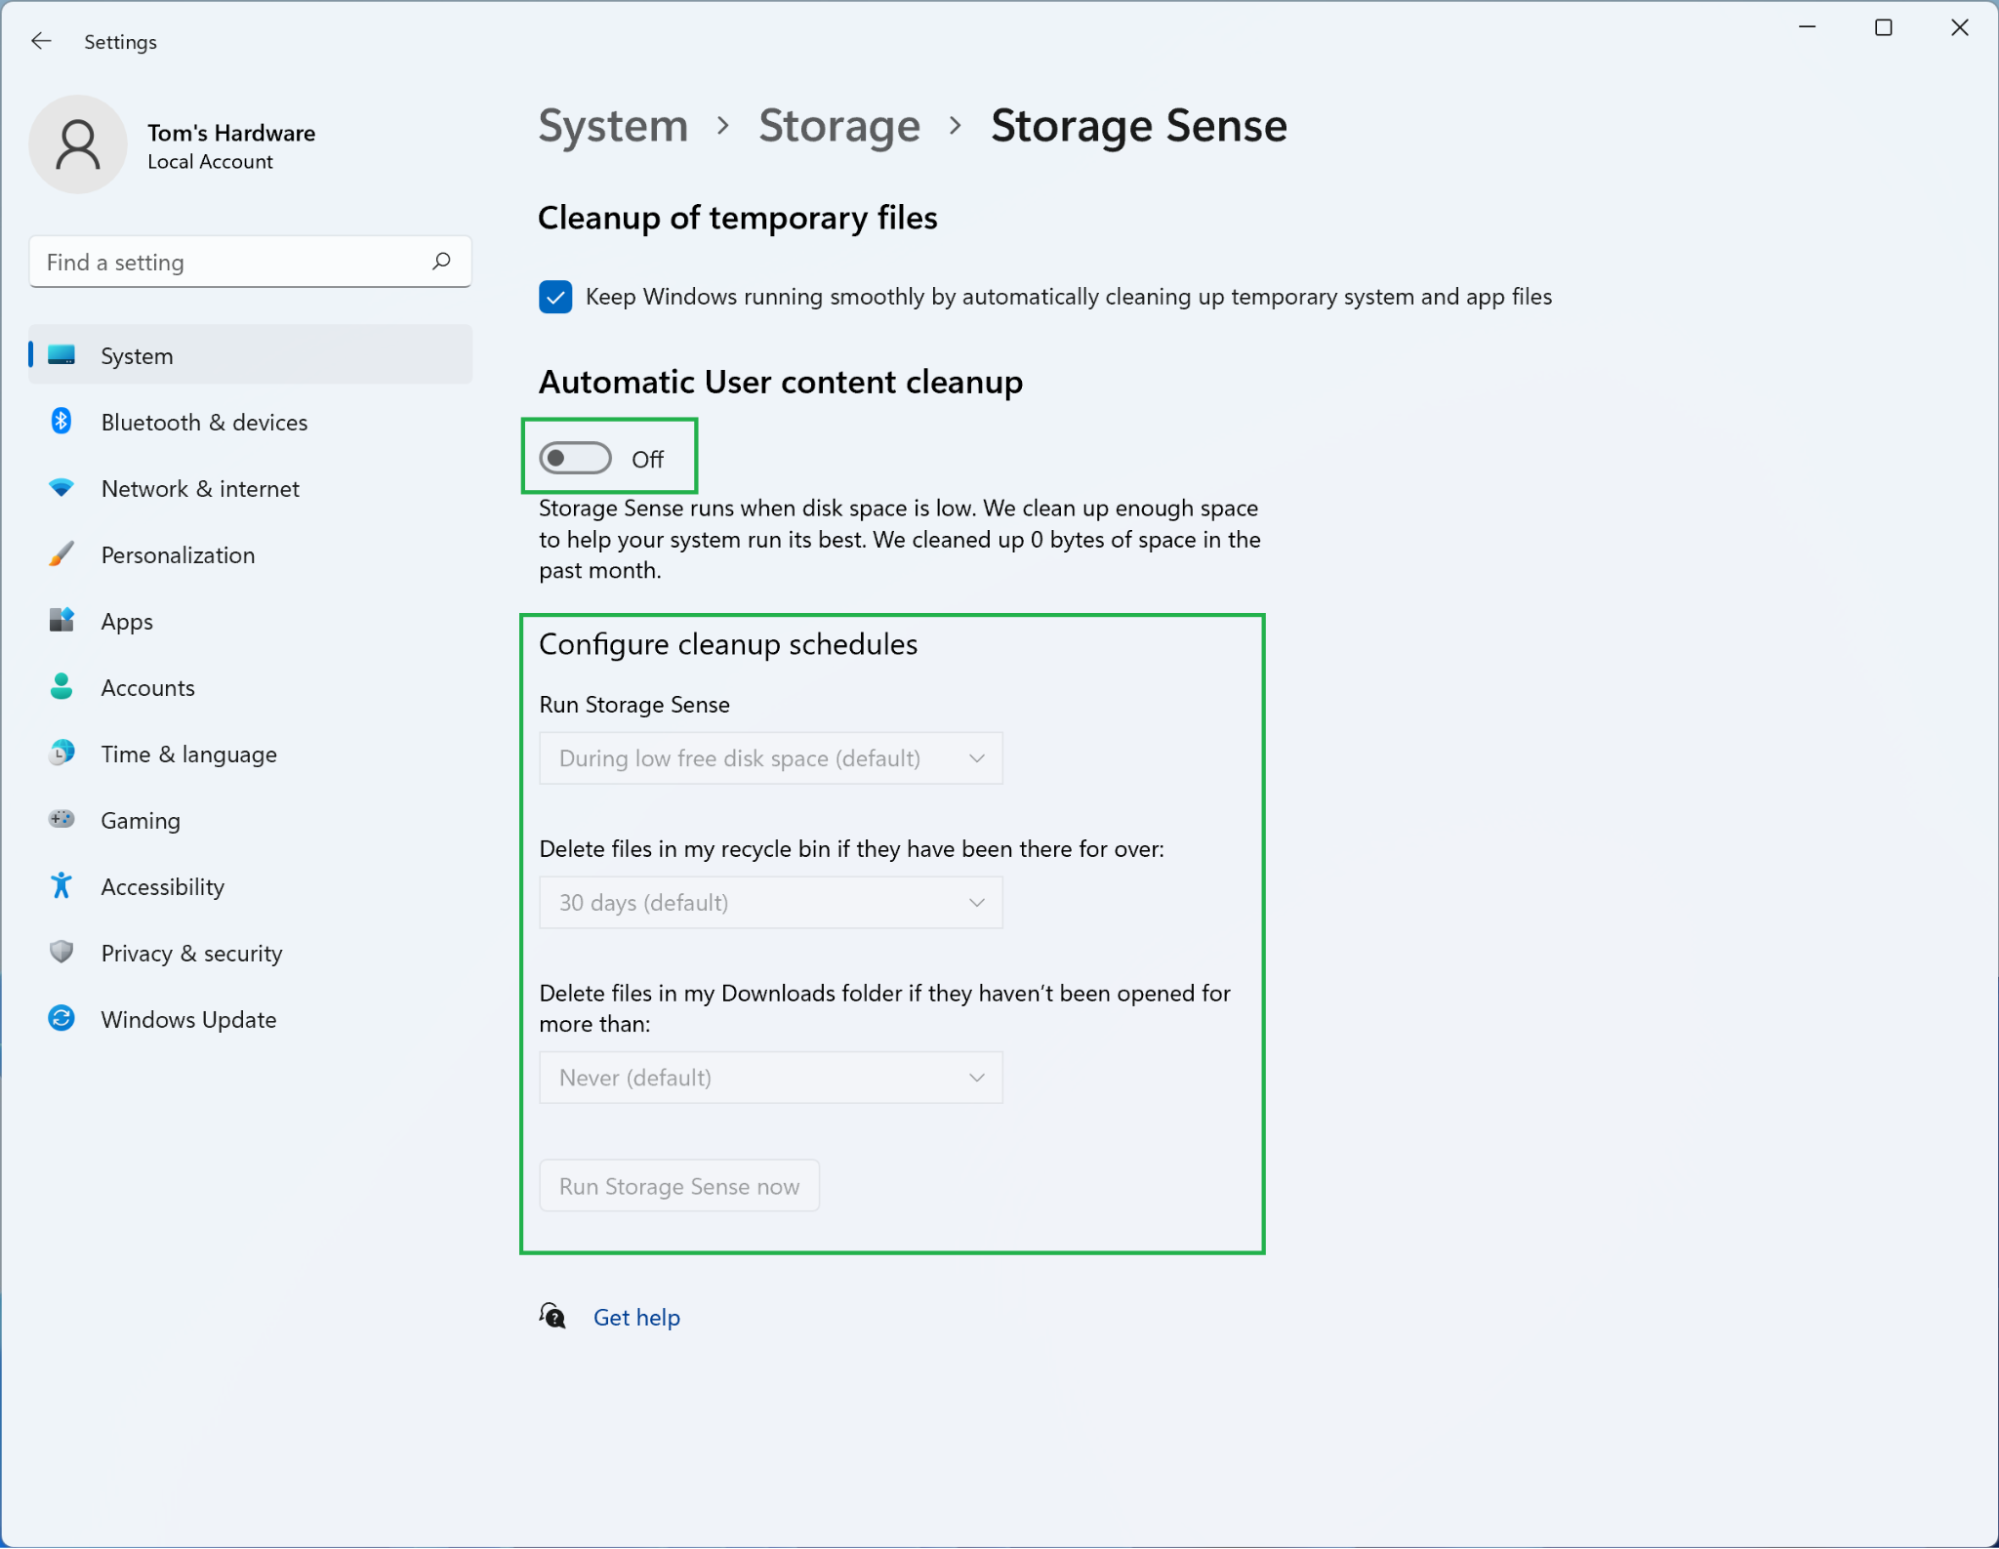
2. Enable and configure Storage Sense. Clicking one of those results leads to the Storage Sense page in the Settings app, which offers a variety of configuration options. You can enable or disable the automatic cleanup of temporary files, decide if the feature can manage User settings, and set the schedule on which Storage Sense operates, among other things.
How to use Disk Cleanup on Windows 11
Disk Cleanup is devoted to removing unnecessary files from your system. It’s a straightforward utility that can quickly delete the relevant data with a few clicks; the trick is knowing it exists in the first place. Here’s how to use this alternative to Storage Sense and the Settings app writ large.
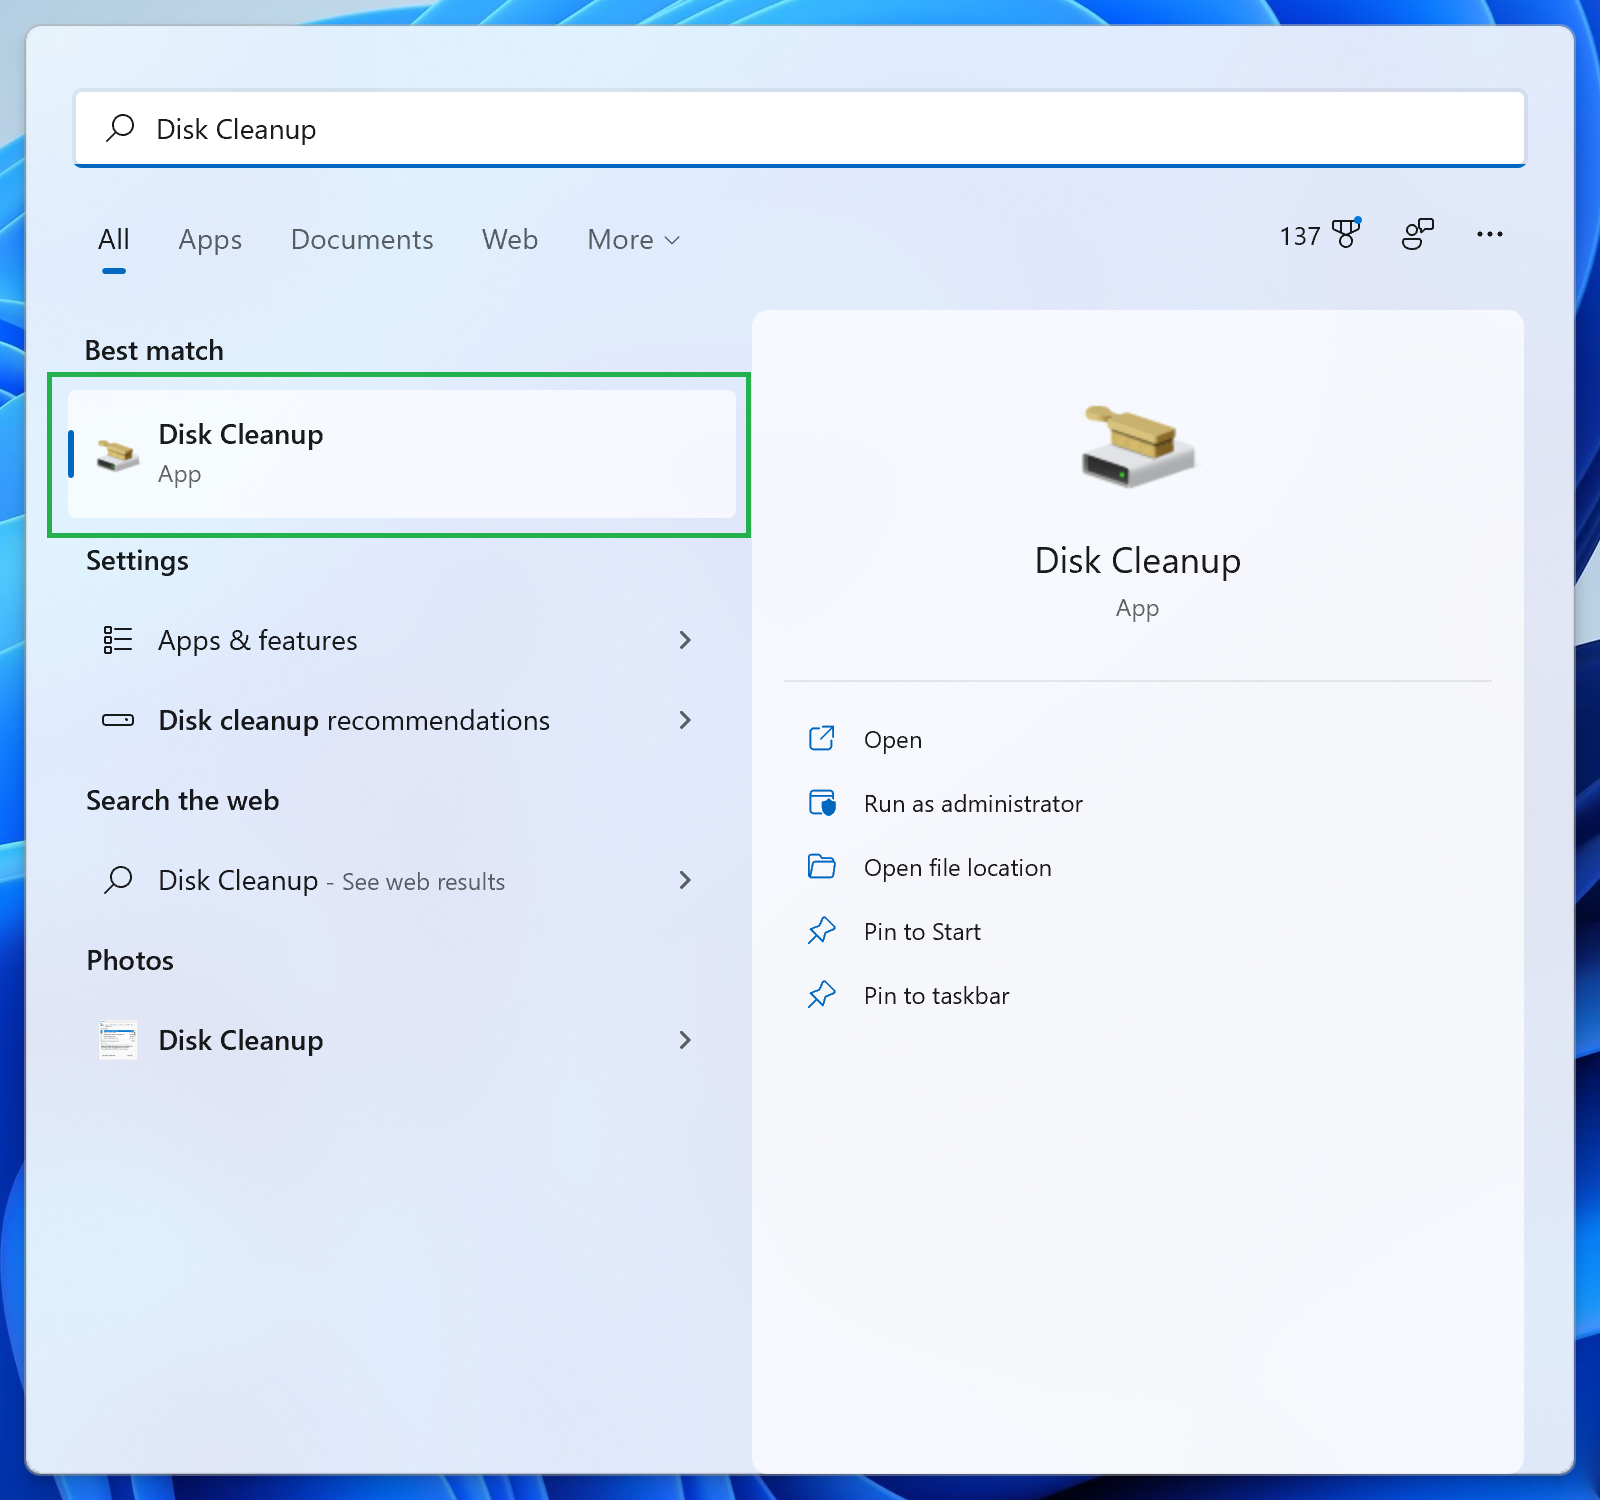
1. Search for ‘Disk Cleanup’ from the Start menu. This is the quickest way to launch Disk Cleanup; all you have to do is select the app from the search results.
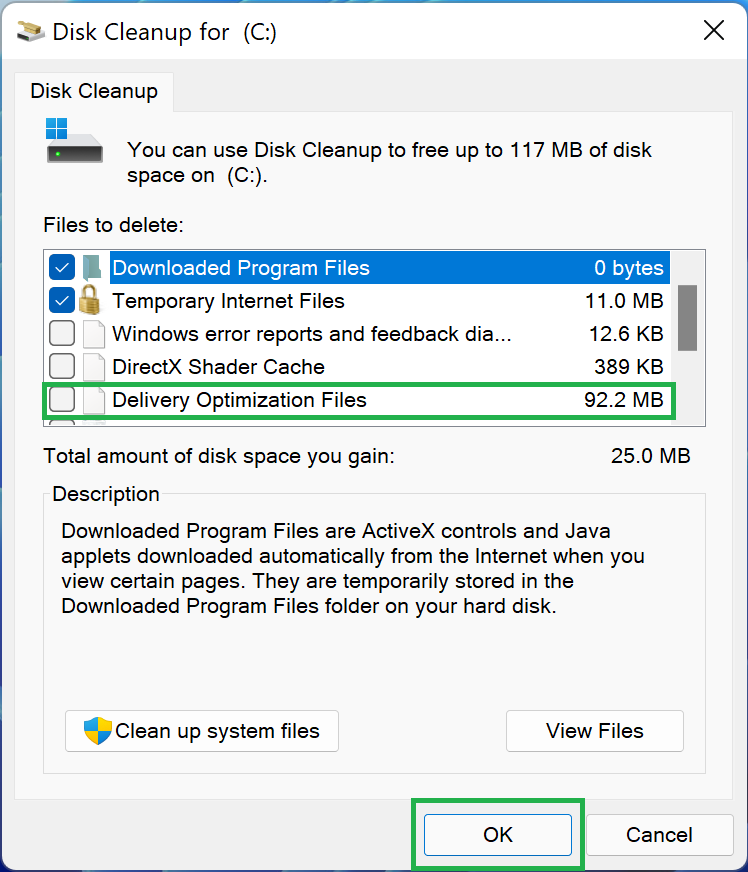
2. Choose what kinds of files you’d like to delete. Disk Cleanup can be used to remove a variety of file types from the system, ranging from Downloaded Program Files to the Recycle Bin, so all you have to do is check the box next to the category you’d like to delete and then click the “OK” button at the bottom of the app’s window.
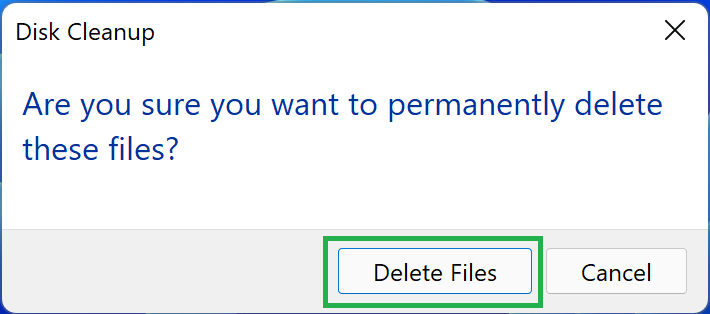
3. Confirm you want to delete those files. A dialog box will appear to make sure you truly want to delete the files belonging to the categories you selected. Clicking “Delete Files” will give Disk Cleanup the go-ahead, at which point it will open a new window showing its progress that automatically closes itself when it’s done removing the selected files. Clicking “Cancel” dismisses the confirmation dialog but leaves Disk Cleanup itself open.
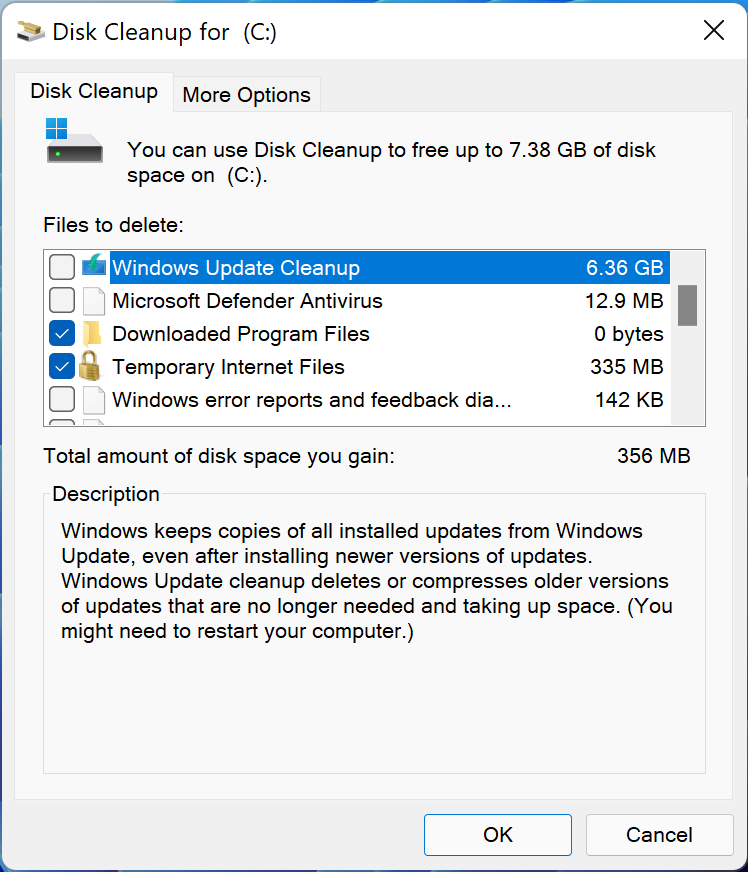
4. Optional: Use Disk Cleanup to delete system files. Disk Cleanup can also be used to remove files that Windows uses for various tasks. This requires you to be using an account with Administrator privileges, but once you click “Clean up system files,” several more options will appear in the categories list for you to choose from.
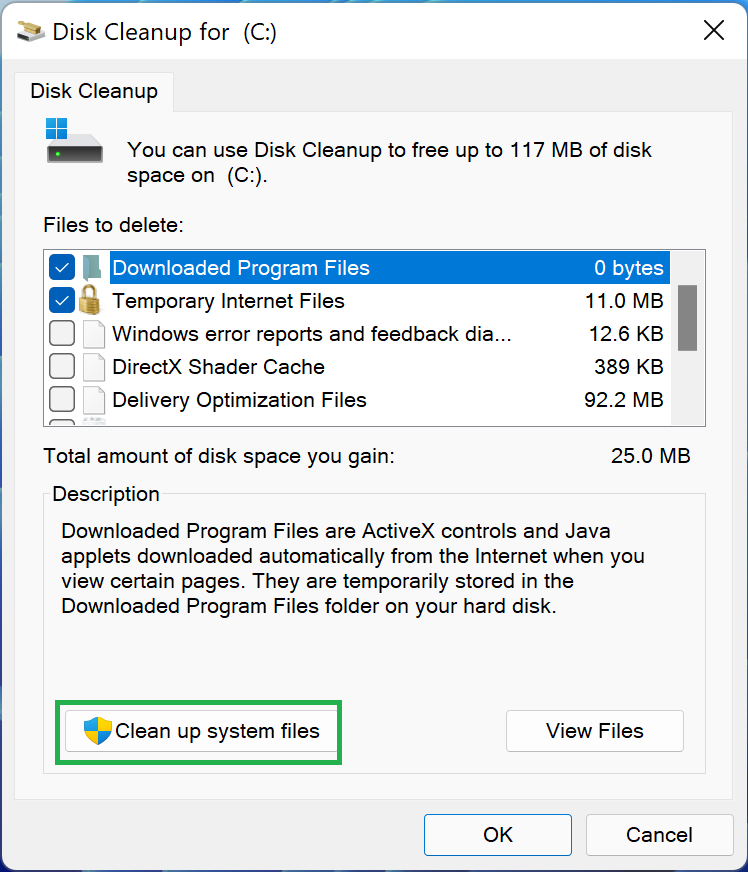
5. Optional: Select the system files you’d like to delete. Disk Cleanup will add new categories, including “Windows Update Cleanup” and “Previous Windows installation(s),” that you can delete. These can free up significantly more space than other file categories—we can free up 6.36 GB via Windows Update Cleanup, for example—but can also require a system restart or cause problems if something goes wrong.
The rest of the process is the same as outlined above: Disk Cleanup will ask you to confirm that you want to delete the selected files, open a new window displaying its progress, then automatically close itself when it’s done going over your drive with a… bristle brush?
How to disable Hibernation on Windows 11
Windows 11 and Windows 10 are automatically configured to save anything in memory to its C: drive by default. This might seem odd, but it allows the operating system to start up quickly by entering Hibernation mode rather than completely shutting down. If you’ve ever closed a laptop and then reopened it to pick up exactly where you left off, or been able to start working at your desktop just by wiggling your mouse, you’ve enjoyed the benefits of this Hibernation mode.
Disabling this feature has its downsides, namely a lack of the responsiveness described in the above scenarios, but it can help reclaim some precious storage space. Here’s how.
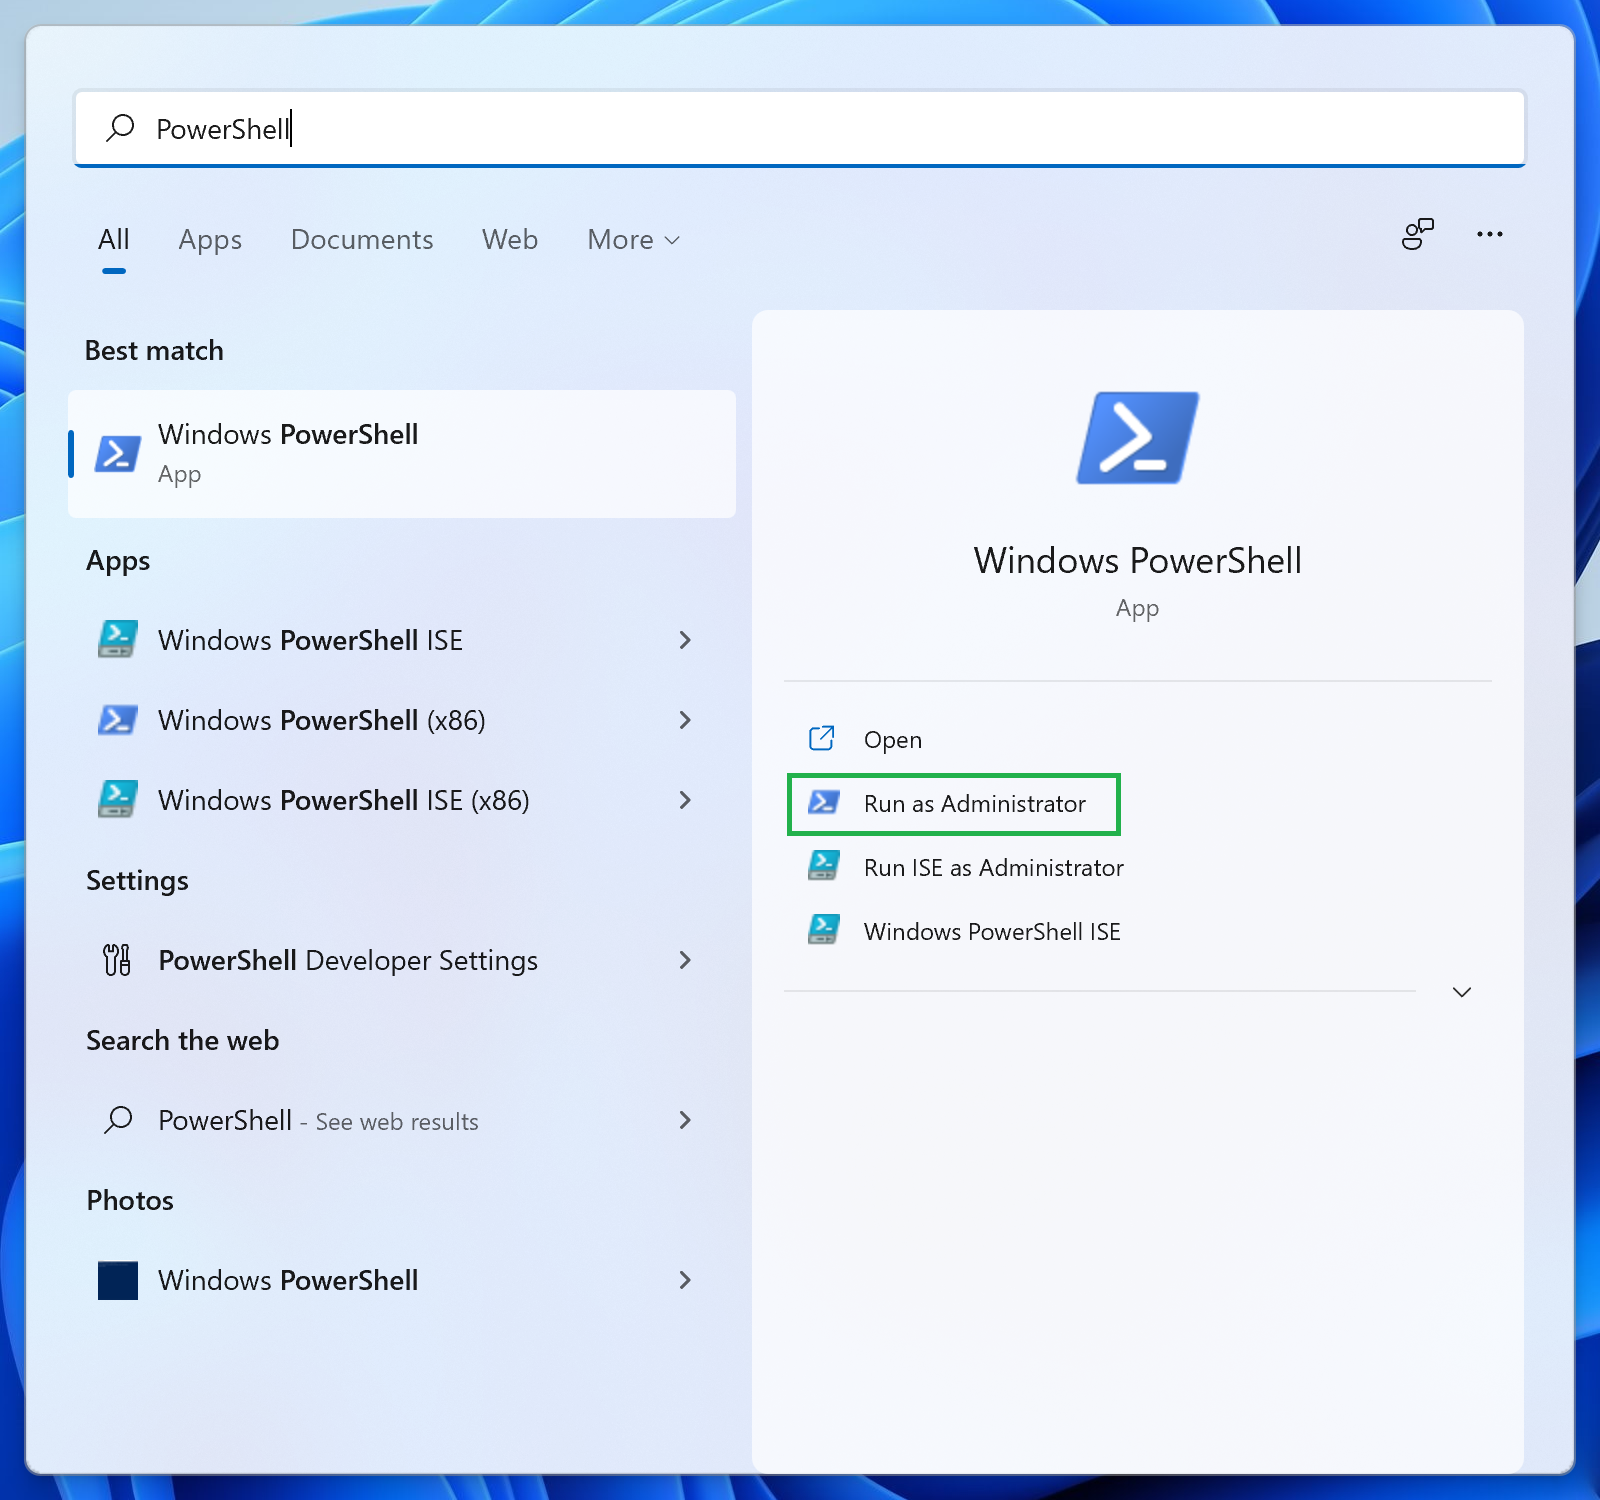
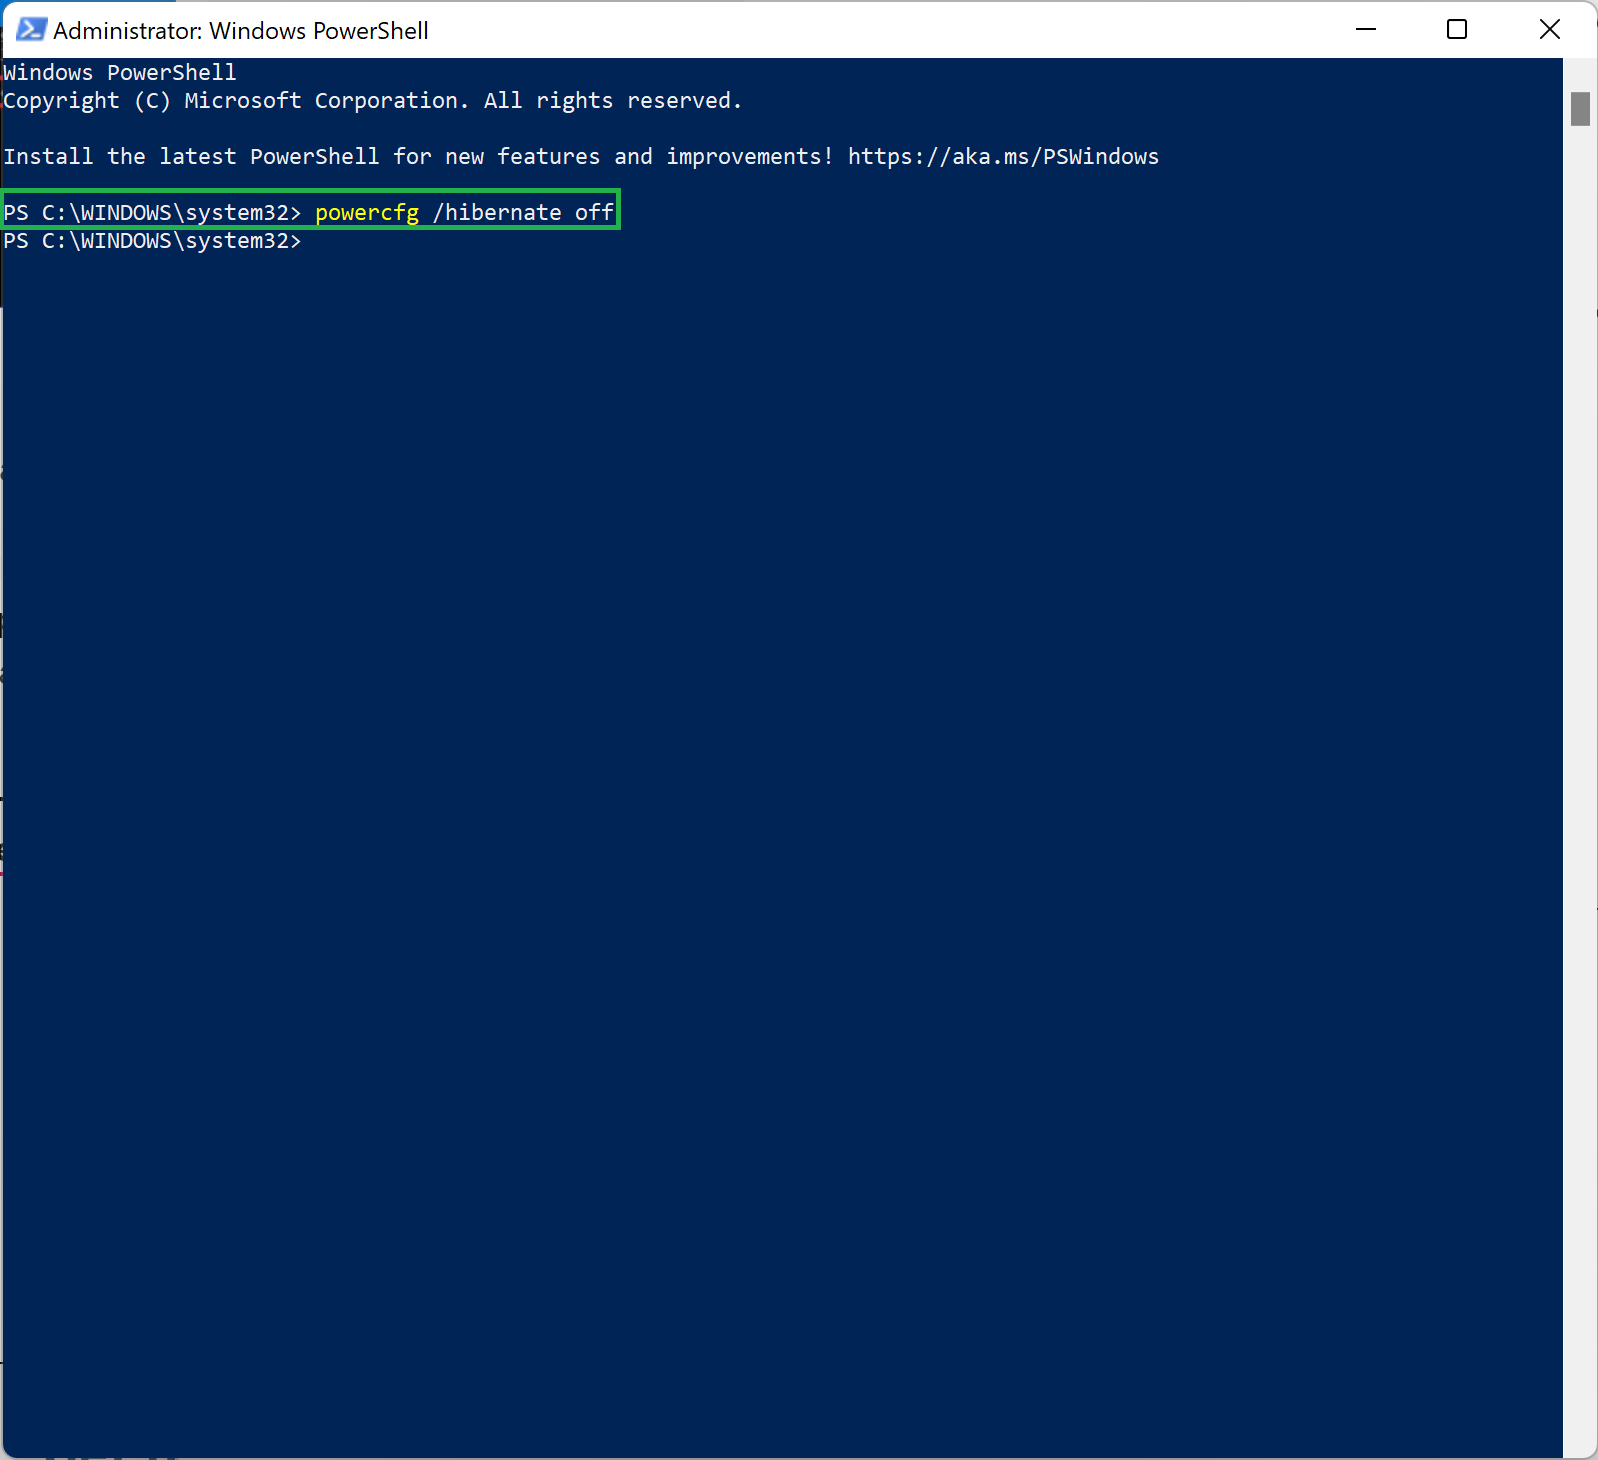
1. Run PowerShell or Command Prompt as an administrator. We’re using PowerShell in our examples, but either program can be used to disable Hibernation, and the steps are practically identical. Just search for “Command Prompt” instead of “PowerShell” from the Start menu and then select the “Run as administrator” option in the right sidebar.
2. Enter the following command: <code>powercfg /hibernate off </code>. (Or, if you’re using Command Prompt, <code>powercfg.exe /hibernate off </code>.) PowerShell won’t offer any confirmation the operation is successful, so don’t be worried if an empty prompt appears after you’ve entered the command. We’ll manually confirm it worked.
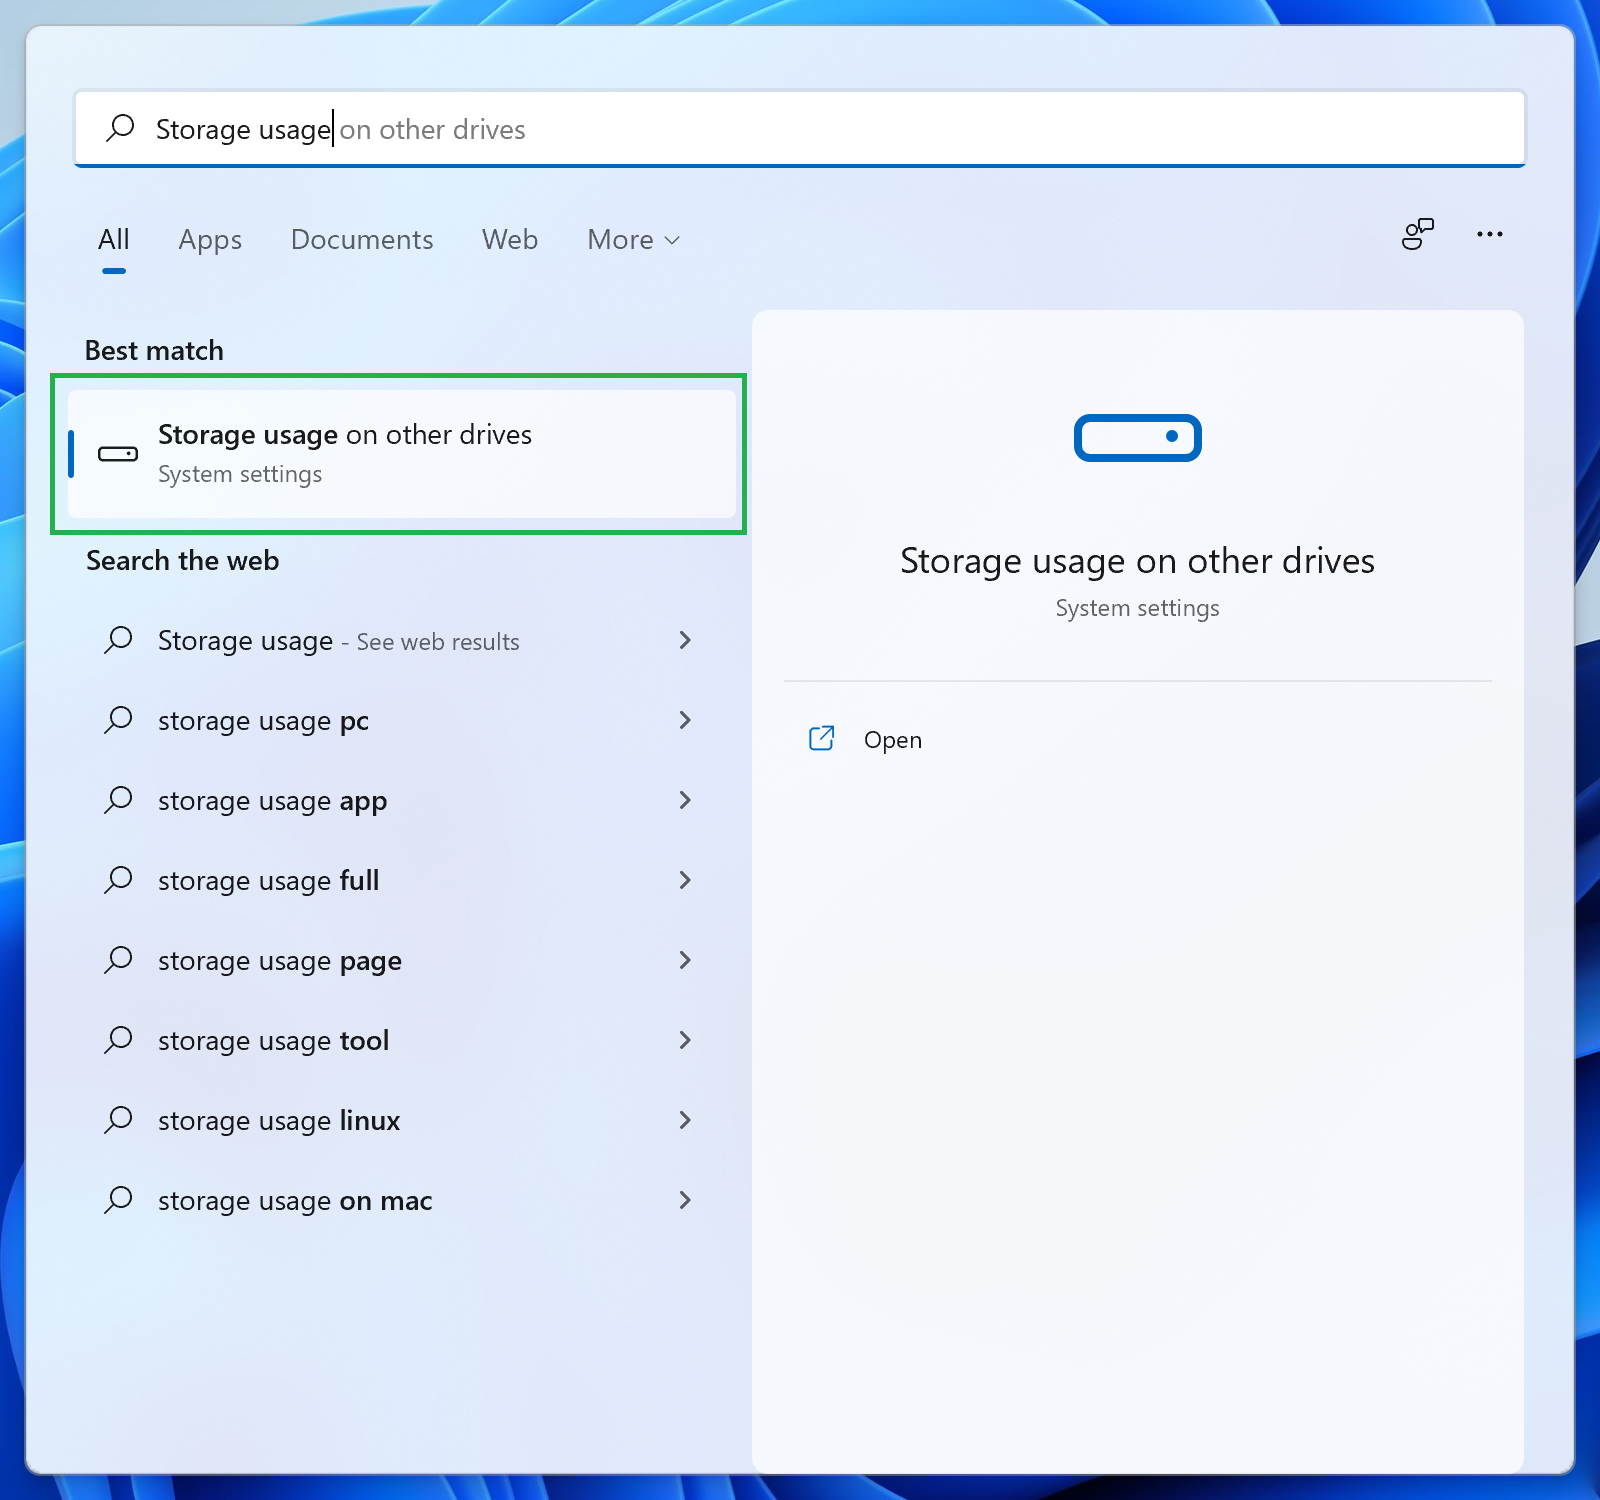
3. Navigate to the “Storage used on other drives” page in Settings. The quickest way to do this is to search for “Storage usage” via the Start menu and select “Storage usage on other drives.” (It’s not clear why the name is different, but that is the correct page.)
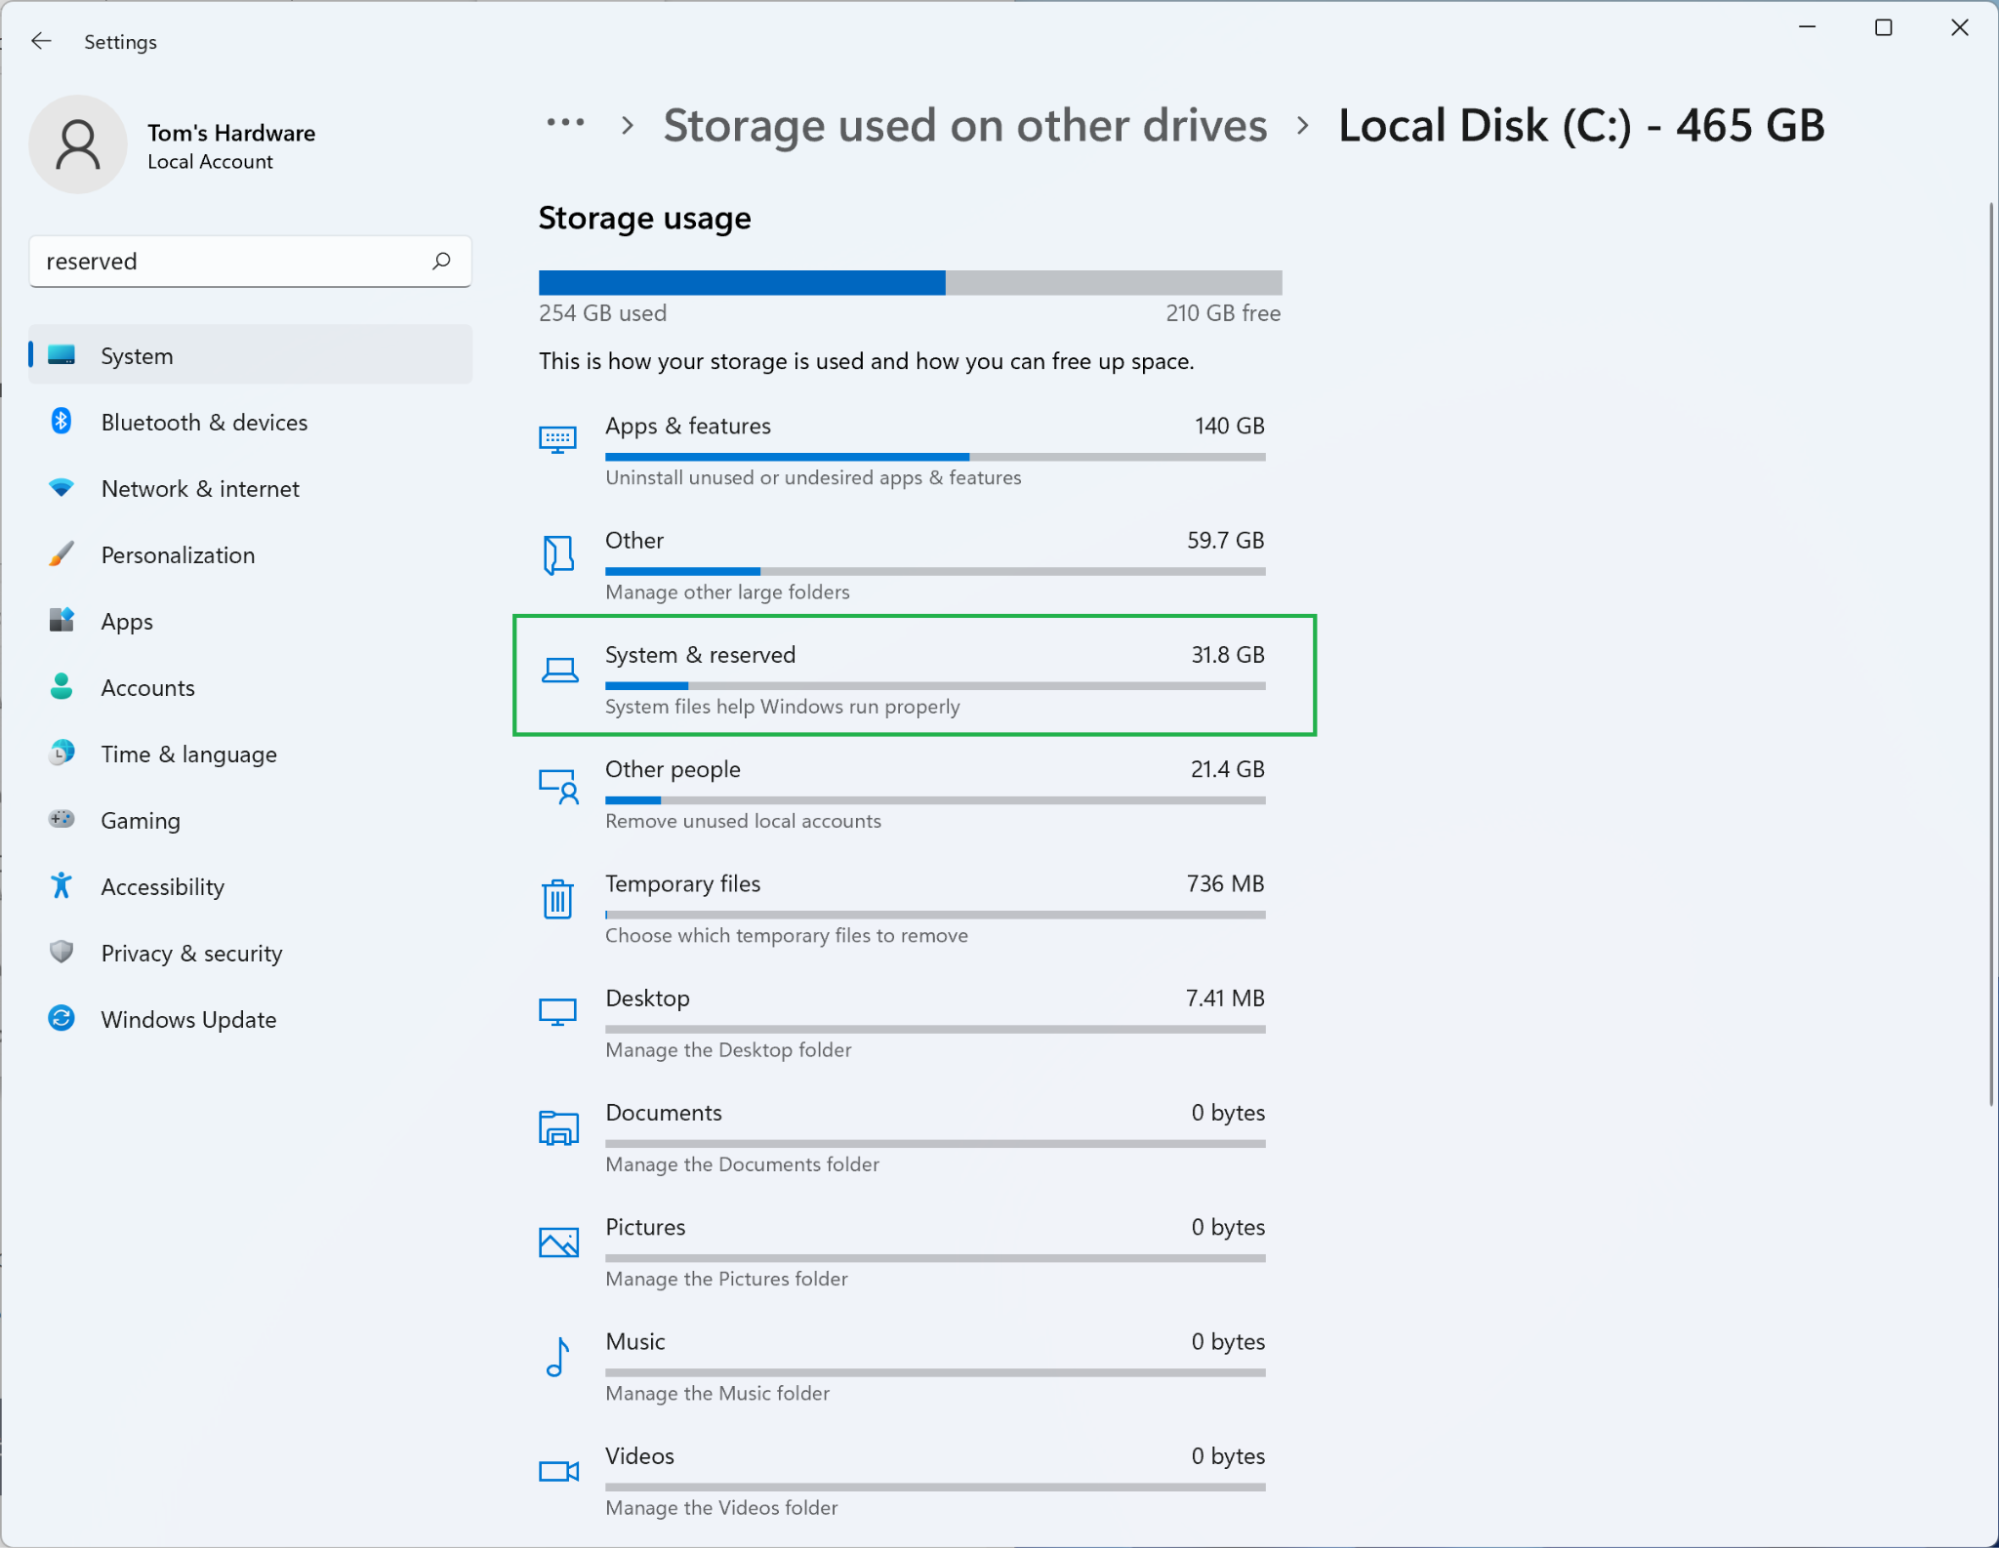
4. Select your C: drive and then click ‘System & reserved.’ This will offer more information about how much of your storage space is devoted to Windows features, including the primary focus of this part of the tutorial, Hibernation.
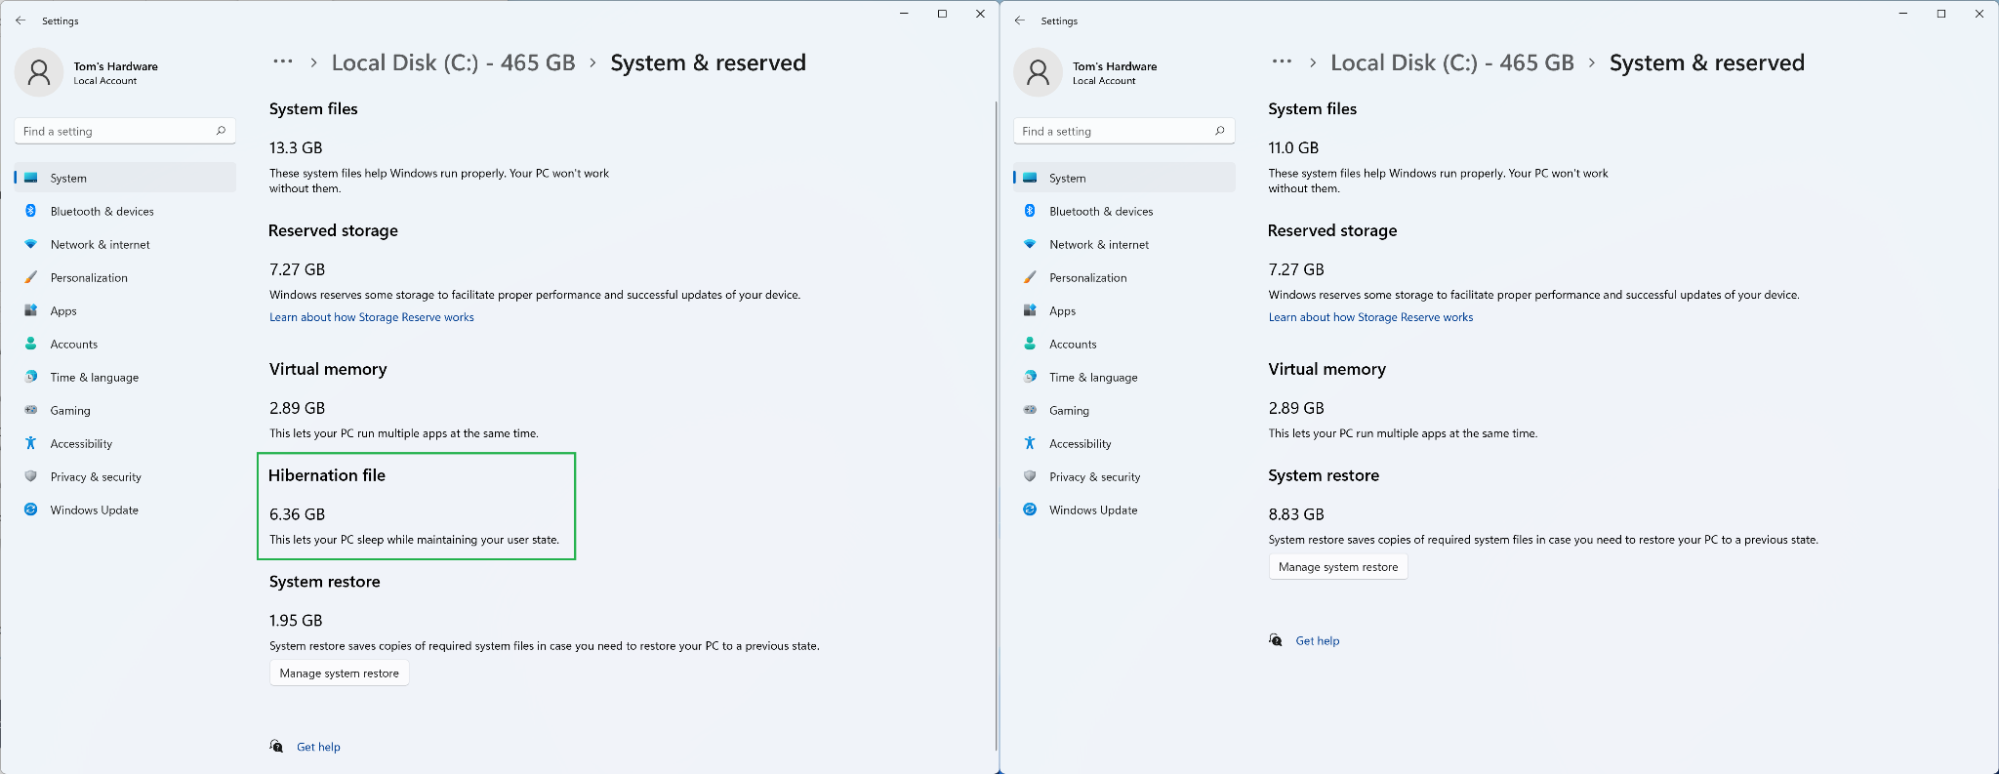
5. Check to see if Hibernation appears. The left side of the image below shows that Hibernation was using 6.36GB of storage on our test system. The feature isn’t even listed on the right side of the image, though, which means it was successfully disabled.
6. (Optional) Re-enable Hibernation. If you find that saving a few gigabytes of storage isn’t worth the hassle of losing access to Hibernation the feature can be re-enabled by entering the following command: <code>powercfg /hibernate on </code>. (Or, if you’re using Command Prompt, <code>powercfg.exe /hibernate on</code>.)
That’s it—disabling and enabling Hibernation requires just one command. It takes longer to see how much space the feature is taking up or confirm the command was successful than it does to manage the setting. Now it’s up to you to decide if you want to maximize storage or convenience by disabling the feature or allowing it to continue slumbering on your system.
How to disable Reserved storage on Windows 11
Another way to reclaim some of your drive space from Windows itself is to disable Reserved storage, which the operating system uses to “facilitate proper performance and successful updates of your device,” as Microsoft puts it in the Settings app. The company also says the feature claims 7GB of space by default but will automatically reduce that figure to “2% of system volume capacity or 3GB of disk space, whichever is lower,” on storage-constrained systems.
That means disabling Reserved storage will typically free up between 3GB and 7GB of space. But this option isn’t for the faint of heart—disabling Reserved storage can lead to unexpected issues the average user probably doesn’t want to figure out how to recover from. If that isn’t a deterrent, here’s how to disable Reserved storage on Windows 11 and Windows 10.
1. Run PowerShell or Command Prompt as the administrator. This is similar to disabling Hibernation, so we’ll continue to use PowerShell, but Command Prompt works as well. The commands are just going to be a little bit different for each program. With that said: Search for your app of choice and then choose “Run as administrator.”
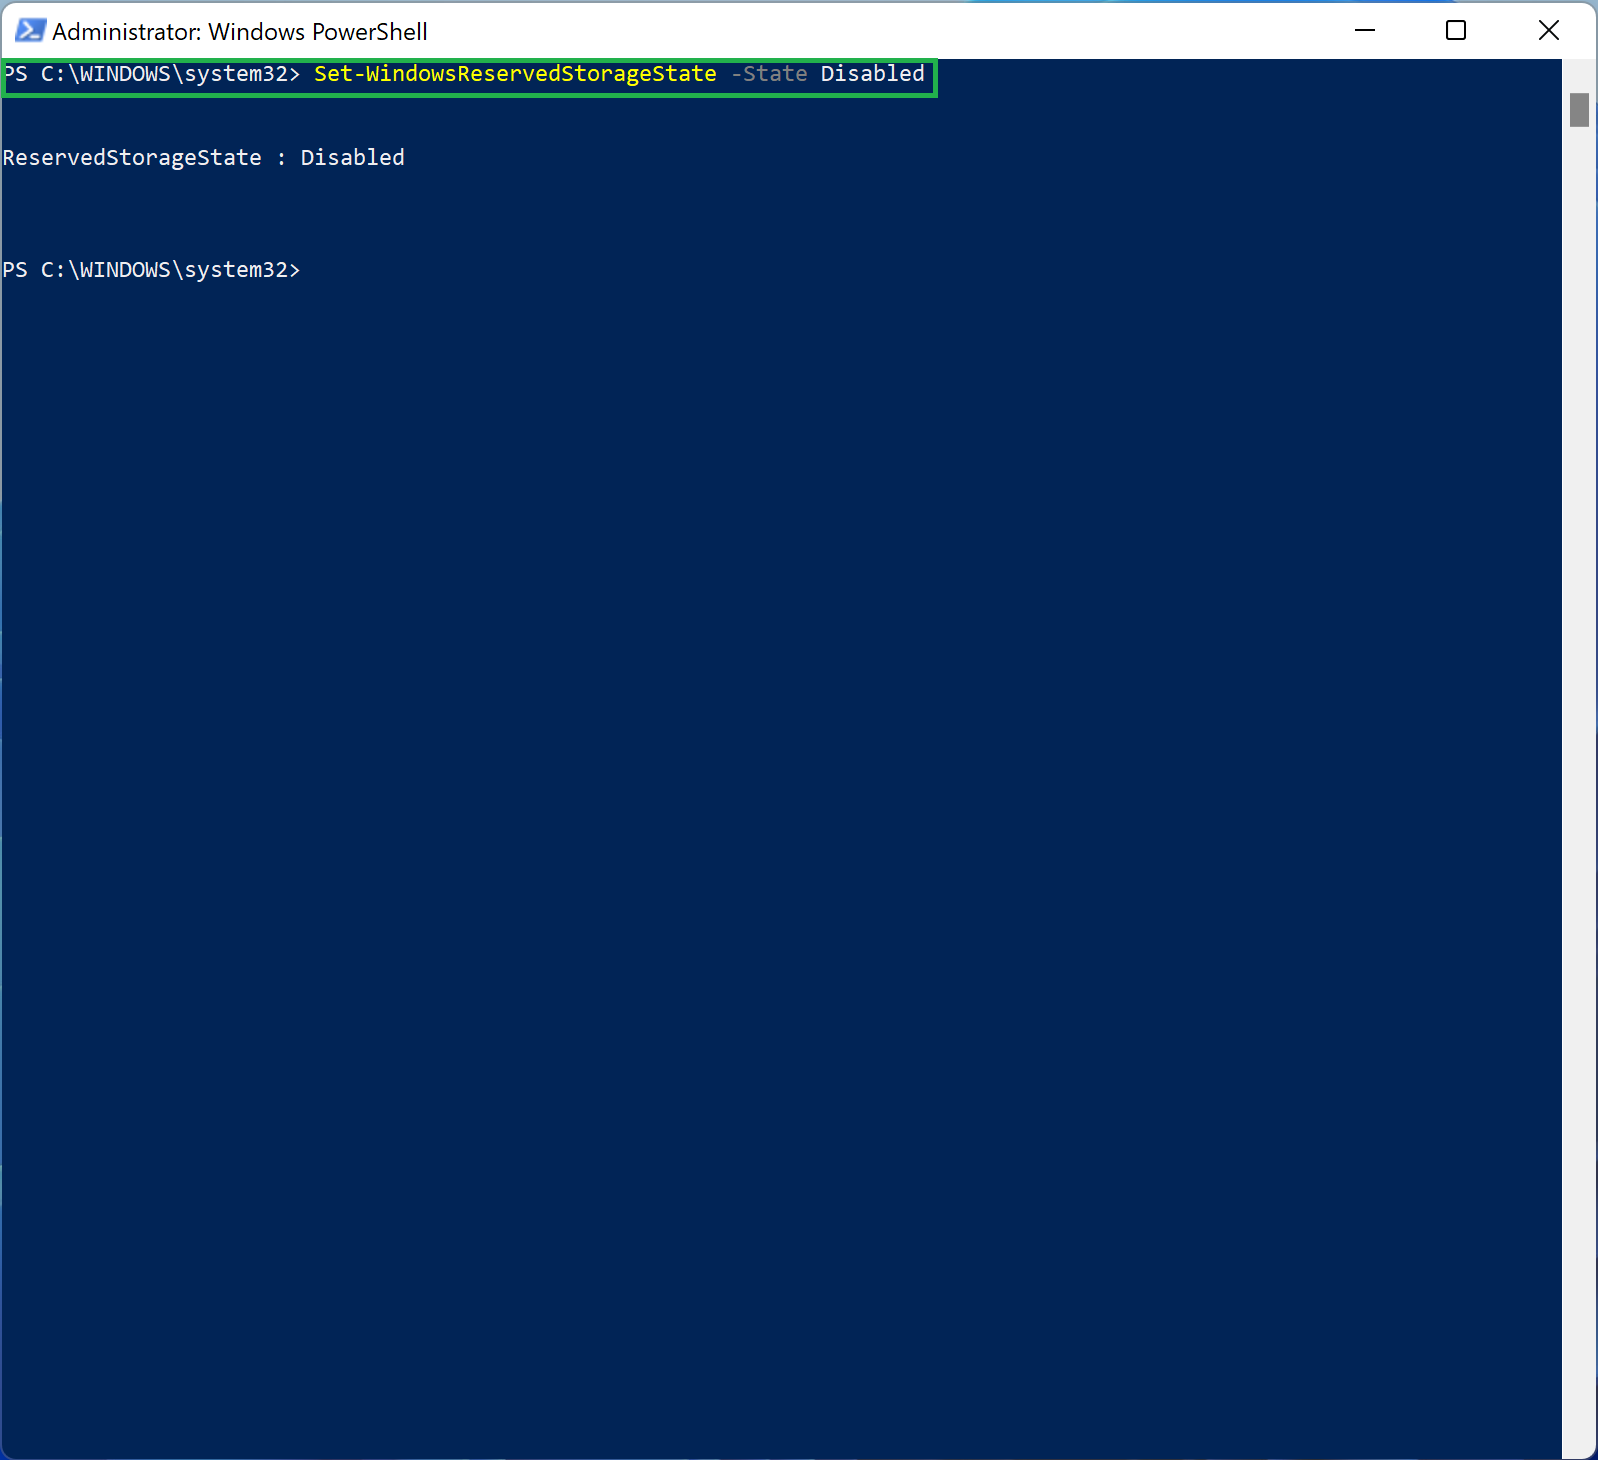
2. Enter the following command: <code>Set-WindowsReservedStorageState -State Disabled </code>. (Or, if you’re using Command Prompt, <code>DISM /Online /Set-ReservedStorageState /State:Disabled </code>.) Unlike with Hibernation, a message will confirm the operation was successful, so we don’t have to use Settings.
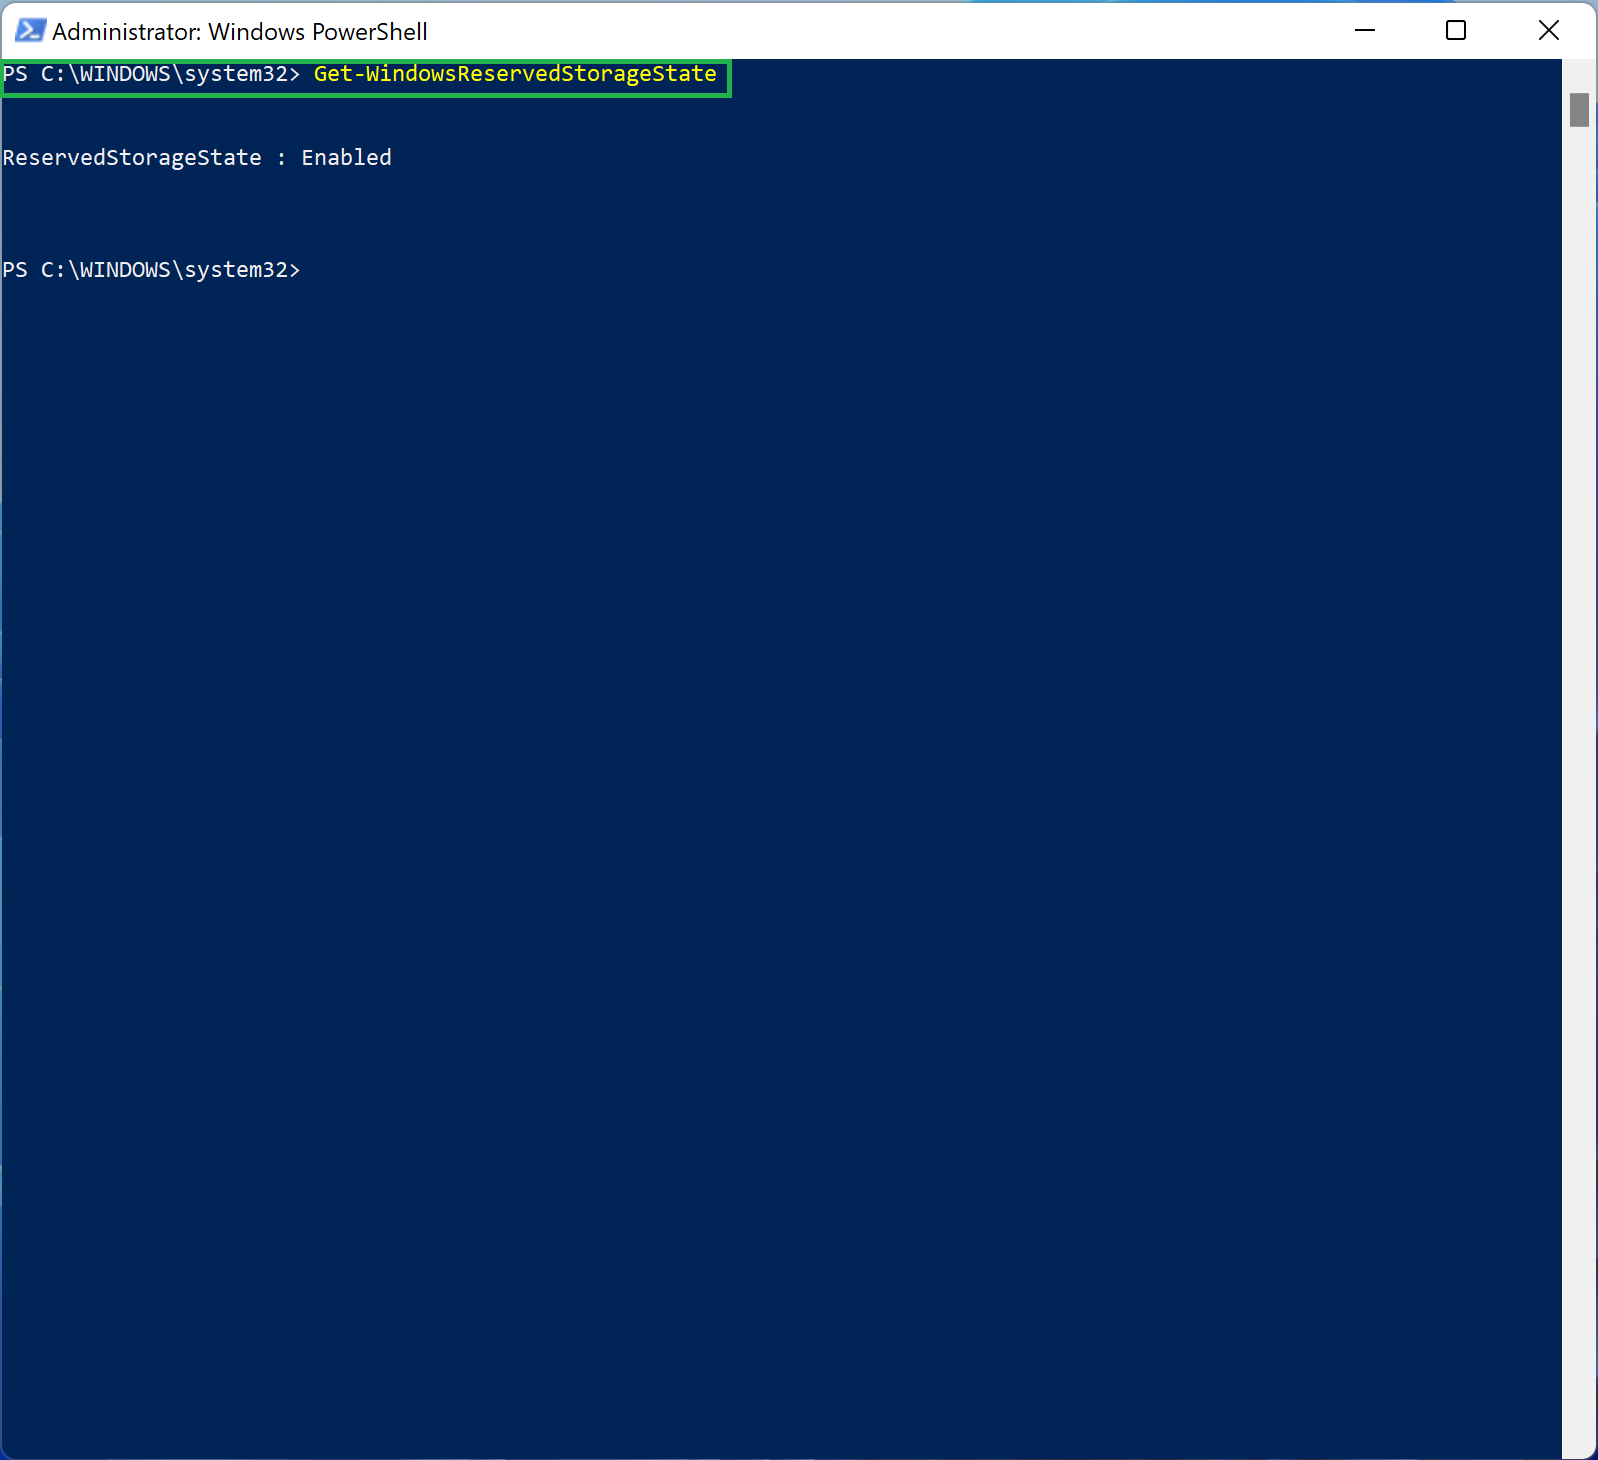
3. (Optional) Check the Reserved storage status. You can enter the <code>Get-WindowsReservedStorageState</code> command on PowerShell or the <code>DISM /Online /Get-ReservedStorageState</code> command on Command Prompt to quickly see if Reserved storage is currently enabled or disabled.
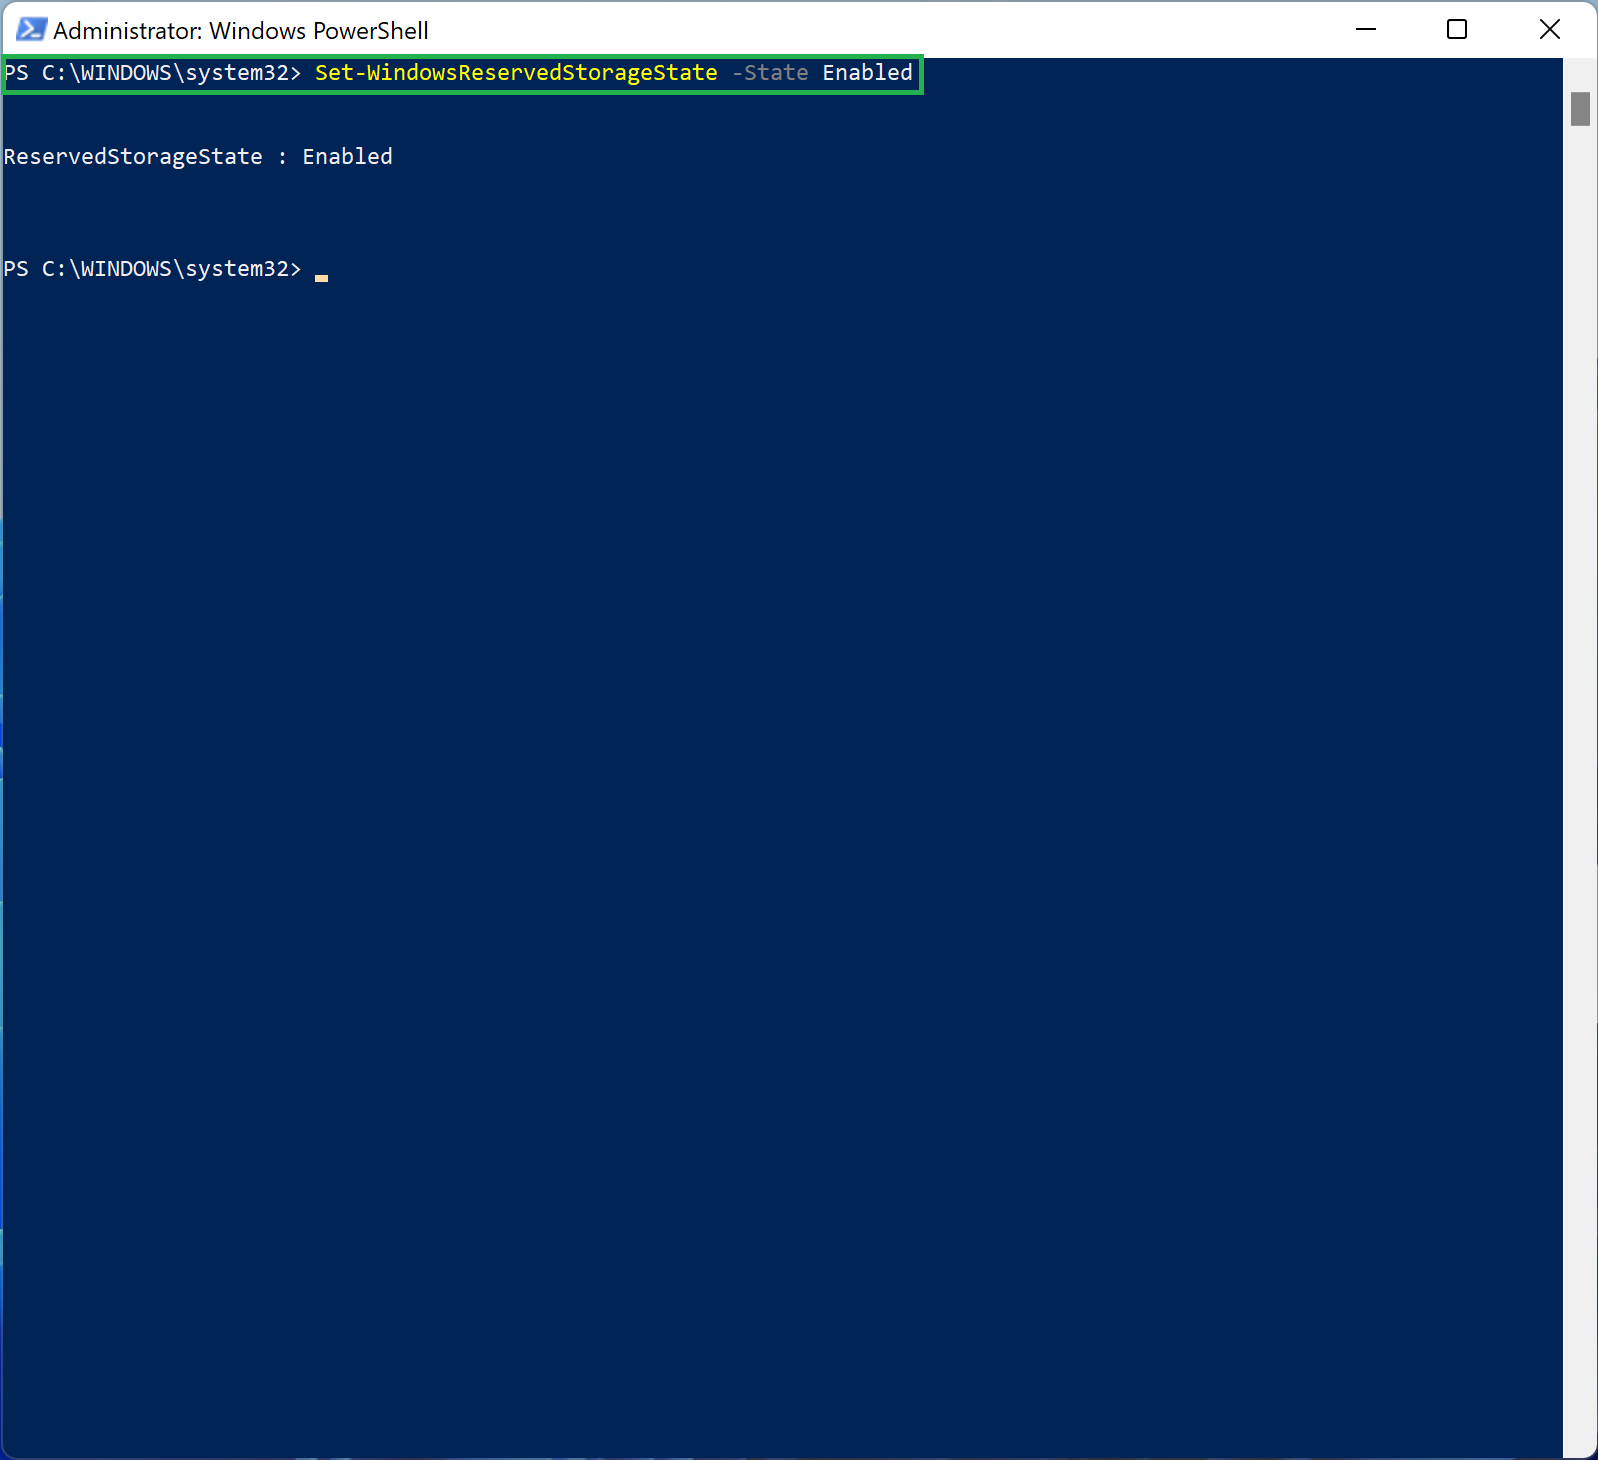
4. (Optional) Re-enable Reserved storage. If you decide to re-enable Reserved storage you can do so by entering the following PowerShell command: <code>Set-WindowsReservedStorageState -State Enabled</code> (Or, in Command Prompt, use <code>DISM /Online /Set-ReservedStorageState /State:Enabled </code>.)
Those commands should quickly reclaim between 3GB and 7GB of storage that Windows 11 and Windows 10 had reserved for its own use. If you’re on a truly space-constrained system that could prove useful, but if you can spare the extra few gigabytes, it’s often worth leaving Reserved storage on now that Microsoft has limited the amount of space it quietly takes from your system.
How to delete restore points in Windows 11
Windows 11 and Windows 10 also create “restore points” that can be used to, well, restore a system configuration from a specific point in time. This is most useful when the operating system itself appears to be so messed up that it would be worth potential data loss to get back to a time when everything worked the way it was supposed to. (Or at least as close as possible.)
“Restore points are generated when you install a new app or driver,” Microsoft says, “and when you create a restore point manually. Restoring won’t affect your personal files, but it will remove apps, drivers, and updates installed after the restore point was made.” The amount of storage devoted to these restore points varies; our test system allocates 10GB to the feature.
There are other ways to recover from the kinds of problems restore points are supposed to address, though, so deleting them can help free up a bit of space on your system. Here’s how to disable the System Restore feature or remove specific restore points.
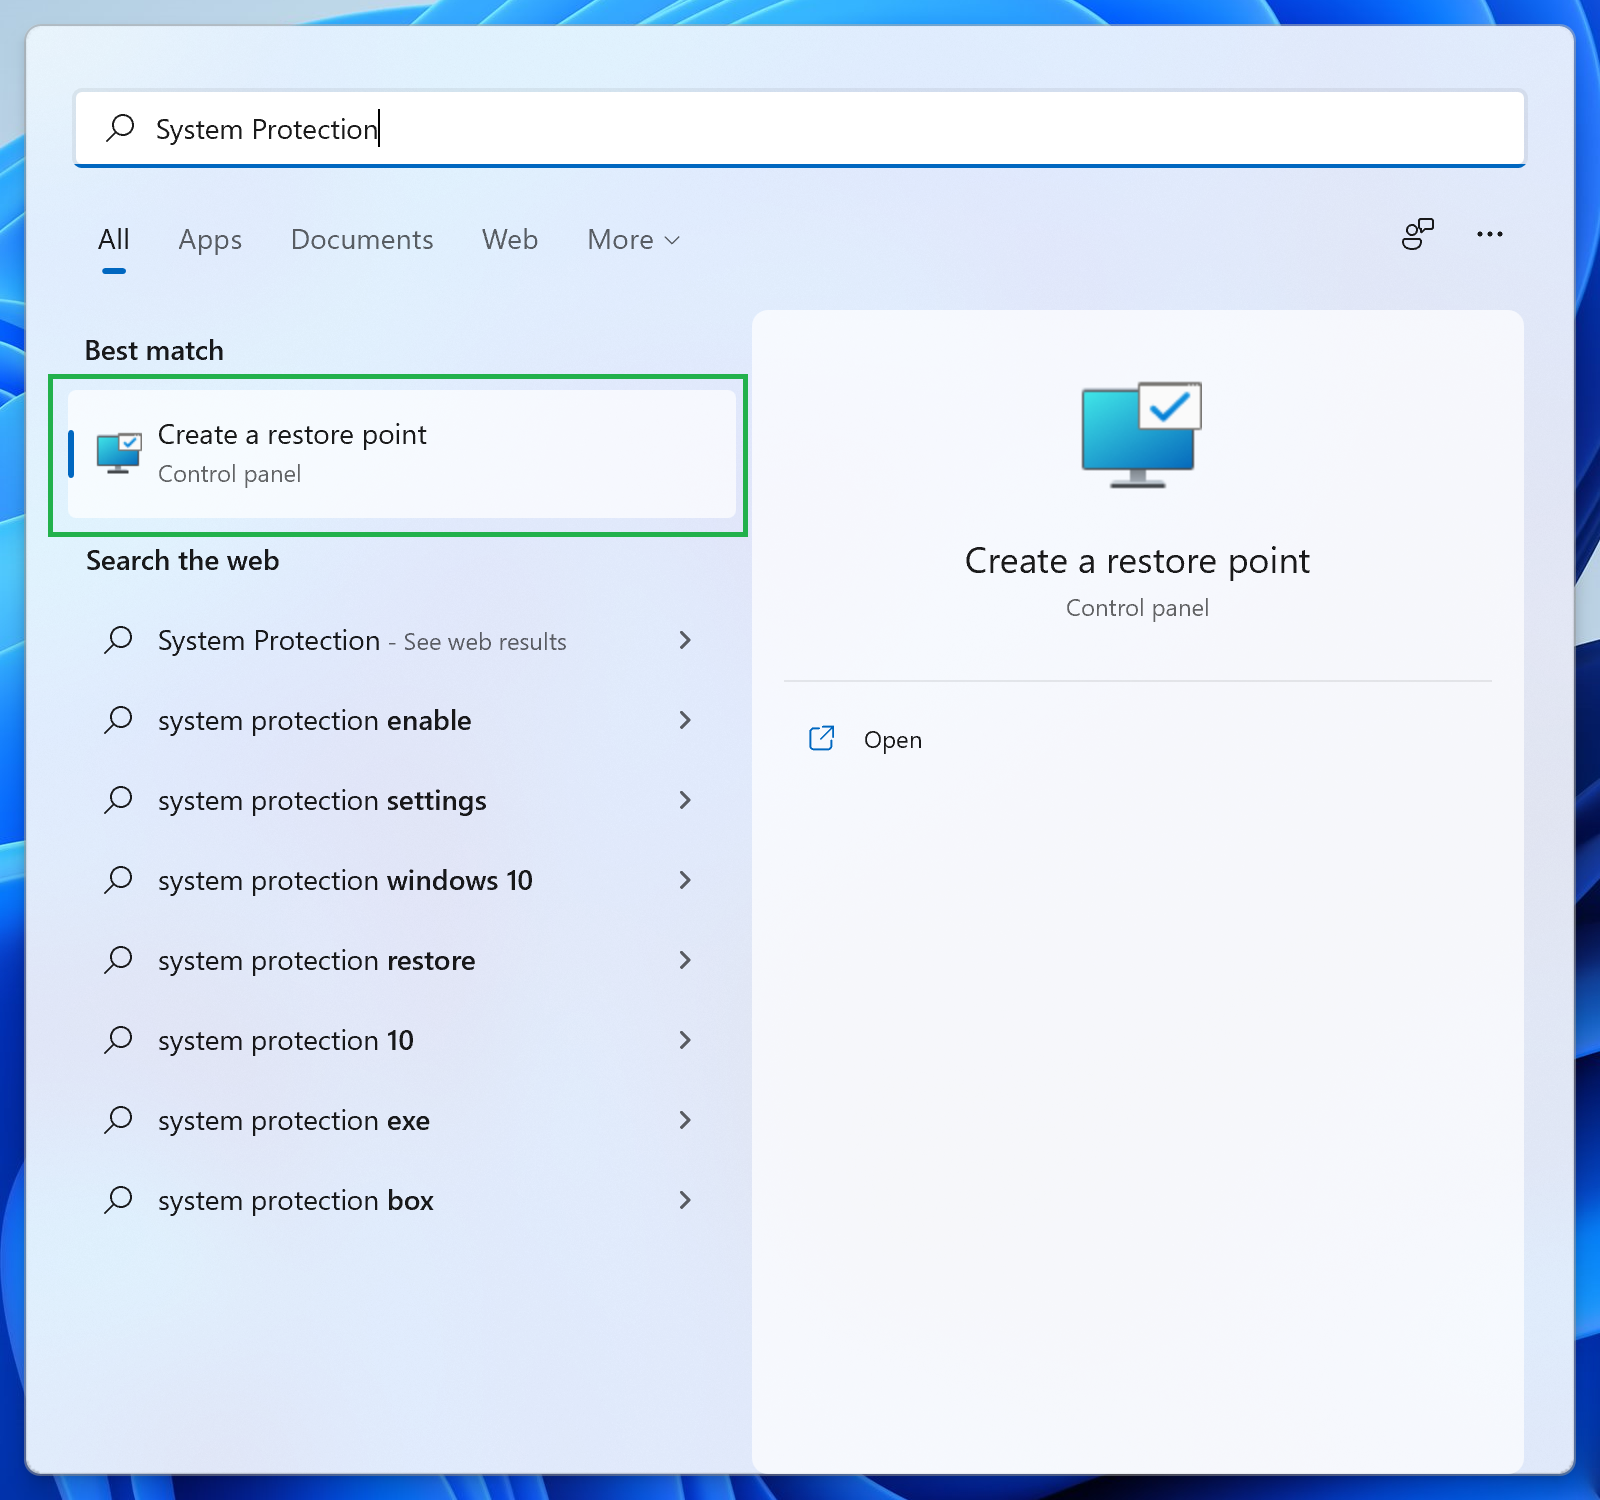
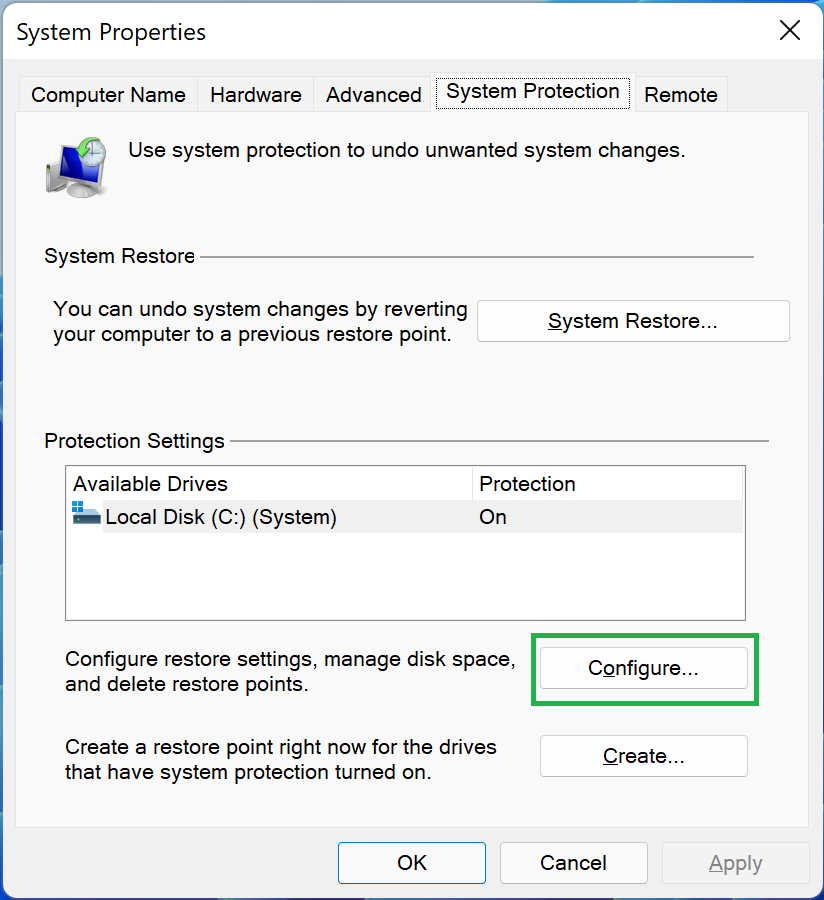
1. Navigate to System Protection in Control Panel. It seems counterintuitive, but the quickest way to do this is to search for “System Protection” via the Start menu and then select “Create a restore point.” (Note that you’ll need to have admin privileges.) This doesn’t actually create a restore point, but instead leads to the page we’re looking for.
2. Click the ‘Configure’ button. This will launch a new window that offers a variety of options for managing the System Restore feature and the restore points themselves.
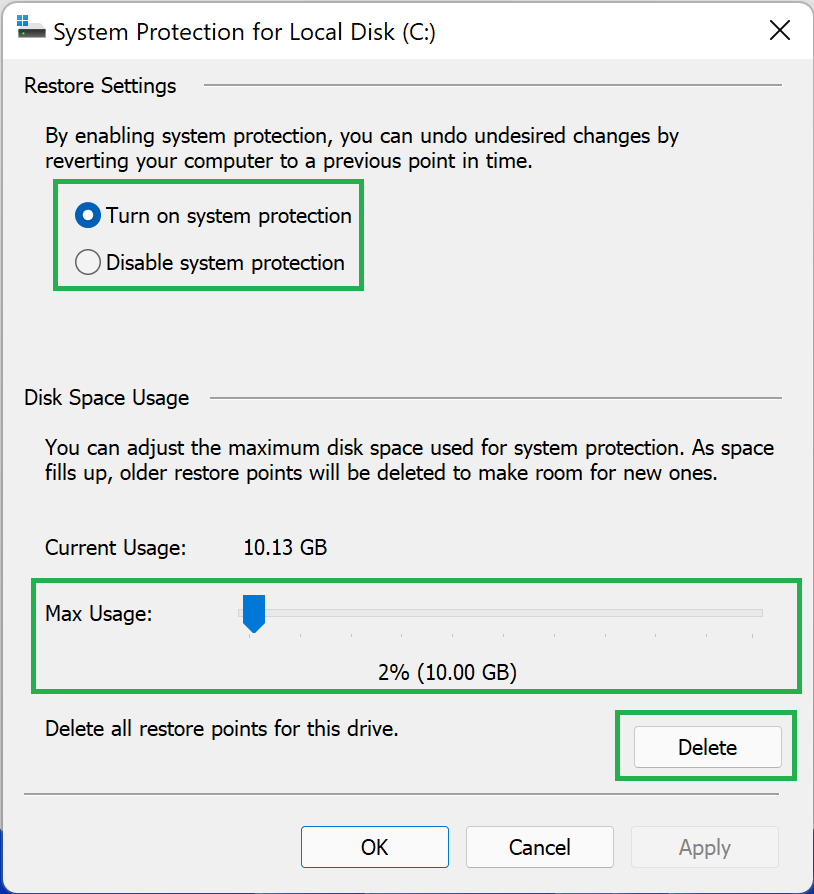
3. Disable System Protection, limit the amount of storage it’s assigned or delete all restore points. The new window offers easy access to everything related to System Restore. You can disable the feature entirely, limit the amount of storage devoted to it, or delete all of the restore points the system has created and saved to your drive.
Once you’ve confirmed that you want to complete whichever action you chose, Windows will automatically delete restore points based on your preferences. It’s probably a good idea to have a backup installation method handy if you choose to disable System Restore entirely, but if you’re just looking to maximize storage space, limiting its maximum usage offers a good middle ground between “devoting gigabytes of storage to a feature you might never use” and “being left without a way to revert to a state where all your operating system, apps, and drivers actually worked.”
Another way to deal with an unstable PC or one that experiences BSODs, besides using system protection, is to do an in-place Windows repair install. However, that may not save all your settings.
More Windows 11 Tutorials:

Nathaniel Mott is a freelance news and features writer for Tom's Hardware US, covering breaking news, security, and the silliest aspects of the tech industry.
