Tear-Down: Let's Take a Trip Inside A UPS
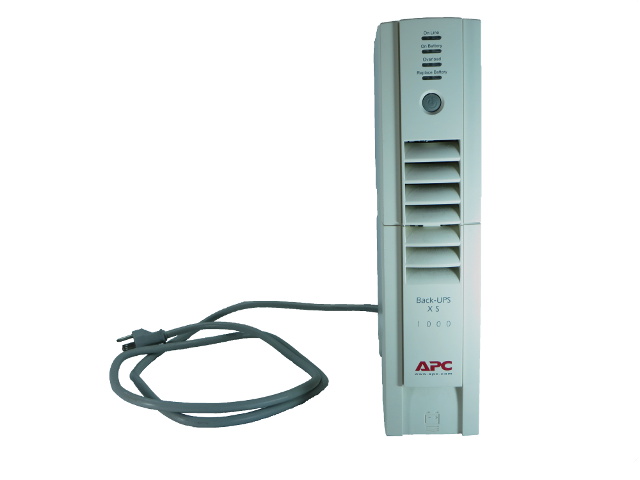
In response to our power bar tear-down, many of you asked to see a UPS receive the same treatment. So, today, we go on a tour inside a vintage APC BX1000.
Another Classic: APC's BX1000
When power bars with surge protection are not enough, and a little security from power loss is desired, the next step up is a UPS. APC sold more than a dozen different units in this form factor under various model numbers with similar feature sets. In my case, the original retail box says BX1000, the battery compartment cover says XS1000, and the USB device identifier string says RS1000. That's a nice little chimera.
The status-and-control panel has LEDs corresponding to On-Line, On-Battery, Overload, and Replace Battery. Below those LEDs lies the single On/Off/Cold-Start button. You get little more than the essential stuff.
Operational End Of The Device
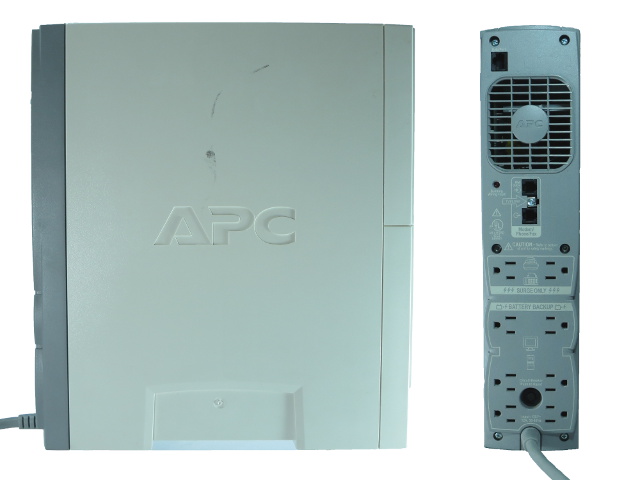
The panels look exactly the same on both sides, with little more to see than APC's logo and an indentation for the floor or desk vertical stand.
On the rear panel, starting from the top, we have a USB interface, though APC decided to use an RJ45 jack instead of a type-B connector, a fan-less vent, a wiring fault indicator LED, the phone line protection jacks with a supplemental TVSS ground screw, a pair of surge-only outlets, six battery-backup outlets, a built-in breaker with an unspecified rating, and a 12 A input rating printed above the cable entry point itself. Again, there's nothing fancy to see; it's pretty much what you expect from a UPS' rear panel.
Not Feeling Label Keen
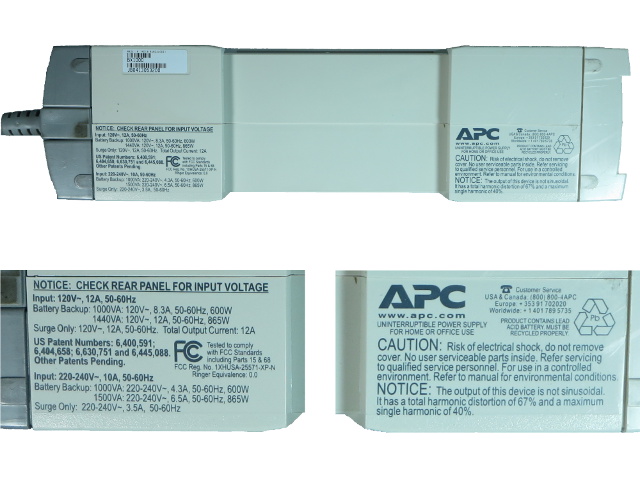
Instead of sticking model-specific labels on its units, APC printed basic ratings for all of the products using this housing (in both 115 and 230 V flavors). Verbiage on the right repeats the familiar "risk of electric shock" warning we see on practically all line-powered items and the "no user-serviceable parts inside" we see on just about everything.
The latter part of the print gives us some potentially useful information on the non-sinusoidal output: up to 67 percent THD with the strongest harmonic up to 40 percent. This is bound to add some depth and warmth to the 120 Hz hum on your favorite audio amplifier. On a more serious note, significant THD can confuse the active power factor correction (APFC) circuitry in some power supplies.
With the external details now covered, it's time to start stripping.
Get Tom's Hardware's best news and in-depth reviews, straight to your inbox.
Behind Door Number One
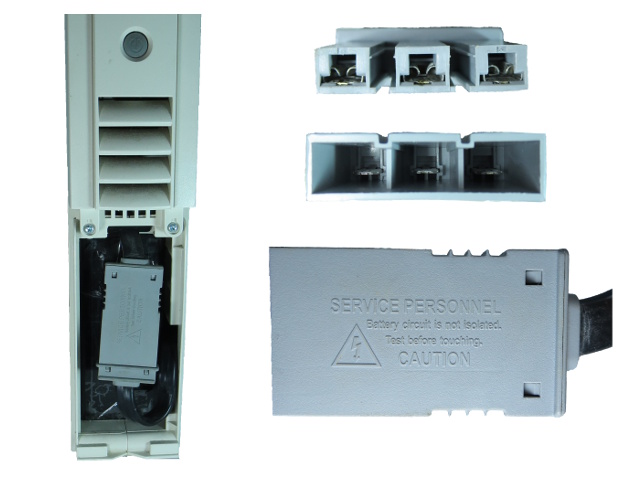
The battery cover hides this beefy-looking connector. At first, you may think there must be something fancy about it. But upon closer inspection, the housing is nothing more than a rig to help people safely plug and unplug the connector's three blade terminals, since the battery might not be isolated from mains or otherwise high voltages. APC reminds you of that by molding the warning on the shell itself.
The battery door also hides three of the 10 screws holding the UPS' enclosure together, two of which are fastening the status panel to the middle of the side panels and the other coming in from the side at the bottom-left corner. Popping the interface panel off reveals a fourth front screw coming in sideways in the top-left corner.
Right about now would be a good time to disconnect the battery and remove it (if possible) before diving in any deeper.
It's Dead, Jim
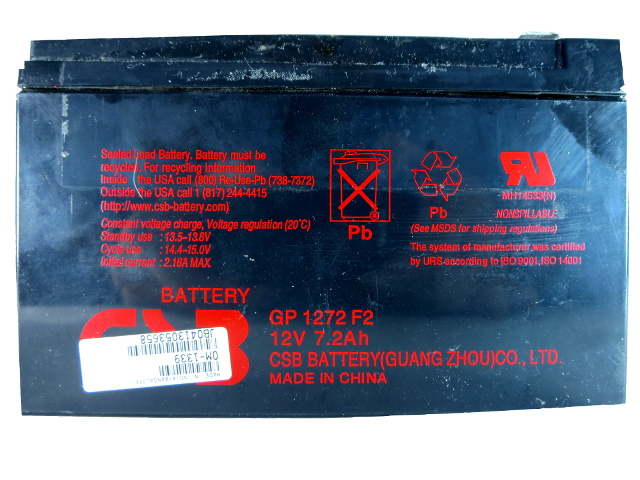
This is one of my BX1000's two long-dead original batteries; I simply haven't gotten around to dropping them off at the nearest Staples for recycling yet. If you are wondering why it appears somewhat oddly shaped, valve-regulated lead-acid accumulators (or VRLA), along with most other battery types, tend to bulge as they get old due to gas build-up. Pressure slowly stretches the casing, much like old and underrated electrolytic capacitors. The bulging is exaggerated in this shot; it does not look half as bad in person. But the effect was still bad enough that I had to partially disassemble the UPS to get the original batteries out when warnings started appearing. This is a somewhat common issue with UPS' that use snug-fitting slide-in batteries.
When you buy an UPS, keep in mind that typical lead-acid batteries have a shelf life of about five to six years under light use. Plan to replace them about that often if you want to minimize surprises, and even more frequently if your UPS kicks in on the regular.
Poor Substitutes?
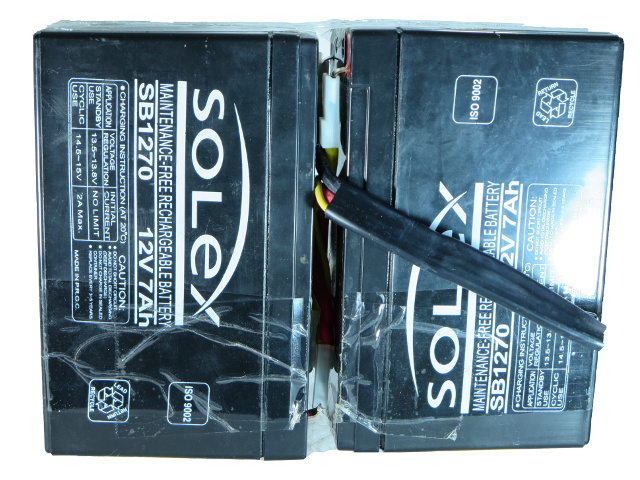
Before you reject the original manufacturer's expensive replacements and substitute your own, compare specifications to get an idea of how well or poorly your improvised alternates will perform. I skipped this step when I bought the pictured batteries, since they were the only ones that fit at the local electronics store, and I was mainly interested in making the UPS stop complaining.
Since I only have about 200 W worth of equipment connected to the UPS, my ~$15 cheapies worked well enough for the last three or so years. However, I only get about four minutes of backup time instead of the 15+ minutes I should be getting with the OEM batteries, which tells me I am about due for a new pair. Without the plastic spacer frame between batteries and the large, tough stickers holding everything securely together, this hack job can be a chore to get in and out—one more reason to consider a proper replacement pack.
If you are curious to see how battery choice affects performance, proceed to the next slide.
Battery Ratings And You
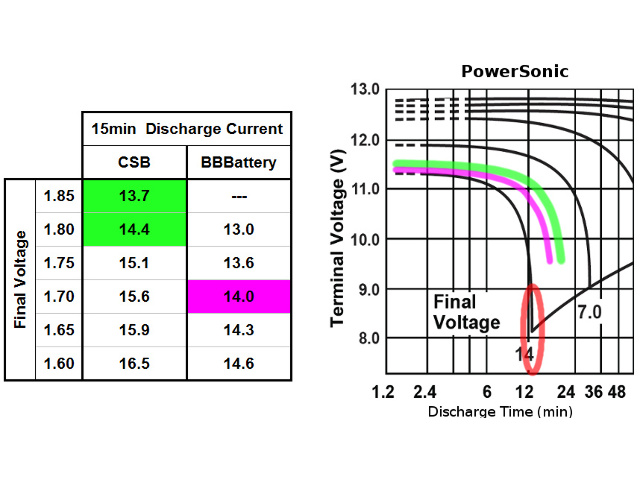
I could not find specifications for my Solex SB1272, so I went hunting for the cheapest battery I could find as a plausible worst-case stand-in. The original CSB GP1272 can be found for $30 to $40, the BBB BP7-12 for $25 to $35, and the PowerSonic PS-1270 for as little as $12.
Different battery manufacturers report their products' performance in different formats. Here, I aggregate CSB's and BBB's 15-minutes discharge ratings and paste part of PowerSonic's graph, since the company does not provide tables. Since all three batteries have a nice common comparison point at or near a 14 A constant-current discharge rate, I extrapolated the other two other batteries' 14 A discharge curve on top of PowerSonic's graph to compare. Ideally, I should have used constant-power curves or tables, but PowerSonic does not provide either of those for this battery model.
The PowerSonic unit drops completely dead near the 12-minute mark, while the BBB unit runs out of steam at 15 minutes. But the CSB only starts to trail off, with maybe four or five minutes more to spare. In a constant-power discharge scenario, in which current rises as battery voltage drops, things would get much worse for the PowerSonic unit after the six-minute mark.
If you want the best performance and battery life out of your UPS, CSB is the mark to beat out of the three batteries I looked at. No wonder APC uses its batteries in so many small-footprint UPS models.
The Catch
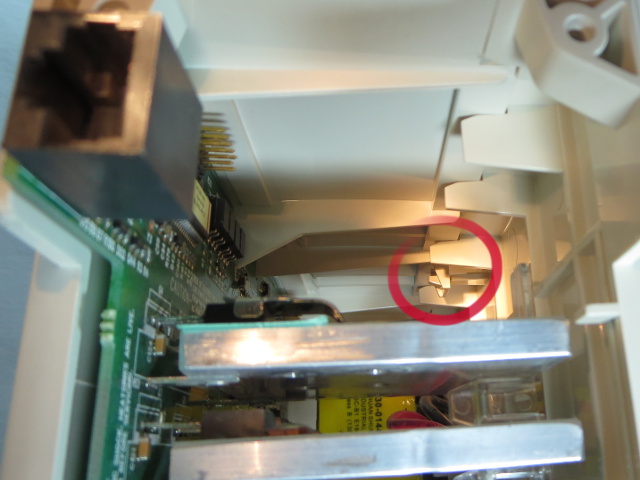
Having trouble unlocking your "slightly used" UPS to take a look inside? At the top of the BX1000, there is a snap about halfway in at the top holding the shell's two halves together. Its location is circled in red on this picture. You need a long, flat screwdriver to easily reach and disengage it.
Before you poke your hand in there, you may want to hit the Power/Mode button a few times after unplugging the unit. While I was working on the case, I accidentally hit the power switch. The unit beeped even though it had been disconnected for over half an hour. There was most likely harmless leftover charge in low-voltage circuitry, since I seriously doubt APC would forget bleeder resistors on the high-voltage side of things. In any event, it's always good to discharge everything you can before poking around, if only to prevent voltages from being applied to the wrong place in case of accidental shorts or other unplanned contact.
The Good Stuff
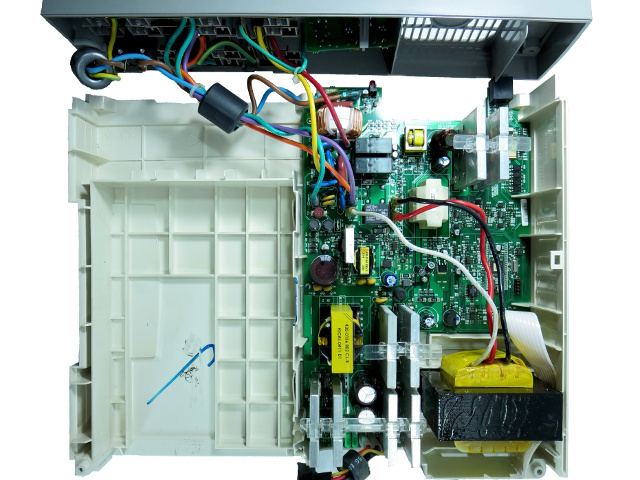
How do you like those spade connectors? APC appears to like them a lot. Everything except for the front interface module connects to the main board using crimped spade connector plugs with rubbery boots. Gotta love teardown-friendly hardware, as teardown-friendly as stiff spade connectors can be, anyway — nothing a decent pair of pliers and a little force cannot overcome.
If you have a penchant for tearing stuff apart without the diagrams to help you put them back together, it is a good idea to take pictures as you go for reference. In this case, APC was nice enough to use different wire colors to make connections and write them on the PCB's silkscreen near their respective spade headers. This will be really handy for reassembly.
All capacitors large enough to carry a logo or brand name are Nippon Chemi-Con, except for two HJ-branded 22 µF 200 V devices along the high-voltage output path.
Take It Off! Not.
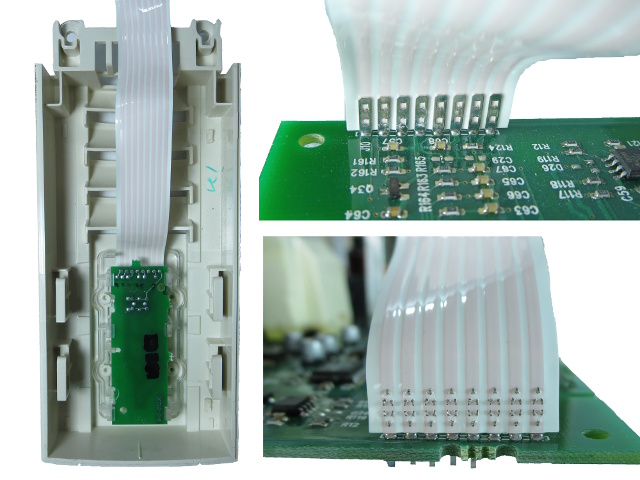
Here's the front panel and its main board attachment mechanism. There are no detachable connectors with exposed conductors; APC uses clinch termination on the unstripped ribbon. Each terminal has eight nails punching through the cable, which are then flattened on the other side. That's not a common sight these days.
The Rear-End
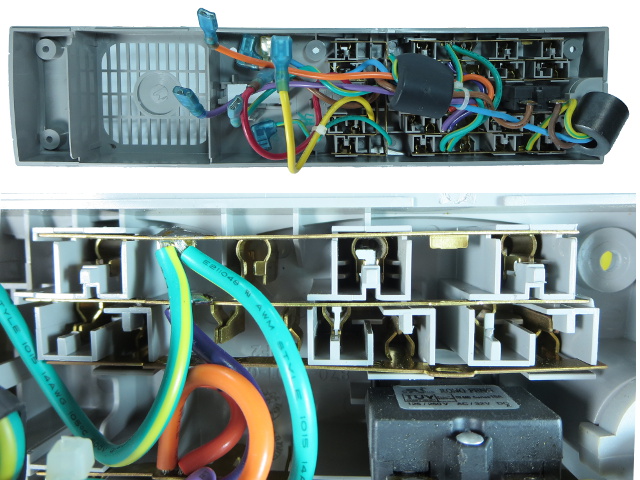
Once the spades are disconnected, the rear panel—complete with power cord, breaker, and outlets—comes off. While it is not easily readable in this picture, I can tell you that the breaker is a Rong Feng unit rated for 15 A at 250 VAC, which contradicts the 12 A input rating printed on the rear cover.
For those of you who were worried about the quality and reliability of outlets on APC's UPS after reading my article on the vintage SurgeArrest (where I complained that the middle outlets were nearly unusable), you’ll be relieved to know that the metal strips in the UPS appear to be slightly thicker. But even more important, instead of using the offset-stamped metal strips that I had issues with on the power bar, the UPS uses bent metal fingers for all connections on every outlet. The fingers have a slight angle to pinch plug prongs as they are inserted, providing a more even insertion and removal force. You have a clear shot at one of those just between the orange and ground wires, unhindered by the plastic framing around usable outlet positions.
Unlike the power bar, where electrical connections on outlet metal strips were spot-welded, these are soldered. All of the solder joints I looked at were clean and smooth, exactly as they should be.
-
blackmagnum Thanks Daniel for the interesting write up of this old beauty. I have always trusted APC for my electricity supply backups.Reply -
olsaltydog Good article, I find it funny you just put this up. I just turned in a 8 page research paper on UPS systems and the potential technology that could replace the traditional lead-acid UPS/ Diesel Generator combination. Could have used you in part of my paper for a citation.Reply -
Daniel Sauvageau Reply
I actually sent in this article two weeks ago. It just happened to finish bubbling up the editorial pipeline last weekend and get a publication slot today.14138873 said:Good article, I find it funny you just put this up. I just turned in a 8 page research paper on UPS systems and the potential technology that could replace the traditional lead-acid UPS/ Diesel Generator combination. Could have used you in part of my paper for a citation.
As for replacements for the good old UPS + Generator combo, I presume you mean things like the Bloom Box - basically a fuel-cell-powered UPS - removes the lead, the acid, periodic battery replacement, periodic maintenance on the mechanical parts, etc. from the equation. -
olsaltydog Yeah one portion of the paper dealt with the Bloom Box being implemented and used by Microsoft, E-bay, and Apple. Another part of the paper was about just replacing the lead acid batteries themselves with the Durathon battery design created by GE. Only thing is GE's battery will be used in larger applications just like the Bloom Box. The last portion I researched was how Hybrid topologies where essentially a combination of of the Star and Bus/Ring topologies you could essentially create a new entire category of UPS' by integrating the UPS into the generator itself.Reply
Im just glad the paper is done and the UPS's we have at work dont need their batteries replaced hopefully for another few years. The ones we are using have a tray of about 20-26 batteries linked together and can make a great sparkler if the terminals make contacts to the wrong parts. -
f-14 ReplyHaving trouble unlocking your "slightly used" UPS to take a look inside? At the top of the BX1000, there is a snap about halfway in at the top holding the shell's two halves together. Its location is circled in red on this picture. You need a long, flat screwdriver to easily reach and disengage it.
or go to your utensil draw and grab those chop sticks you've been saving! -
rahulkmr391 i have a APC Back UPS RS600 which i purchased in june 2011 and its battery has been replaced on april of 2014 it worked fine till august of 2014 suddenly it it stated to give me problems it was refusing to start up but battery power was working but it refuses to supply power to my equipment when i asked tech support they said the main Board has to be changed the reason they said to me is fluctuation killed my ups. what an utter piece of junk, my older ups served me for about 9 years with regular battery changes but the apc one died in less than 3yrs is this what apc makes quality ups..?Reply -
olsaltydog So you had one failure with how many long lasting APC UPS' out there. UPS' have many parts that can wear or fail at some point and should not be looked at as the ultimate safeguard. They can fail and most people find that out when they need it not to. I know it sucks but this one instance you had with APC probably should not deter you from their product. Check online if the model has been having issues then yeah avoid it, no different then what we do with power supplies which is a good reason there is a list here on site. Other then that I have seen many types of there products hold strong and true for years, hope your next experience even if with another company goes better.Reply
