Here’s How We Booted Windows 10 in 4.9 Seconds (Now, Beat Us)
Conclusion and Challenge
Ensure Fast Startup is Turned On
Fast Startup is a cool feature that images the system kernel and loaded drivers into the hibernation file when shut down. During a startup, instead of looking all around the file system for the needed files, all the system needs to do is load up the hibernation file into memory and resume instead of a full system restart.
Note: Some systems may occasionally have issues freezing on reboot after a shut down when this is enabled. This is a strange bug and likely not to affect you, but if it does, disable Fast Boot. This is enabled by default on most computers so it works fine for most people.
- Click the Windows start button
- Type “Power & sleep settings” and hit enter, the settings window will open
- Click “Additional power settings” to the right side of the window, Power Options will now open
- Click “Choose what the power buttons do” to the top left side of the window
- Under “Shutdown settings,” “Turn on fast startup (recommended)” should be checked, if not, check the box.
- Click the “Save changes” button at the bottom and exit.
Disable All Startup Programs
A surefire way to speed up your boot time is to disable applications that load at startup. If you have a long list going, you should see a significant improvement by enabling only the apps you want at boot.
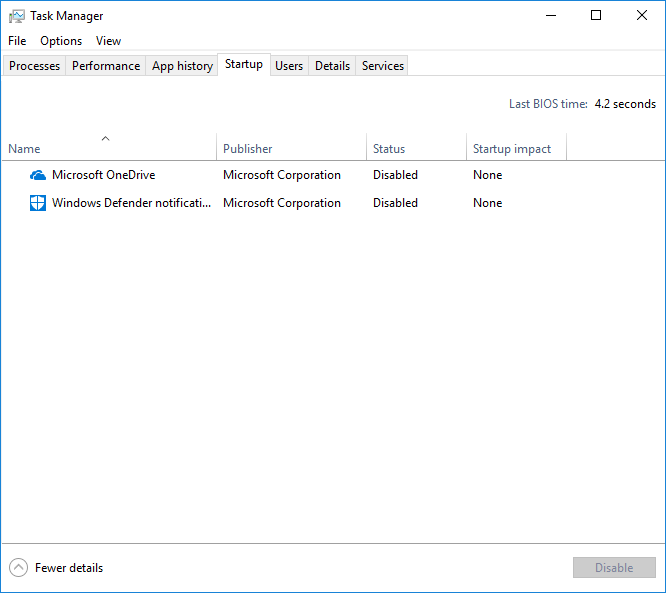
- Open Task Manager by right clicking the taskbar and selecting it or press Ctrl + Shift + Esc keys on your KB at the same time.
- Click “More details” at the bottom or navigate to the “Startup” tab at the top if you already have done so.
- Disable all startup applications to get the fastest possible boot time. However, in real-life, you probably will want some of these to run at the start, including your antivirus software, your chat clients (ex: Skype) and your cloud storage software (ex: Dropbox).
Note: The “Last BIOS time: X.X seconds” in the top right. This is your motherboard’s POST time. You can refer to this time every time you change a setting in the UEFI/BIOS to see if it had any effect.
Disable Services You Don’t Need/Use
This doesn’t affect our boot time too much, but it can for an HDD. It always helps to free up resources for things you can actually use them for too. For this, I’ve always referred to Black Viper’s Services Configuration Lists.
Disclaimer: Services disabled in our testing do not necessarily reflect our recommendation for normal use. Our changes are similar to what one would do when building a drag racing car. You cut every extra feature out that you don’t need to go down the track faster. Services are just extra processes that we don’t want to waste time on loading when we want to race to the desktop as fast as possible.
Be sure to read about the services you choose to disable before doing so, otherwise you could accidentally disable something you use. Additionally, we disabled Windows Update and Windows Defender services for better consistency when testing. To go through and change your services settings do the following:
Get Tom's Hardware's best news and in-depth reviews, straight to your inbox.
- Click the Windows start button
- Type “Services” and hit enter and the services window will open
- Go through them and find the settings you want to change or disable.
- Right click each one and select “Properties”
- Select Startup type: Disable or any other setting from the drop down as per your choice
- Click “OK” to save changes and exit each
Here’s our “short” list of what services we have disabled exactly, some may already be disabled in your system by default.
- AllJoyn Router Service
- Application Layer Gateway Service
- Application Management
- Auto Time Zone Updater
- AVCTP service
- Bluetooth Audio Gateway Service
- Bluetooth Support Service
- BranchCache
- Certificate Propagation Download Maps Manager
- Geolocation Service
- HV Host Service
- all the Hyper -V services
- Infrared Monitor Service
- Internet Connection Service
- IP Helper
- IP Translation Configuration Service
- Microsoft Account Sign-in Service Microsoft App-V Client
- Microsoft iSCSI Initiator Service Microsoft Windows SMS Router Service Natural Authentication
- Netlogon
- Network Connected Devices Auto-Setup Offline Files, Parental Controls
- Payments and NFC/SE Manager
- Phone Service
- Remote Desktop Configuration
- Remote Desktop Services
- Remote Desktop SErvices UserMode Port Redirector
- Remote Procedure Call Locator
- Remote Registry
- Retail Demo Service
- Routing and Remote Access
- Sensor Data Service
- Sensor Monitoring Service
- Sensor Service
- Shared PC Account Manager
- all smart card services
- SNMP Trap Touch Keyboard and Handwriting Panel Service
- User Experience Virtualization Service
- Web Account Manager WebClient
- Wi-Fi Direct Services Connection Manager Service
- Windows Biometric Service
- Windows Camera Frame Server
- Windows Defender Firewall
- Windows Insider Service
- Windows License Manager Service
- Windows Mobile Hotspot Service
- Windows Remote Management (WS-Management)
- Windows Search
- Windows Update
- WWAN AutoConfig
- all Xbox Live services
Uninstall Programs and Turn Windows Features Off You Do Not Use
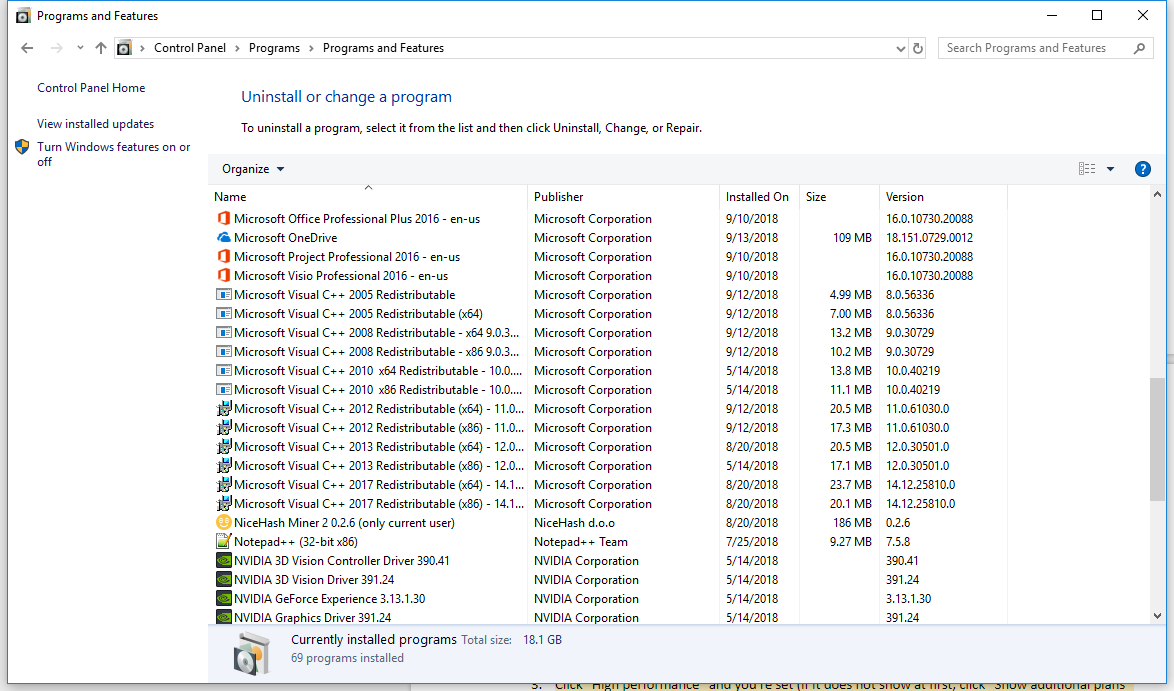
Go through and uninstall any programs you do not use and uncheck features you do not need. This, along with disabling excessive services running will help to speed up your boot time since there will be less to load up on a boot. And who knows, you might even find some malware you didn’t know you had and now is the perfect time to clean it up.
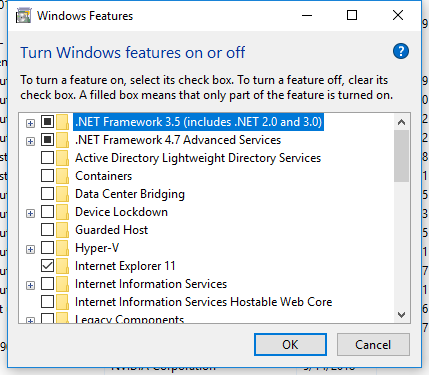
For our testing, we just went ahead and unchecked all the Features that Windows installs by default. Again, less things to load or initialize, the faster your boot will be.
To uninstall unused programs:
- Click the Windows start button
- Type “Control Panel” and hit enter and the Control Panel window will open
- Click “Uninstall a program” under the Programs category
- Go through and prune your installed programs list
Turn Windows features off that you do not use:
- In the same program list window, click “Turn Windows features on or off” in the top left
- Go through and uncheck features you do not use
- When done click the “OK” button at the bottom
Power Plan
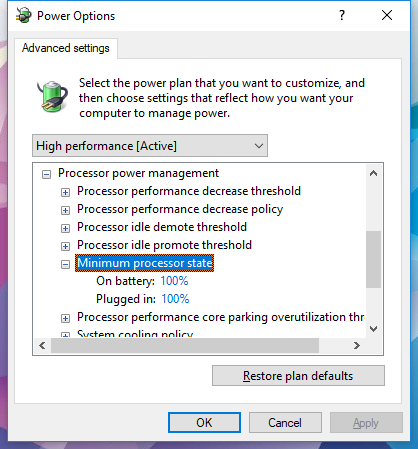
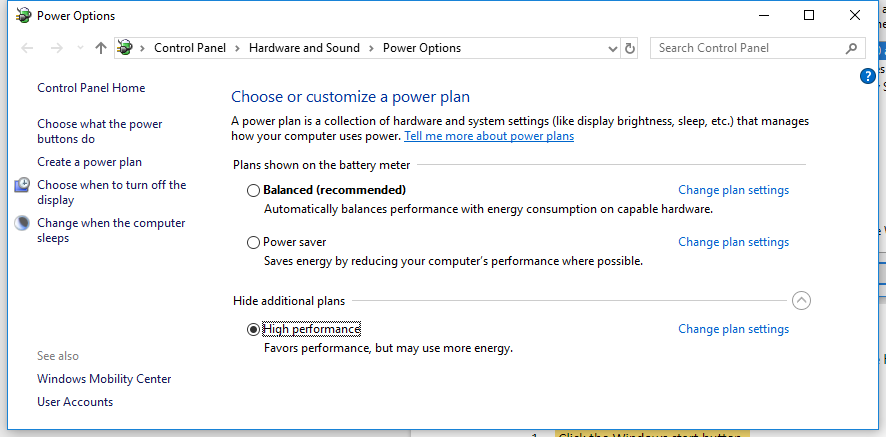
Operating at full power is great for performance, therefore, we have changed the default Balanced plan to High performance. The High performance plan keeps your system running at full speed.
Specifically, we choose high performance in order to set the minimum processor state to 100% from the Balanced plan’s default setting of 5%. If you are making a custom power plan, set the Minimum Processor State it to 100%. This will result in more power draw, but ensures the CPU will be requested to run at its full potential at all times. This resulted in a boot time decrease of 0.07 seconds.
To change the power plan:
- Click the Windows start button
- Type “Choose a power plan,” hit enter and the Power Options window will open
- Click “High performance” and you’re set (if it does not show at first, click “Show additional plans”
Advanced Performance Options
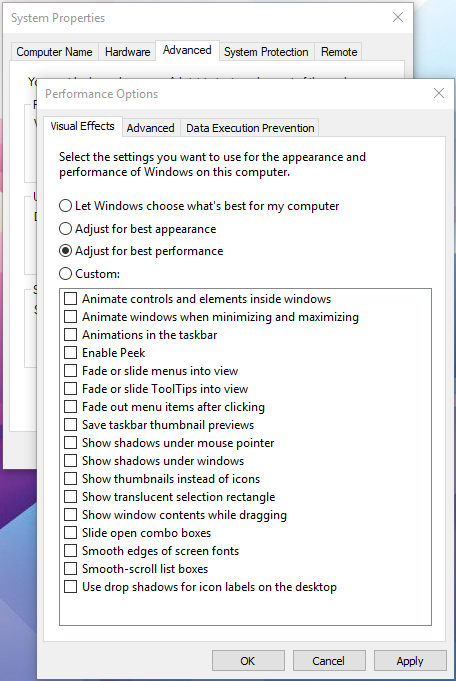
These settings helped us get to the desktop ever so slightly faster (0.03 seconds faster) by selecting the “Adjust for best performance” option. You can also set a custom profile by going through each setting one by one. I recommend spending the time to do this one by one since it will help your system feel a bit snappier by removing some of the fading Windows effects, but some settings make the text easier to read and navigation more pleasing to the eyes.
- Click the Windows start button
- Type “Control Panel” and hit enter and the Control Panel window will open
- Select “System and Security” and then select “System” next
- To the top left select “Advanced system settings”
- In the “Performance” box, click “Settings…”
- Select “Adjust for best performance” or go through and make a custom selection
Results – Fastest Times Documented
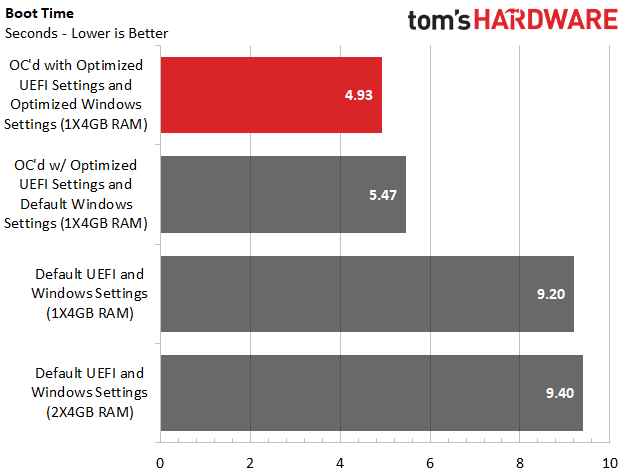
Before going through all these settings, we left everything on default in our UEFI and Windows (Fast Boot was enabled by default in Windows). This resulted in a boot time of 9.40 seconds with Intel Optane SSD 905P, which is fast enough for most people. But, as enthusiast’s, you know that's not enough for us.
Next, we removed a stick of RAM, then proceeded to optimize the UEFI and overclock, and followed up with our Windows optimizations. In all, we shaved off 4.47 seconds, nearly half the time, from our total boot time with the fastest hardware we could get our hands on.
On top of testing with the 905P, we went ahead and tested the boot time on six different SSDs. The Intel Optane SSD 905P is the undisputed champ in the storage world and delivered the fastest result of just 4.93 seconds, however, it is closely followed by its smaller brother, the Intel Optane SSD 800P and other PCIe NVMe based SSDs.
SATA SSDs aren’t much slower as we can see by the 860 EVO’s result. And, the WD Blue HDD obviously comes in last, but with Fast Boot enabled, it sped to the desktop in just 15 seconds, an admirable result that shows just how well Windows Fast Boot works, even for the slowest of storage devices.
Myth Busted
One suggestion I always see pop up online is to go into System Configuration and check “No GUI boot” and go into the “Advanced settings…” and set the “Maximum memory” and “Number of processors” manually. In testing this actually resulted in a boot time that was 0.5-0.6 seconds longer than with it left them alone. These changes should only me made if you are troubleshooting problems with your system.
Conclusion and Challenge
We set out with a goal to load Windows in 5 seconds or less. At the end of the day, it's up to you to decide how far to tweak your system, what features, and what settings work best for you with your hardware and software. Many of the settings we have gone over may not apply, nor are recommended outright without caution.
After going through this guide, we hope you are able to shave some time off your boot and get to your files faster than ever before. If you want to quickly get your boot time faster, there’s no better way to do so than get some new hardware, especially a new SSD...along with some optimizations here and there.
We’re also eager to see if any of our readers can go from hitting the power button to seeing a Windows 10 desktop in less than 4.9 seconds. If you’re up to the challenge, add a comment below and include a link to video proof of your boot time. The reader with the fastest boot time, even if it's not less than 4.9 seconds, gets bragging rights and a custom user status on the forums.

Sean is a Contributing Editor at Tom’s Hardware US, covering storage hardware.
-
David_693 Link and info for the Intel 660p SSD are for the 512GB model NOT 1TB, $99 was too good to be true!Reply -
Peter Martin you know, I put an 850 evo in my kids asus laptop at it boots as fast or faster with fast-boot. we hit the button and it's almost instant. he loves that stupid laptop. when he got it, it had a 5400 rpm in it... lol, he hated it. i could not believe it once I installed the ssd and windows 10 fresh. I was stunned. i did a bunch of timings with my stopwatch, not that accurate but still, 3-5 seconds boot to usable is amazing.Reply -
Colif Software tab only talks about bios, mentioning you set up netplwiz in win 10 to auto login would have helped or PC wouldn't be getting to desktop in that speed :)Reply -
davidgirgis Here's How I rebooted Windows 10 in 4.5 Minutes:Reply
(Now, Beat Me)
2012 13" Macbook Pro 9,2
Windows 10 Pro via Boot Camp
Restart from Desktop to Desktop in 2:29
Not usable until the 5400 rpm hard drive goes down from 100% utilization at 4:27 -
davidgirgis Reply21349926 said:Does booting from a Win10 VM stored on a RAM Disk qualify? :)
Yes. You qualify because you used a combination of Hardware and Software. Albeit, non-traditionally. -
maestro0428 Great article. Somethings I can try to speed up my boot times, although I typically leave my PC on 24/7.Reply
