De-Lidding and Overclocking Core i7-7700K with Water and LN2
We're testing Kaby Lake's maximum frequency at various core voltages, the influence of de-lidding, and even applying a bit of liquid nitrogen. Get ready to learn more about overclocking Intel's latest architecture with a bunch of Core i7-7700K CPUs.
Overclocking with Water Cooling
Cinebench R15
In order to determine what our processors can do, we first test them with Cinebench R15. This benchmark does not utilize AVX (Advanced Vector Extensions), so it gives us an idea of the frequencies and temperatures a gamer might see.
We don't run the benchmarks with Intel's TIM above a core voltage of 1.3V to keep from damaging the processors.
Since we're here, we run a number of different experiments:
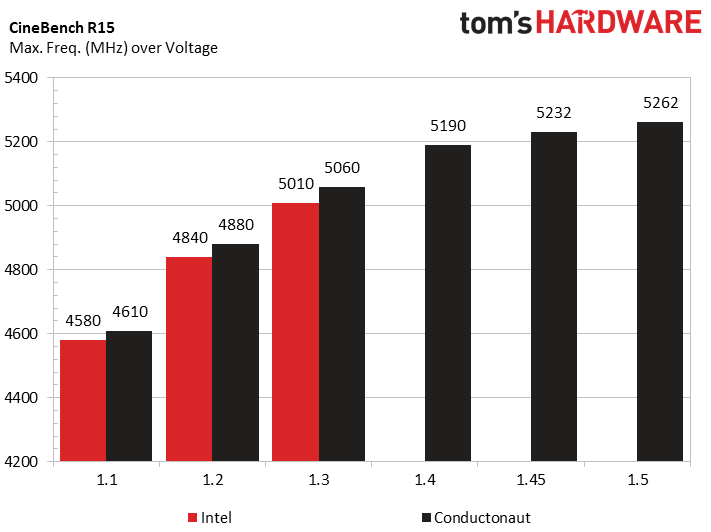
- For those who want to under-volt for lower temperatures and power consumption, we dial in 1.1V. We were able to run stably at 4580 MHz before de-lidding, and 4610 MHz after.
- When we increase the voltage to 1.2V, our maximum attainable frequency climbs more than 250 MHz, yielding a remarkable gain. At this voltage, the difference between thermal pastes increases slightly (from 30 MHz at 1.1V to 40 MHz at 1.2V).
- At 1.3V we reach 5 GHz. The thermal paste difference now reaches 50 MHz.
- With 1.4V, we pass the test at 5190 MHz. Not bad!
- In search of 5.2 GHz, we give ourselves a couple of tries at 1.45V. The outcome is 5232 MHz.
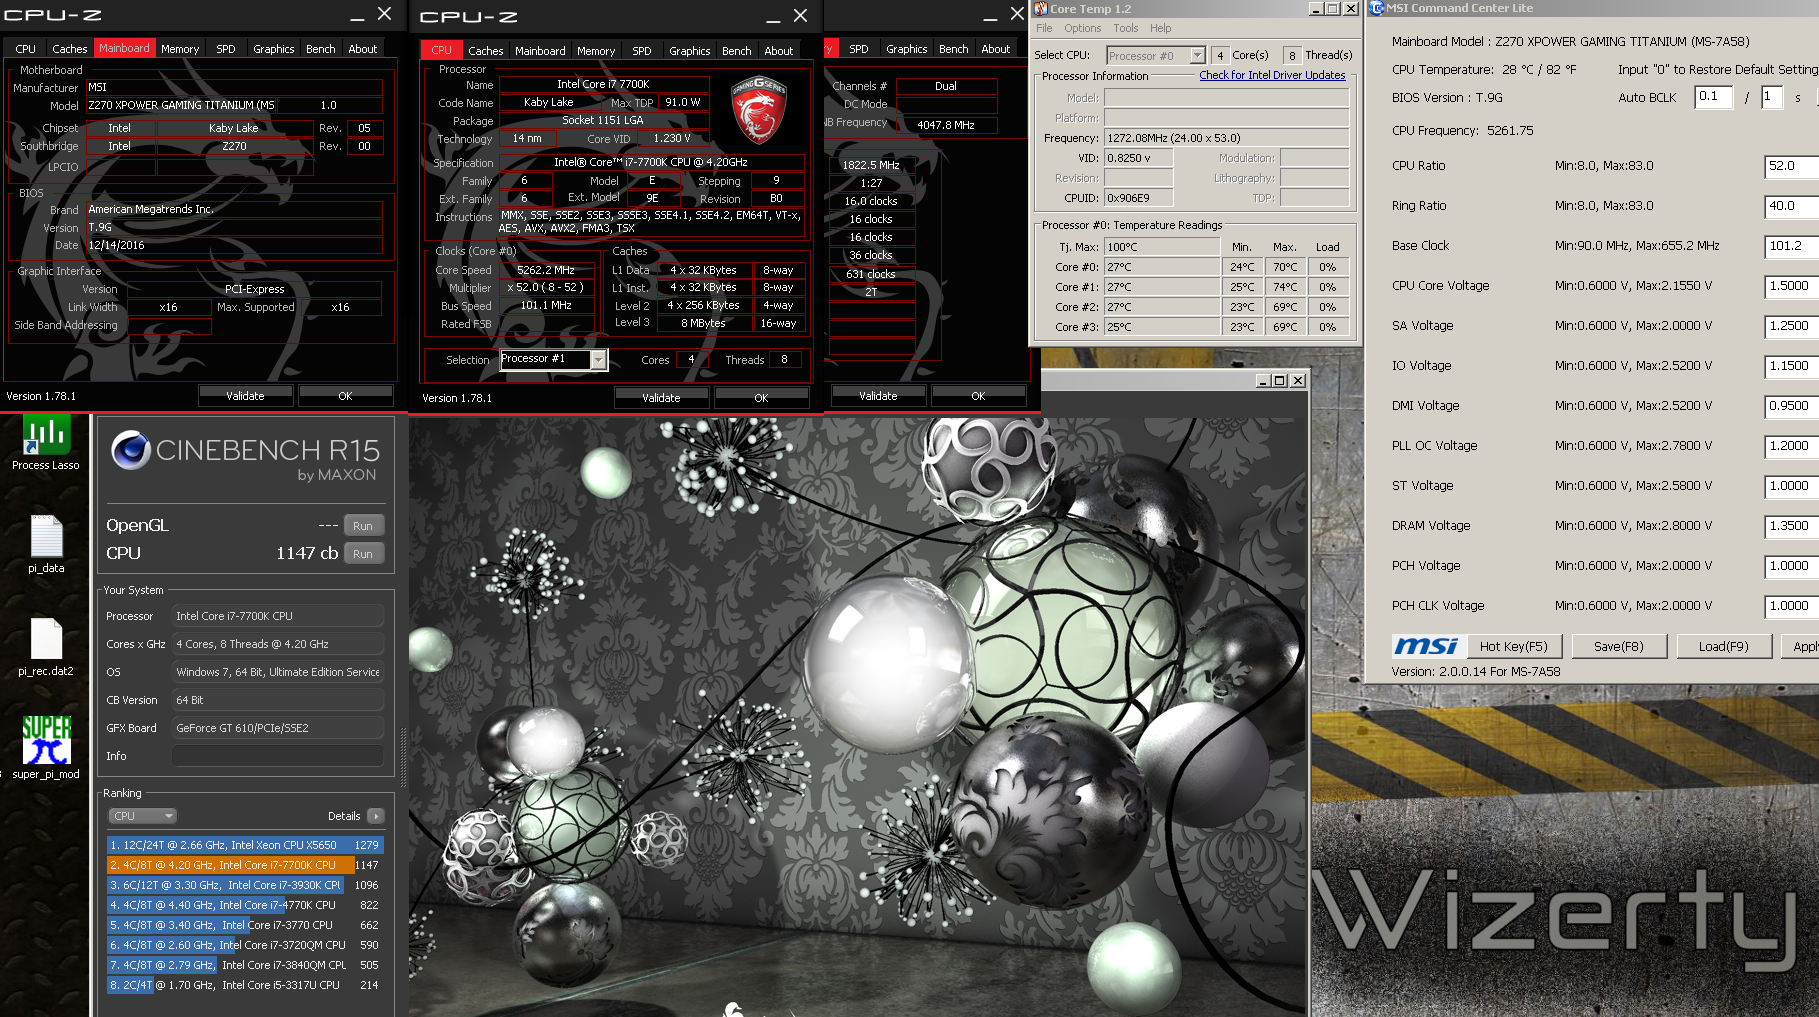
- And why not 5.3 GHz? Alas, 1.5V wouldn't allow us to break the 5262 MHz mark.
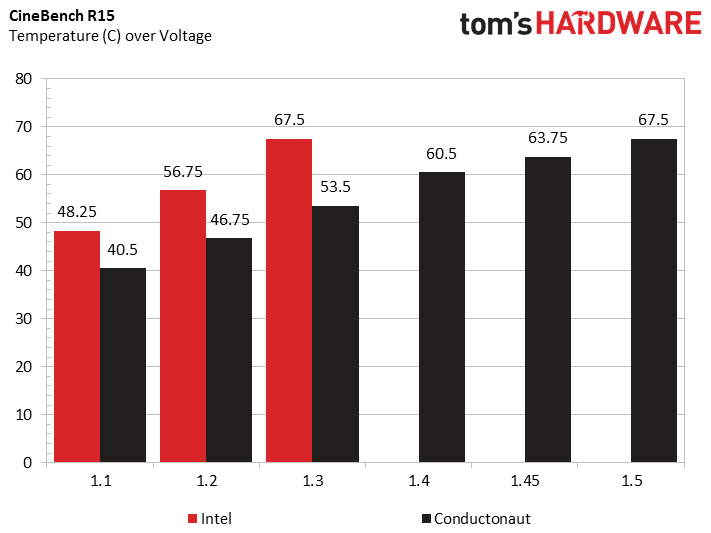
Looking at the temperatures, we see that de-lidding does very little at Intel's base voltage. The processor doesn't get particularly hot, and the change to Conductonaut only yields an 8°C improvement; it's understandable that the frequency gain would also be small. But when voltage is increased, the processor heats up more and the thermal paste plays a greater role, lowering temperature by 10°C at 1.2V and 14°C at 1.3V. Using Conductonaut at 1.5V gives us the same operating temperature as Intel's TIM at 1.3V!
It's fairly simple then: de-lidding only becomes interesting when you intend to apply a voltage greater than 1.25V.
| Tip: When you start chasing megahertz, you risk meeting our friend the blue screen. This is part of the game. But the blue screen, as annoying as it is, may also clue you in on whatever caused your failure. “Memory management” errors speak for themselves. In other cases, you'll often see some 101s and 124s, which, for the most part, are explained like this: STOP: 0x00000101 -> Not enough Vcore, or you're gunning for too high of a frequency.STOP: 0x00000124 -> Not enough Vcache, or you're gunning for too high of a cache frequency. |
For the curious, here is the data we collected:
| Setting | TIM | Freq. (MHz) | Vcore (V) | Score (pt) | Temp. (°C) |
|---|---|---|---|---|---|
| Stock | Intel | 4500 | 1.22 | 983 | 55.75 |
| Conductonaut | 4500 | 1.22 | 984 | 46 | |
| 1.1V | Intel | 4580 | 1.1 | 1010 | 48.25 |
| Conductonaut | 4610 | 1.1 | 1018 | 40.5 | |
| 1.2V | Intel | 4840 | 1.2 | 1060 | 56.75 |
| Conductonaut | 4880 | 1.2 | 1070 | 46.75 | |
| 1.3V | Intel | 5010 | 1.3 | 1099 | 67.5 |
| Conductonaut | 5060 | 1.3 | 1108 | 53.5 | |
| 1.4V | Conductonaut | 5190 | 1.4 | 1132 | 60.5 |
| 1.45V | Conductonaut | 5232 | 1.45 | 1138 | 63.75 |
| 1.5V | Conductonaut | 5262 | 1.5 | 1147 | 67.5 |
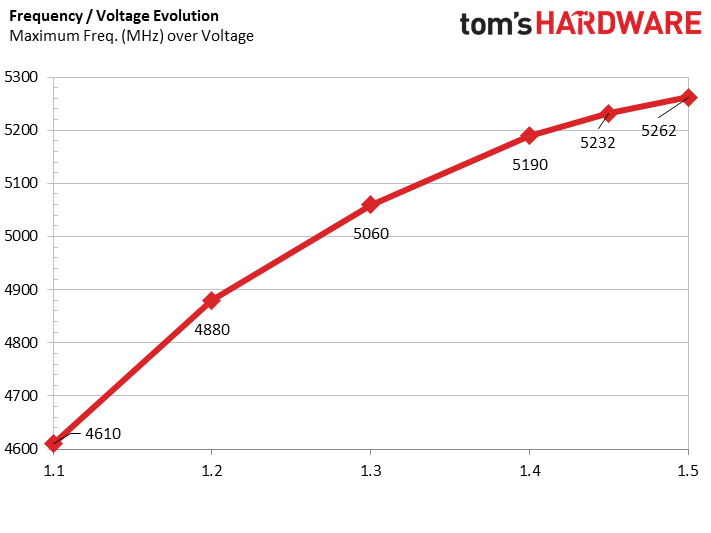
Before moving on to a more demanding test, let's take a closer look at the evolution of frequency as a function of core voltage. In other words, we want to examine scaling.
Get Tom's Hardware's best news and in-depth reviews, straight to your inbox.
The transition from 1.1V to 1.2V facilitates a significant frequency jump (+270 MHz). This is a very good progression: small voltage, many MHz. The processor scales well. With an additional 0.1V, the gain drops to 180 MHz. You can see diminishing returns kick in a bit, though we're still getting a fairly favorable outcome.
Pushing to 1.4V, however, only yields 130 MHz. The processor appreciates increased Vcore less and less, and if this is your daily computer, it's time to stop. Effectively, you're increasing temperature and voltage while netting less impressive speed-ups.
Naturally, moving to 1.45V sees the curve level off even more. A 40 MHz jump for 0.05V is the equivalent of 80 MHz for 0.1V. Getting to 1.5V gives us barely 30 MHz more. The only way to keep frequency scaling up is to cool the CPU more aggressively.
AVX Stability
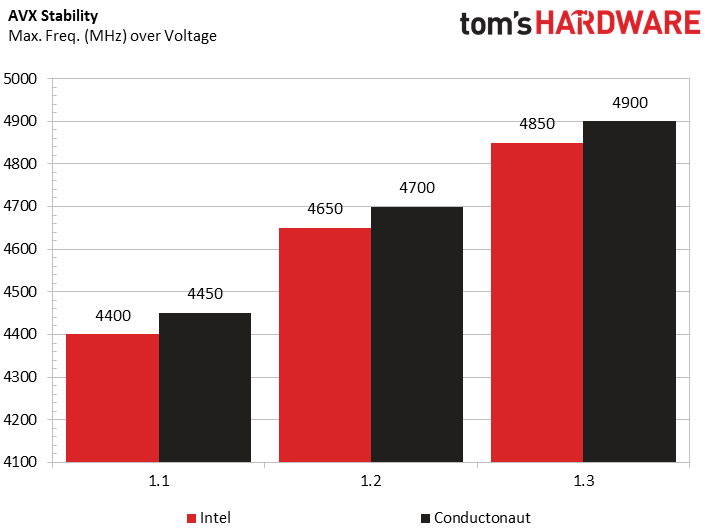
To put greater stress on the processor, we launched a stability test that uses massive amounts of AVX instructions. This is not a scenario you would encounter in daily usage.
Before we explain the chart, it's important to clarify that with 1.1V the processor cache is not stable at 4.2 GHz. We therefore lowered it to 4 GHz to run this test properly.
With the core voltage lowered to 1.1V, the processor was stable at 4400 MHz before de-lidding, and 4450 MHz with the help of Conductonaut. The rise to 1.2V yields an additional 250 MHz with both configurations. At 1.3V, the difference (50 MHz) with de-lidding is unchanged.
We expected this gap to grow, but with the tests being very long and the increments relatively large, subsequent steps simply were not stable. Still, we noticed an important difference: at 1.1 V the next clock rate up wouldn't even hold up for one second, while at 1.3V it was almost stable. Sadly, in dealing with stability, we're either good or not. Let's just say that at 1.3V we're in reach of 4950 MHz.
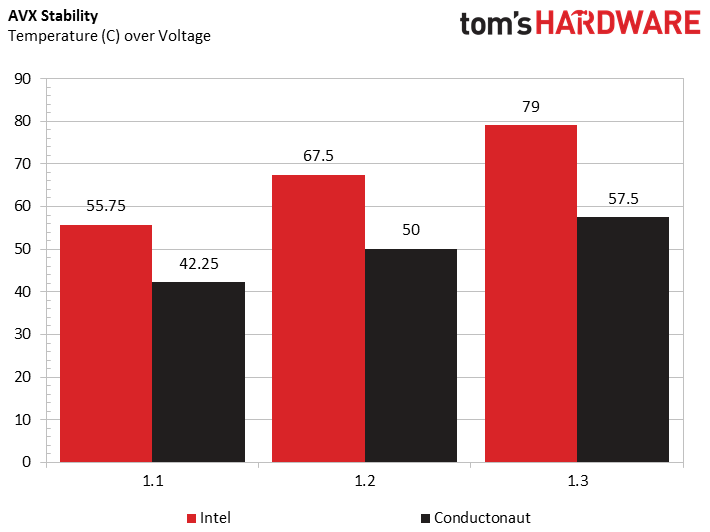
If you are a fan of OCCT (OverClock Checking Tool), Lynx, or Prime 95, you are going to love de-lidding. AVX loads generate lots of heat, so the gains become more important. Starting at a 13°C difference at 1.1V, we reach a 22°C difference at 1.3V. Instead of pushing the limits at 79°C, you're breezing with a low of 57.5°C.
| Setting | TIM | Freq. (MHz) | Vcore (V) | Temp. (°C) |
|---|---|---|---|---|
| Stock | Intel | 4500 | 1.24 | 66.5 |
| Conductonaut | 4500 | 1.24 | 50 | |
| 1.1V | Intel | 4400 | 1.1 | 55.75 |
| Conductonaut | 4450 | 1.1 | 42.25 | |
| 1.2V | Intel | 4650 | 1.2 | 67.5 |
| Conductonaut | 4700 | 1.2 | 50 | |
| 1.3V | Intel | 4850 | 1.3 | 79 |
| Conductonaut | 4900 | 1.3 | 57.5 |
Take note of your motherboard's default values and do not leave the settings on automatic. If you don't need to overclock, at least drop the core voltage.
| Tip: If you want to overclock your processor to higher frequencies, but don't want to give up stability in AVX-heavy workloads, use your BIOS' AVX Offset feature. Let's say your CPU isn't stable in AVX-based tests above 4.8 GHz, but is stable at up to 5 GHz otherwise. You have three options:Set the chip to operate at 4.8 GHz. It'll be stable in every test, even though you lose out on the 200 MHz it'd accommodate in non-AVX tasks like games.Set your processor to 5 GHz, knowing if you start an AVX-optimized workload, a crash is likely imminent.Set your processor to 5 GHz with an AVX offset of -2 in the BIOS. For non-AVX applications, the processor runs at up to 5 GHz, and when an AVX-optimized task starts, the frequency automatically drops to 4.8 GHz. Isn't technology wonderful? |
Memory
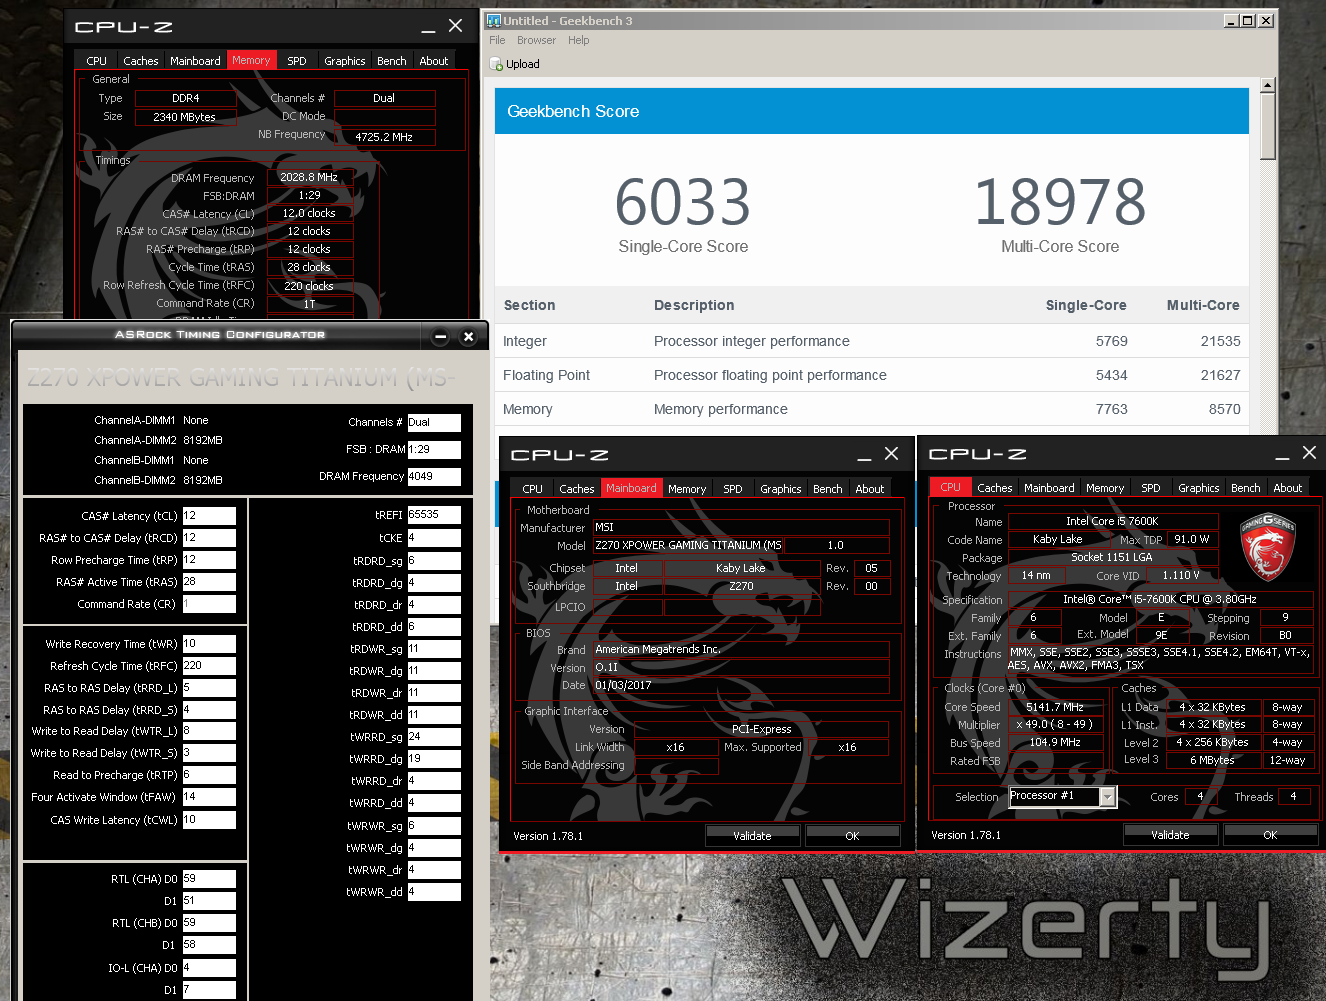
Memory overclocking on Kaby Lake and Skylake is exactly the same, so we won't go into much depth there. If you'd like a look at what's possible, check out the image below.
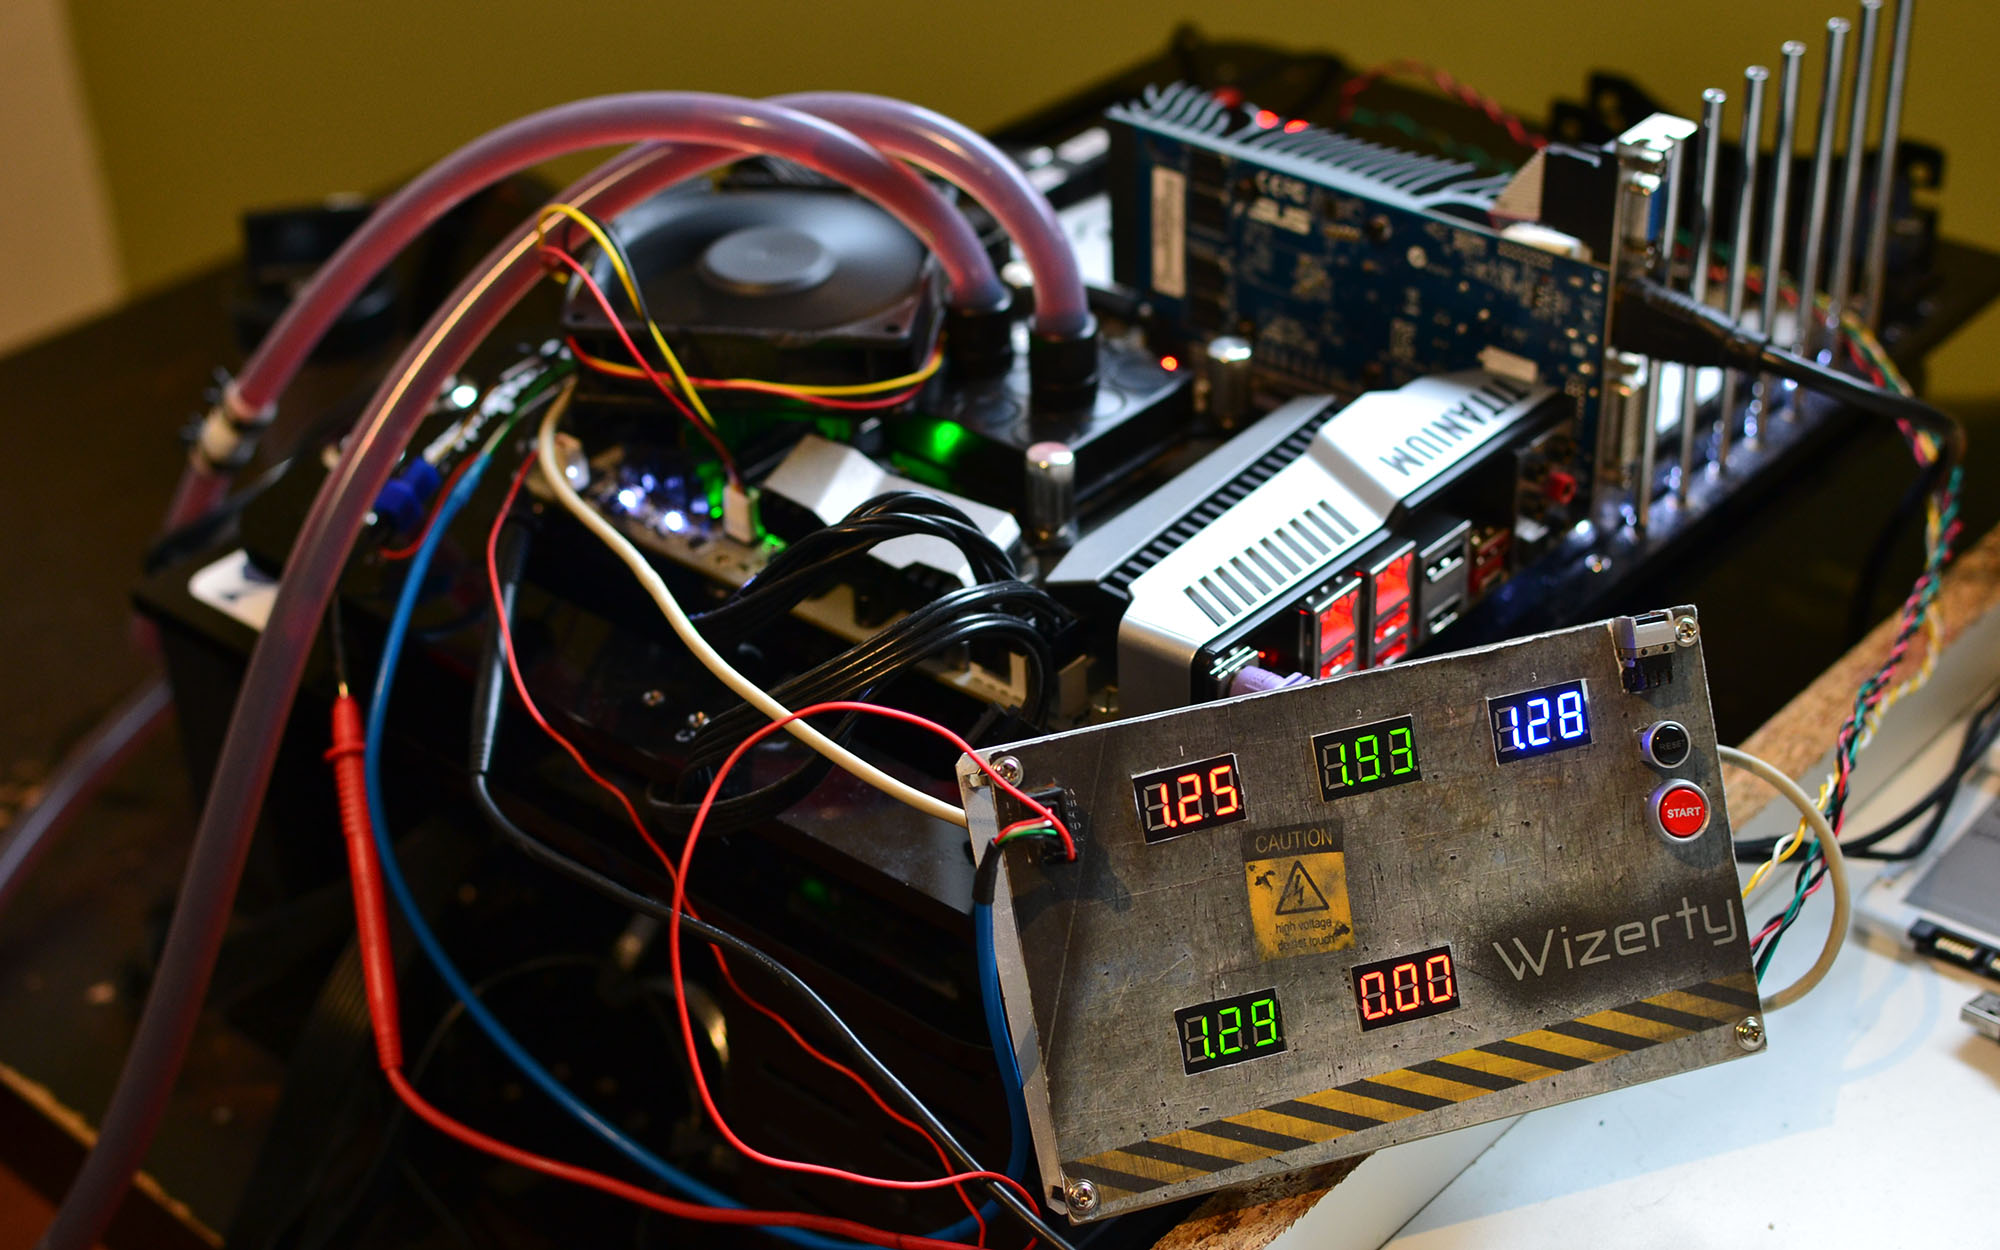
Although we had to apply 1.93V (instead of the standard 1.2V supply) to our DDR4 modules, they seem to love this. We saw 4060 MT/s at 12-12-12-28 120 and 1T!
Remember that not all motherboards and memory kits are made to handle that much voltage or facilitate tight timings. For our experiment, we're using DRAM modules with Samsung memory chips (revision B-die) and an MSI Z270 XPower Titanium motherboard.
MORE: Best CPUs
Current page: Overclocking with Water Cooling
Prev Page Intel Core i7-7700K: De-Lidded and Overclocked Next Page Overclocking with Liquid Nitrogen-
rantoc Intel should be ashamed of themselves for applying such useless TIM to save a few cents in a "high end" product as they like to call it!Reply -
AgentLozen Very fun article to read.Reply
You guys were using water cooling and liquid nitrogen for this experiment. I wonder how well aggressive air cooling would have held up. -
InvalidError Reply
The quality of Intel's TIM is perfectly fine. The problem is the thickness as the gap between the die and IHS is many times wider than necessary. Most of the cooling performance gain from de-lidding comes from reducing or eliminating the adhesive thickness.19451139 said:Intel should be ashamed of themselves for applying such useless TIM to save a few cents in a "high end" product as they like to call it!
To make a fair comparison against Intel's stock TIM, you'd need to shim the IHS to achieve the same total package thickness. Any TIM will perform much worse when it is 5X thicker than the minimum necessary. -
Xajel I miss the days of Phase Change cooling, while LN is more extreme, you just can't use it in real world usage, just to see how far you can go with it without going for more extreme cooling ( eg. LHe ), With Phase Change, you can even go 24/7 If you have the build correctly ( isolation from humidity )Reply -
Math Geek i'd love to know how much power it took to get those results :)Reply
folks ask all the time how much extra power they need for overclocking and this looks like a good opportunity to get some solid numbers if they'd like to share them. what kind of wattage does this use at 6.6 ghz??? -
rantoc Reply19451237 said:
The quality of Intel's TIM is perfectly fine. The problem is the thickness as the gap between the die and IHS is many times wider than necessary. Most of the cooling performance gain from de-lidding comes from reducing or eliminating the adhesive thickness.19451139 said:Intel should be ashamed of themselves for applying such useless TIM to save a few cents in a "high end" product as they like to call it!
To make a fair comparison against Intel's stock TIM, you'd need to shim the IHS to achieve the same total package thickness. Any TIM will perform much worse when it is 5X thicker than the minimum necessary.
Sure the distance the TIM have to transfer the heat is one of the variables for thermal conductivity but there are tons of documented straight out switches of only the TIM after deliding (without any changes in the IHS height above the CPU) that have resulted in similar improvements like this articles when overclocking the CPU. Sure the tim is sufficient for non overclocking use but intels stock tim is clearly holding the CPU back when pushing that overclock. -
InvalidError Reply
If you include the nitrogen separator and helium chillers needed to generate a sufficient stream of LN2 to keep the overclock running, probably in the neighborhood of 10kW :)19451369 said:what kind of wattage does this use at 6.6 ghz??? -
InvalidError Reply
I have only seen one site report on attempting to maintain the same thickness with Ivy Bridge and that site's results showed worse performance with most aftermarket pastes. All other deliddings I have seen removed the glue and did not put anything back in its place to duplicate its thickness or when they did (ex.: deBauer), they minimized that thickness by pressing the IHS against the substrate before curing.19451405 said:Sure the distance the TIM have to transfer the heat is one of the variables for thermal conductivity but there are tons of documented straight out switches of only the TIM after deliding (without any changes in the IHS height above the CPU) that have resulted in similar improvements like this articles when overclocking the CPU.
