LAN 102: Network Hardware And Assembly
Building Your Own Twisted Pair Cables
When it’s time to wire your network, you have two choices. You can opt to purchase prebuilt cables, or you can build your own cables from bulk wire and connectors.
You should build your own twisted pair (TP) cables if you:
- Plan to perform a lot of networking
- Need cable lengths longer than the lengths you can buy preassembled
- Want to create both standard and crossover cables
- Want to choose your own cable color
- Want maximum control over cable length
- Want to save money
- Have the time necessary to build cables
While you can save money building your own cables, you can get pre-made network cables at very low prices from some online vendors such as MonoPrice (www.monoprice.com). In many cases you’ll find that it is actually cheaper to purchase pre-made cables than it is to build your own.
TP Wiring Standards
If you want to create TP cables yourself, be sure your cable pairs match the color coding of any existing cable or the color coding of any prebuilt cabling you want to add to your new network. Because there are eight wires in TP cables, many incorrect combinations are possible. Several standards exist for UTP cabling.
Tip: The key is to be consistent. Use the same scheme for all your cables, and ensure that anyone else working on your network understands this scheme.
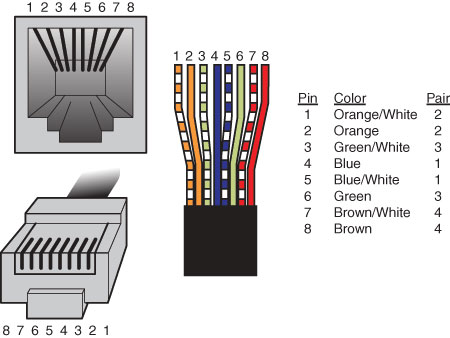
The most common standard is the AT&T 258A configuration (also called EIA/TIA 568B). The following table lists the wire pairing and placement within the standard 8P8C (RJ45) connector.
Get Tom's Hardware's best news and in-depth reviews, straight to your inbox.
| 8P8C (RJ45) Connector Wire Pairing and Placement for AT&T 258A/EIA 568B Standard | ||
|---|---|---|
| Pin | Color | Pair |
| 1 | Orange/White | 2 |
| 2 | Orange | 2 |
| 3 | Green/White | 3 |
| 4 | Blue | 1 |
| 5 | Blue/White | 1 |
| 6 | Green | 3 |
| 7 | Brown/White | 4 |
| 8 | Brown | 4 |
*This pair is not used with 10BASE-T or Fast Ethernet 100BASE-TX, but all four pairs are used with Fast Ethernet 100BASE-T4 and gigabit Ethernet 1000BASE-TX standards.
In the following image, an 8P8C (RJ45) cable connector is wired to the AT&T 258A/EIA 568B standard.
Note: You also might encounter the similar EIA 568A standard. It reverses the position of the orange and green pairs listed previously.
Crossover UTP Cables
Crossover cables, which change the wiring at one end of the cable, connect two (and only two) computers when no hub or switch is available or connect a hub or switch without an uplink port to another hub or switch. The pinout for a crossover cable is shown in the table below. This pinout is for one end of the cable only; the other end of the cable should correspond to the standard EIA 568B pinout, as shown in the previous table.
| 8P8C (RJ45) Connector Wire Pairing and Placement for EIA 568A Standard | ||
|---|---|---|
| Pin | Color | Pair |
| 1 | Green/White | 3 |
| 2 | Green | 3 |
| 3 | Orange/White | 2 |
| 4 | Blue | 1 |
| 5 | Blue/White | 1 |
| 6 | Orange | 2 |
| 7 | Brown/White | 4 |
| 8 | Brown | 4 |
Note: Most standard cables have both ends wired using the EIA 568B standard, however it is also possible to wire them with both ends using the EIA 568A standard. As long as both ends are wired the same in a straight-through configuration, the cable will work. Crossover cables should have one end in an EIA 568B configuration, while the other end is in an EIA 568A configuration, thus crossing pairs 2 and 3. It should be noted that other wiring schemes exist for connecting UTP cables with 8P8C (RJ45) connectors. The ones listed in this chapter are the most common.
Most newer switches are designed so as to automatically detect whether a crossover connection is required and configure the connection appropriately. This feature is called Auto-MDIX (automatic medium-dependent interface crossover) and essentially negates the need for having dedicated “uplink” ports or using crossover cables when connecting devices together.
Constructing the Cable
Making your own network cables requires a few tools that aren’t found in a typical toolbox. Those items that you might not already have you can typically purchase for a single price from many network-products vendors. You need the following tools and supplies to build your own Ethernet cables:
- UTP cable (Category 5 or better)
- 8P8C (RJ45) connectors
- Wire stripper
- 8P8C (RJ45) crimping tool
Before you make a “real” cable of any length, you should practice on a short length of cable. 8P8C (RJ45) connectors and bulk cable are cheap; network failures are not. Follow these steps for creating your own twisted-pair cables:
1. Determine how long your cable should be. You should allow adequate slack for moving the computer and for avoiding strong interference sources. Keep the maximum distances for UTP cables of about 100 meters in mind.
2. Roll out the appropriate length of cable.
3. Cut the cable cleanly from the box of wire.
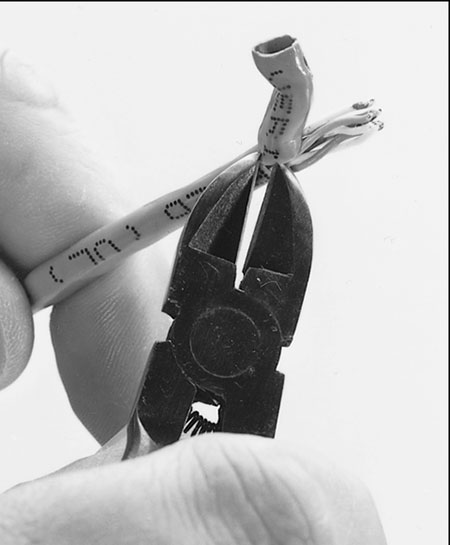
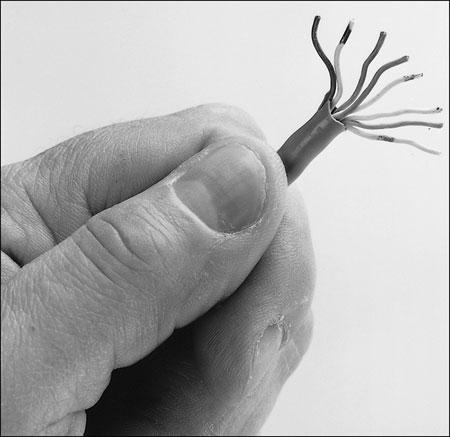
4. Use the wire stripper to strip only the insulation jacket off the cable, exposing the TP wires (see the figure below); you’ll need to rotate the wire about one and a quarter turns to strip away all the jacket. If you turn it too far, you’ll damage the wires inside the cable.
5. Check the outer jacket and inner TP wires for nicks; adjust the stripper tool, and repeat steps 3 and 4 if you see damage.
6. As shown in the image below, arrange the wires according to the EIA 568B standard. This arrangement is listed previously, in the section “TP Wiring Standards.”
7. Trim the wire edges so the eight wires are even with one another and are slightly less than 1/2-inch past the end of the jacket. If the wires are too long, crosstalk (wire-to-wire interference) can result; if the wires are too short, they can’t make a good connection with the 8P8C (RJ45) plug.
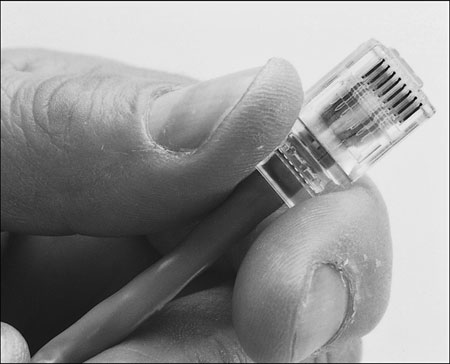
8. With the clip side of the 8P8C (RJ45) plug facing away from you, push the cable into place (see the image below). Verify that the wires are arranged according to the EIA/TIA 568B standard before you crimp the plug onto the wires (refer to the previous table further up this page). Adjust the connection as necessary.
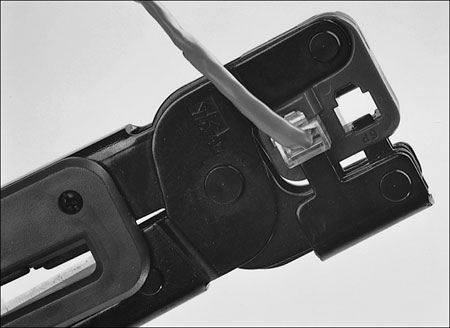
9. Use the crimping tool to squeeze the 8P8C (RJ45) plug onto the cable (see the image below). The end of the cable should be tight enough to resist being removed by hand.
10. Repeat steps 4–9 for the other end of the cable. Recut the end of the cable if necessary before stripping it.
11. Label each cable with the following information:
- Wiring standard
- Length
- End with crossover (if any)
- ________ (a blank) for computer ID
The cables should be labeled at both ends to make matching the cable with the correct computer easy and to facilitate troubleshooting at the hub. Check with your cable supplier for suitable labeling stock or tags you can attach to each cable.
Cable Distance Limitations
The people who design computer systems love to find ways to circumvent limitations. Manufacturers of Ethernet products have made possible the building of networks in star, branch, and tree designs that overcome the basic limitations already mentioned. (For more information, see the “Wired Network Topologies” section later in this chapter.) Strictly speaking, you can have thousands of computers on a complex Ethernet network.
LANs are local because the network adapters and other hardware components typically can’t send LAN messages more than a few hundred feet. The table below lists the distance limitations of various types of LAN cable. In addition to the limitations shown in the table, keep the following points in mind:
- You can’t connect more than 30 computers on a single Thinnet Ethernet segment.
- You can’t connect more than 100 computers on a Thicknet Ethernet segment.
- You can’t connect more than 72 computers on a UTP Token-Ring cable.
- You can’t connect more than 260 computers on an STP Token-Ring cable.
| Network Distance Limitations | |||
|---|---|---|---|
| Network Adapter | Cable Type | Maximum | Minimum |
| Ethernet | 10BASE-2 | 185 m (607 feet) | 0.5 m (1.6 feet) |
| 10BASE-5 (drop) | 50 m (164 feet) | 2.5 m (8.2 feet) | |
| 10BASE-5 (backbone) | 500 m (1640 feet) | 2.5 m (8.2 feet) | |
| 10BASE-T | 100 m (328 feet) | 2.5 m (8.2 feet) | |
| 100BASE-TX | 100 m (328 feet) | 2.5 m (8.2 feet) | |
| 1000BASE-TX | 100 m (328 feet) | 2.5 m (8.2 feet) | |
| 10GBASE-T | 100 m (328 feet) | 2.5 m (8.2 feet) | |
| Token Ring | STP | 100 m (328 feet) | 2.5 m (8.2 feet) |
| UTP | 45 m (147 feet) | 2.5 m (8.2 feet) | |
| ARCnet | Passive hub drop | 30 m (98 feet) | Varies by cable type |
| Active hub | 600 m (1968 feet) | Varies by cable typ |
If you have a station wired with Category 5 or better cable that is more than 328 feet (100 meters) from a hub, you must use a hub or switch that acts as a repeater to regenerate the signal. If you have two or more stations beyond the 328 foot limit of UTP Ethernet, connect them to a hub or switch that is less than 328 feet away from the primary hub or switch and connect the new hub or switch to the primary hub or switch via its uplink port. Because hubs and switches can act as repeaters, this feature enables you to extend the effective length of your network.
Current page: Building Your Own Twisted Pair Cables
Prev Page Wired Network Adapter Connectors Next Page Wired Network TopologiesDon Woligroski was a former senior hardware editor for Tom's Hardware. He has covered a wide range of PC hardware topics, including CPUs, GPUs, system building, and emerging technologies.
-
KelvinTy O... I thought all CAT5 are able to transmit 1000Mbps signals BEFORE reading this article... It's kind of weird ~_~" that I can get 5.X MB/s download speed = ="Reply -
Reynod Don could you talk to Chris A and Joe and see if we could give a few hard copies of this book away as prizes for some of our users here in the forums who work hard to help others?Reply
How about a copy for each of the users who make the top ranks for the month of November ... under the Hardware sections of the forums?
:) -
JasonAkkerman They make it look like making a cable it so easy, and it is, after the first few tries. Also, making one or two cables isn't too bad, but don't let yourself get talked into making 50 two foot patch cables. Your finger tips will never forgive you.Reply -
xx_pemdas_xx JasonAkkermanThey make it look like making a cable it so easy, and it is, after the first few tries. Also, making one or two cables isn't too bad, but don't let yourself get talked into making 50 two foot patch cables. Your finger tips will never forgive you.I got talked into making 10...Reply
-
spookyman JasonAkkermanThey make it look like making a cable it so easy, and it is, after the first few tries. Also, making one or two cables isn't too bad, but don't let yourself get talked into making 50 two foot patch cables. Your finger tips will never forgive you.Reply
Oh I don't know. I have made several thousand patch cord over the past 18 years.
All you need is a high quality crimper, good cutters and small screw driver. You are set.
-
silveralien81 This was a great article. In fact it inspired me to buy the book. I'm happy to report that the rest of the book is just as well written. Very educational. A top notch reference.Reply -
neiroatopelcc Read the first page. Seems like well written stuff, but not exactly written for my type of user. Also it seems to be igoring a lot of stuff. For instance it sais the network runs at the speed of the slowest component and will figure it out on its own. This isn't true. If you run a pair of 1000TX capable nics on old cat 5 cable (without the e), it'll still attempt to run at that speed, despite the massive crc errors it might generate. Also, if you're running on 'old gigabit hardware' it won't nessecarily have support for 10Base-T speeds. Also, not all firmware has autonegotiate or automdix support, thus you sometimes have to specificly set the speed between links. This is mainly for fiber links though, which seem to have been ignored entirely.Reply
Anyway. As I said, I think it's well written and probably quite suitable for people who don't know anything about networks (except it seems to assume people know the osi model). I'll go see if the other chapters are equaly basic.
