The RGBaby: How We Built a Mini ITX RGB Gaming PC
All of the lights, none of the space.
We had a feeling that putting together a mini ITX RGB PC build would be hard. It turns out that was an understatement -- especially when it came to getting the myriad of cables inside the tightly packed case with anything approaching tidiness.
We got all of our parts together, but first, the case had to be entirely deconstructed. That included taking out the top, sides, the PSU shroud, drive rack, GPU support and fan dust filters.
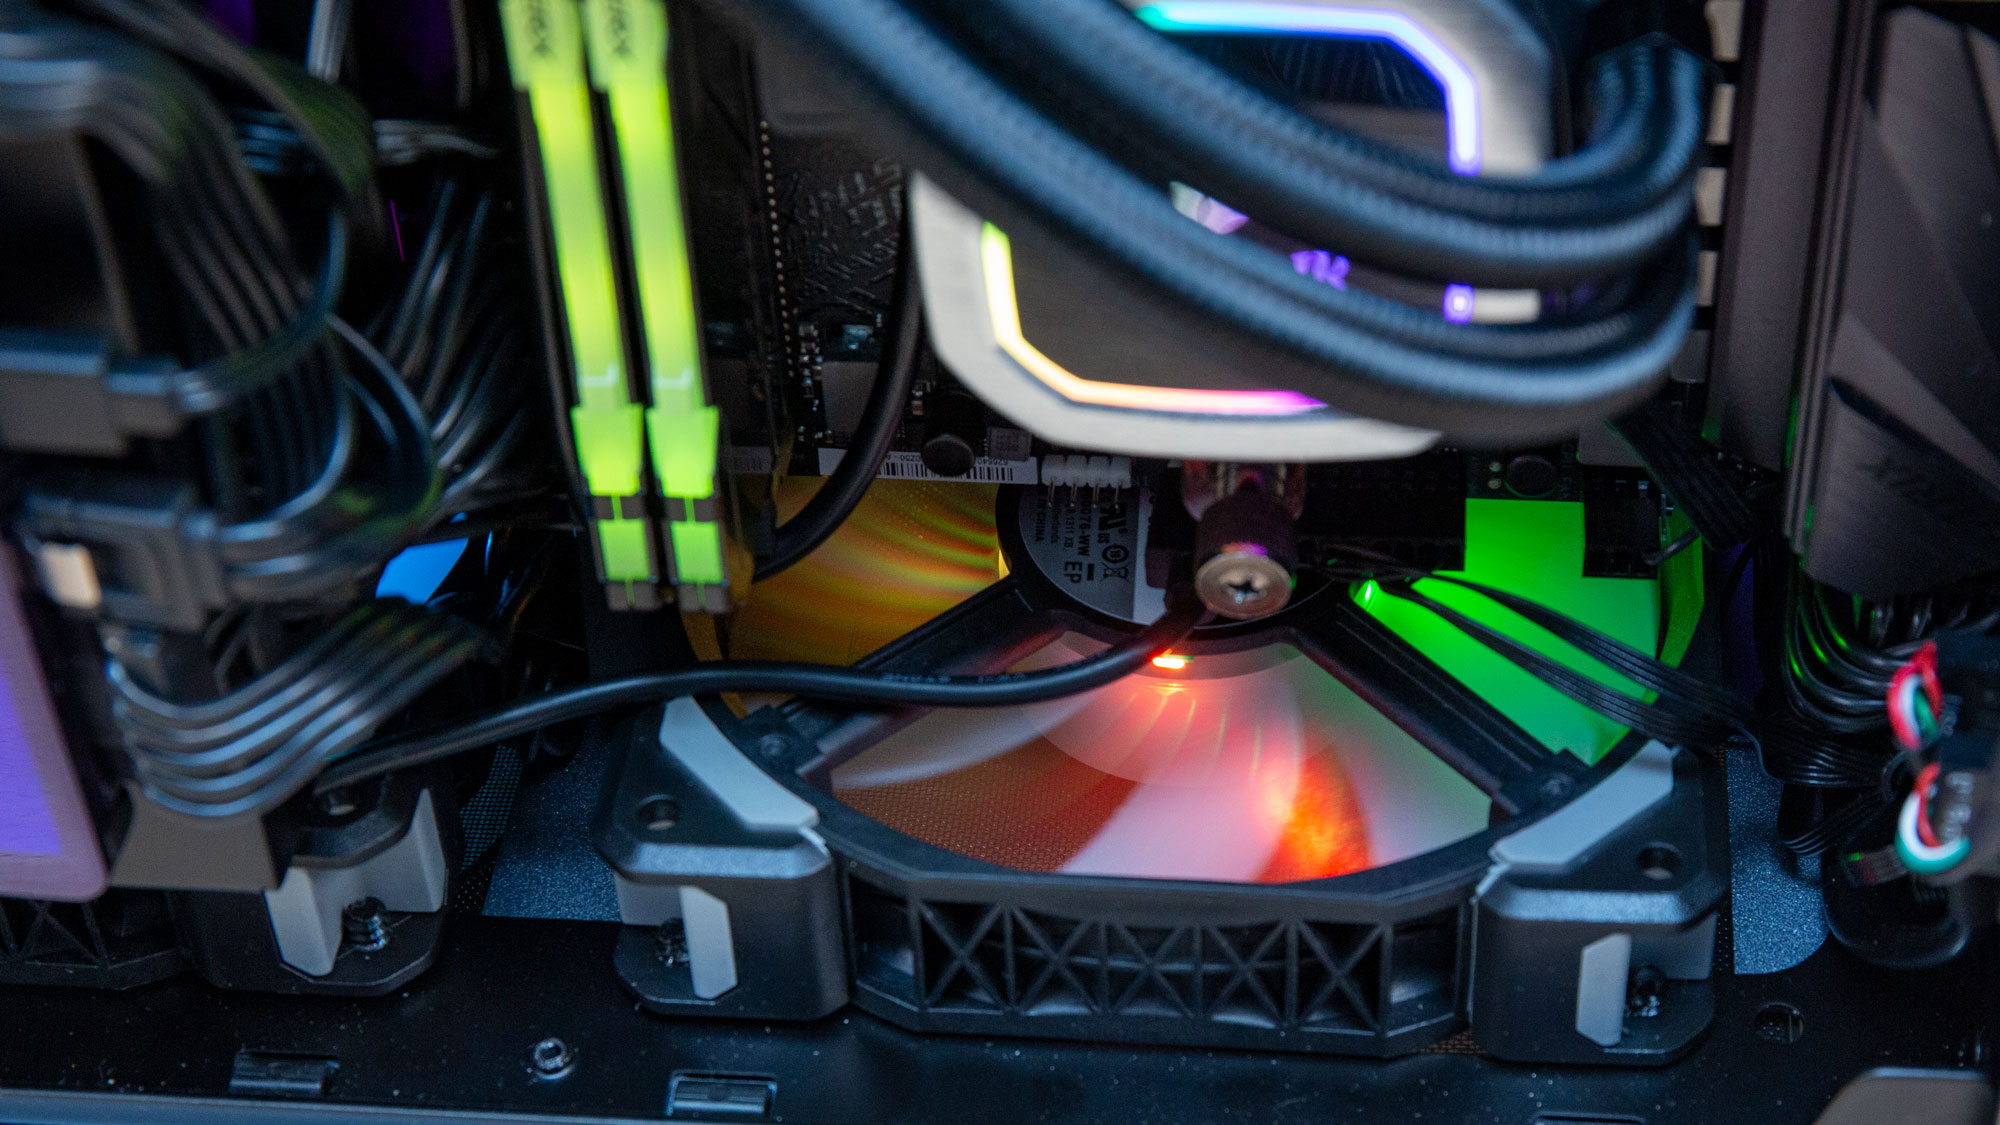
This is a build you definitely want the instruction manual for, because Jonsbo suggests putting some parts in the case in a way you might not typically expect. First, to go in were the two 120mm Corsair ML120 Pro fans and the 240mm radiator up top.
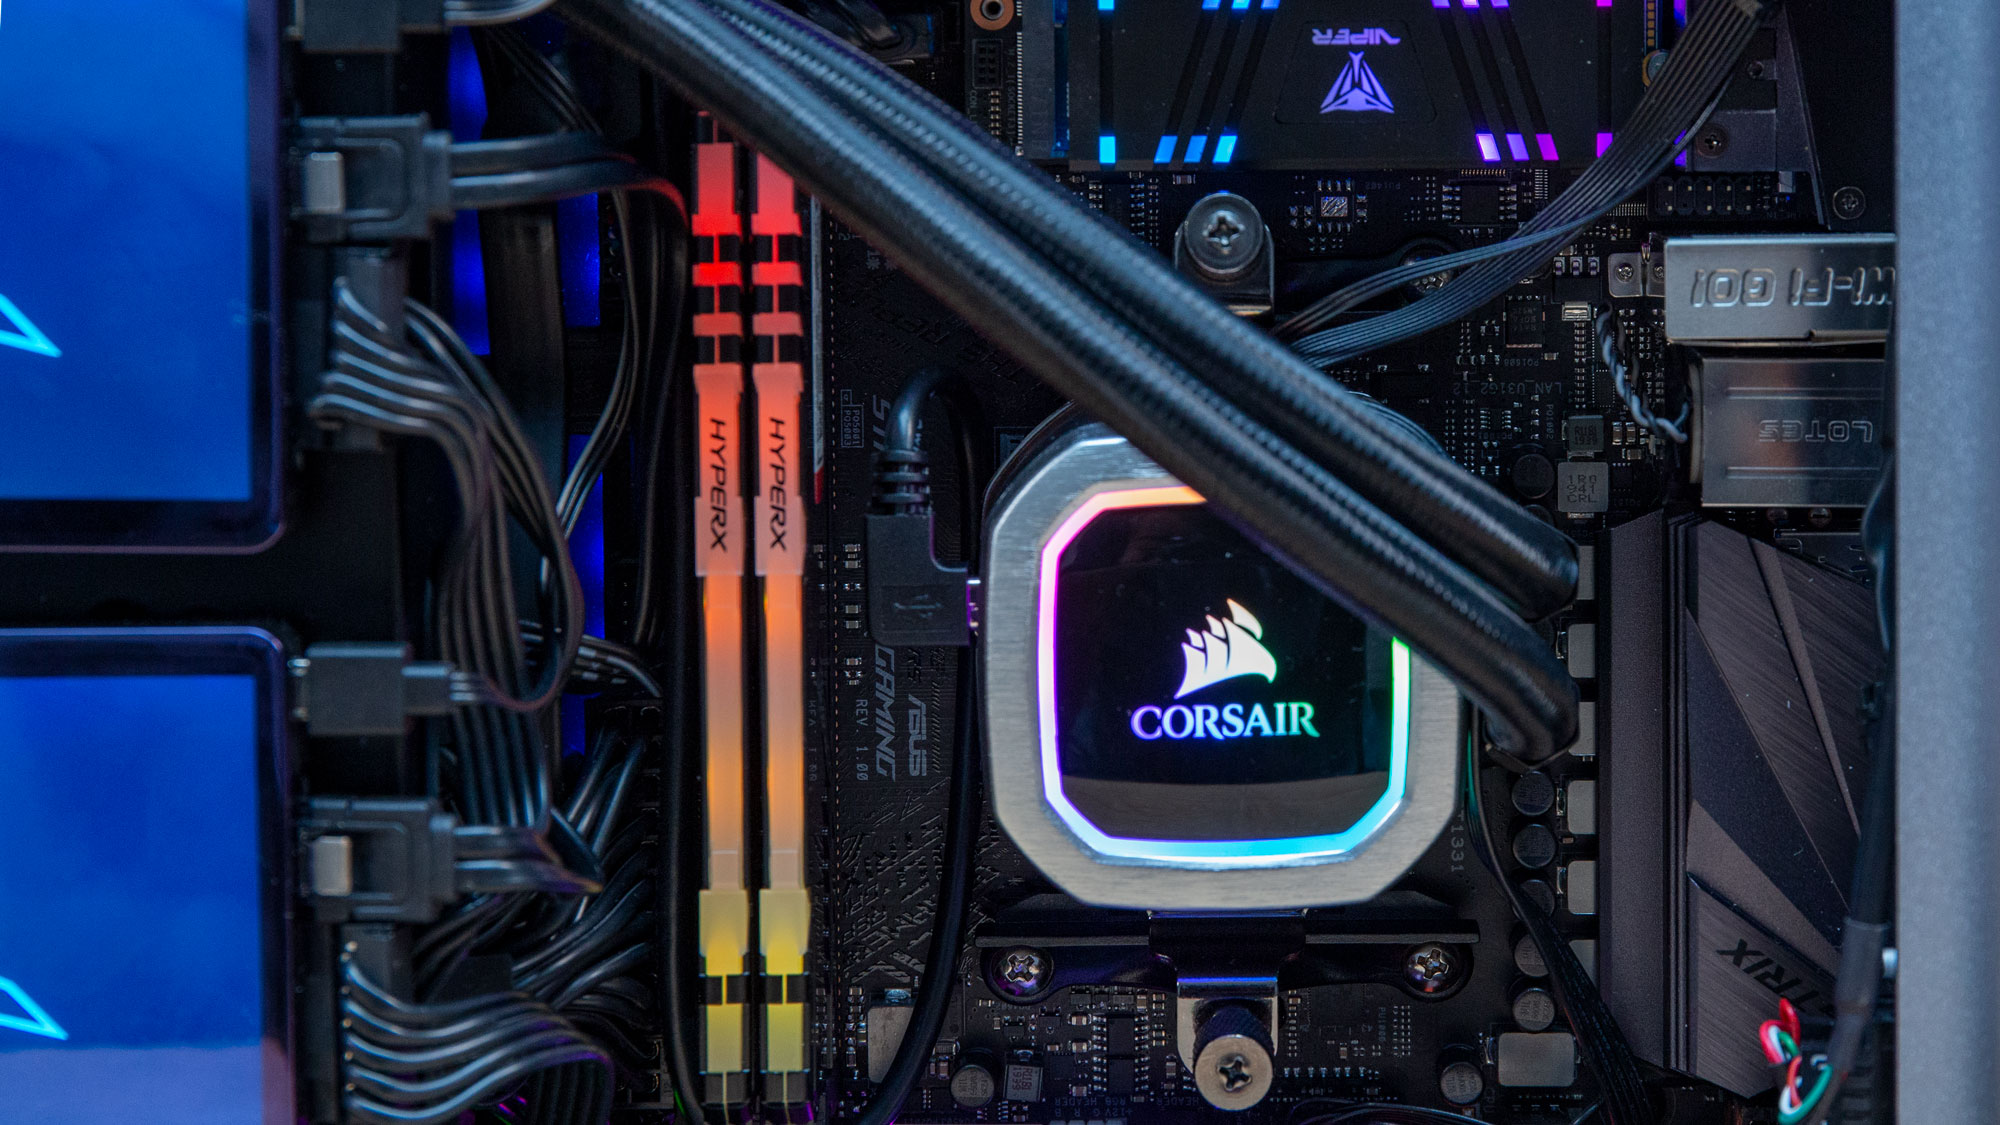
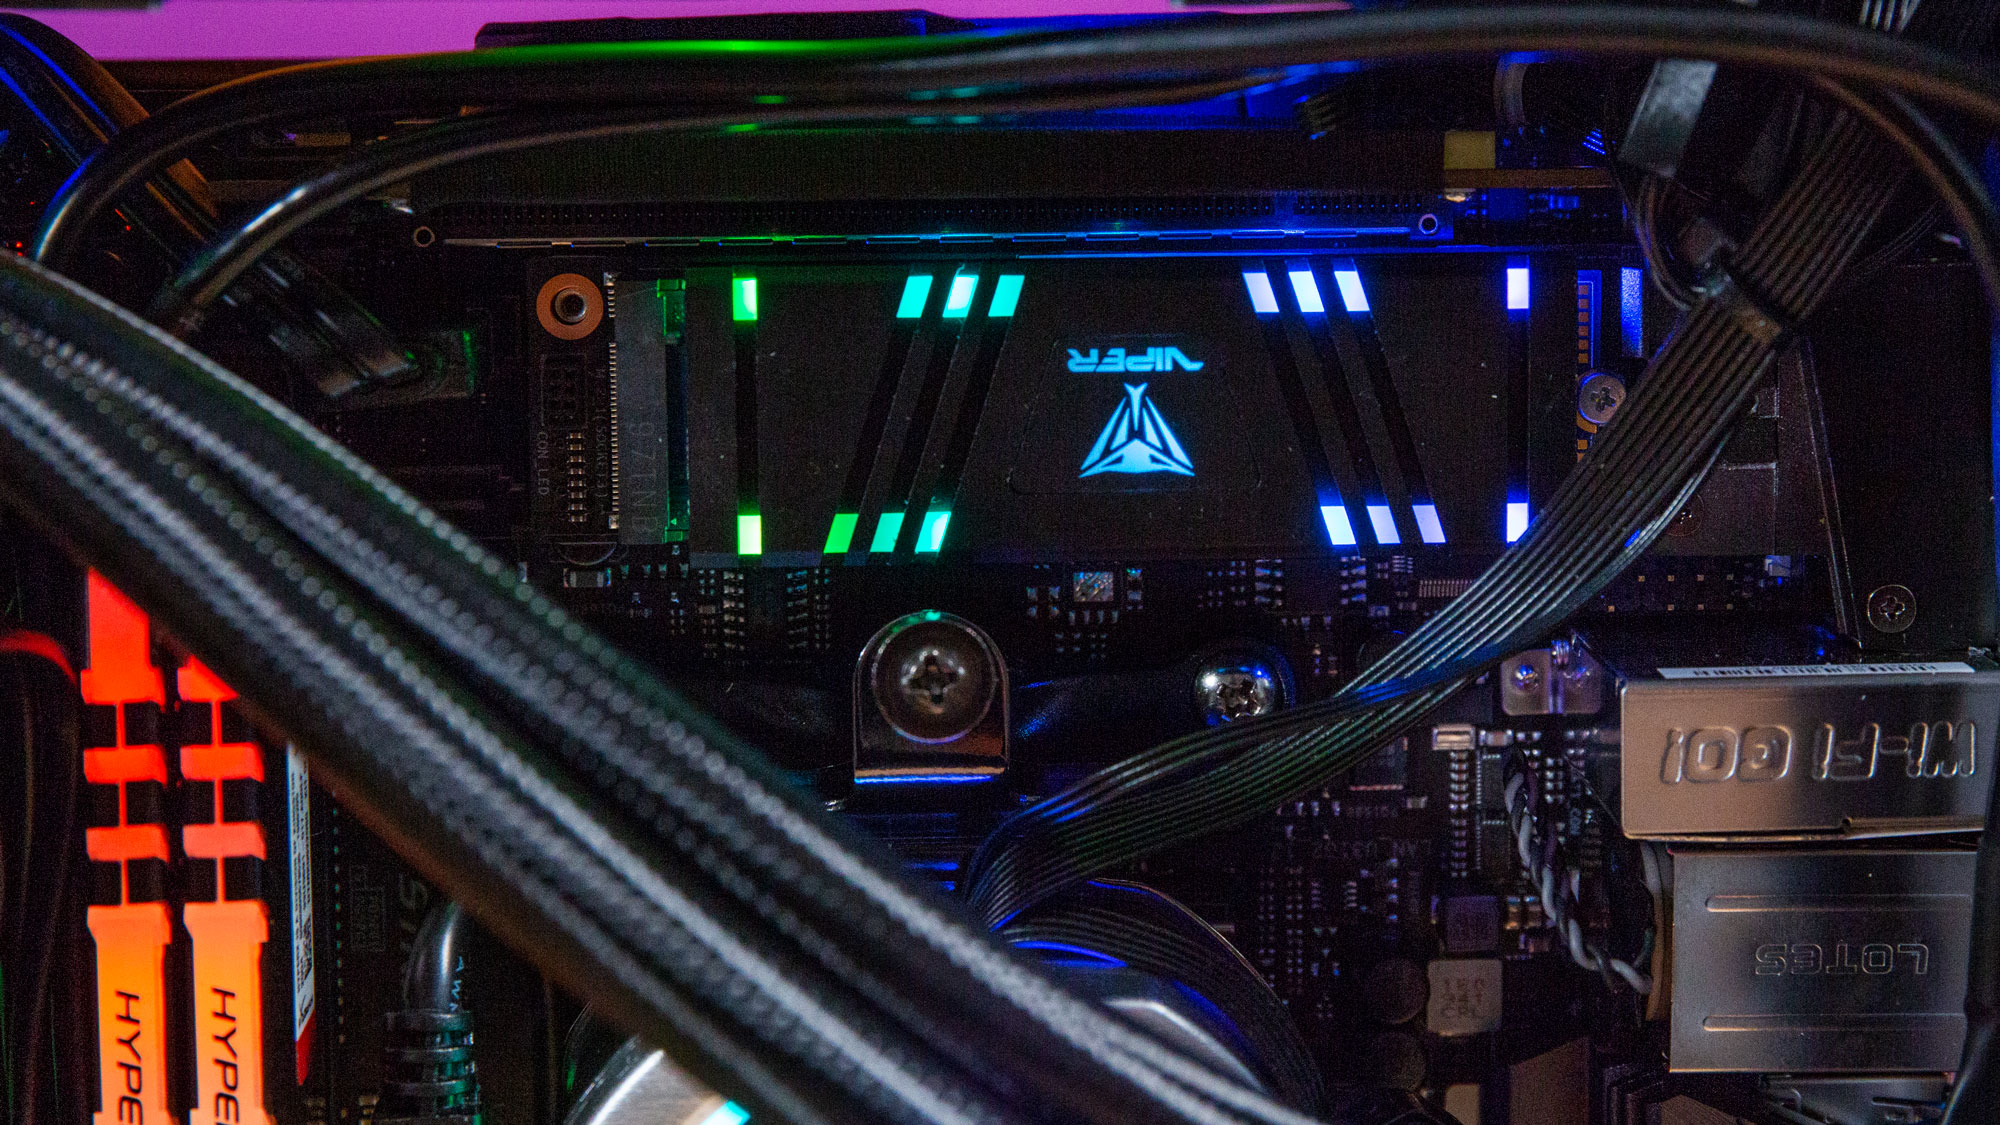
Next up was the motherboard. Getting the CPU, RAM and PCIe NVMe SSD installed was cake, though because the VPR100 has a heat sink, we had to ditch an SSD cover that attaches to the Asus motherboard. Also, the motherboard gets mounted on the right side of this case, and upside down (which soon became a theme). With the board in, it was time to hook up the cooler.
Then there’s the power supply. We had to screw on a bracket that fits into the case, and then screw the drive cover on top of that. But this proved difficult. Because we were fitting the PSU in now, all of the cables needed to be attached. And those take up a lot of space behind the shroud. With lots of pushing and routing through the proper holes in the cover and the case's motherboard mounting plate, we were finally able to screw it in place.
Prior to this, we had been hoping to also be able to use the Lian Li Strimer Plus for even more RGB. But as soon as we installed the power supply and its cables, we knew that would be physically impossible. There is barely room for the PSU cables, let alone the extra length of the Strimer extenders. These are the kinds of things you learn when trying to jam too much into a mini ITX RGB PC build.
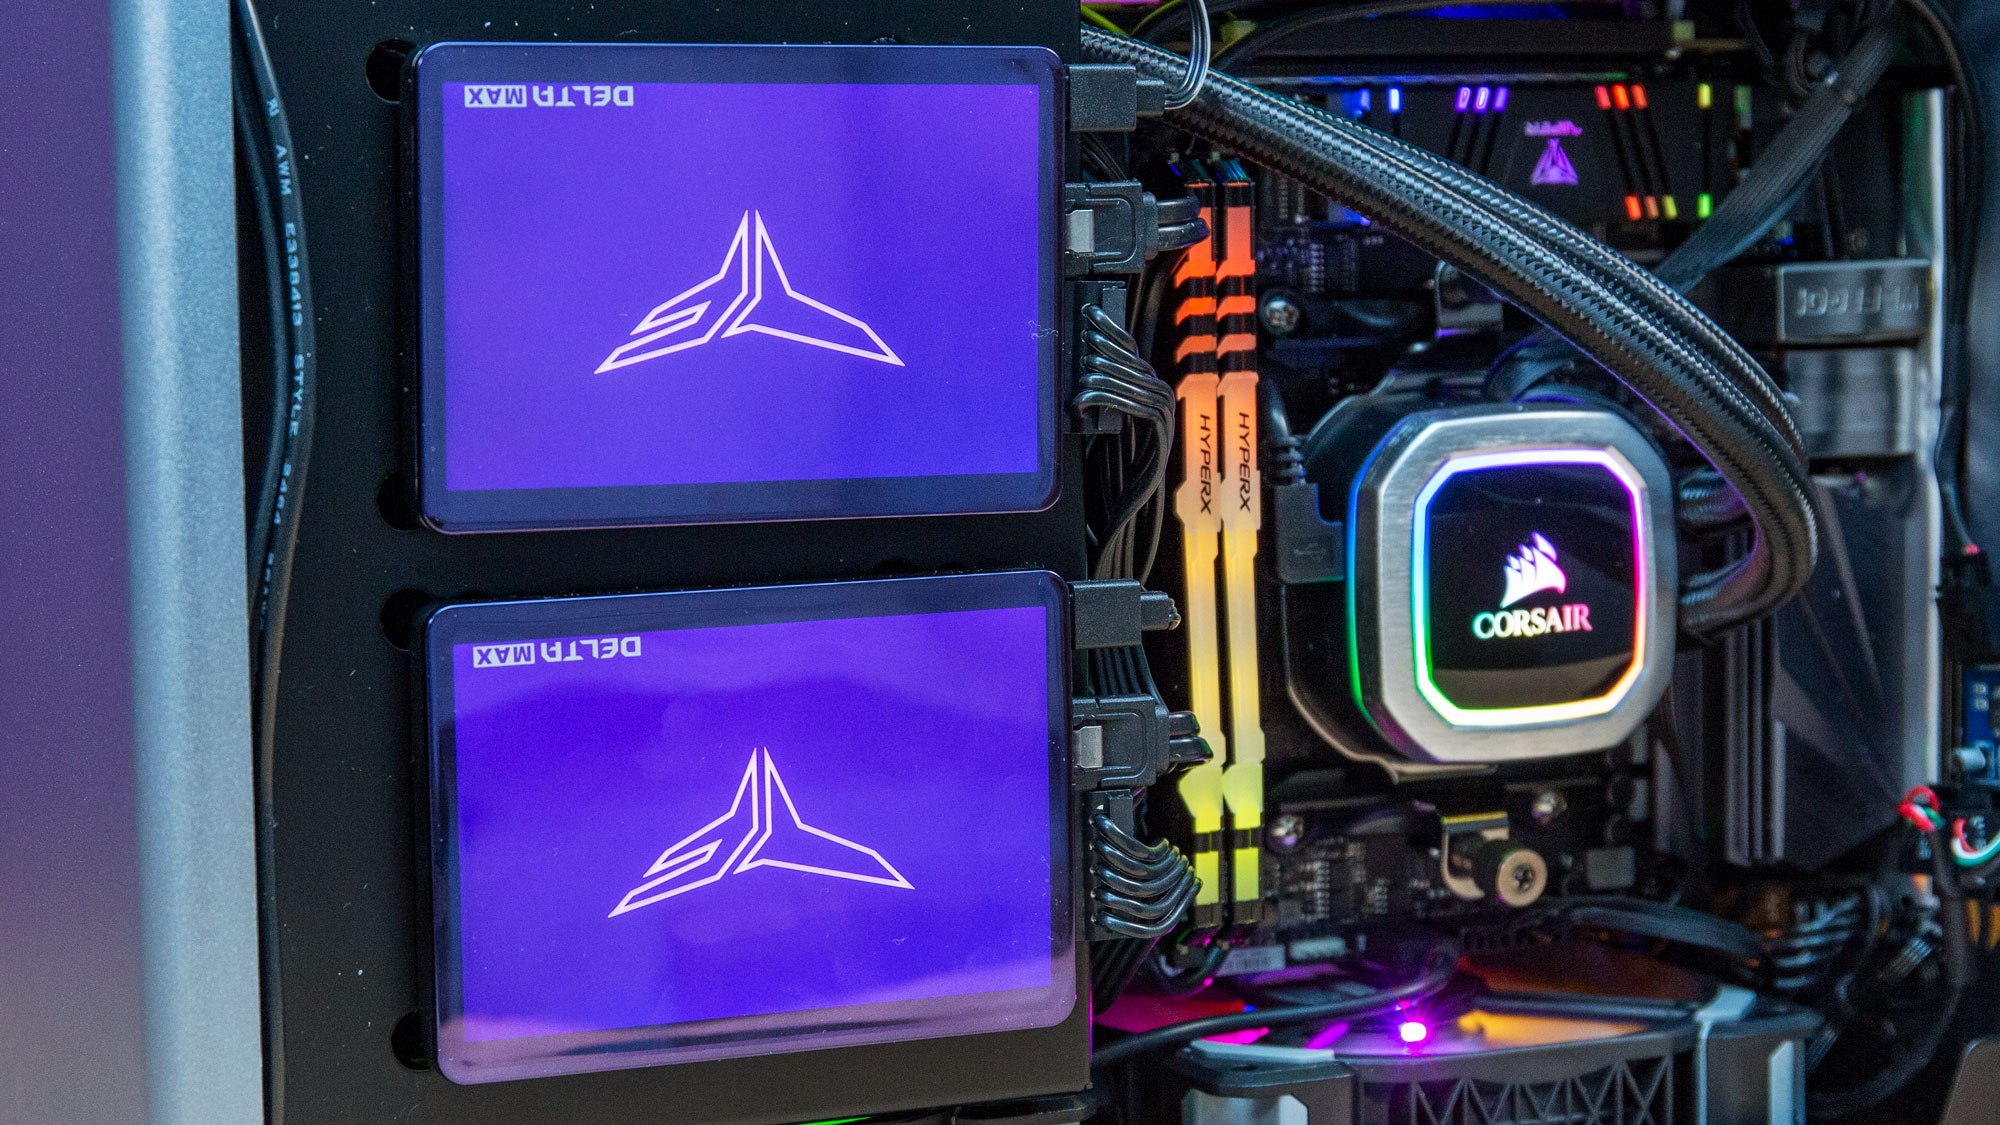
Getting the T-Force Delta Max drives on was easy. All we had to do was screw on some rubber gaskets and slide them into place on the shroud. However, this is when we noticed that the SSDs were ever so slightly thicker than usual due to the lighting. That meant they were sticking out beyond the boundaries of the case. So we opted to remove the gaskets and stick them on with only the screws. This meant they didn’t always stay completely parallel, but they fit -- at least mostly. The cable bump from one of our SATA power connectors also pressed up against the glass side panel, making getting everything back in place at the end fairly frustrating, but doable. We also had to mount the SATA drives upside down, because the connections needed to be facing the motherboard to fit. Even then, with the SATA, power and USB connectors, it was tight, and rather unsightly, at least with the glass panel off.
Before we put the GPU in, it was time to worry about RGB controllers. We had a Corsair Commander Pro on hand, but jettisoned that idea as it was clear there was no room to physically fit in the system. We also had the Asus Aura Terminal from the RGBeast, but to get that in there we would have had to taken out a fan. So instead, we went with the smaller controller boxes that came with the Corsair fans.
Get Tom's Hardware's best news and in-depth reviews, straight to your inbox.
But as noted earlier, we were lacking in terms of USB and RGB headers. So we grabbed a USB header splitter and an ARGB splitter from Cooler Master. That way, we could plug in every fan, the CPU cooler, the two controller boxes for Corsair’s software and the T-Force SSDs, all of which required one or both of those connections. This all, of course, added to the amount of cable mess inside the case, which was now so full of components and other cables that there simply was no room to make things look tidy.
As also noted earlier, we wound up one SATA power connector short. One of the connections coming from the PSU was buried in the mess of cables in the PSU shroud. There was no way to get it out, because the cable was too short. So we bought a SATA splitter so that we could connect the RGB controllers and drives.
We needed this all hooked up at this point, because once the GPU was in, there would be no more room for arranging these connections.
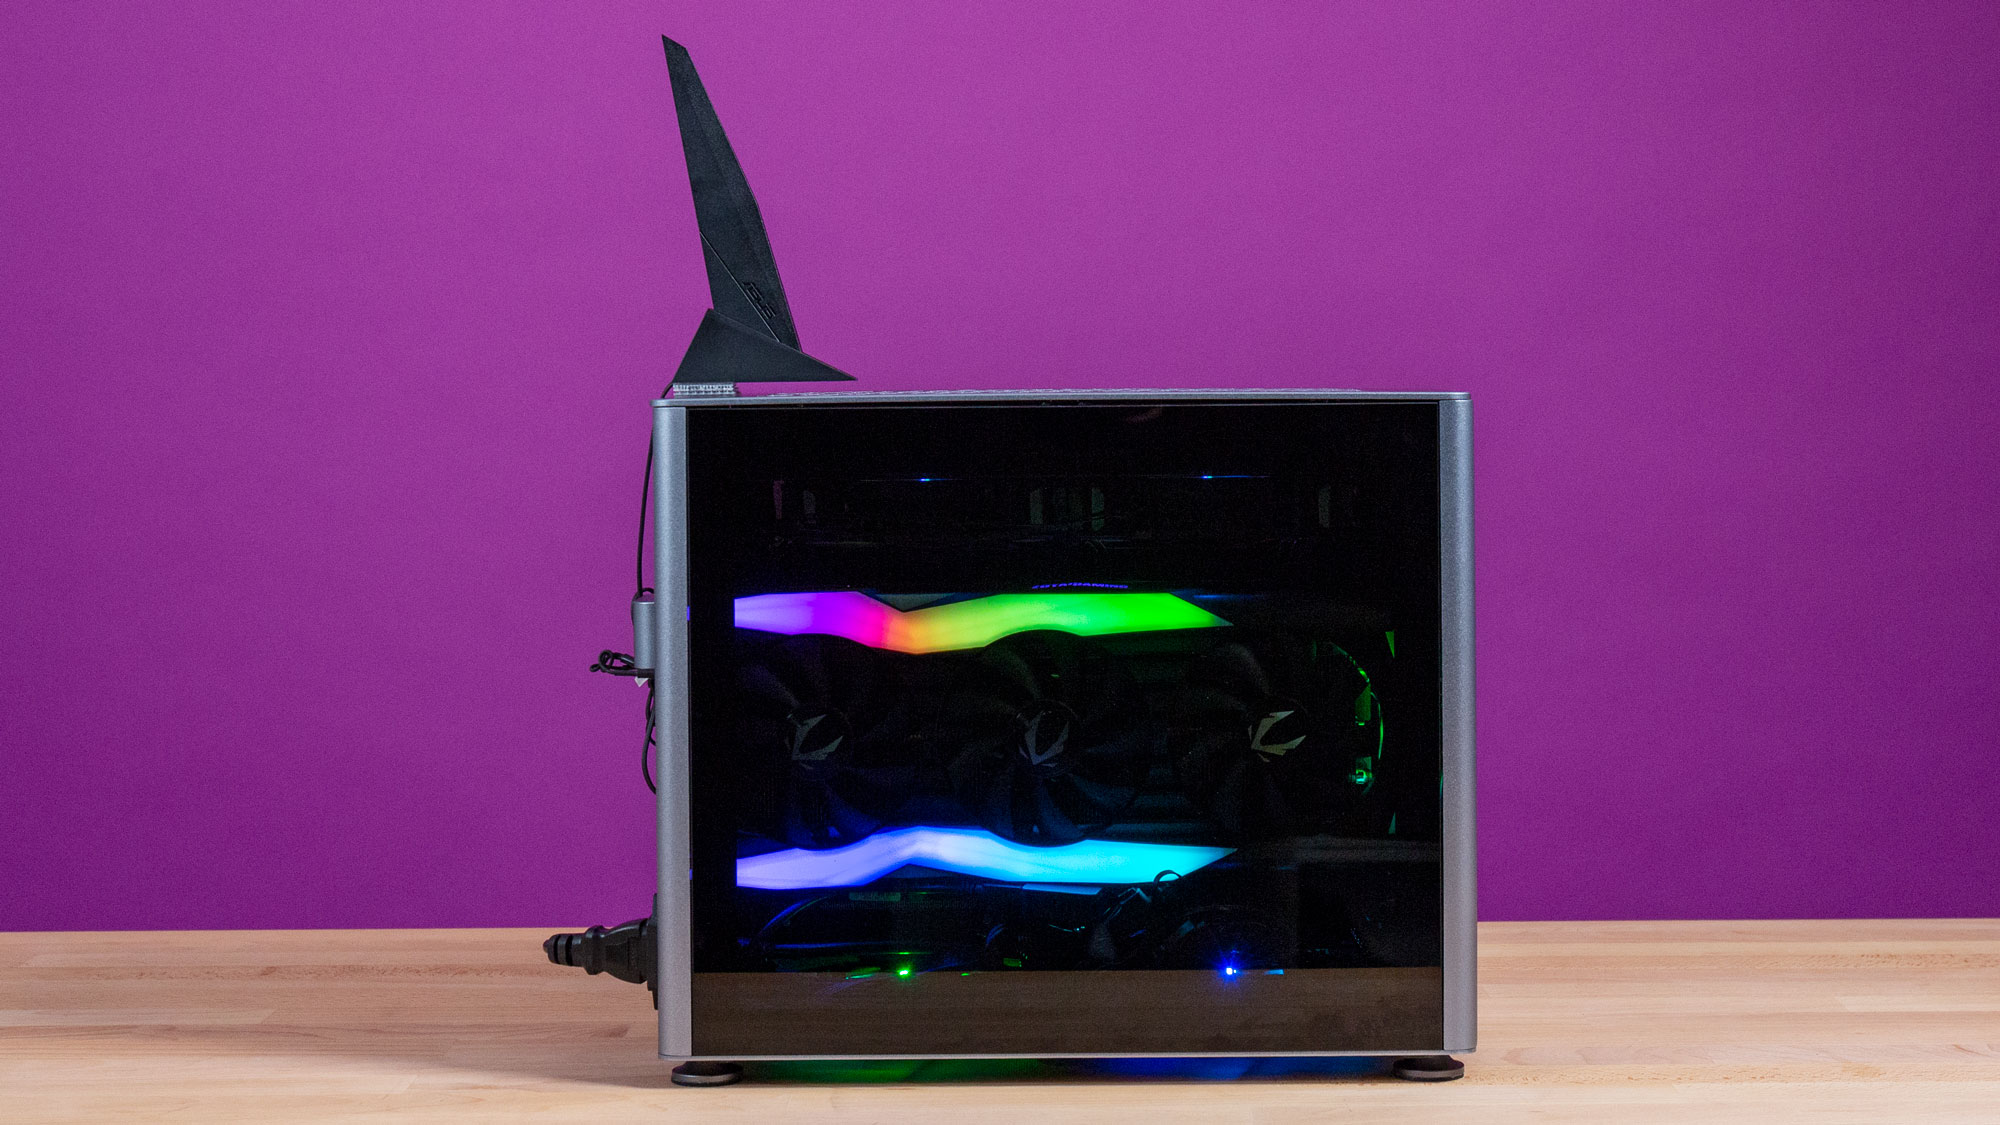
The case comes with with a riser cable for mounting the GPU vertically, up against the left-side window. It plugged into the top of the board (really the bottom, but the board is rotated 180 degrees here) of the motherboard and fit easily in the cramped space between the edge of the board and the the fans mounted to the radiator.
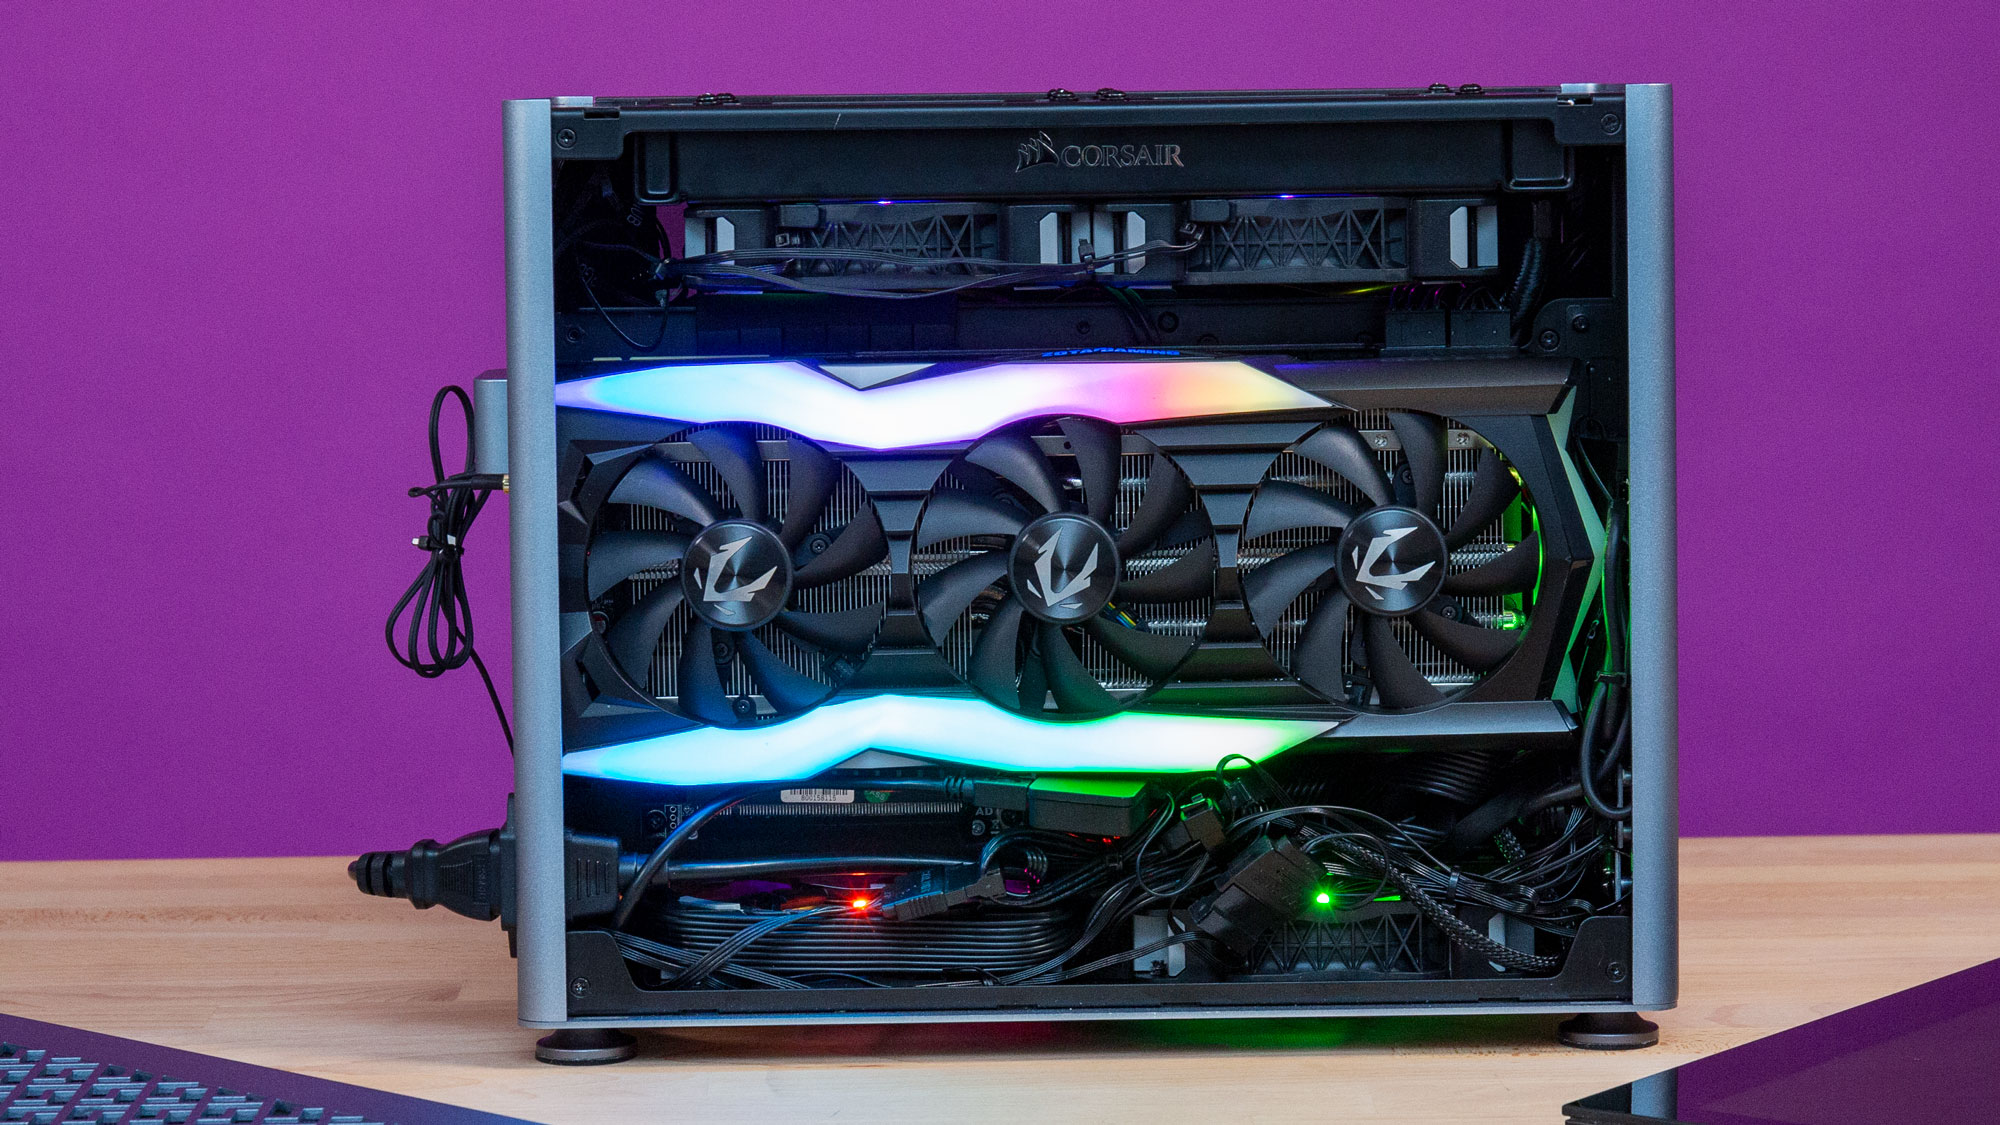
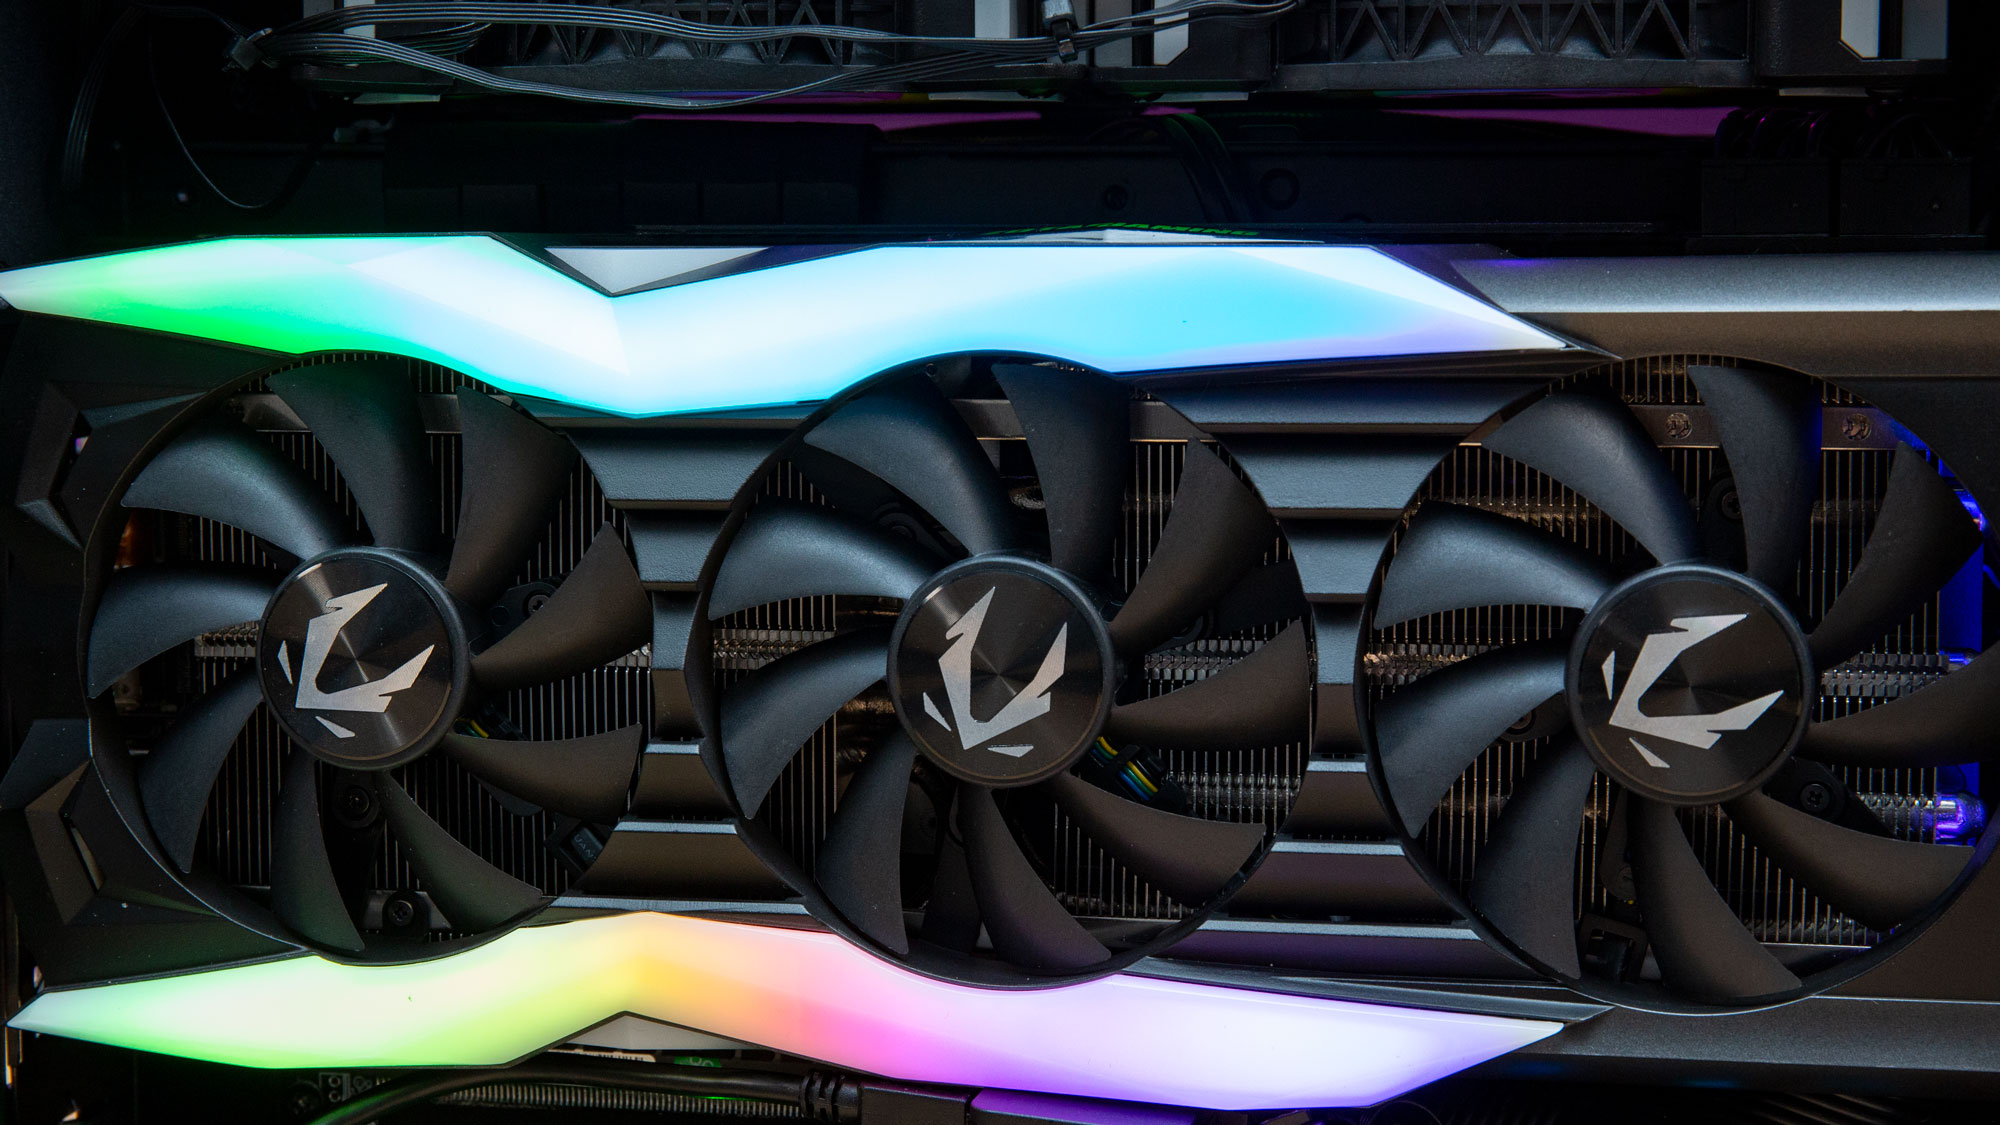
After removing the slot covers from the back of the case, getting the GPU into the system was a bit like parallel parking. We had done a dry run when the parts showed up to make sure the GPU would fit, but now the rest of the parts were in the case. With some careful cajoling, the Zotac AMP Extreme fit--if just barely. We fixed it to the riser cable and then fixed the riser cable to the motherboard with two screws. Then we put a small included support bracket in its place to keep the GPU stable in its vertical position.
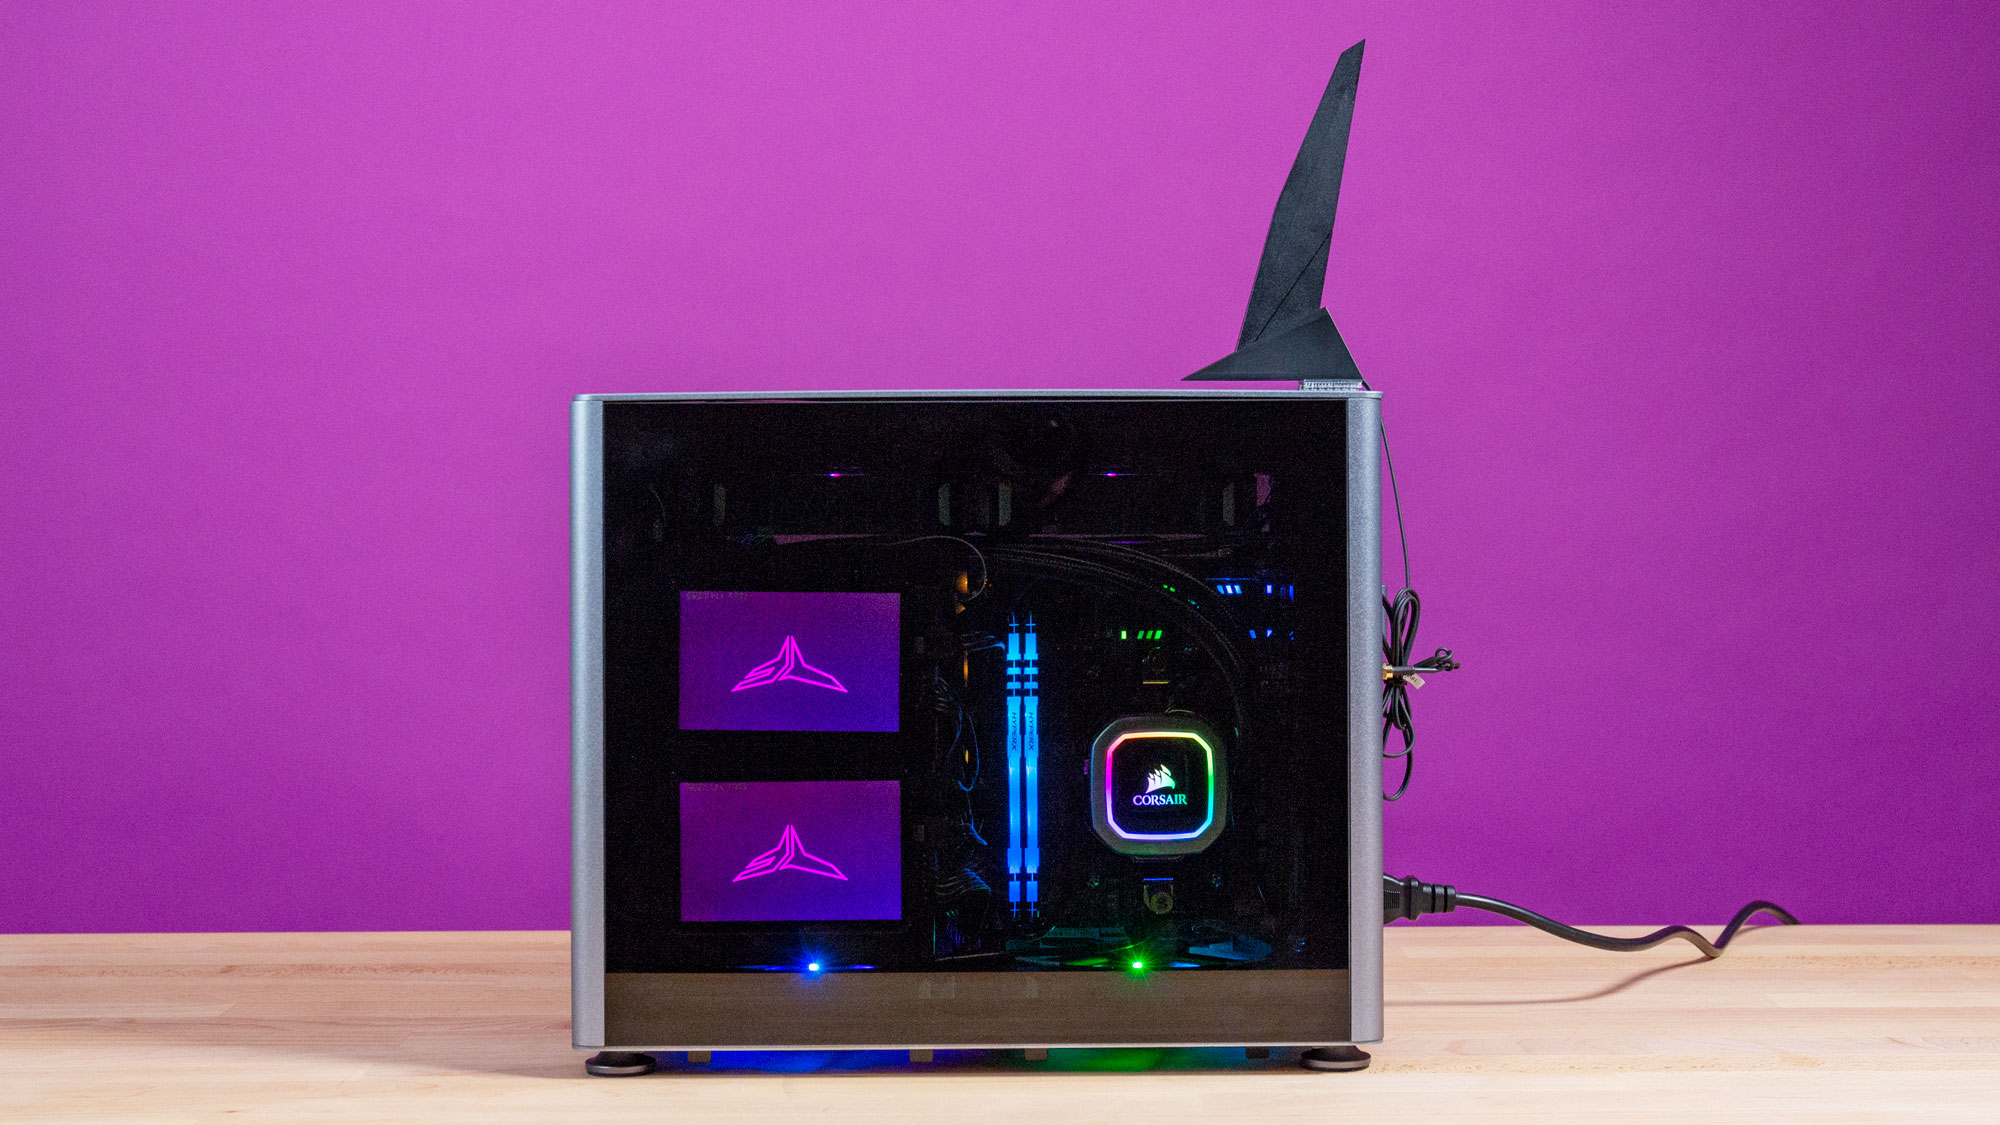
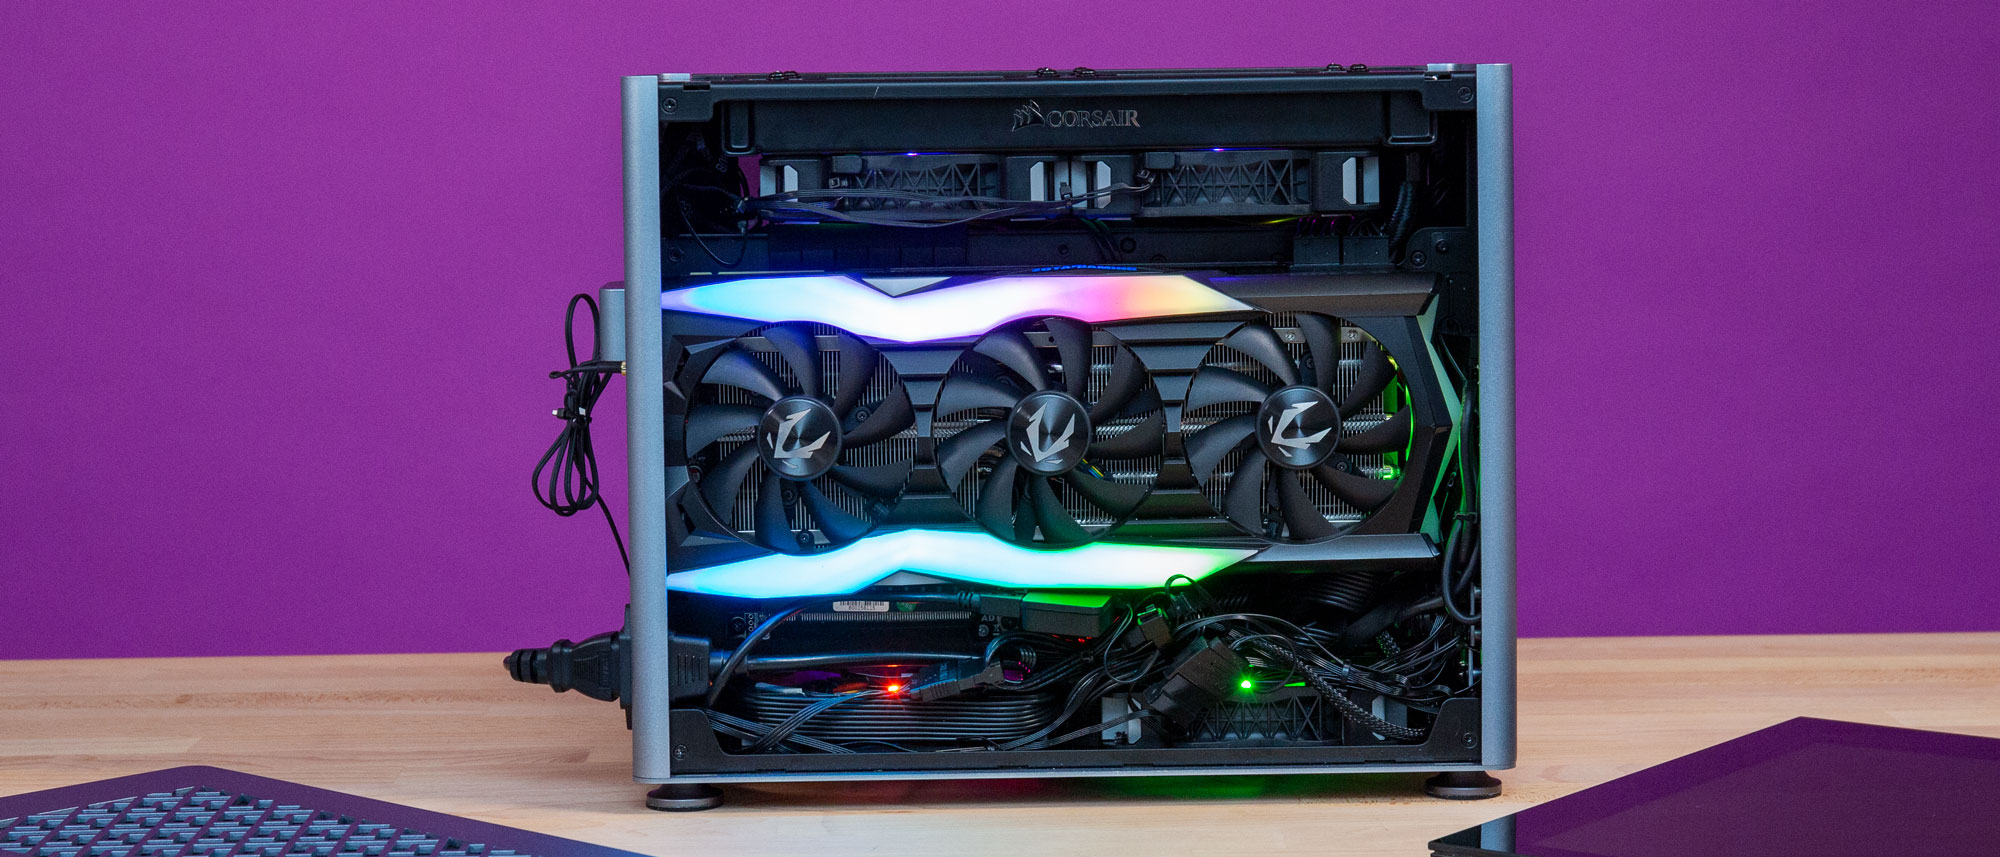
Before getting into cable management (such as it was) and putting the rest of the case back together, we turned the system on and let it boot to post. The lights were working -- the RGB baby glowed for the first time, and then it was time for a frustrating attempt at cable management. But as noted previously, there were just way too many wires--mostly due to the abundance of RGB, and barely any space to tuck anything neatly away.
When we were did all we could on the cable front (mostly just making sure everything was tucked and zip-tied away from fan blades and allowing as much airflow as possible), we put the dust filters back on the bottom of the case, attached the metal cover for the expansion slots, then popped the sides and top cover back on.
The Wi-Fi antenna from the ROG Strix motherboard looked a bit like a shark fin, so we grabbed some Velcro to fix it to the top, because we thought it was adorable on our mini ITX RGB PC build. In retrospect, maybe we should have considered googly eyes, too.
With Windows 10 installed, it was time to play with the lighting setup. It ended up that we would need more programs than we'd hoped. To start, we installed both Asus Aura Sync and Corsair iCue. There’s a plugin for iCue to make it work with Asus’ RGB program, but we found that in practice, this was pretty wonky. So while we built this system with the idea of using iCue to control the board's lights and the components plugged into it, we needed to use both pieces of software separately -- and then some.
Aura Sync worked for the motherboard and RAM, as well as the two SATA SSDs. It thought the drives were light strips, but it got the job done.
But Aura Sync didn’t see the VPR100, which meant installing Patriot’s own RGB software specifically for that SSD. And then the Zotac RTX 2080 AMP Extreme required the company’s Spectra software. For the CPU cooler and fans, we used iCue. That’s four programs. So much for simple.
Also of note: Updating the Corsair RGB controller caused one fan to stop lighting up, but with enough uninstalling and reinstalling, we eventually got it working again.
What We Learned: Big Things Break Small Packages
When we built a full-tower RGB-focused PC, cables weren't a huge problem. But even reducing the number of RGB controller boxes couldn’t help here: The sheer amount of stuff that we had to jam into the Jonsbo A4 was a challenge.
First up was cable management, which was kind of a nightmare. Some boxes had to go in between or above the intake fans on the bottom, which was far from ideal, but necessary. We were able to route some cables along the outside of both the intake and exhaust fans, and we managed to fit a couple slim cables behind the graphics card.
The fact of the matter is this: RGB builds need lots of cables, and putting them into this mini ITX RGB PC build, in addition to the other powerful parts, meant there really wasn’t enough room.
We ultimately got things neat enough to allow for airflow, while also managing to get the sides and top on (just barely). But days after the build, the right-side panel, which covers the motherboard and SSDs, started coming off. Even though we removed the gaskets behind the SSDs, they were right up against the glass, and one in-line SATA power cable in particular was pushing up against the glass. Without much room to move, the tubing from the Corsair H100i Platinum cooler also pressed against the glass.
Eventually, the door machanism gave way. The glass is held onto the system with some hooks that slide into place on the chassis. Adhesive holds the hooks to the glass. We came into the labs one morning to see the adhesive had separated from the glass. We were able to reattach it, but it never fit as well again and now requires continuous readjustment. This case was just not designed for this much stuff, especially thicker-than-average SSDs.
The general tips we have for people looking to build a mini ITX RGB PC or something like it would be to pare limit your expectations--and your component selection. Don’t try to do too much all at once, like we did. Get your core parts and build the system. Get it up and running, then start getting the extra lights and components you want one at a time, and be sure to measure clearances before you order. Because as we found out when we decided to ditch the Strimer RGB cables, when building small, there's a big difference between what we wanted to fit in this build and what we actually could install.
Performance and Temperatures
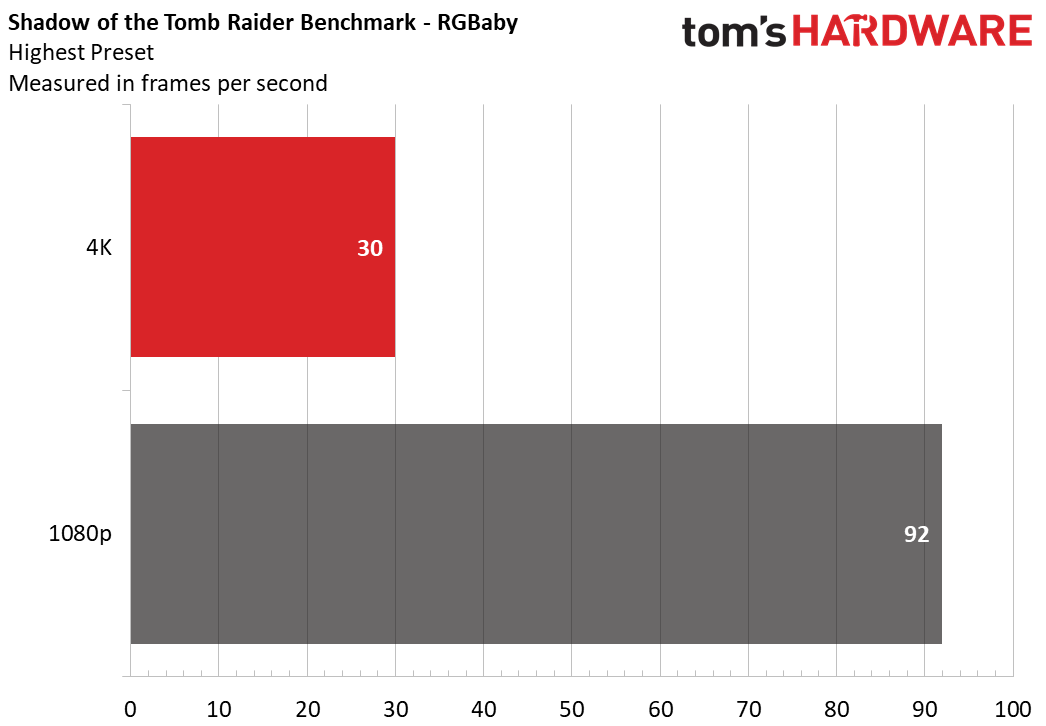
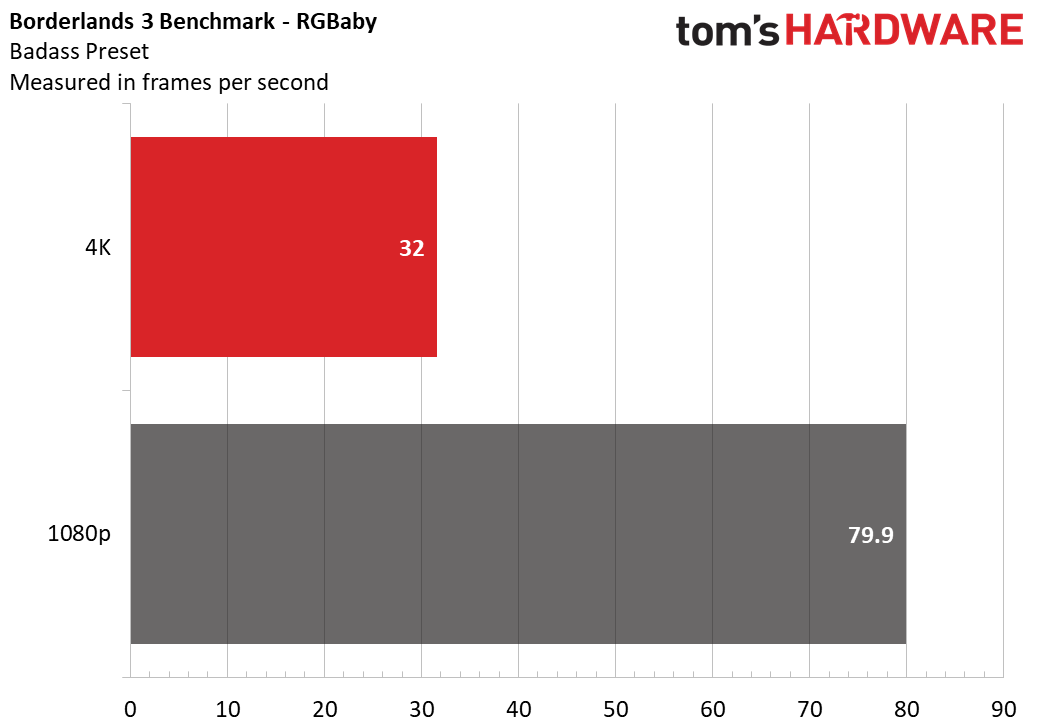
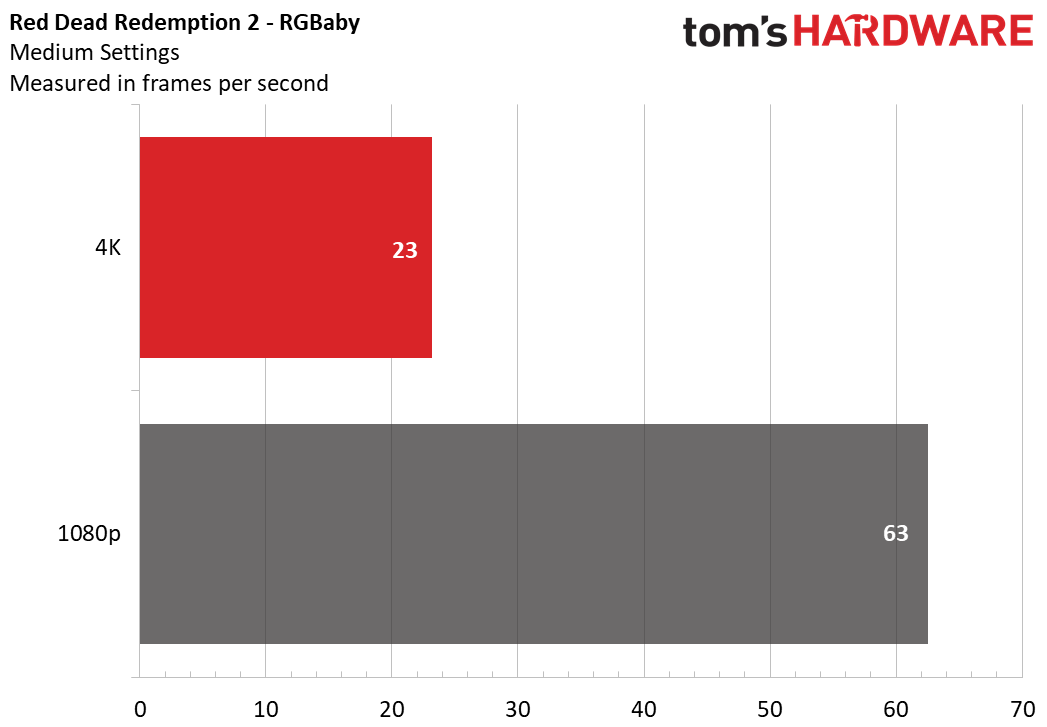
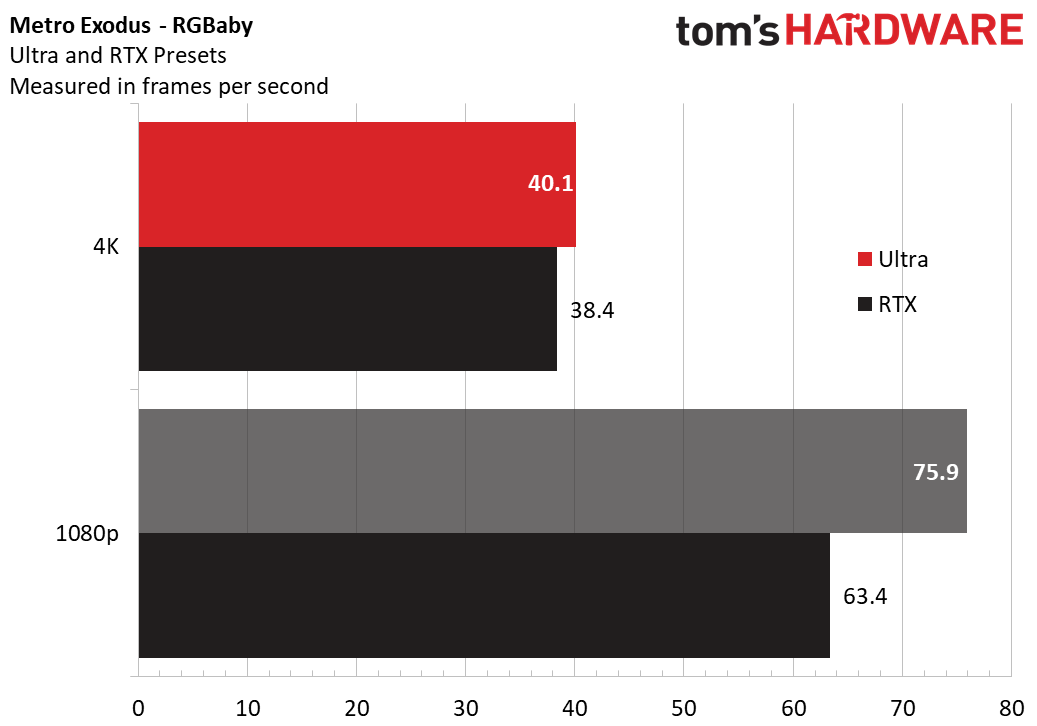
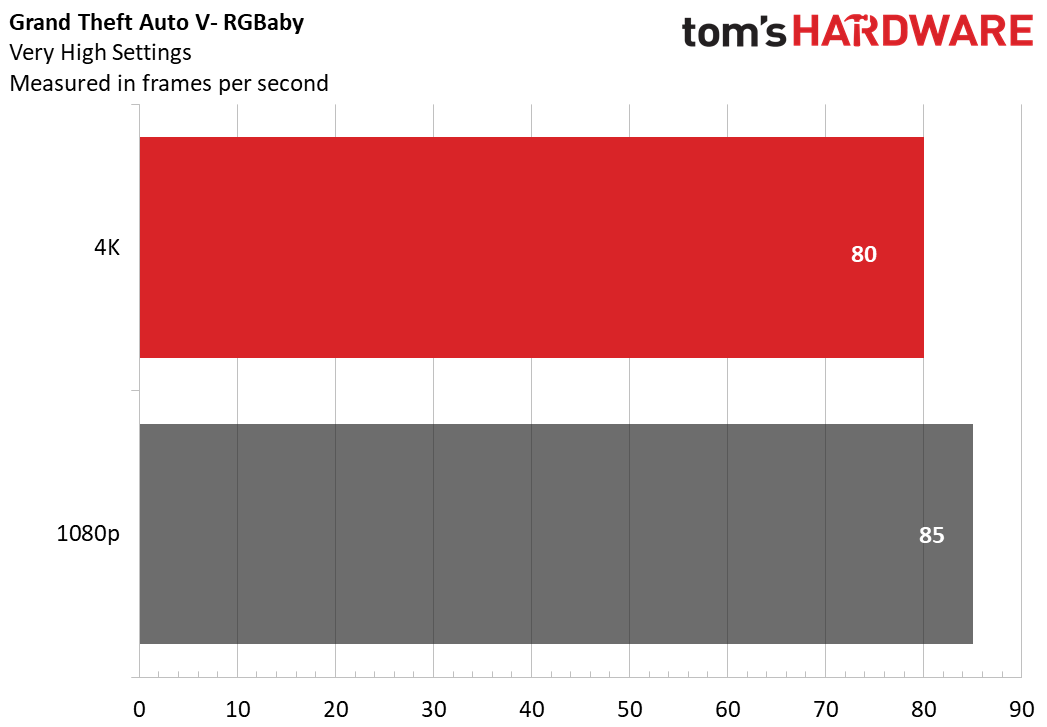
Unsurprisingly, the RGBaby is a performer. That’s what an RTX 2080 and Ryzen 3900X will buy you.
The RGBaby easily cleared 60 frames per second at 1080p on most benchmarks’ highest settings and hit 30 fps at 4K. The odd one out here is Red Dead Redemption 2 -- not even an RTX 2080 is ready to play that game at 4K just yet without making some sacrifices.
On Geekbench 5.0, our baby earned a multi-core score of 10519. On Cinebench R20, it earned a multicore CPU score of 6915 and single core score of 494.
To temperature test the system, we ran Metro Exodus 15 times on a loop to simulate roughly half an hour of gaming. The CPU measured an average of 62 degrees Celsius (143.6 degrees Fahrenheit) and the GPU measured an average of 77 degrees Celsius (170.6 degrees Fahrenheit). While the graphics card could certainly be cooler, despite all the wires we had to jam into places that weren't idea, aesthetically or for airflow, temps remained reasonable. Although if you were really doing something to hammer the graphics card harder than gaming (like mining or maybe Folding@home to fight COVID-19) for hours on end, it would probably be a good idea to pop the side panel off.
Conclusion
We didn’t birth the RGBaby for it to make sense. We did it because a mini ITX RGB PC was a challenge to build. And in the end, it doesn’t, like its predecessor, make a ton of sense.
This was an exercise in compact power and aesthetics, and honestly, it didn’t entirely work out. The size of the case was extremely challenging for all the wiring in RGB components, and some thicker-than-expected SSDs bowing the side panel wasn’t an outcome we were looking for.
But the computer still performed admirably and looked good doing it--at least with the tinted glass hiding most of the cable jumble. There are some places we would make changes in our own builds, but it can be done. Just be sure to measure an awful lot before you build, and again, don't expect everything you'd like to install to actually fit.
MORE: Best Gaming Desktops
MORE: How To Build A PC
MORE: All PC Builds Content

Andrew E. Freedman is a senior editor at Tom's Hardware focusing on laptops, desktops and gaming. He also keeps up with the latest news. A lover of all things gaming and tech, his previous work has shown up in Tom's Guide, Laptop Mag, Kotaku, PCMag and Complex, among others. Follow him on Threads @FreedmanAE and BlueSky @andrewfreedman.net. You can send him tips on Signal: andrewfreedman.01
-
logainofhades ReplyNightHawkRMX said:ITX is too pricy. I guess its sorta cool?
ITX really isn't that pricey, compared to many ATX boards. Frankly I think they need to find someone that can actually shop around, because some of those prices are way off what they should be. Who pays $280 for a B-450 board, when you can get an X570, for less? Over $1k for an RTX 2080? That is 2080ti territory. $202 for 16gb of 3200 ram? You can get 32gb of 3600 Gskill Trident Z neo, for less. Your 2tb boot drive, is actually 1tb. This keeps the same spirit, of the build, but is cheaper, and faster. Couldn't do an RGB NVME, due to the chipset fan, but minor sacrifice to make, imo.
PCPartPicker Part List
CPU: AMD Ryzen 9 3900X 3.8 GHz 12-Core Processor ($418.89 @ B&H)
CPU Cooler: Corsair H100i RGB PLATINUM 75 CFM Liquid CPU Cooler ($159.99 @ Best Buy)
Motherboard: Gigabyte X570 I AORUS PRO WIFI Mini ITX AM4 Motherboard ($219.00 @ B&H)
Memory: G.Skill Trident Z Neo 32 GB (2 x 16 GB) DDR4-3600 Memory ($188.99 @ Newegg)
Storage: Team T-FORCE Delta Max RGB 1 TB 2.5" Solid State Drive ($137.99 @ Newegg)
Storage: Team T-FORCE Delta Max RGB 1 TB 2.5" Solid State Drive ($137.99 @ Newegg)
Storage: Intel 665p 2 TB M.2-2280 NVME Solid State Drive ($224.99 @ Newegg)
Video Card: EVGA GeForce RTX 2080 SUPER 8 GB XC GAMING Video Card ($714.98 @ B&H)
Power Supply: Fractal Design Ion SFX-L 650 W 80+ Gold Certified Fully Modular SFX Power Supply ($124.94 @ Amazon)
Case Fan: Corsair ML120 PRO RGB 47.3 CFM 120 mm Fan ($39.99 @ Amazon)
Case Fan: Corsair ML120 PRO RGB 47.3 CFM 120 mm Fan ($39.99 @ Amazon)
Custom: JONSBO A4 ($167.99)
Total: $2575.73
Prices include shipping, taxes, and discounts when available
Generated by PCPartPicker 2020-03-24 10:08 EDT-0400 -
EndEffeKt_24 Its a good board, but I hate the Asus Bios, it is a pain to work with. I paid 135 € used.Reply -
NightHawkRMX When you are already spending thousands on a PC, maybe not a massive percent, but still a lot more. This cost more than $200 than a comparable Matx system that isnt much larger.Reply
$200 to me is a fair bit of money.
PCPartPicker Part List
Type|Item|Price
:----|:----|:----
CPU | AMD Ryzen 9 3900X 3.8 GHz 12-Core Processor | $418.89 @ B&H
CPU Cooler | Corsair H100i RGB PLATINUM 75 CFM Liquid CPU Cooler | $159.99 @ Best Buy
Motherboard | ASRock X570M Pro4 Micro ATX AM4 Motherboard | $183.98 @ Newegg
Memory | G.Skill Trident Z Neo 32 GB (2 x 16 GB) DDR4-3600 Memory | $188.99 @ Newegg
Storage | Team T-FORCE Delta Max RGB 1 TB 2.5" Solid State Drive | $137.99 @ Newegg
Storage | Team T-FORCE Delta Max RGB 1 TB 2.5" Solid State Drive | $137.99 @ Newegg
Storage | Intel 665p 2 TB M.2-2280 NVME Solid State Drive | $224.99 @ Newegg
Video Card | EVGA GeForce RTX 2080 SUPER 8 GB XC GAMING Video Card | $703.98 @ Newegg
Case | Cooler Master MasterBox Lite 3.1 MicroATX Mid Tower Case | $49.99 @ B&H
Power Supply | EVGA SuperNOVA GA 650 W 80+ Gold Certified Fully Modular ATX Power Supply | $76.98 @ Newegg
Case Fan | Corsair ML120 PRO RGB 47.3 CFM 120 mm Fan | $39.99 @ Amazon
Case Fan | Corsair ML120 PRO RGB 47.3 CFM 120 mm Fan | $39.99 @ Amazon
| Prices include shipping, taxes, rebates, and discounts |
| Total (before mail-in rebates) | $2413.75
| Mail-in rebates | -$50.00
| Total | $2363.75 | Generated by PCPartPicker 2020-03-24 10:49 EDT-0400 | -
WildCard999 Nice build & writeup.Reply
Just wondering, when you do these builds do you end up selling them? Donating? Keeping for yourself or disassemble? -
macawmatt I'm with the first guy, total fail with the upside down drives. When I built in my H700, I specifically only looked at SSDs that would be right reading when mounted on the sled on the bottom of the case next to the glass. Its like someone building out a ridiculous sound system in a car and all it does is rattle like crazy, totally distracting and ruins what could of been an awesome build.Reply
