How to Install Windows 11 on a Raspberry Pi 4 (Updated)
You don’t even need a PC to make this happen.
The Raspberry Pi is commonly associated with Linux operating systems such as Raspberry Pi OS. But what about running Microsoft OS on your Raspberry Pi? Officially, Microsoft’s only operating system for the Pi is Windows 10 IoT Core, but that is not a true operating system, merely a means to create an appliance with the Pi. Ambitious developers from the Raspberry Pi community are always finding a way to run a full desktop version of Windows on Raspberry Pi.
In 2020, we installed a version of Windows 10 onto a Raspberry Pi 4 and it performed admirably, if a little slowly. With the recent announcement of Windows 11 we revisited Windows on Raspberry Pi and thanks to a new ARM64 Insiders Preview image we’ll show you how to install Windows 11 on your Raspberry Pi 4. This how-to has been updated to include a new, simpler method which downloads and installs Windows 11 for Raspberry Pi using the Raspberry Pi itself no Windows PC is required. This new method is easier than installing via a Windows 10 computer, but the trade off is that it is much slower, taking well over an hour (sometimes two) versus under an hour for the manual (via a PC) method which we also show below.
However, before you begin, please note that this is not an official Microsoft product and the source of the images and software used is from a passionate and vibrant community working together to create this project. The Windows 11 image file is easy to source but there is a process that we have to follow in order to create a valid image which can be used with our Raspberry Pi. We can’t vouch for the safety or legitimacy of any of the custom files the community has created for this project so proceed at your own risk.
At the time of writing, this project runs surprisingly well (see below for more details) but has a lot of caveats. The Raspberry Pi’s onboard Wi-Fi, Bluetooth and GPIO do not work so you’ll need to use Ethernet or a USB Wi-Fi dongle to get online (there’s no list of supported dongles so we can’t guarantee yours will work). If your Pi isn’t near an Ethernet connection, you can always share a Windows PC’s Internet via Ethernet. Audio via HDMI is also not available but audio via the 3.5 mm headphone jack does work, with the occasional “pop”. Again, Bluetooth is not available so we can’t use a Bluetooth speaker.
What you will need to install Windows 11 on a Raspberry Pi 4
- Raspberry Pi 4 4GB or 8GB
- An 32GB or larger SSD via a USB 3 caddy. Best for performance or 16GB or larger microSD card, (see best microSD cards for Raspberry Pi)
- USB boot enabled, see below.
- A micro SD card with the latest Raspberry Pi OS
- Windows 10 PC (if you are following the longer method).
- USB to Ethernet or WiFi dongle
- Bluetooth dongle (if you want Bluetooth)
- Keyboard, mouse, HDMI and power for your Raspberry Pi
Configuring Raspberry Pi to boot off of SSD
For our install we chose to use an SSD via a USB3 caddy with USB boot enabled on the Pi. This did not go as expected. The images were successfully written to the drive, and they did indeed boot, but they failed at the device discovery portion of the setup. After discussing the issue with YouTuber leepspvideo, it turned out that our USB 3 caddy was to blame. So we opted to use an Argon M.2 case which has a built in USB 3 to SATA board. This worked the first time, and the added bonus is that our Pi is kept cool.
Before using Windows 11 on the Raspberry Pi 4 with an SSD, we first need to ensure that the firmware and bootloader of our Raspberry Pi 4 is set to the latest version so that we can boot from USB 3. The process to do this is detailed in our How to Boot Raspberry Pi 4 / 400 From a USB SSD or Flash Drive. Please complete those steps before moving on.
Installing Windows 11 the Simple Way Via a Raspberry Pi 4
The Windows on Raspberry Pi community never sleeps and we’ve just seen their work on installing Windows 11 onto a SSD using nothing more than the Raspberry Pi 4. No Windows machines are required to do this! The original method was complex and convoluted, but thanks to WoR member Botspot we now have a largely automated install process that runs completely from the Raspberry Pi 4. Many thanks to leepspvideo for bringing this simpler method to our attention.
Get Tom's Hardware's best news and in-depth reviews, straight to your inbox.
There are drawbacks, however. This method takes longer than the manual method (shown below) which involves using a PC to generate the ISO file. Depending on your Internet connection and whether anything fails (which it can, causing you to start again), this method could take an hour or two. The manual (via PC) method below should take less than an hour but has more steps and requires a PC.
1. Boot Raspberry Pi OS and open a Terminal to download the WoR-flasher tool from GitHub.
$ git clone https://github.com/Botspot/wor-flasher
2. Connect the SSD that will contain the Windows 11 installation.
3. Run the WoR-flasher GUI tool.
$ ~/wor-flasher/install-wor-gui.sh
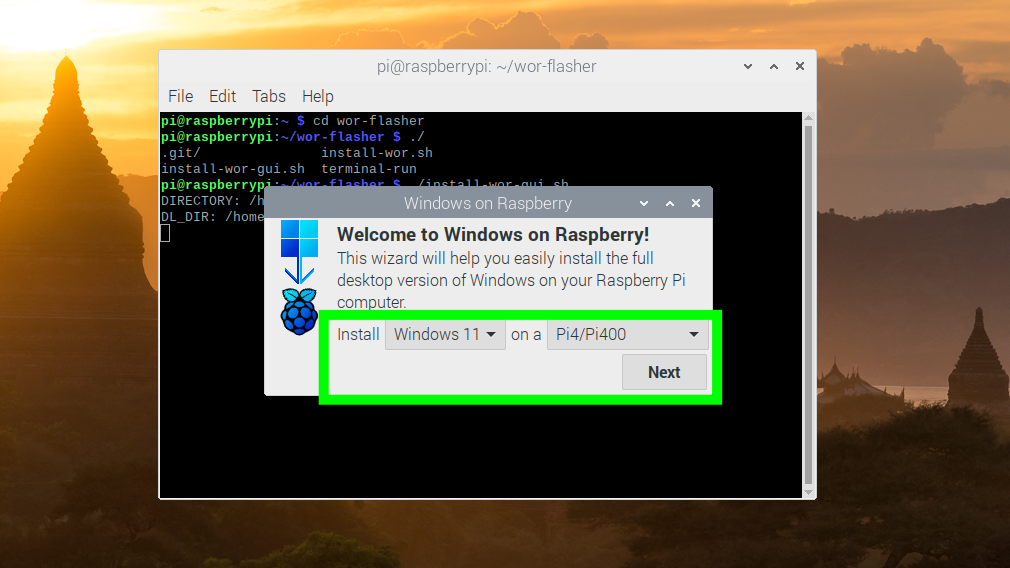
4. In the GUI, select Windows 11 and then your model of Raspberry Pi and click Next. We chose Pi4/400.
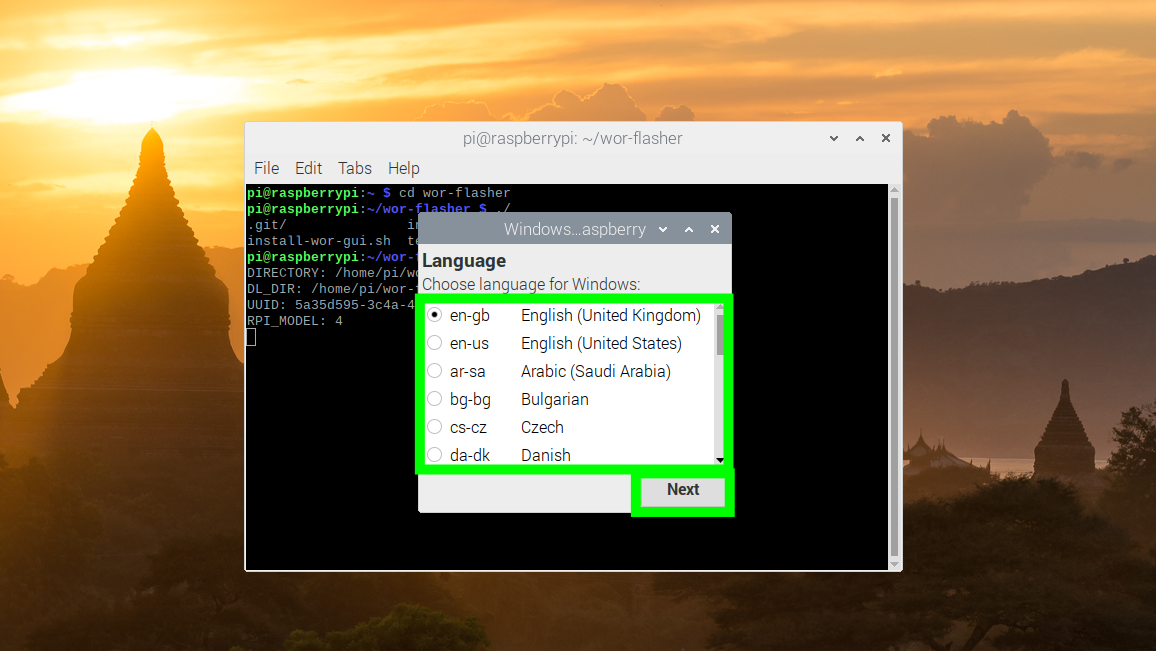
5. Select the correct language and click Next.
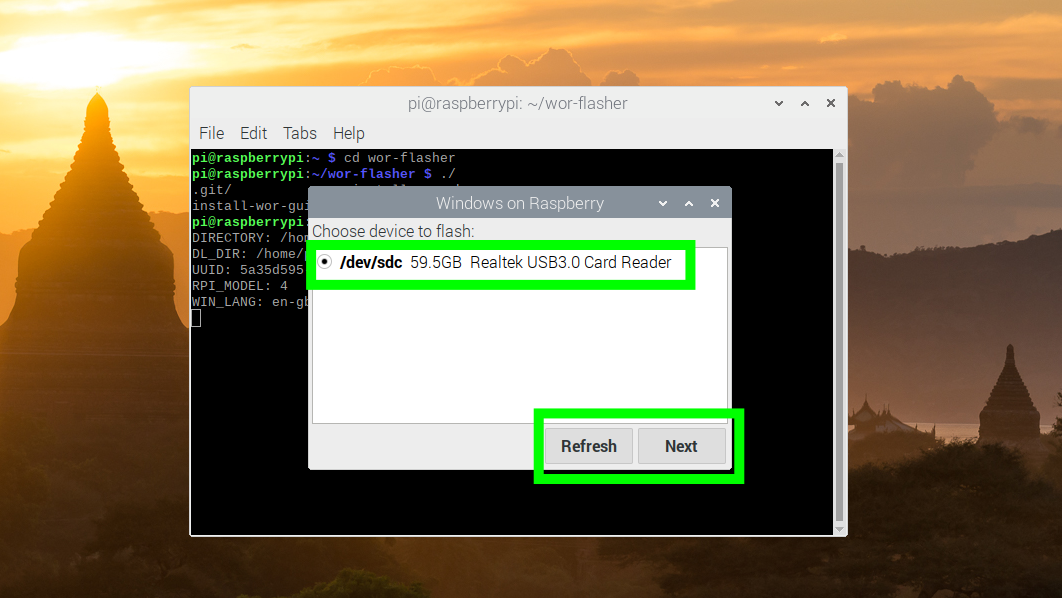
6. Select the drive that will be used to install Windows 11 then click Next. Click Refresh if none are shown.
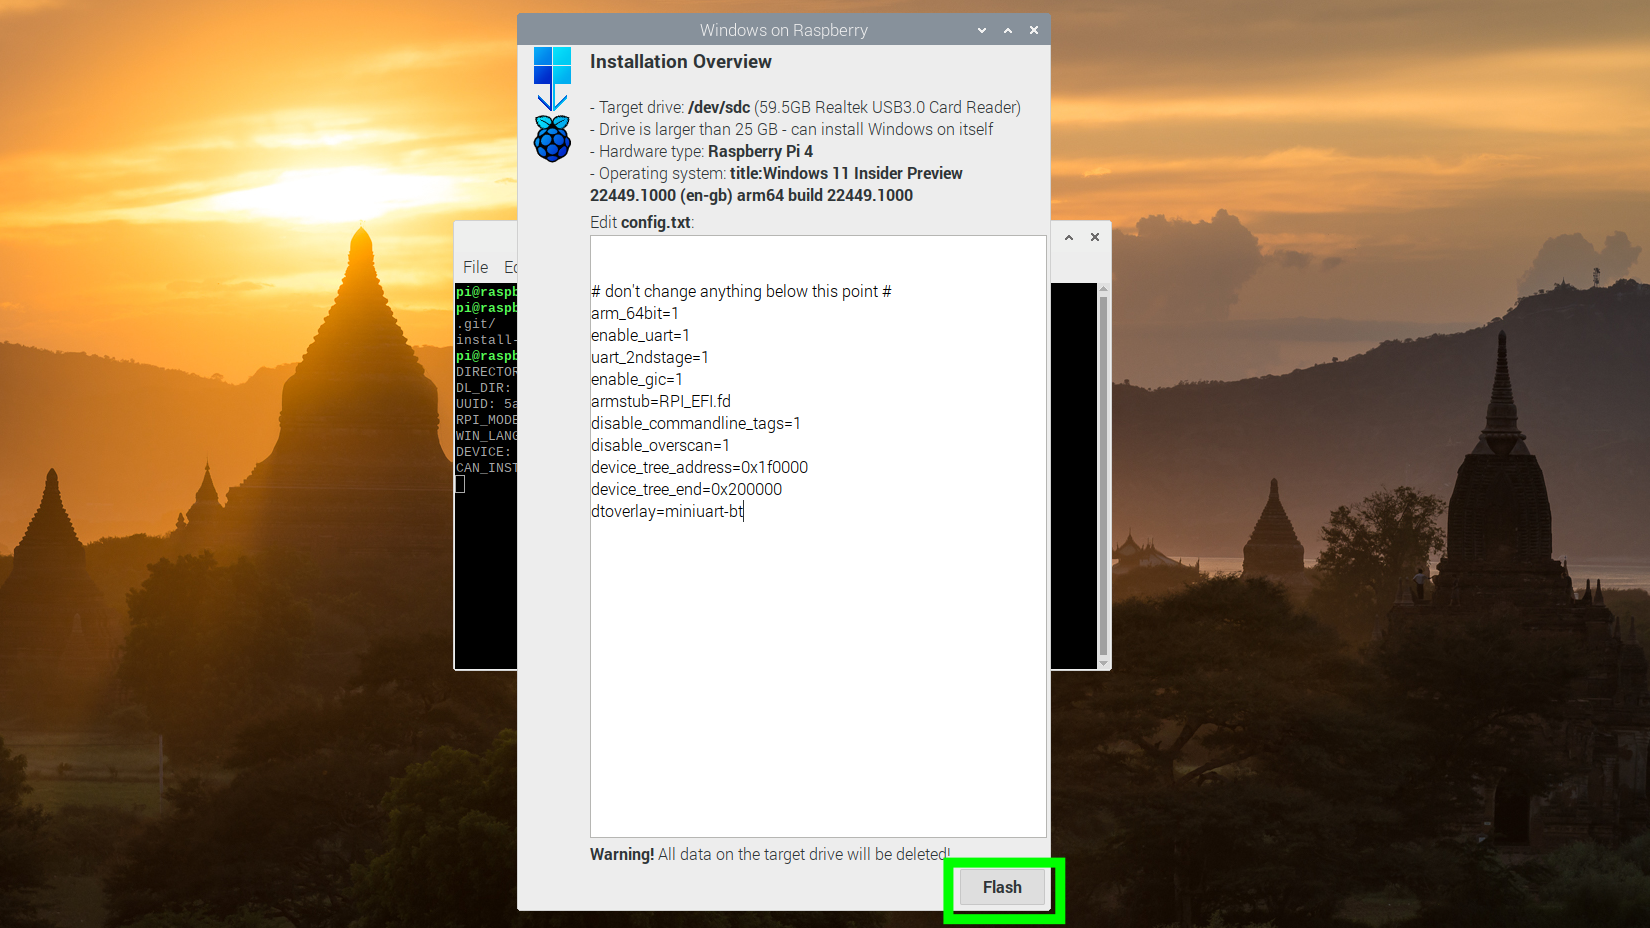
7. Click Next to install Windows 11 to the drive. We do not have to make any changes to this screen.
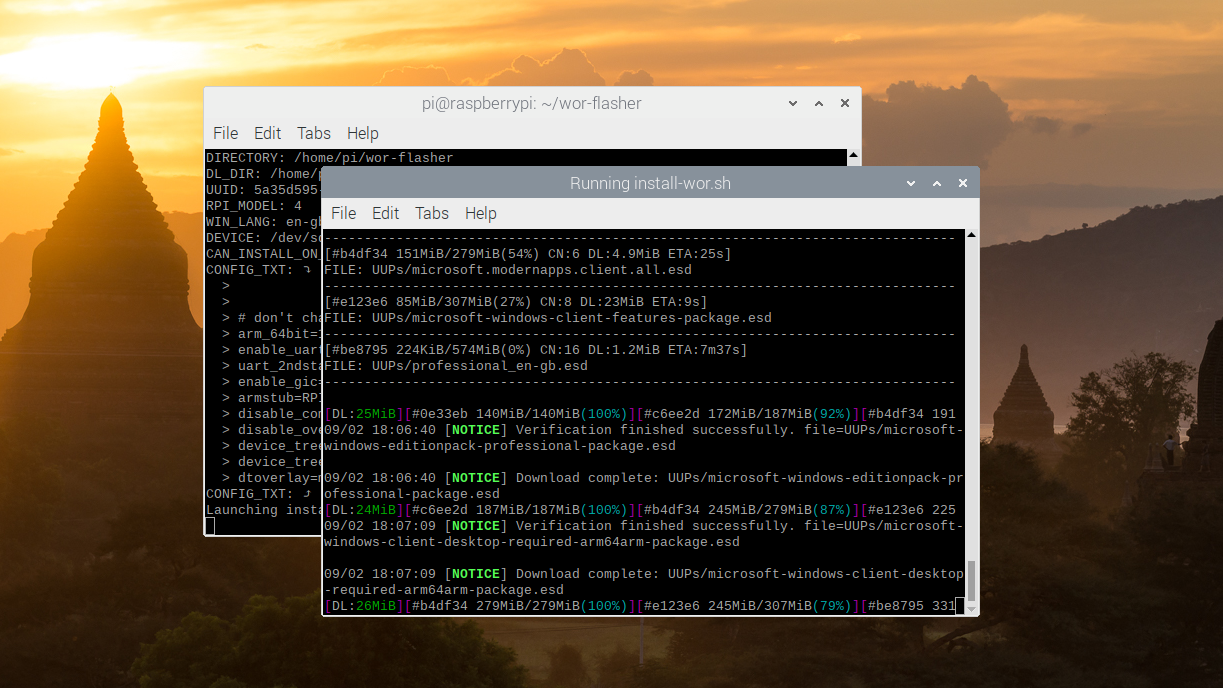
The install process will take some time, possibly up to an hour. Take no action but continue to monitor the output for any errors. There is a chance that the install may fail, if so close the terminal and repeat the previous steps,
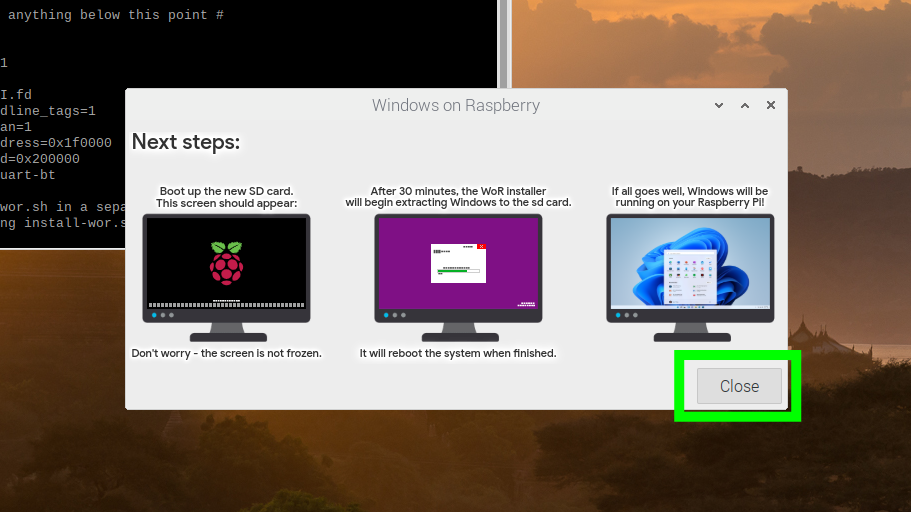
8. Once the installation is complete you will see the Next Steps screen. This screen tells us what to expect when we boot into Windows 11 for the first time. Click on Close.
9. Power off your Raspberry Pi, and remove the Raspberry Pi OS boot drive / micro SD. Ensure your Windows 11 drive is connected via USB3 and then power up your Raspberry Pi
The first boot will take quite some time. Leave the installation to complete and you will soon be presented with the typical Windows 11 setup screens. Follow these screens to complete the installation.
How to Install Windows 11 on the Raspberry Pi 4 Using a PC
To install Windows 11 on a Raspberry Pi 4 we first need to create a viable installation image.
1. Search for “Windows 11 Arm” on UUDump
2. Select the latest build for “arm64”.
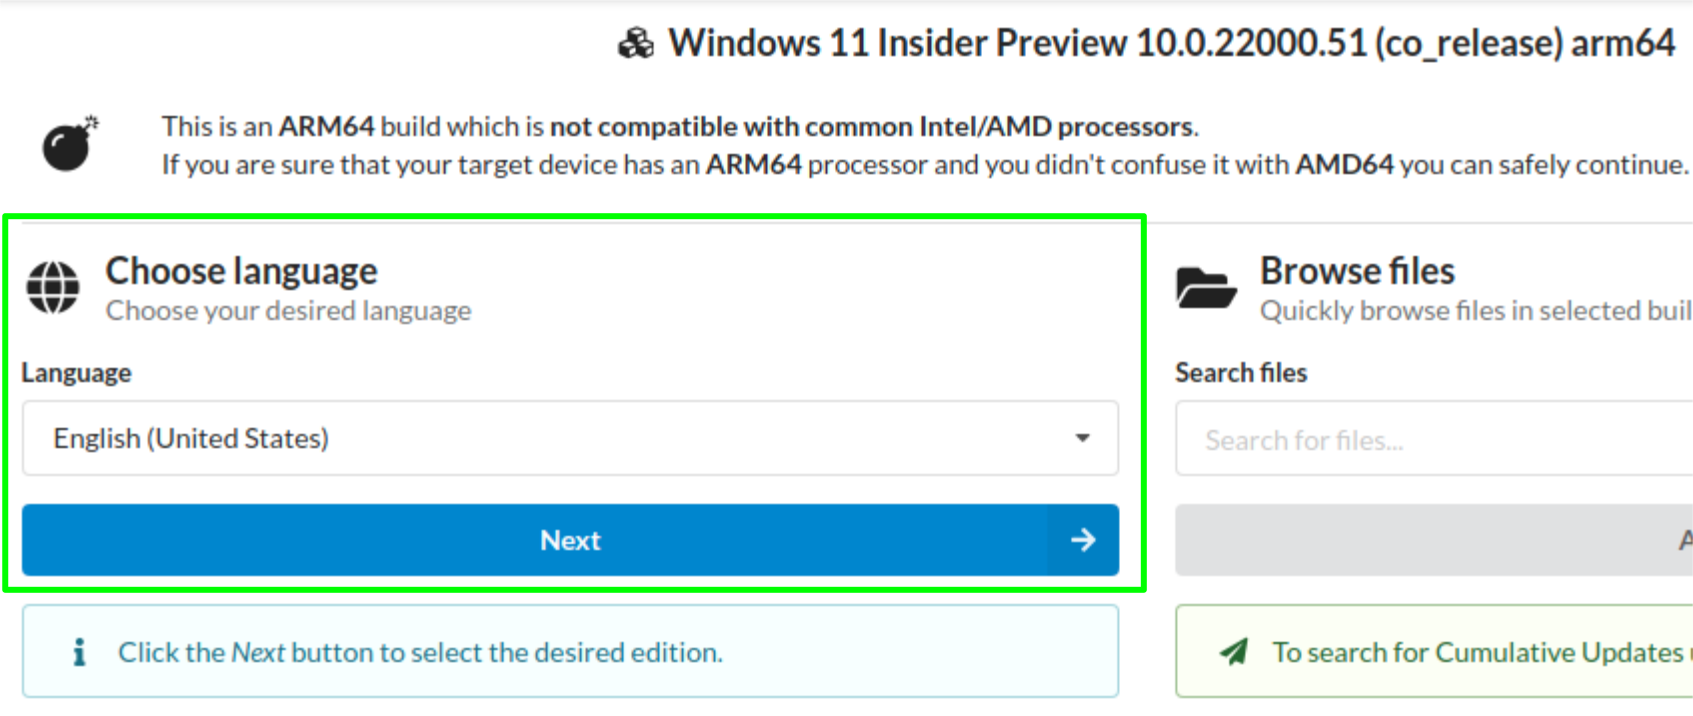
3. Set your preferred language.
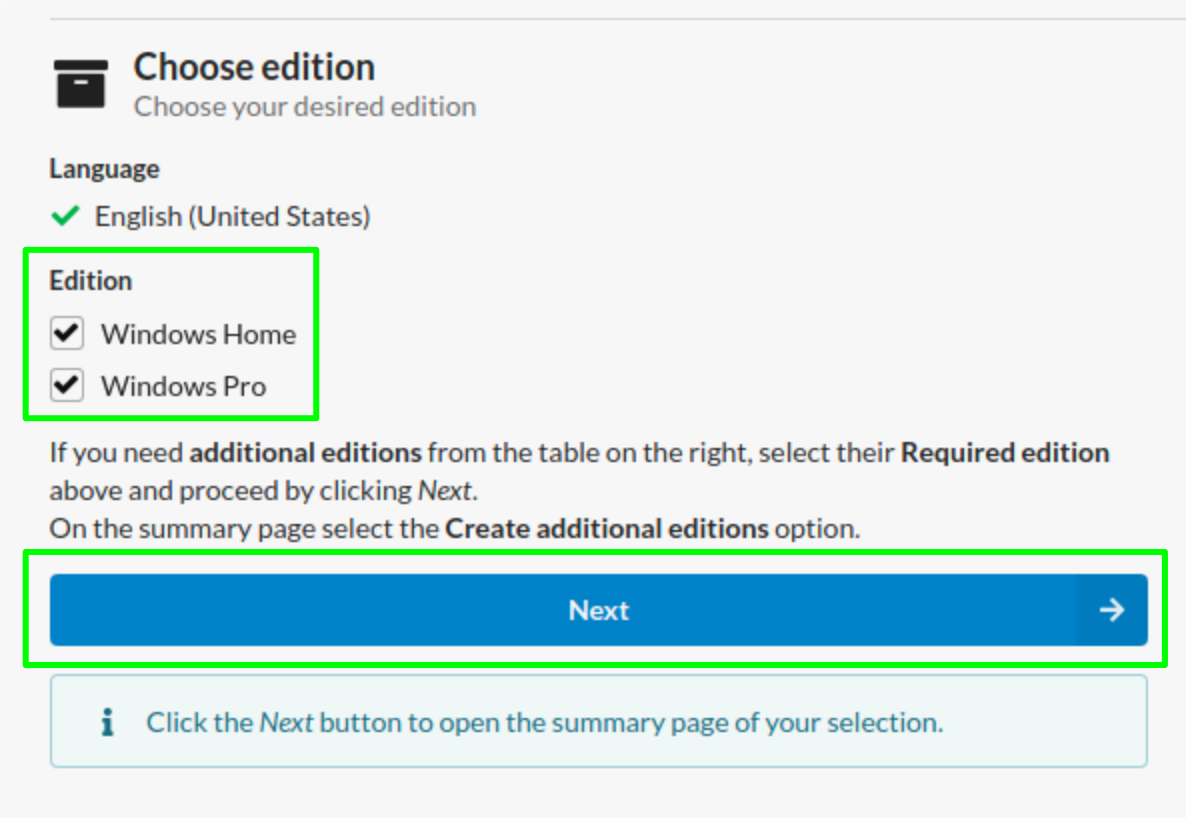
4. Choose the edition of Windows 11 that you would like. We chose Windows Home and Pro. Click Next.
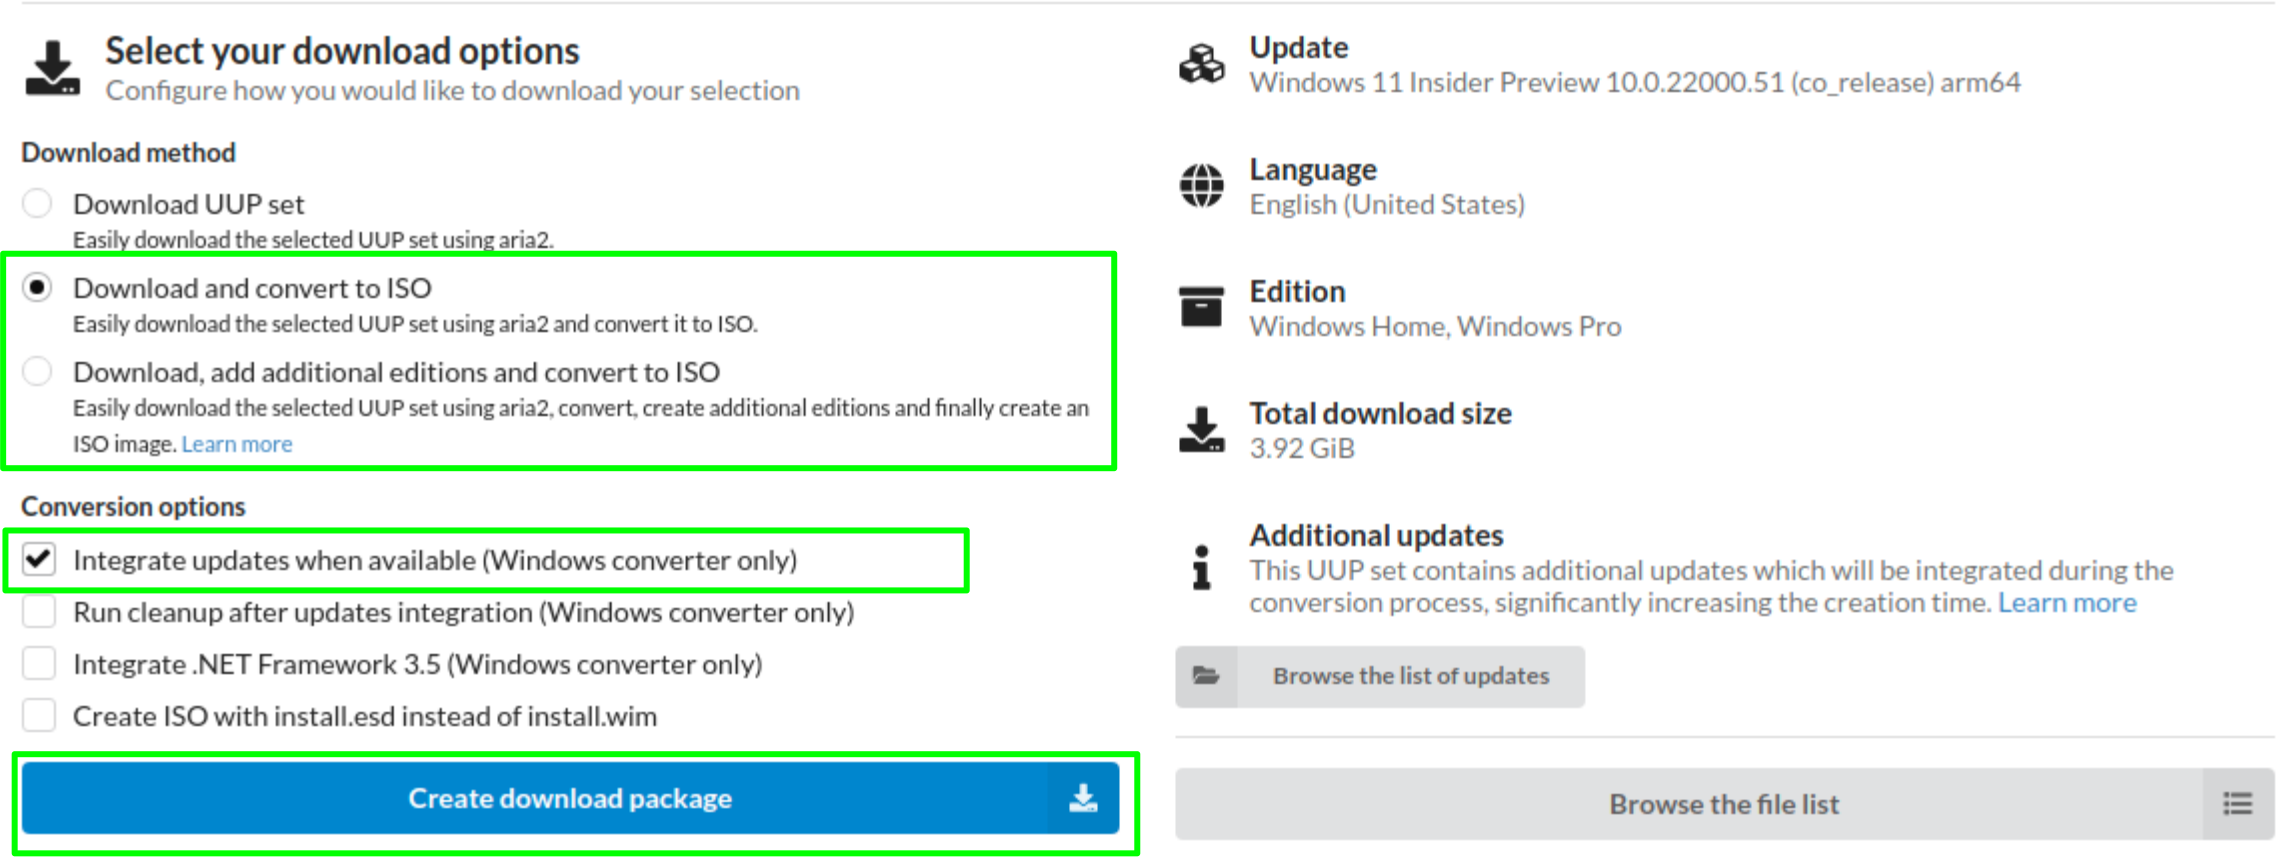
5. Set the download method to “Download and convert to ISO” then click “Create download package”.
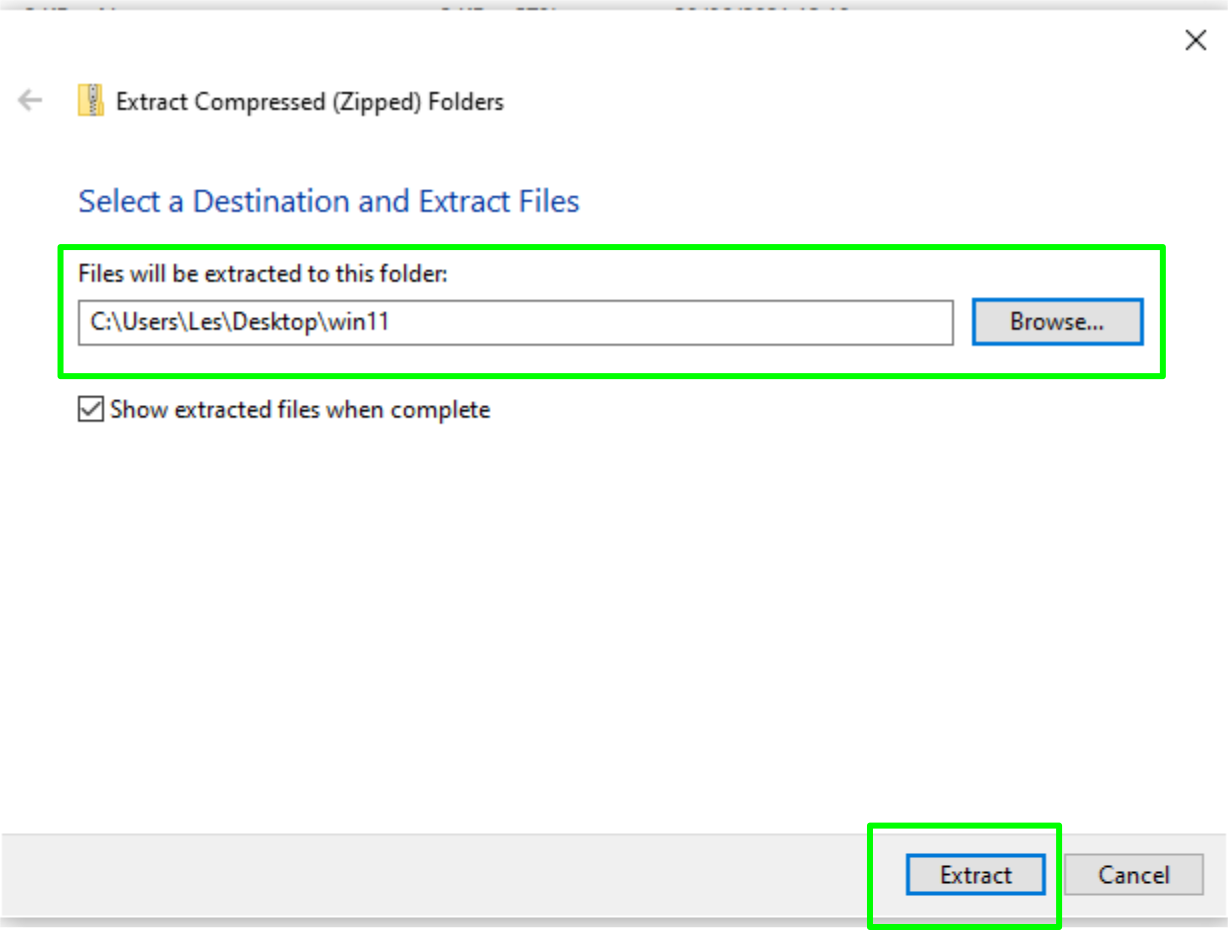
6. Extract the contents of the download into a folder called “win11” and go to that folder.
7. Double click on the uup_download_windows.cmd file. This will trigger a security warning. Click on “More info” and then “Run anyway” and finally allow the app to make changes to your device.
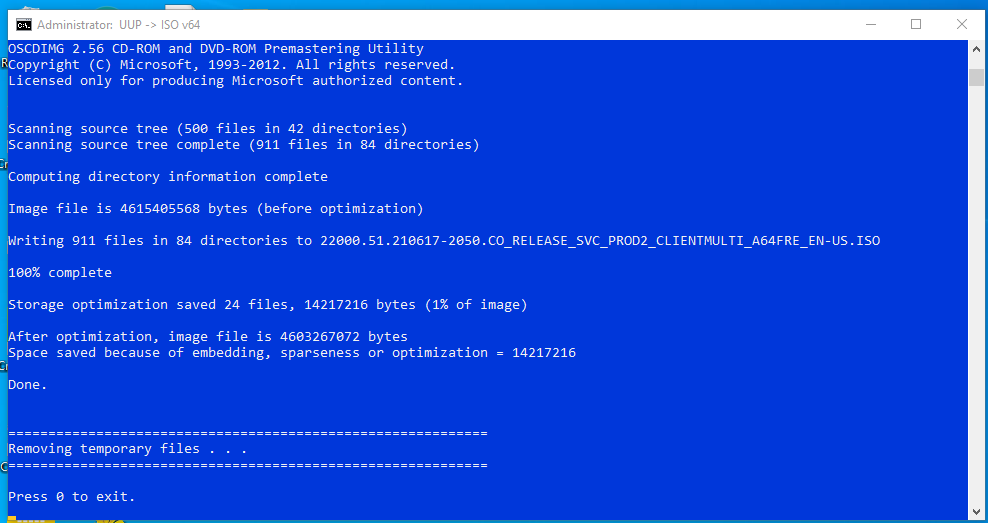
The command prompt will now fill with text. This is the output of a command that will download the Windows 11 for Arm image, patch it and then prepare an ISO image. This process may take some time, depending on your Internet connection and the power of your computer.
8. Press 0 to close the prompt when the process is complete.
We now have an ISO image that we can install to a micro SD card or SSD.
9. Insert a micro SD card / SSD via USB into your PC. The drive should appear and be ready for use. Please note that the drive will be formatted, and any existing data on the drive will be lost.
10. Download the Windows on Raspberry Imager tool and extract the ZIP to the “win11” folder.
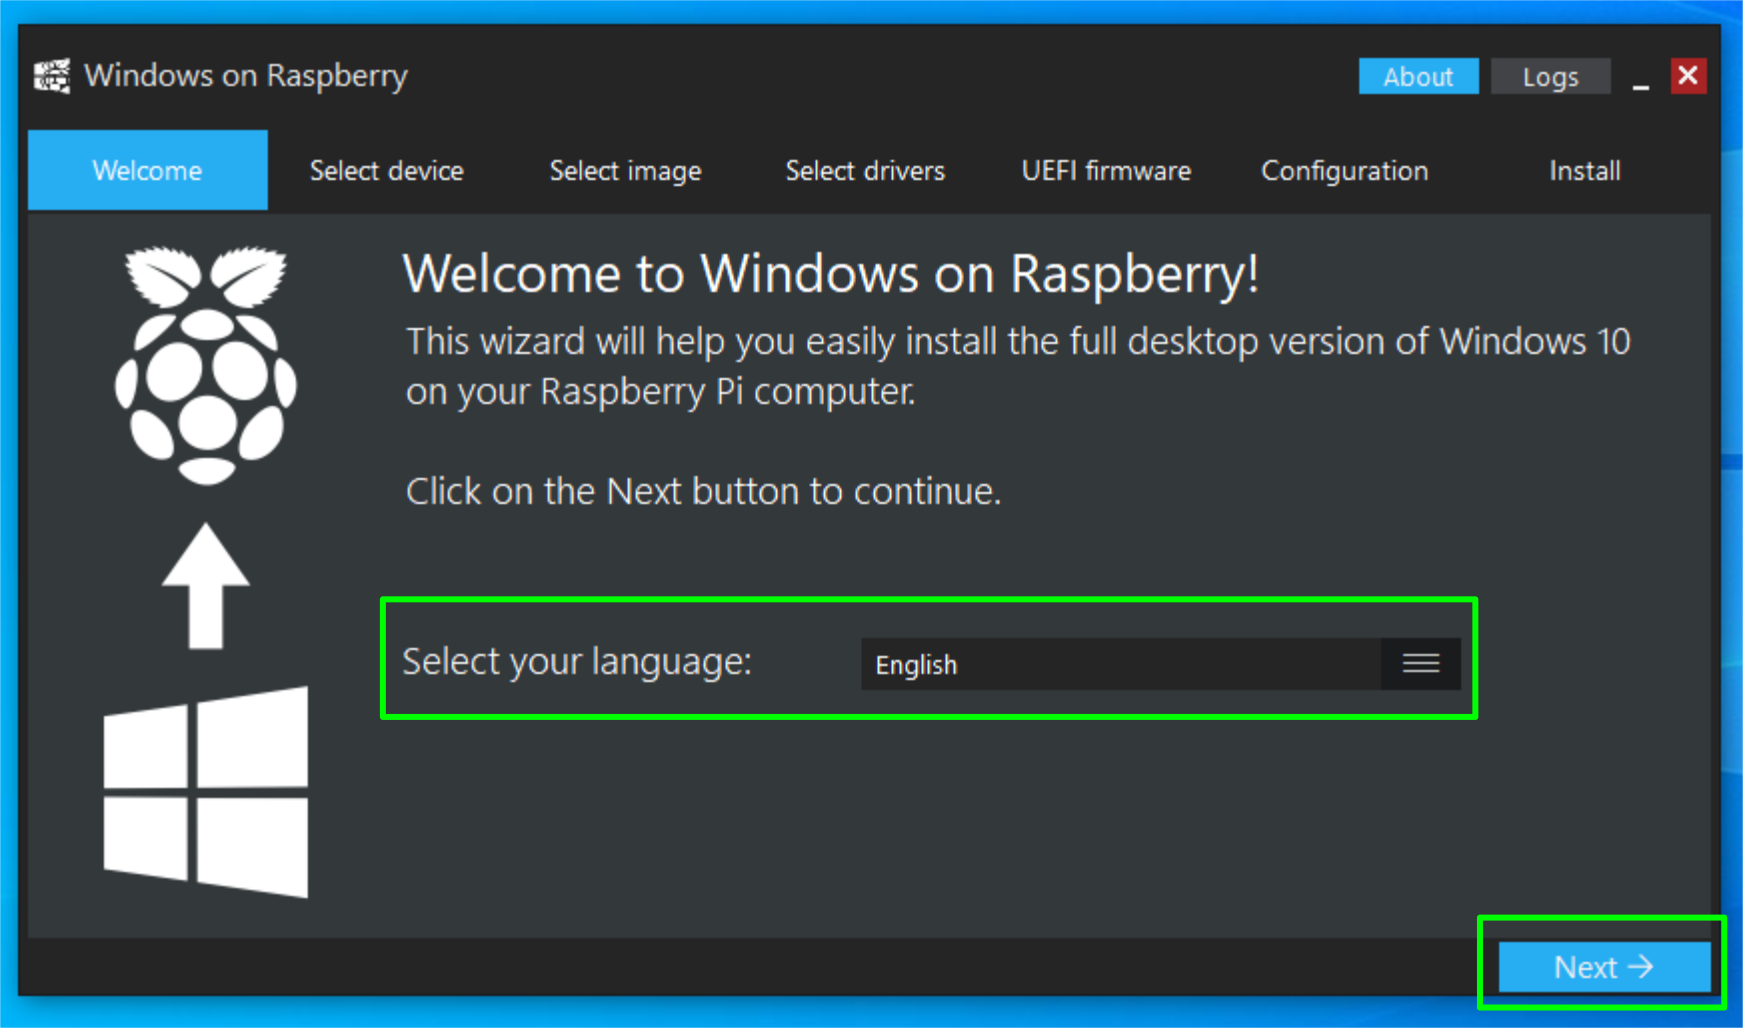
11. Open WoR and allow the application to make changes to your computer. Set your preferred language and then click Next.
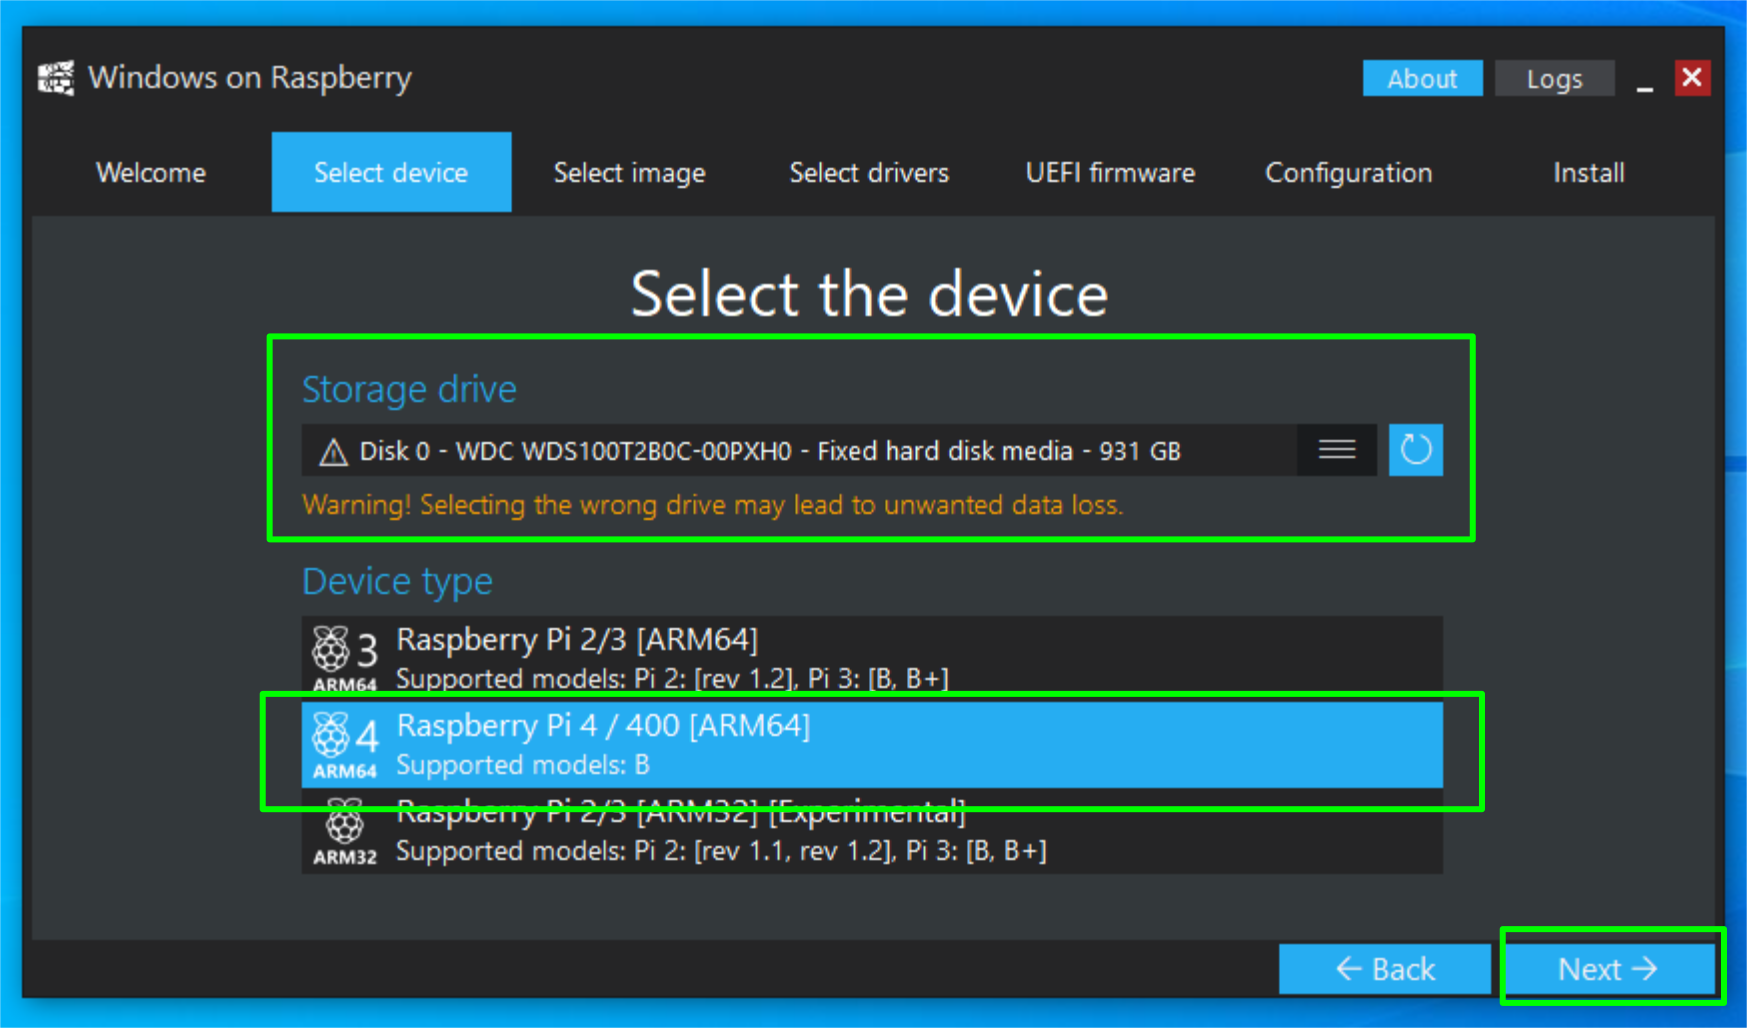
12. Select the micro SD / SSD storage device that you wish to install Windows 11 to. Then set the device type, in this case a Raspberry Pi 4 / 400. Click Next to move on.
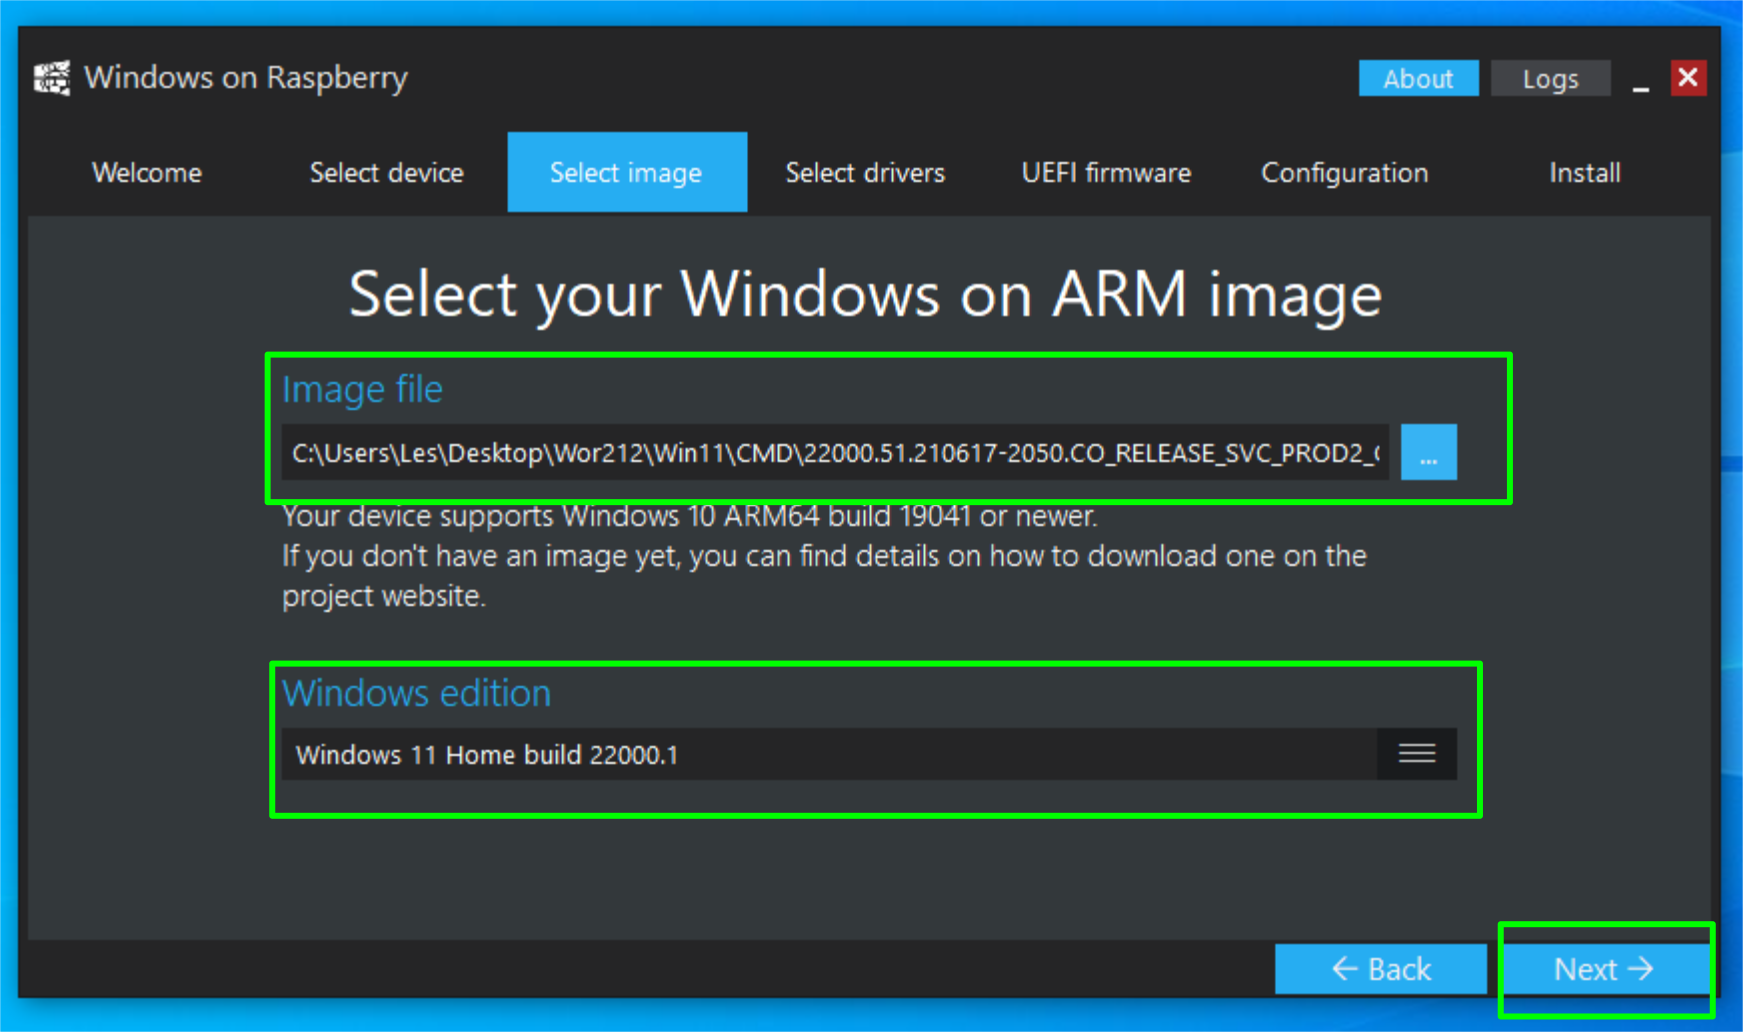
13. Select the freshly-created Windows 11 ISO image and click Next.
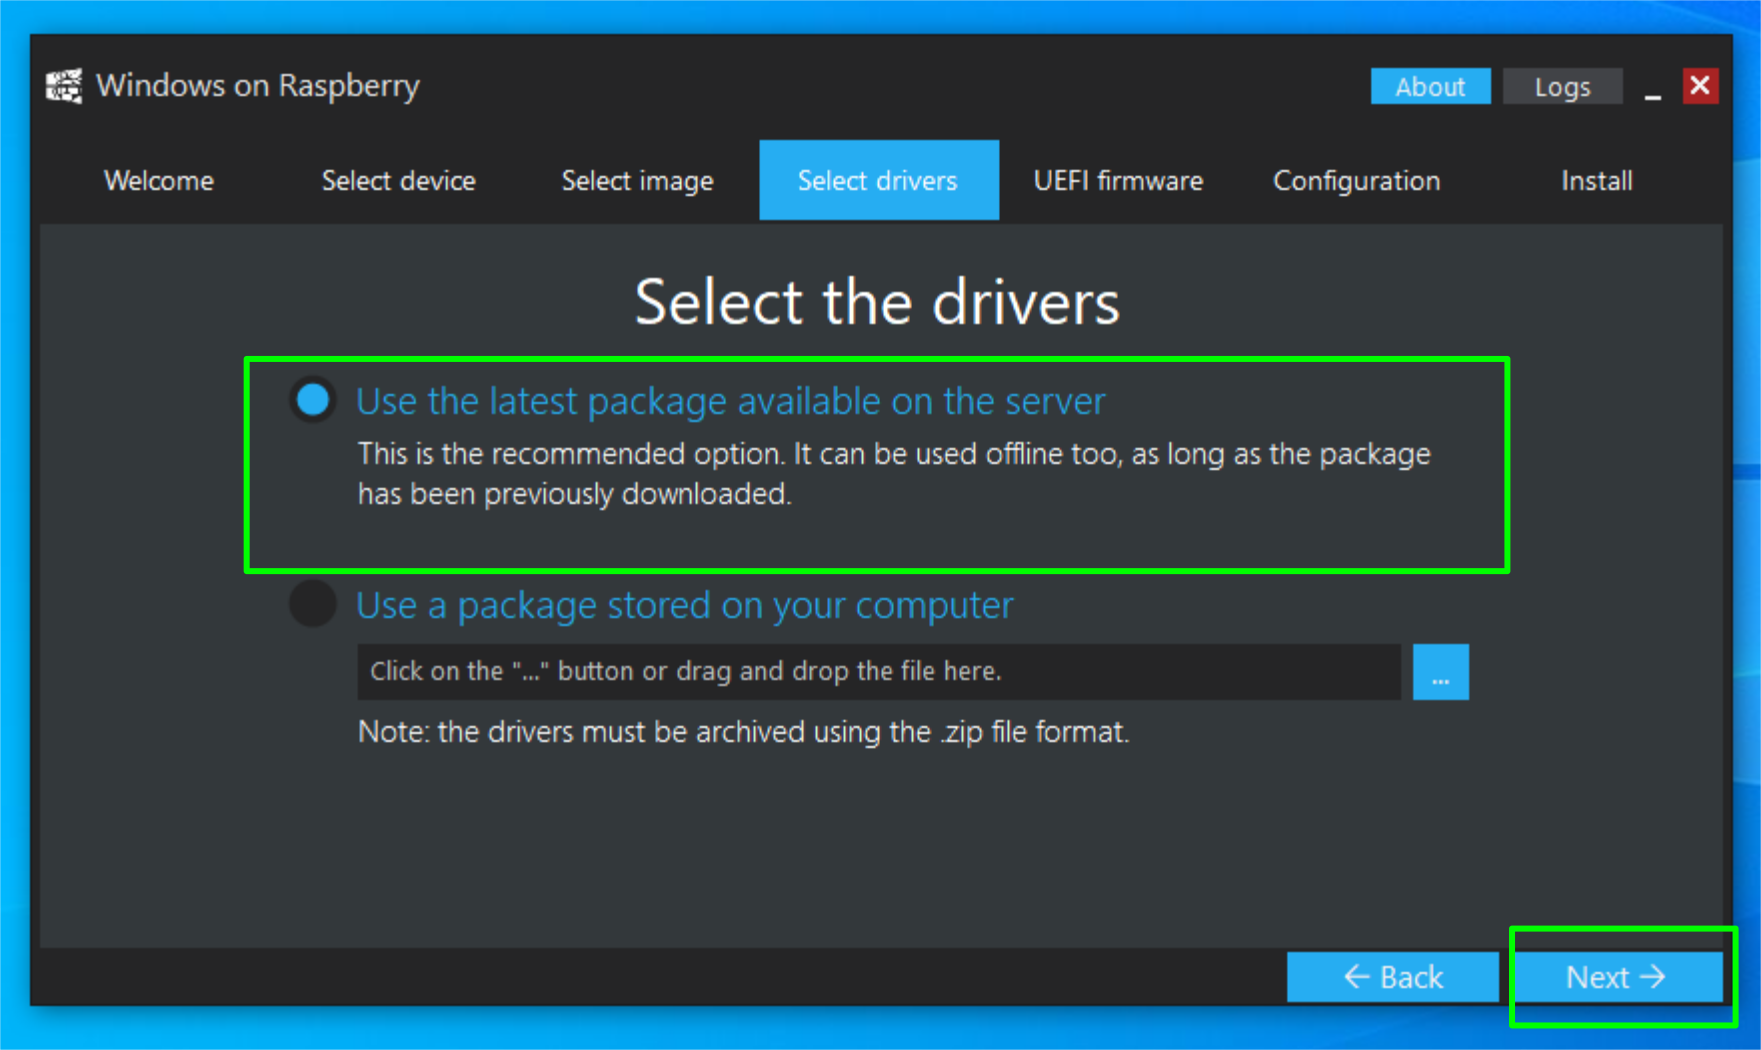
14. Use the latest driver packages, available from the remote server. These files are cached locally for future installs.
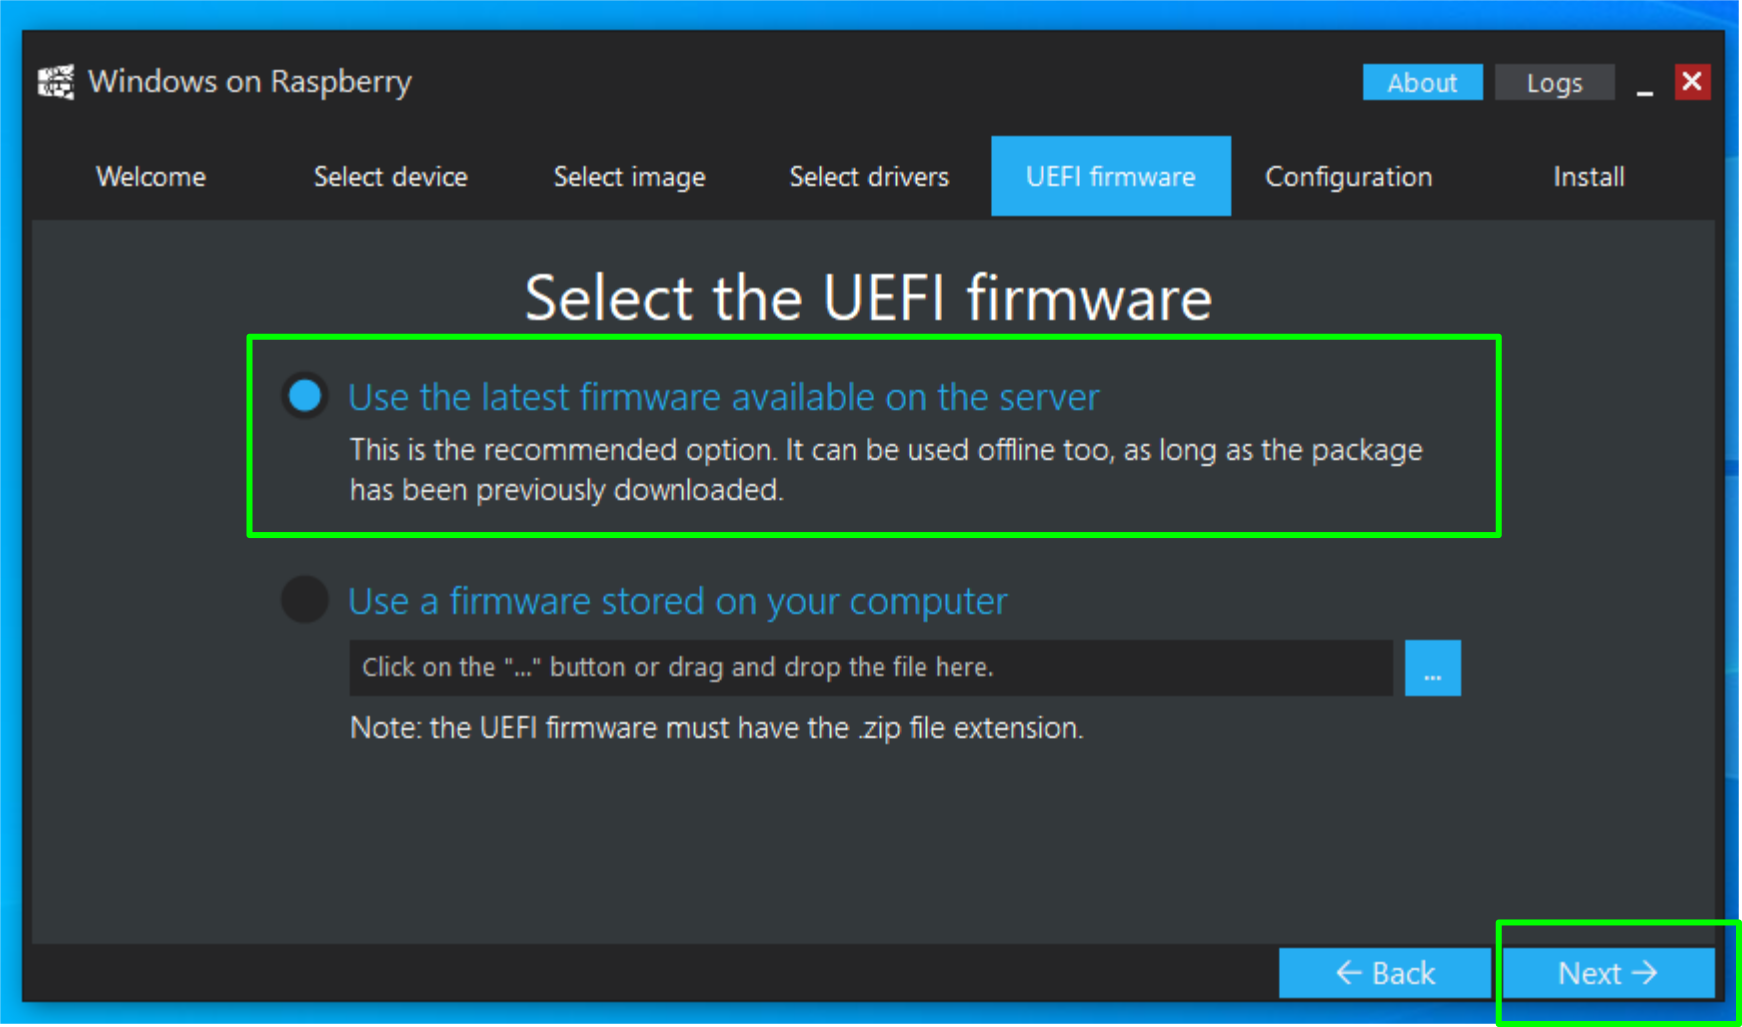
15. Use the latest UEFI firmware from the server. This is also stored locally for future installs.
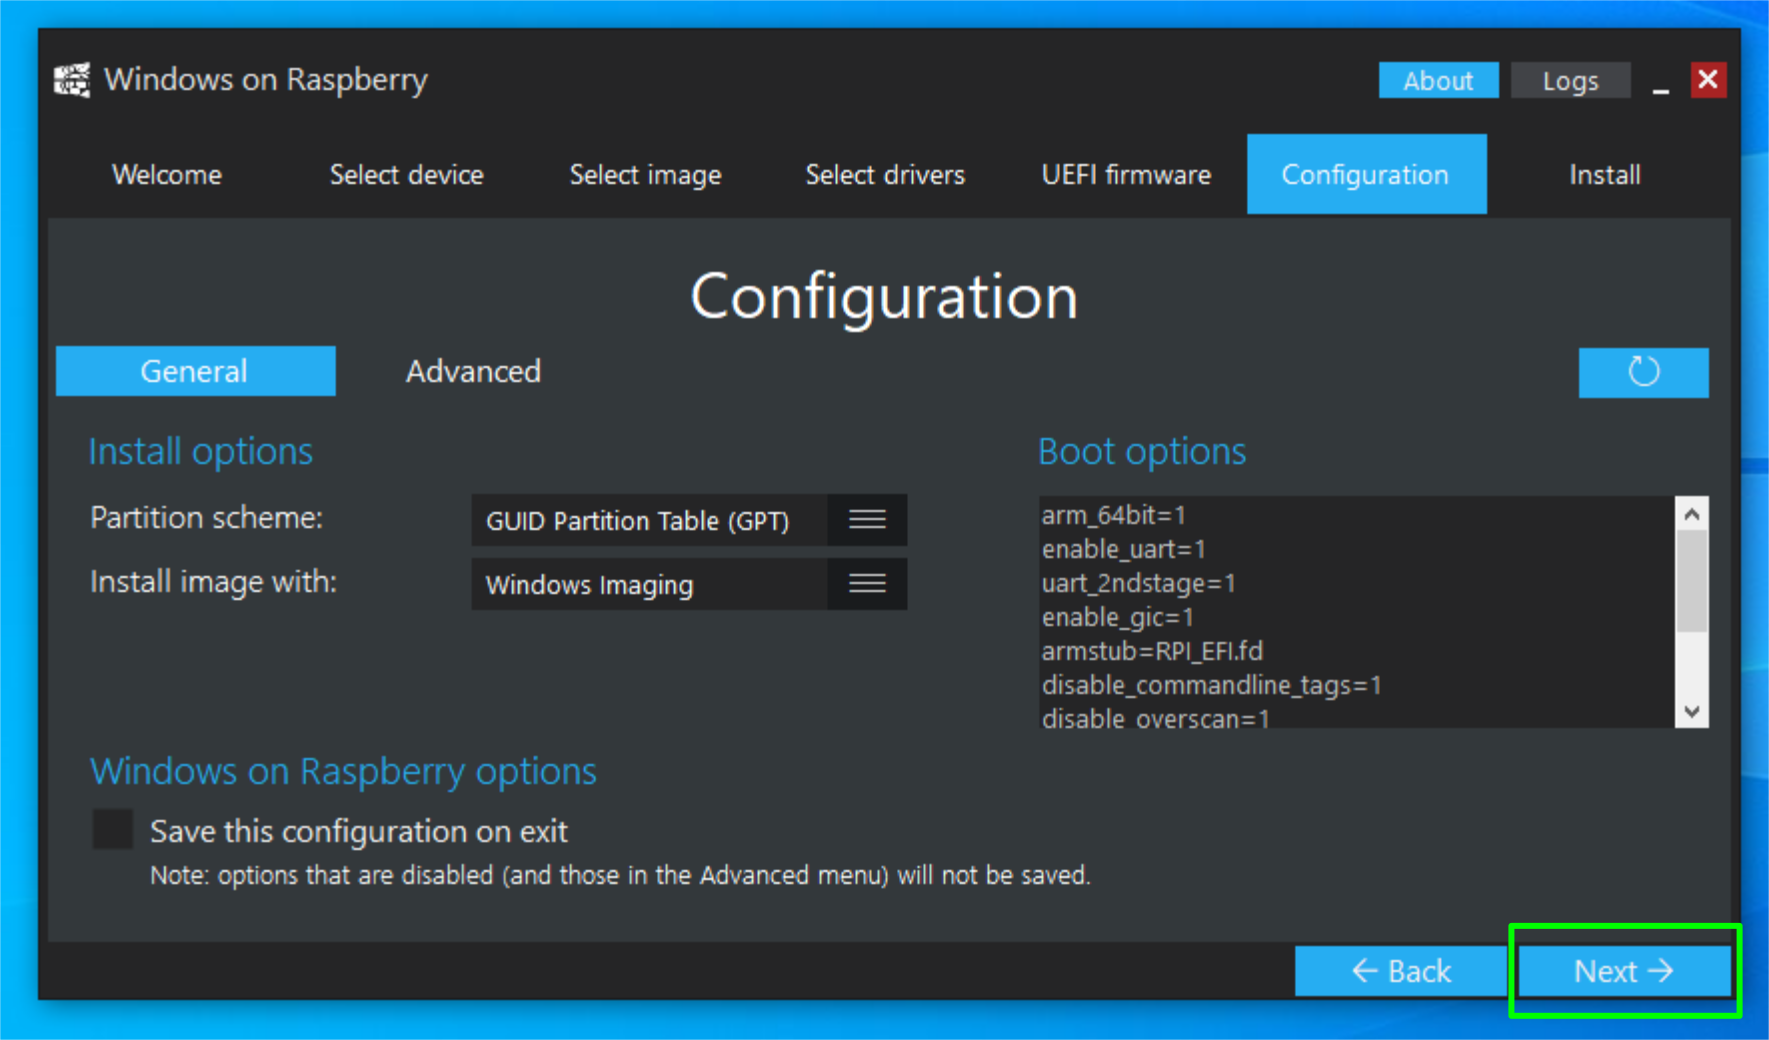
16. Click on Next to accept the current configuration. Only make changes here if you understand what you are changing.
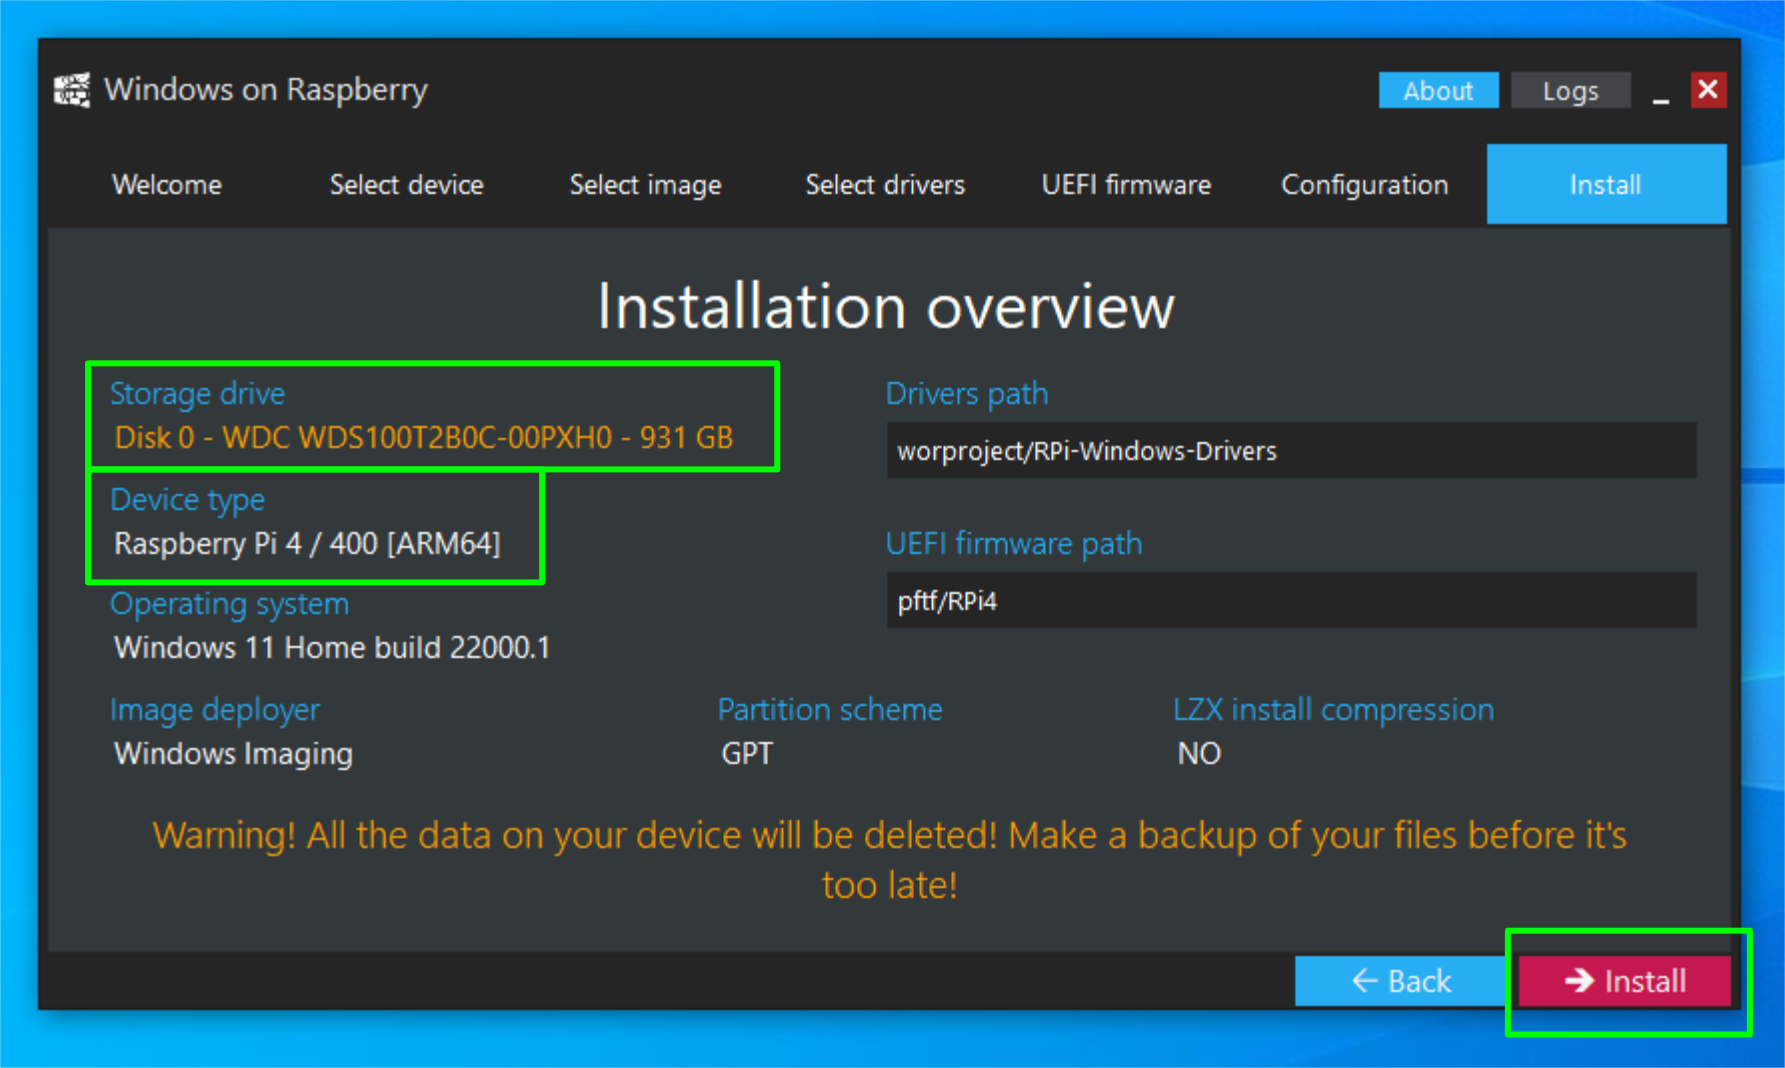
17. Check the installation overview. Is the correct drive selected? Have you chosen the correct model of Raspberry Pi? Click Install. The installation process will take around 10 minutes for an SSD. MicroSD installations are longer.
18. Close WoR when finished, eject the micro SD / SSD and insert it / connect it into your Raspberry Pi 4. Connect up your Pi peripherals and power on.
Setting Up Windows 11 on Raspberry Pi 4
With the Windows 11 micro SD / SSD inserted and our Raspberry Pi booting we now have to setup the Windows 11 install using the standard post installation setup sequence. Follow the process and your Windows 11 Raspberry Pi is ready for use.
There are a couple of tweaks that we can make to the install, especially if we are using a Raspberry Pi 4 with 4GB or more of RAM.
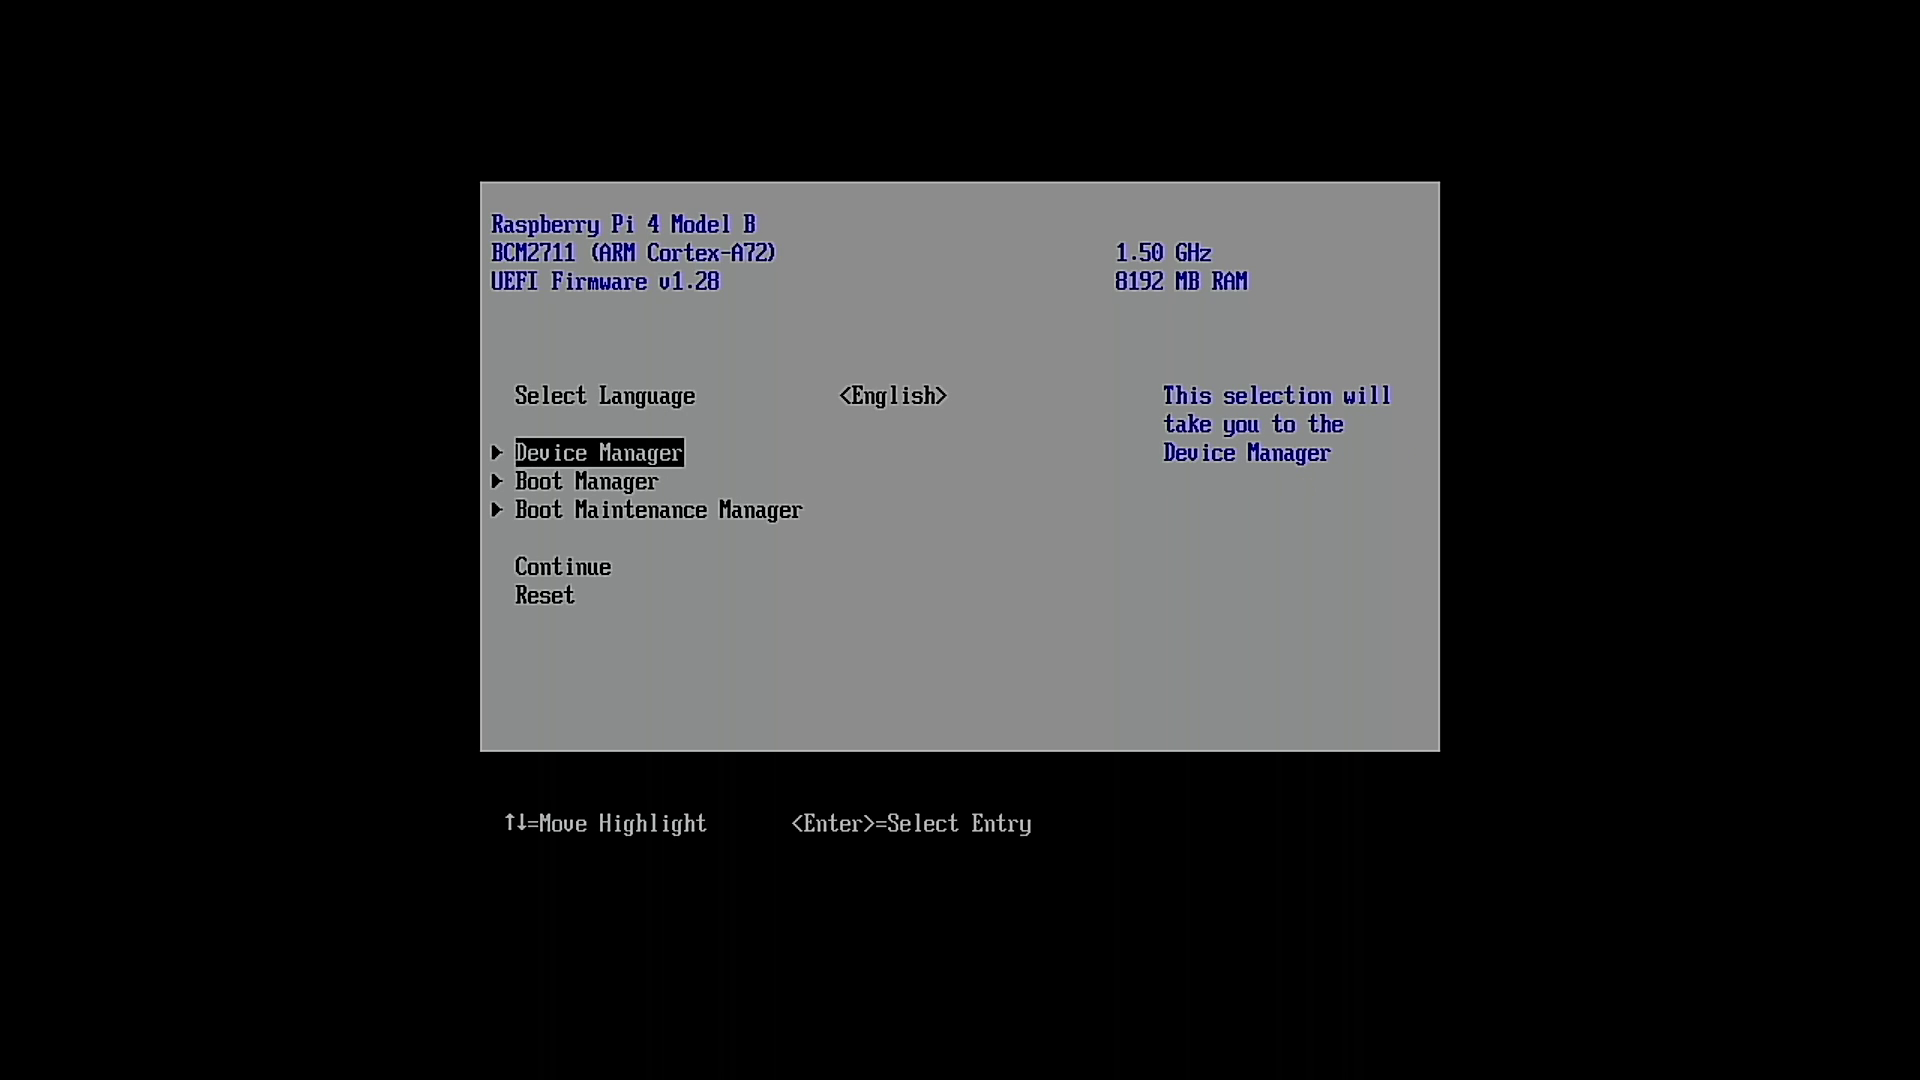
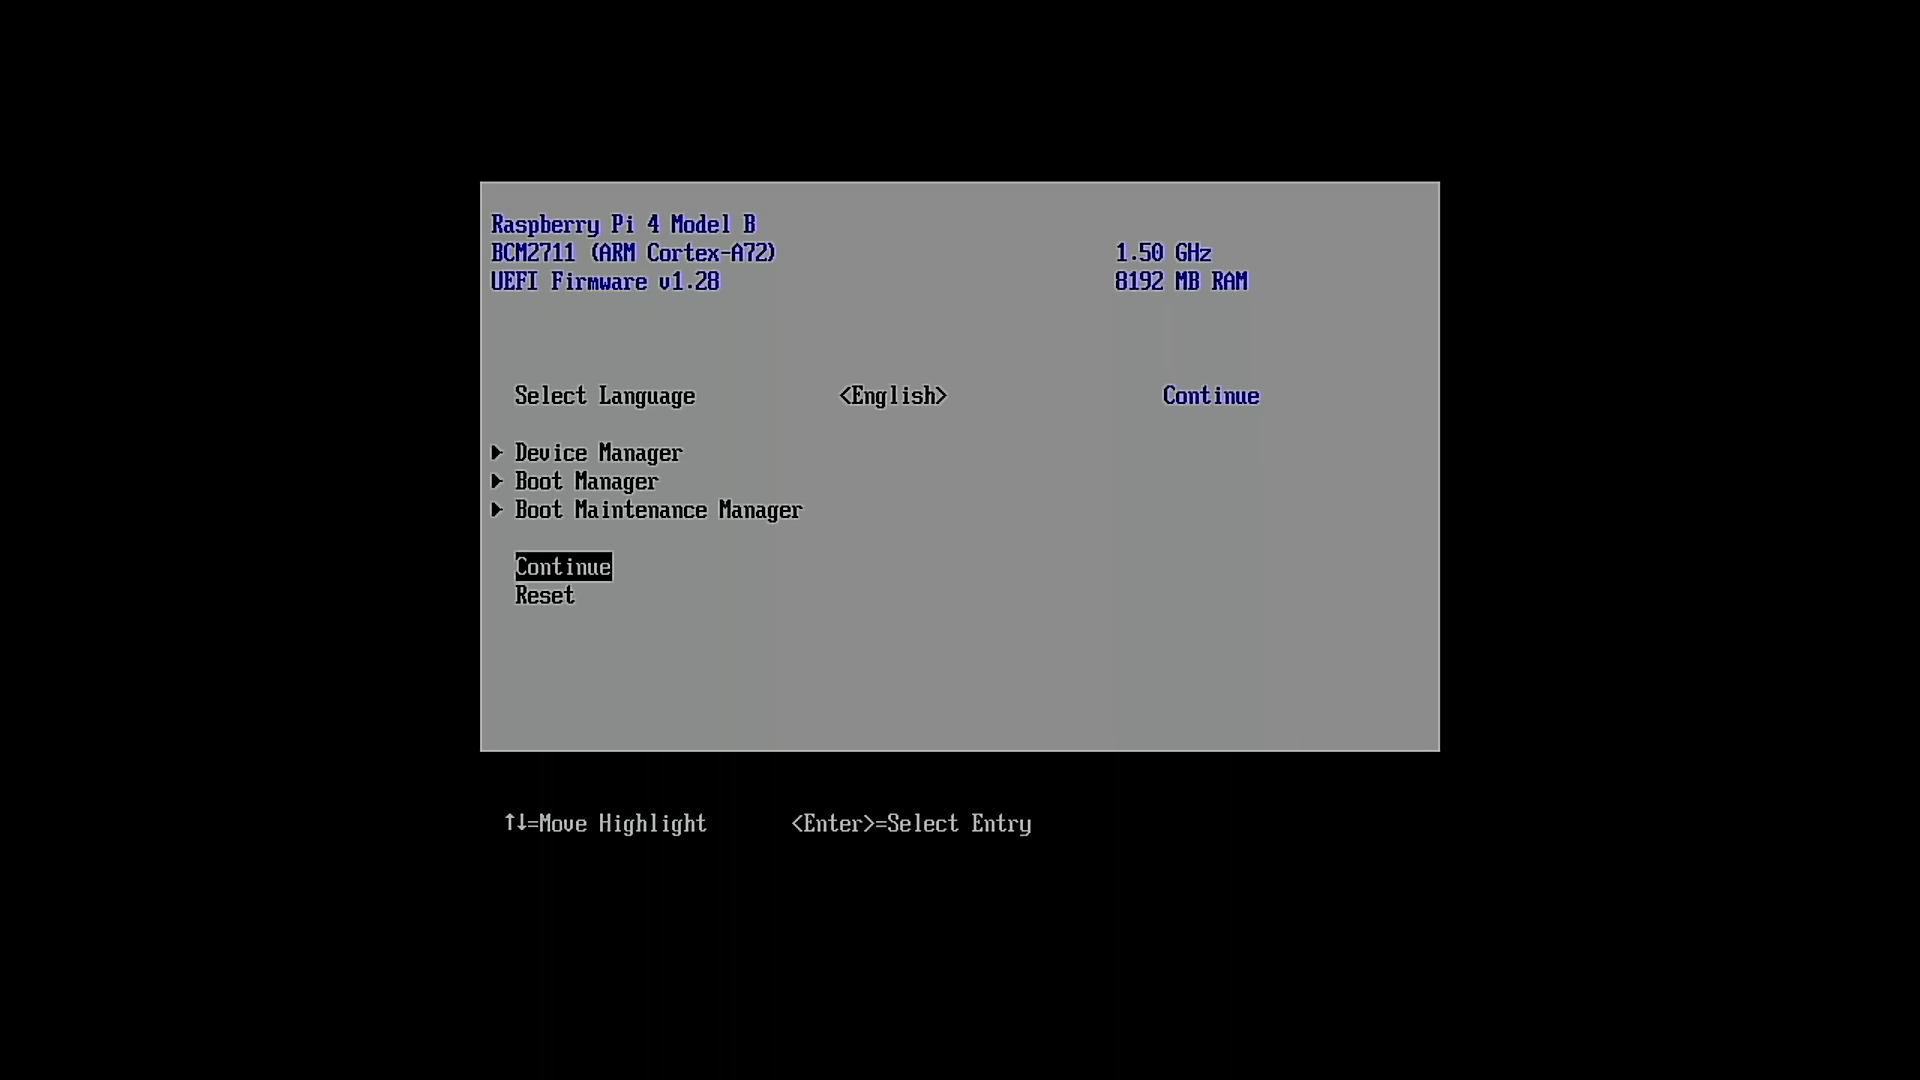
1. Reboot / power up the Raspberry Pi and press ESC when prompted.
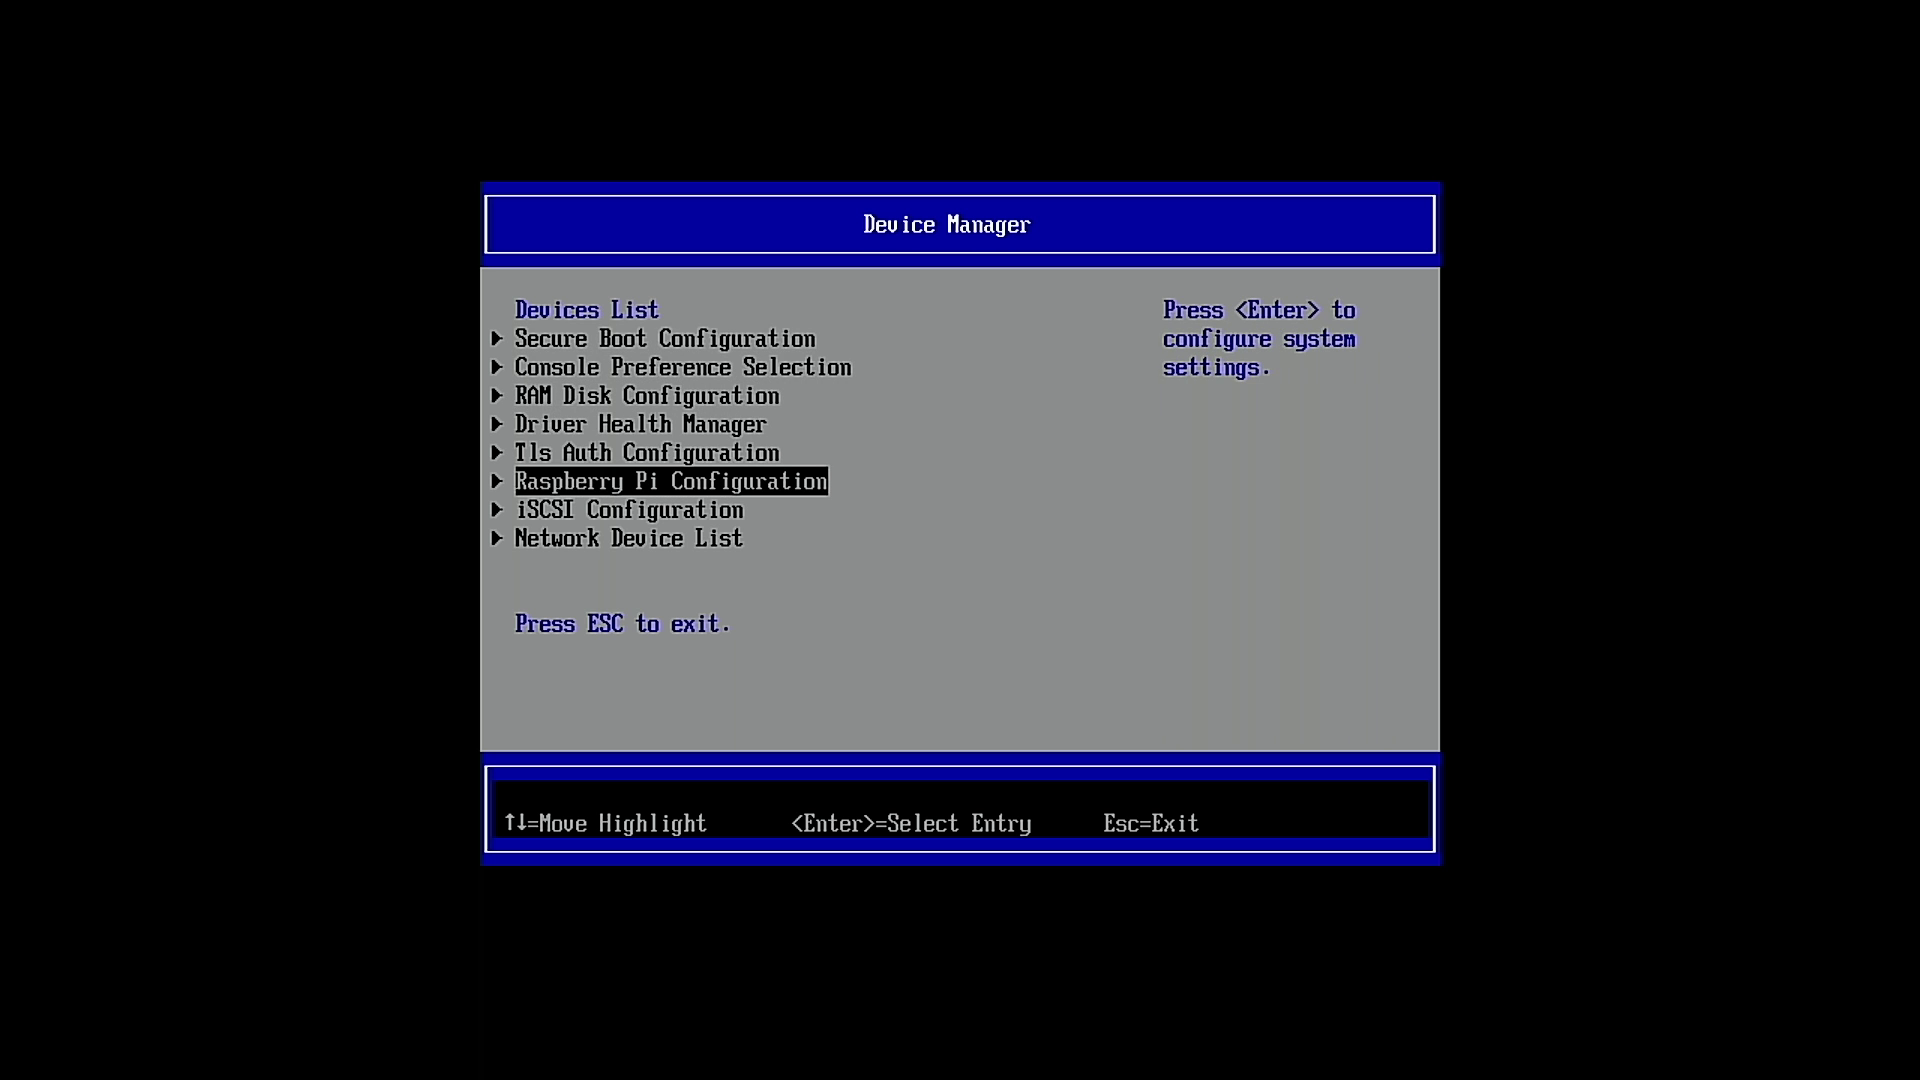
2. Scroll down to Device Manager and press Enter.
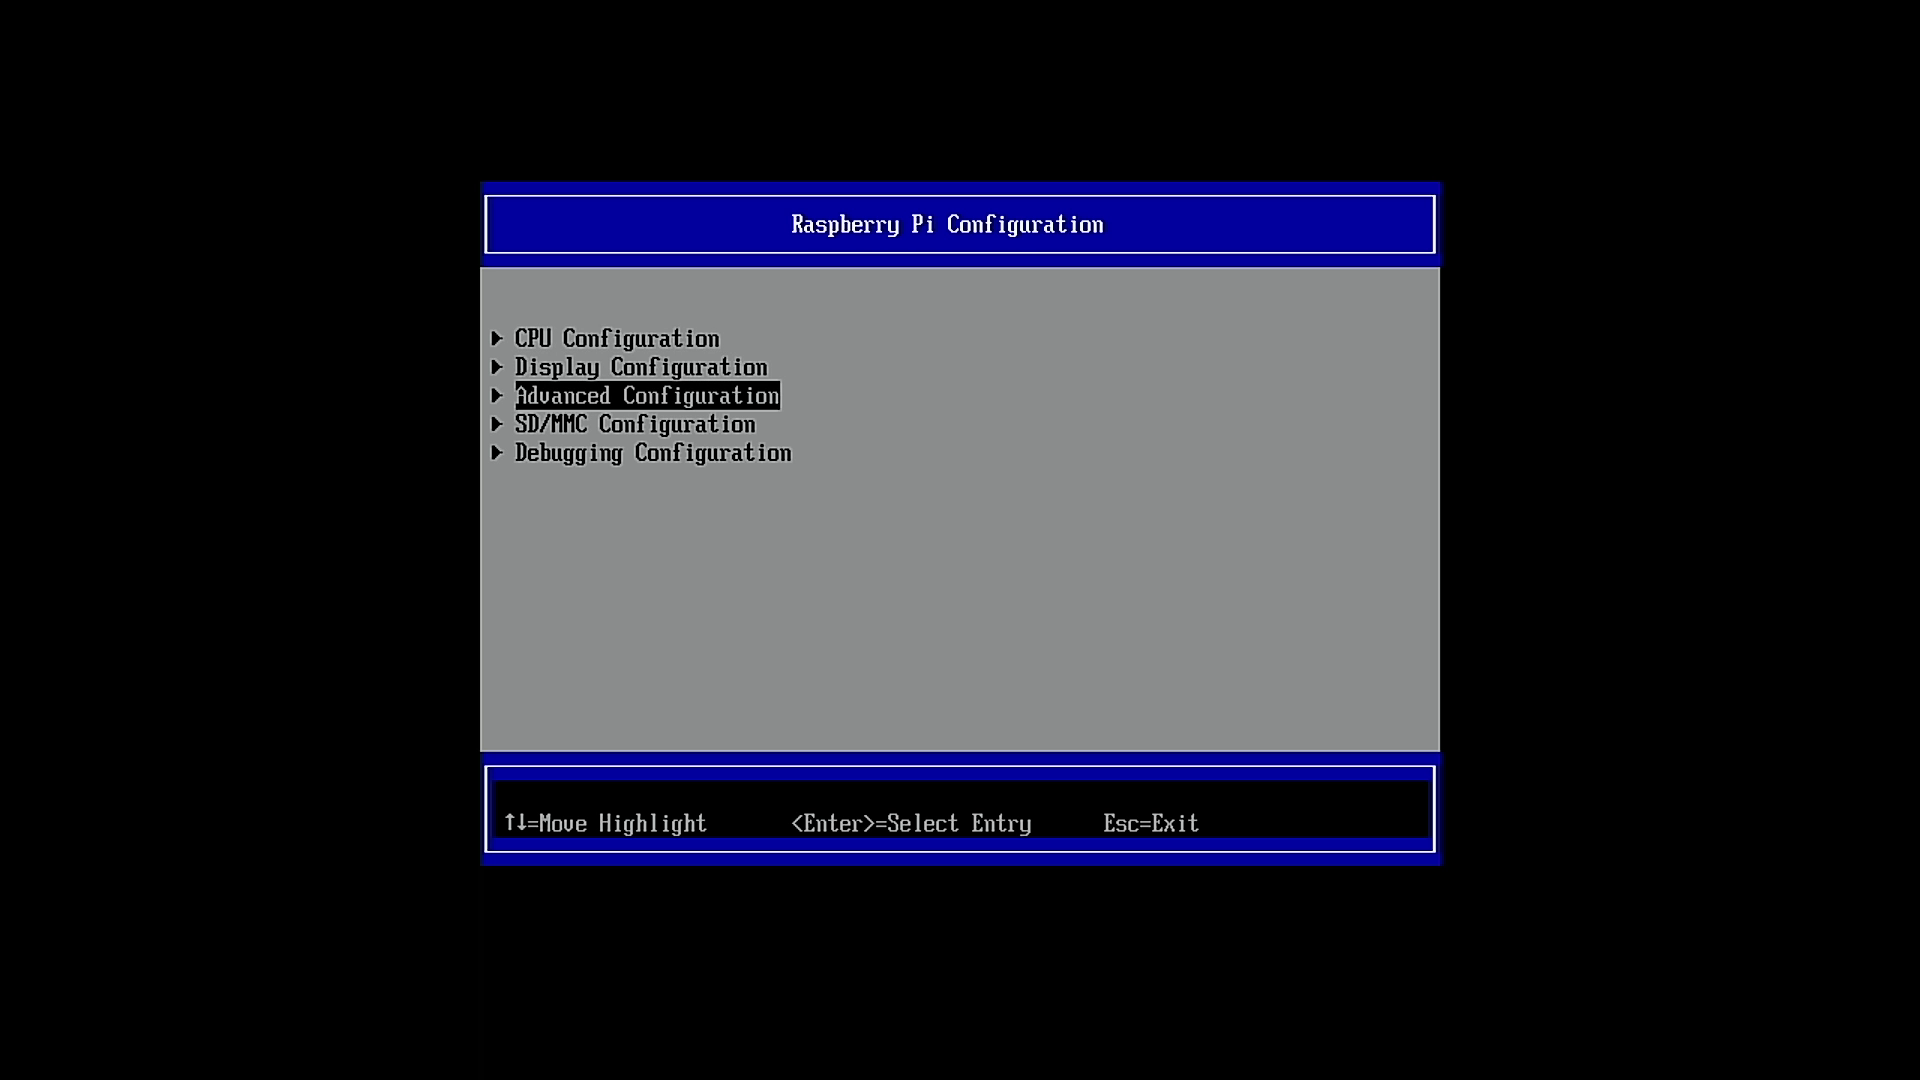
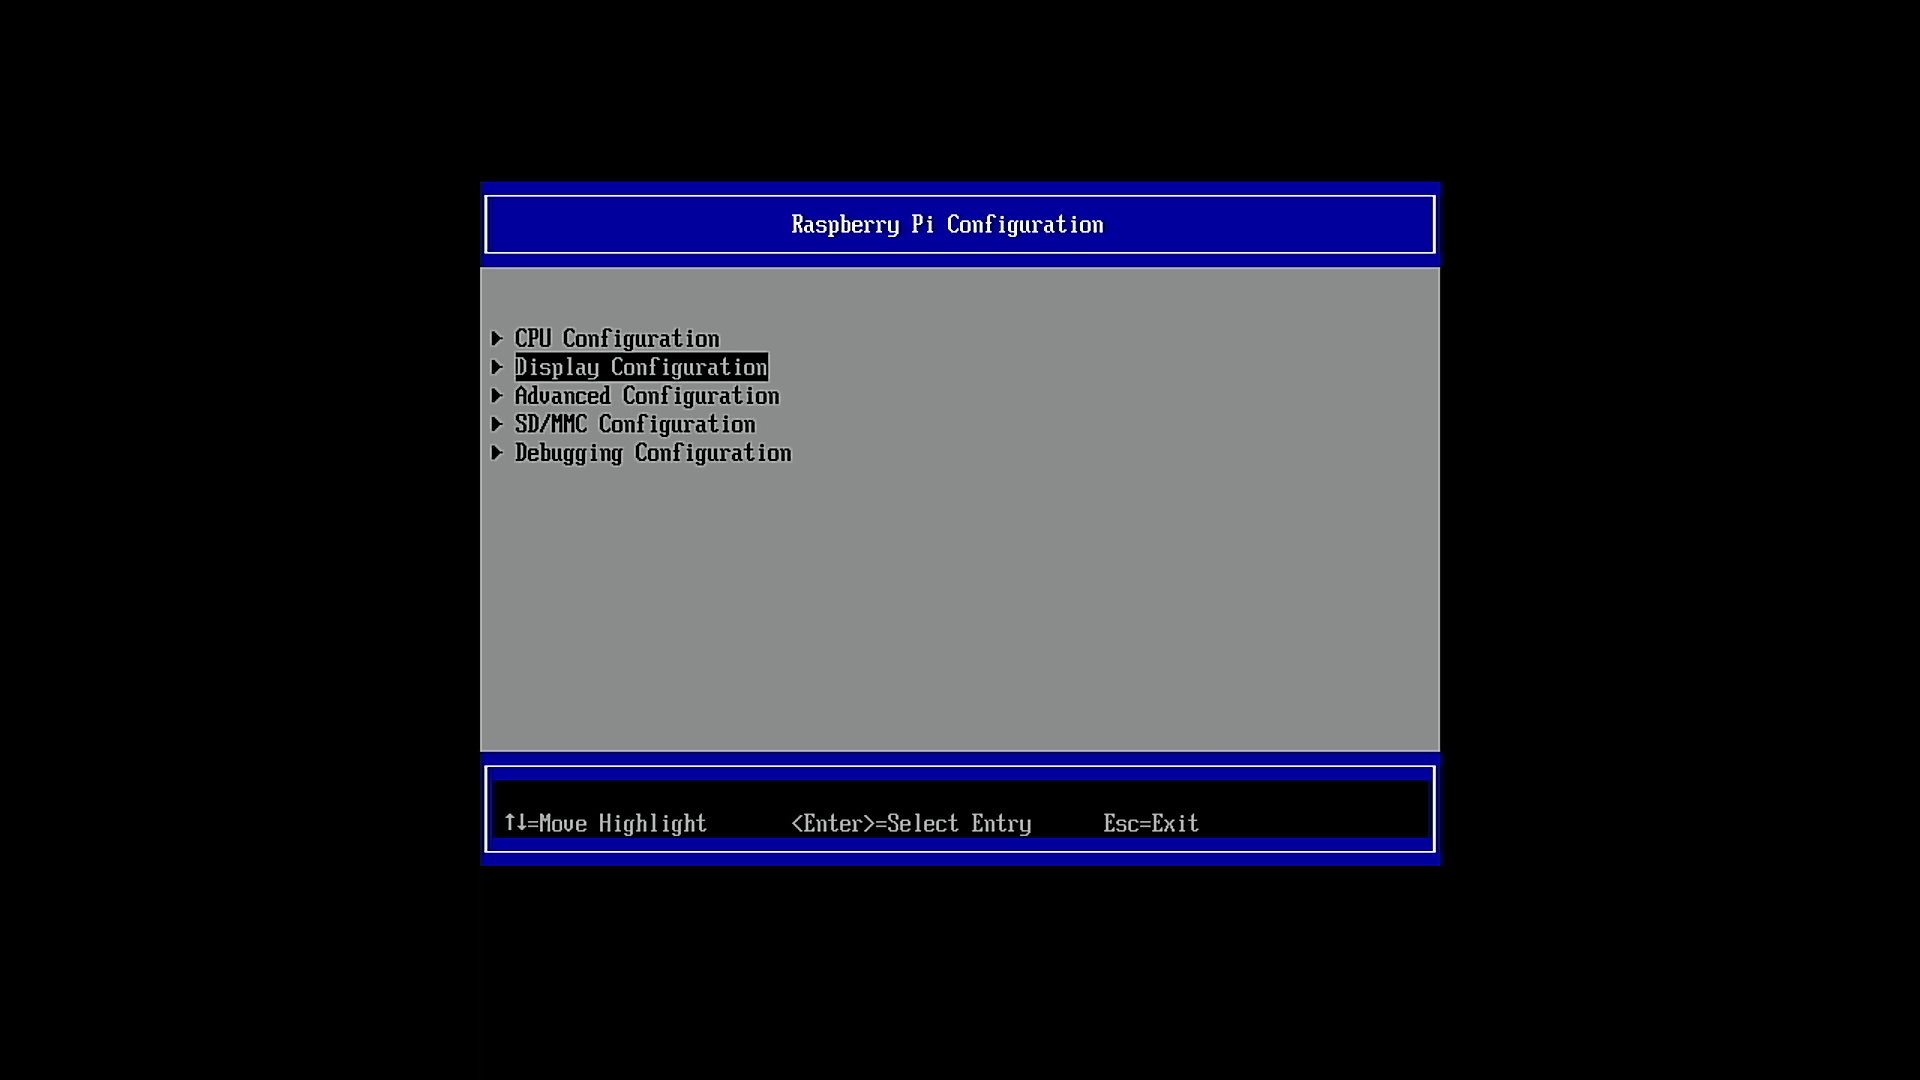
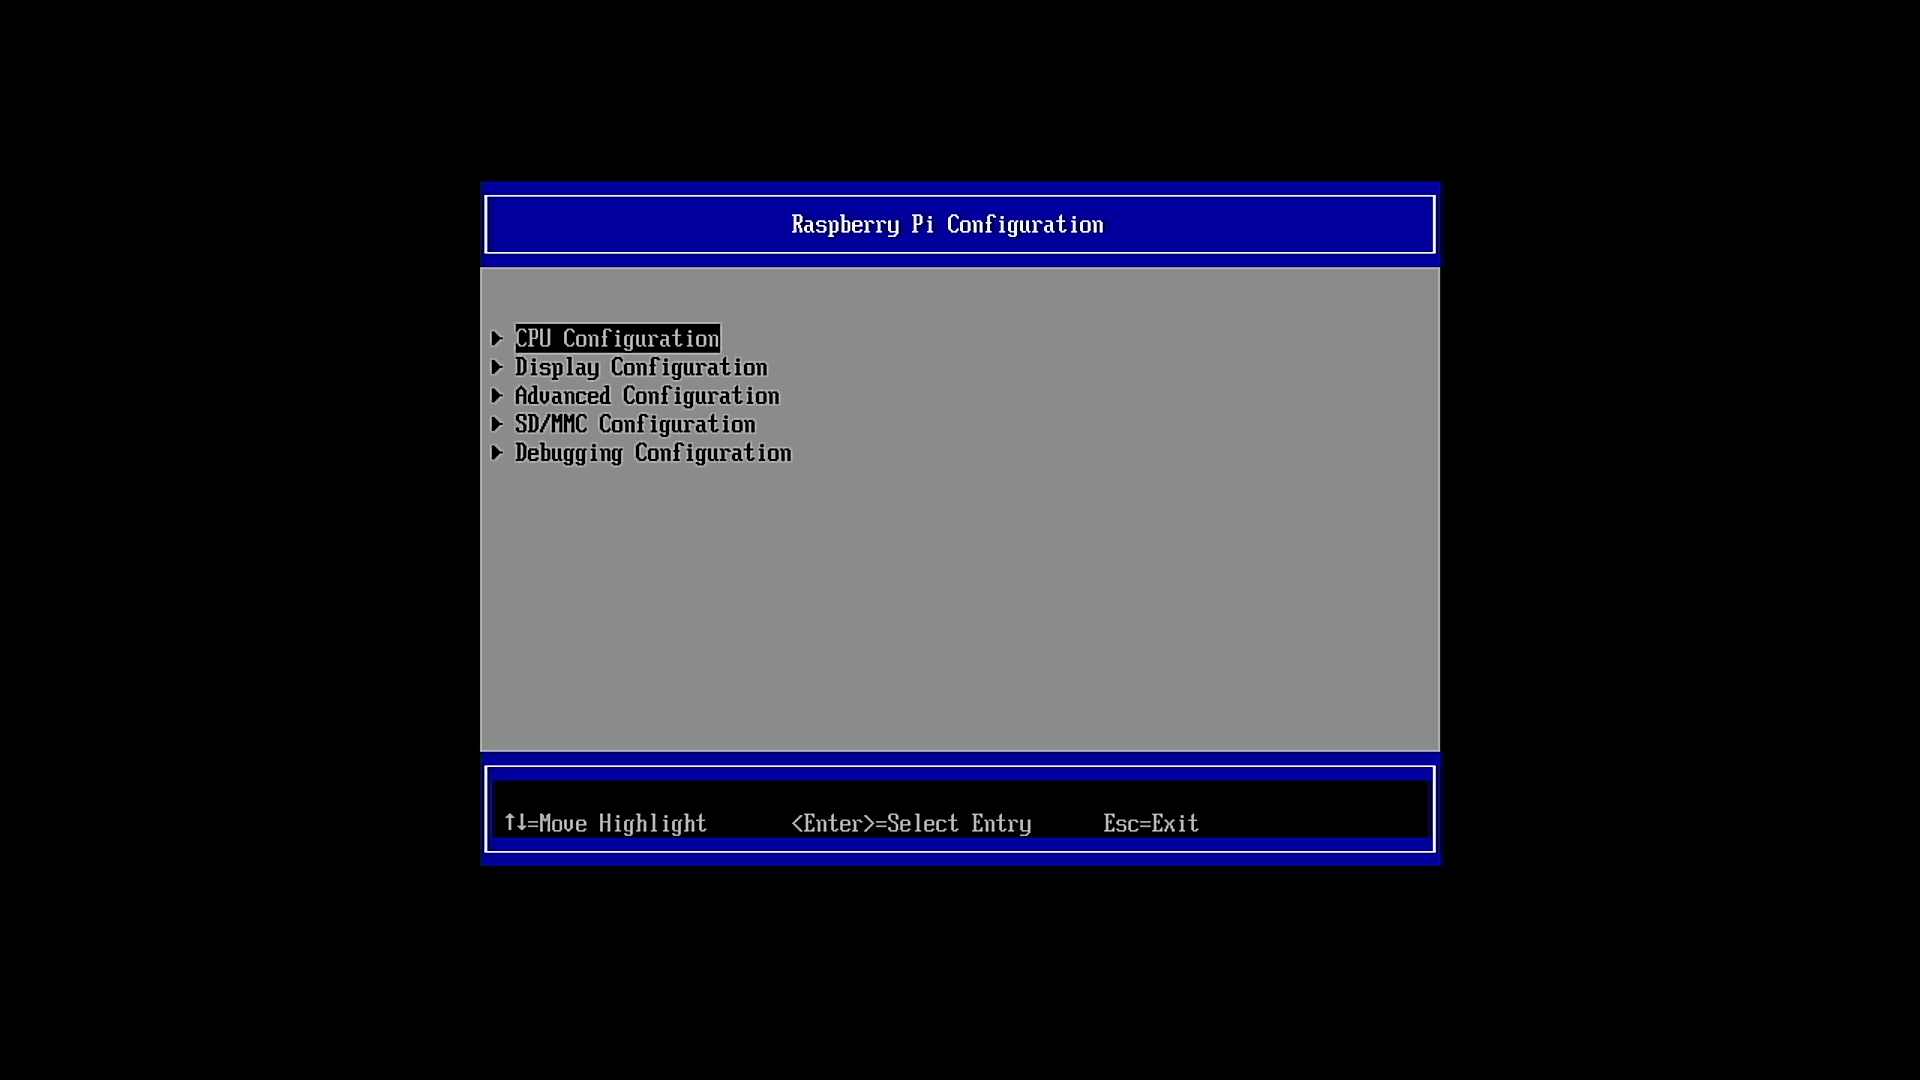
3. Select Raspberry Pi Configuration.
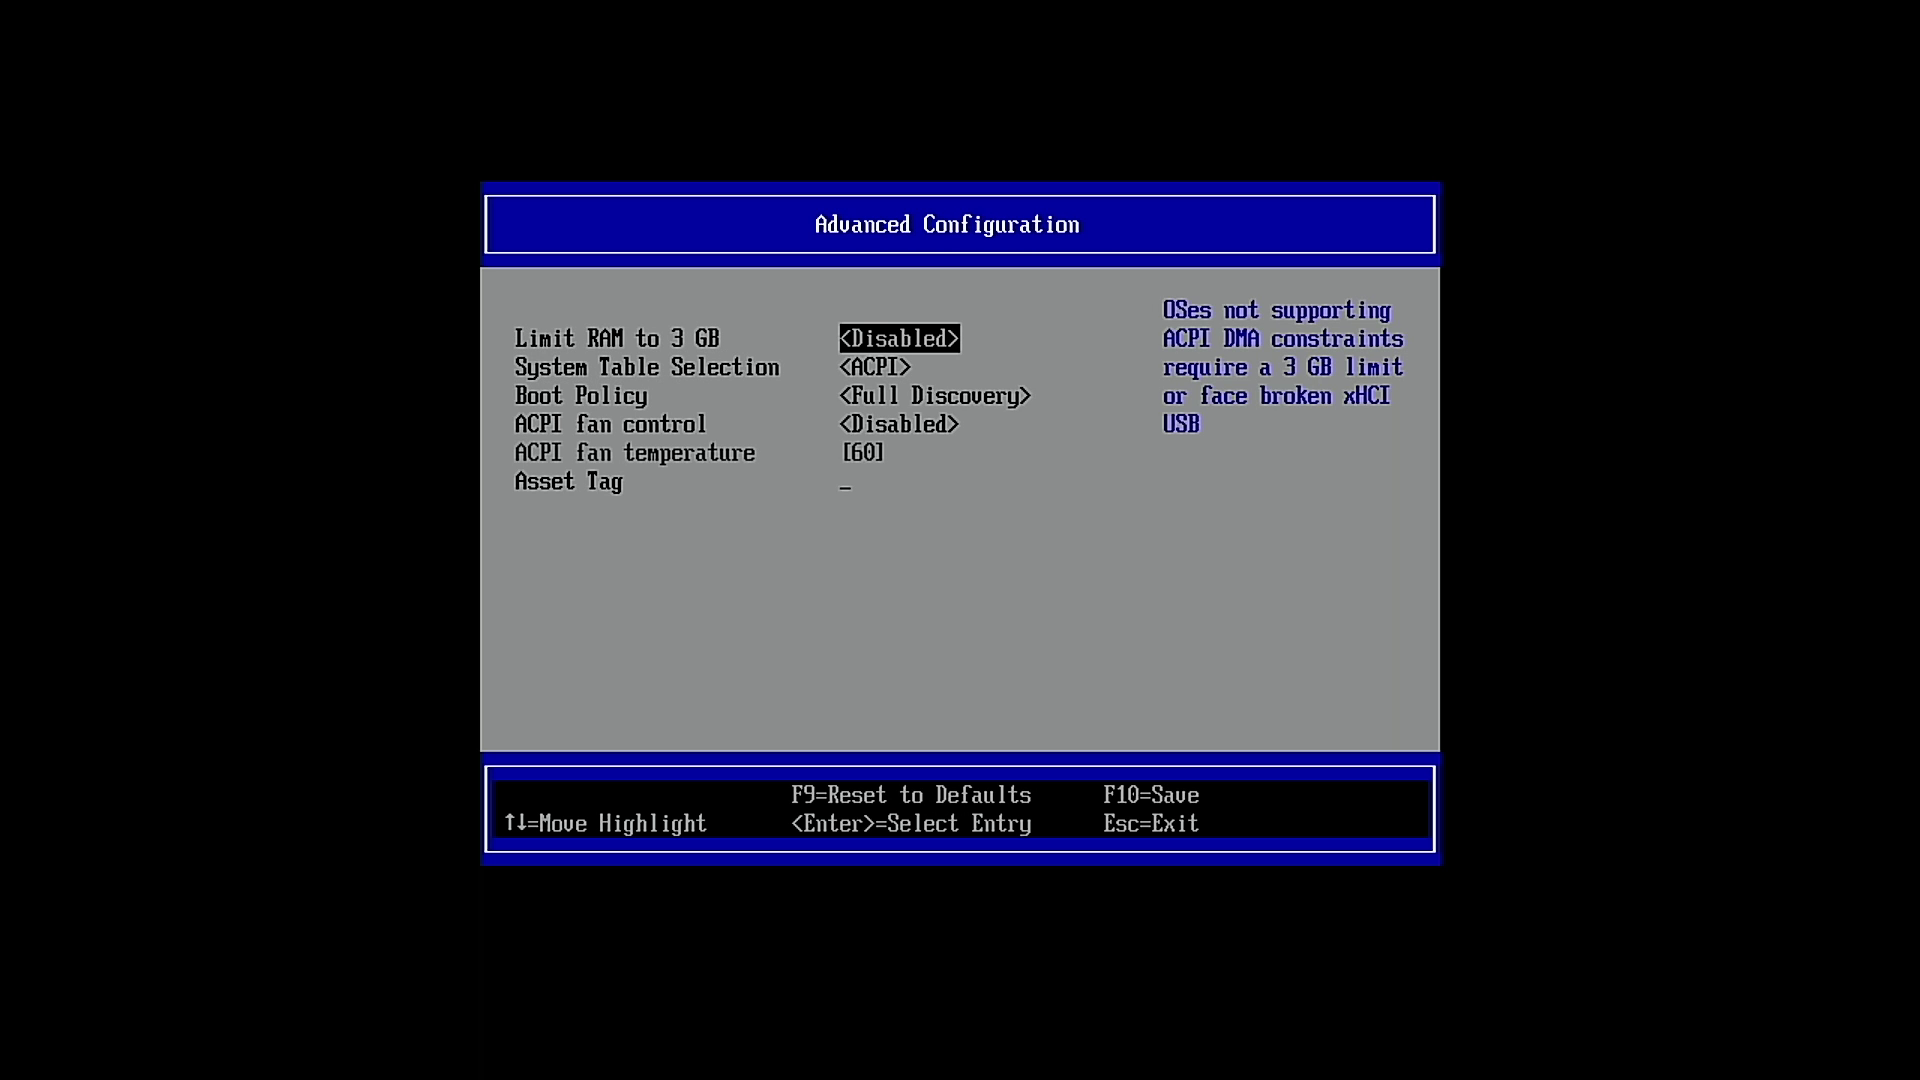
4. Select Advanced Configuration.
5. Set Limit RAM to 3 GB to <Disabled> and press F10 to save. Press Esc to exit.
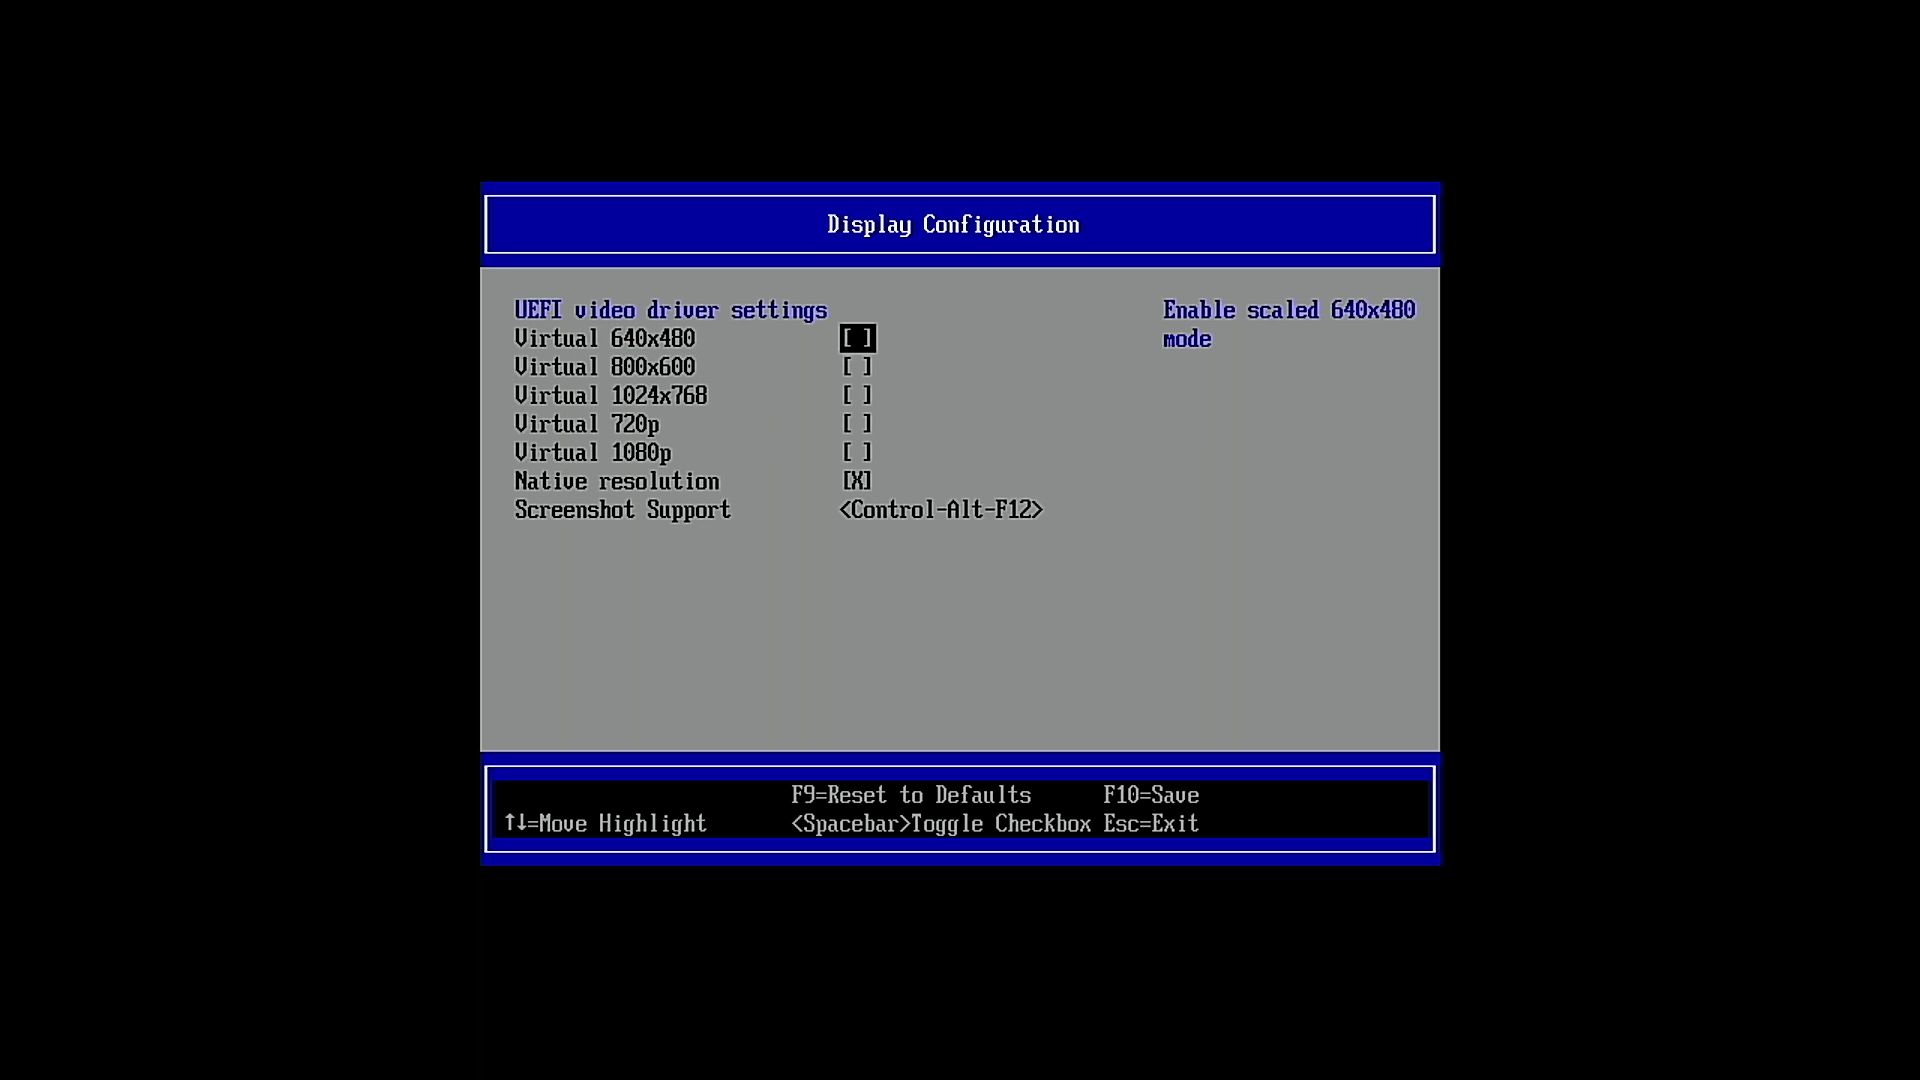
6. Select Display Configuration.
7. Set the resolution by highlighting the option and press Enter. Press F10 to save and then Esc to exit.
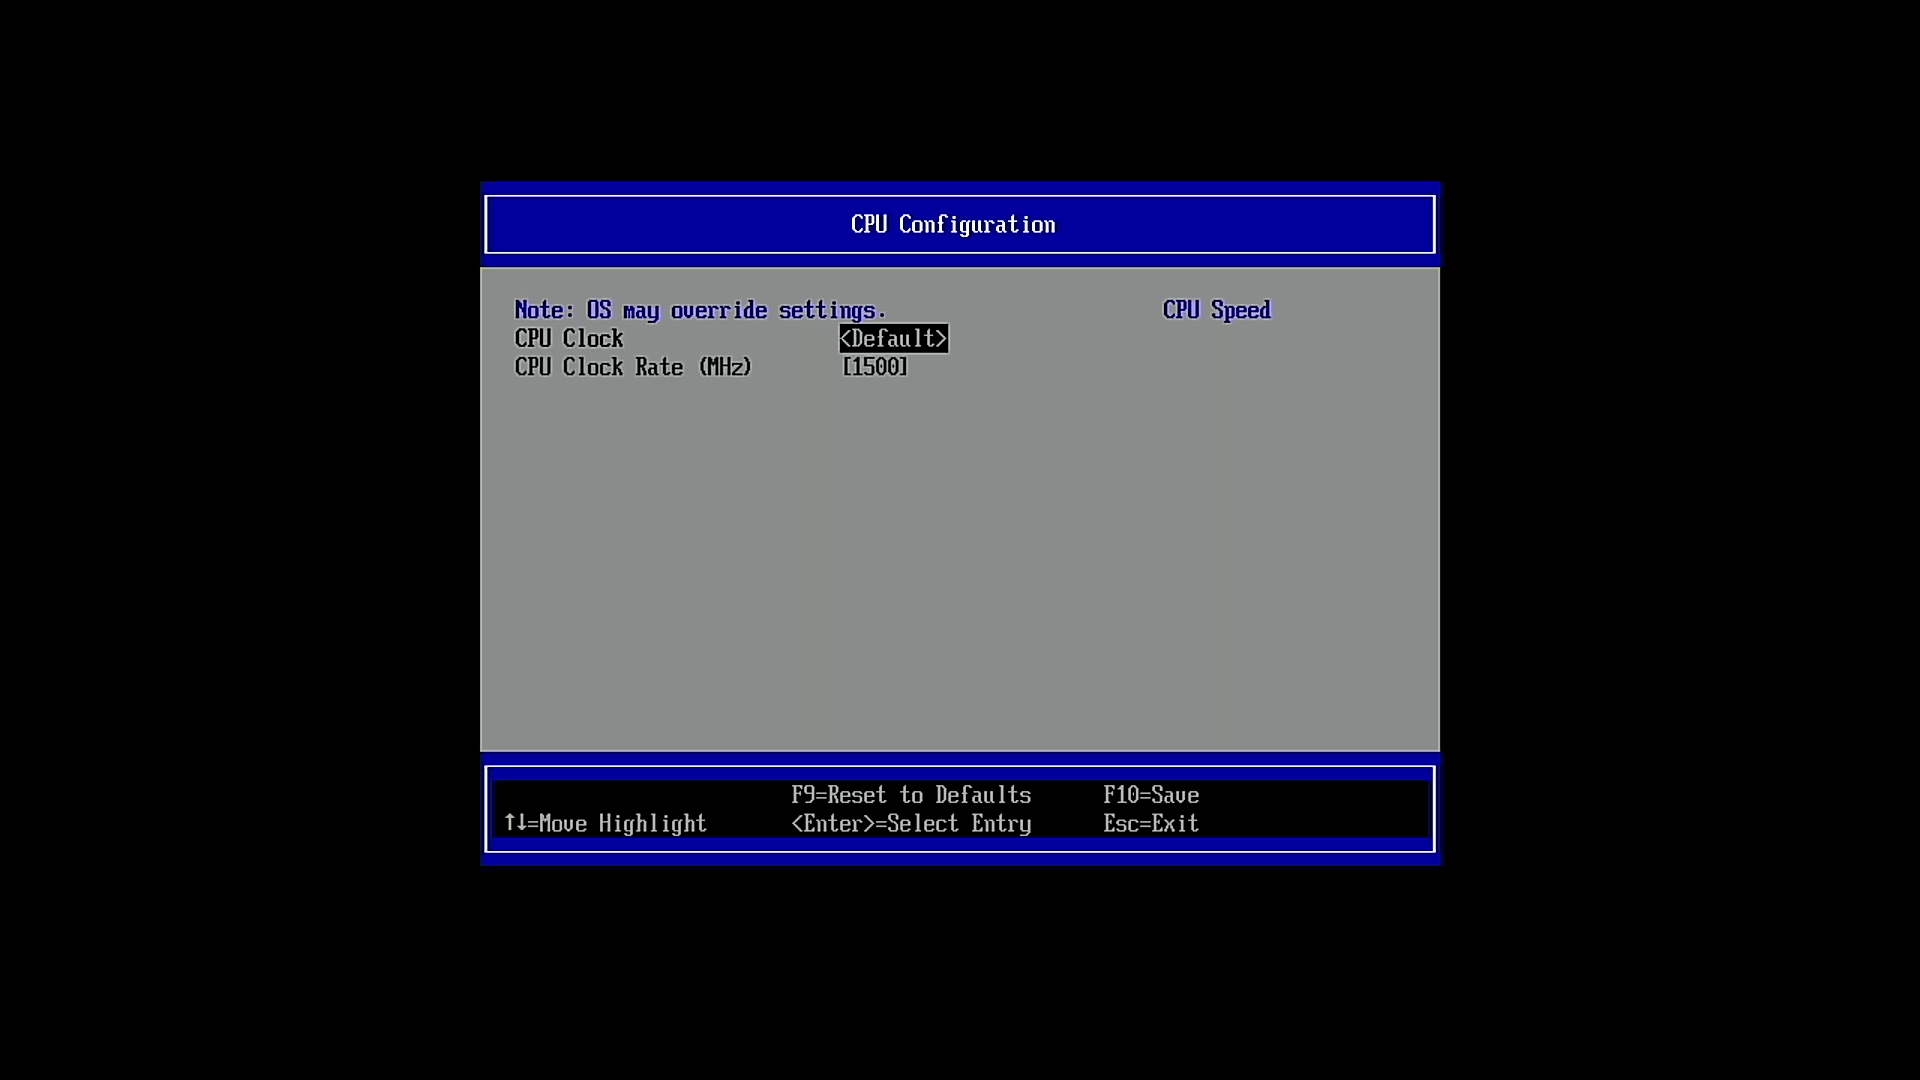
8. Ensure that the CPU Clock is set to Default in the CPU configuration menu, Any overclocking at this time will prevent Windows 11 from booting. Press Esc until you reach the first menu.
10. Select Continue to exit the BIOS and boot Windows 11 with the new settings.
How does Windows 11 on Raspberry Pi perform?
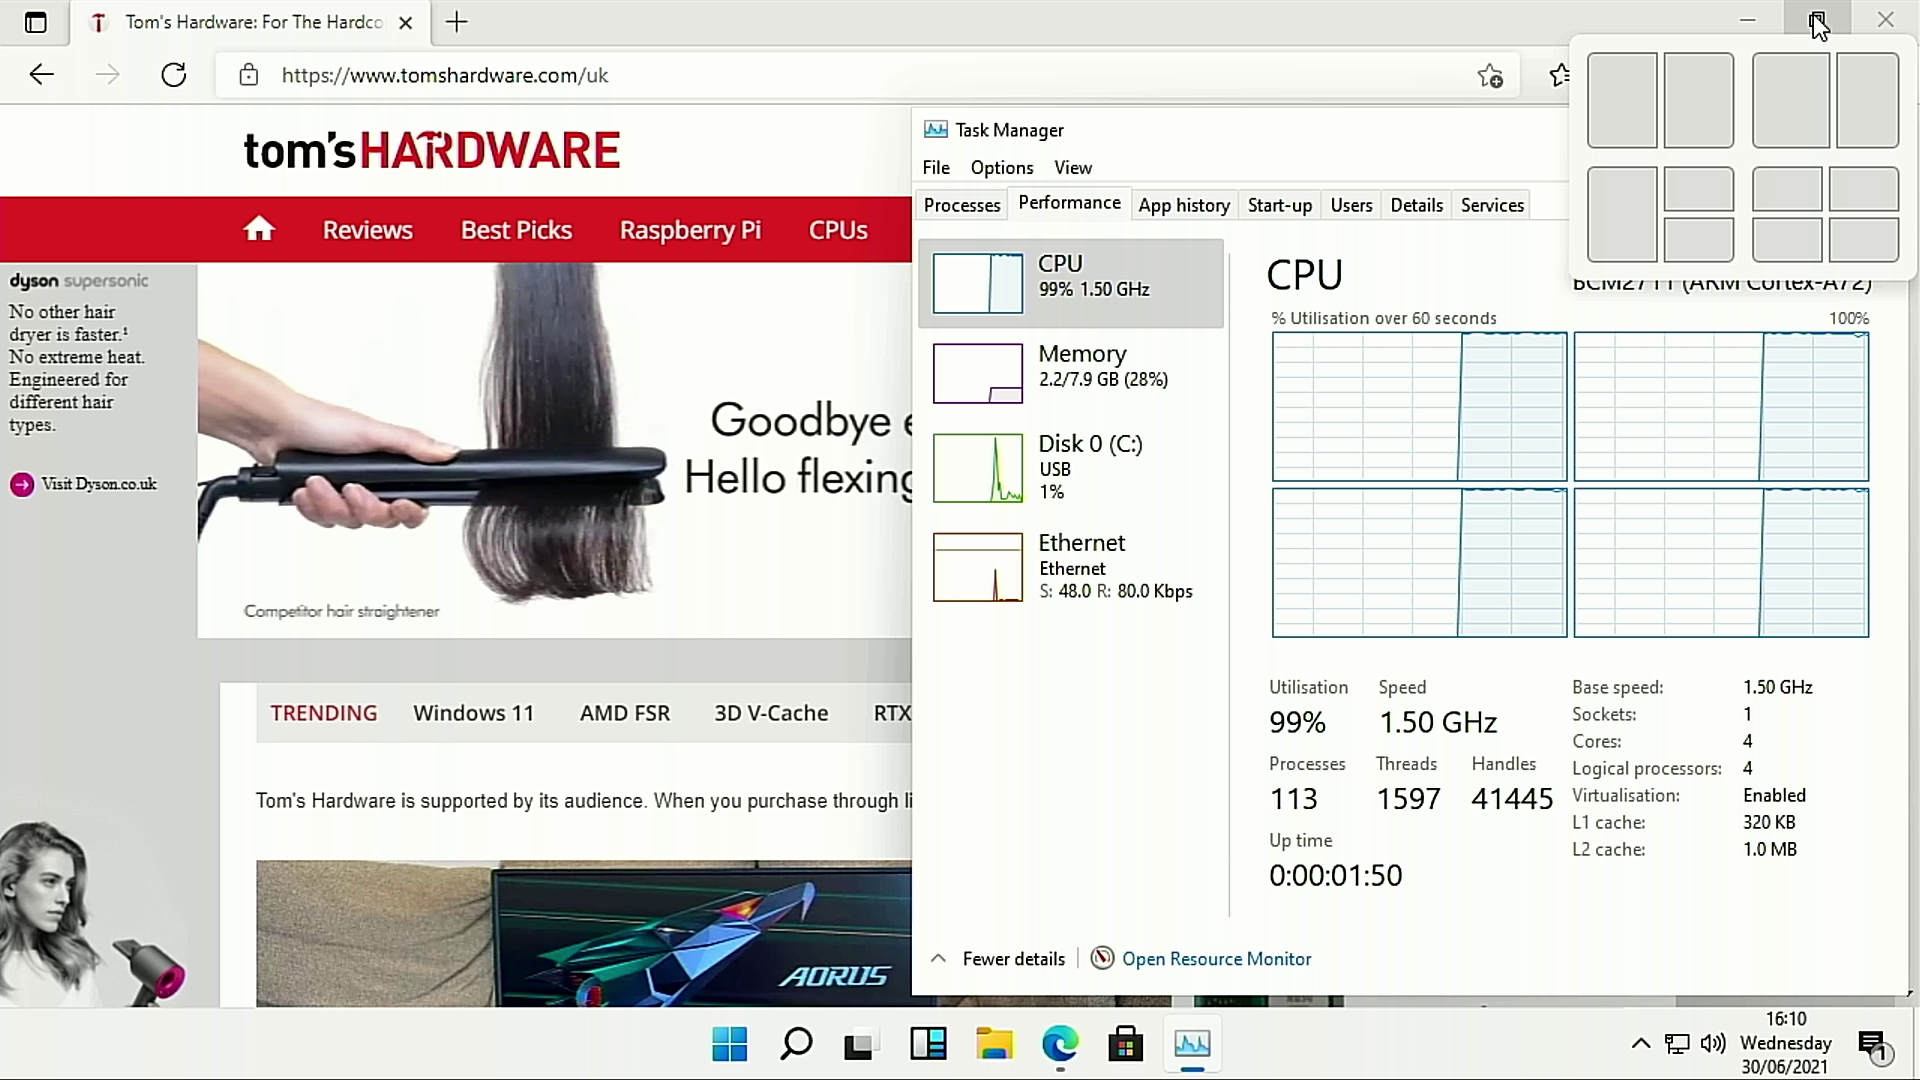
In our testing, overall performance is decent, in fact it was much better than our 2020 Windows 10 install. Boot time was good, longer than Raspberry Pi OS, but nothing major. Feeling more like an Intel N4100 Celeron in general use.
Once the desktop was loaded the overall feel of Windows 11 on Raspberry Pi was responsive. Windows 11 responded to our input with minimal lag, and moving windows around the screen held up pretty well. The Edge web browser provided a good browsing experience.
Heavy sites such as YouTube proved troublesome due to the lack of a hardware graphics driver which meant our CPU was working harder to render an image. Videos at 480p were smooth, 720P was passable. Going fullscreen caused a large delay, and a number of dropped frames. We didn’t attempt 1080p as the odds are that it will be a slideshow.
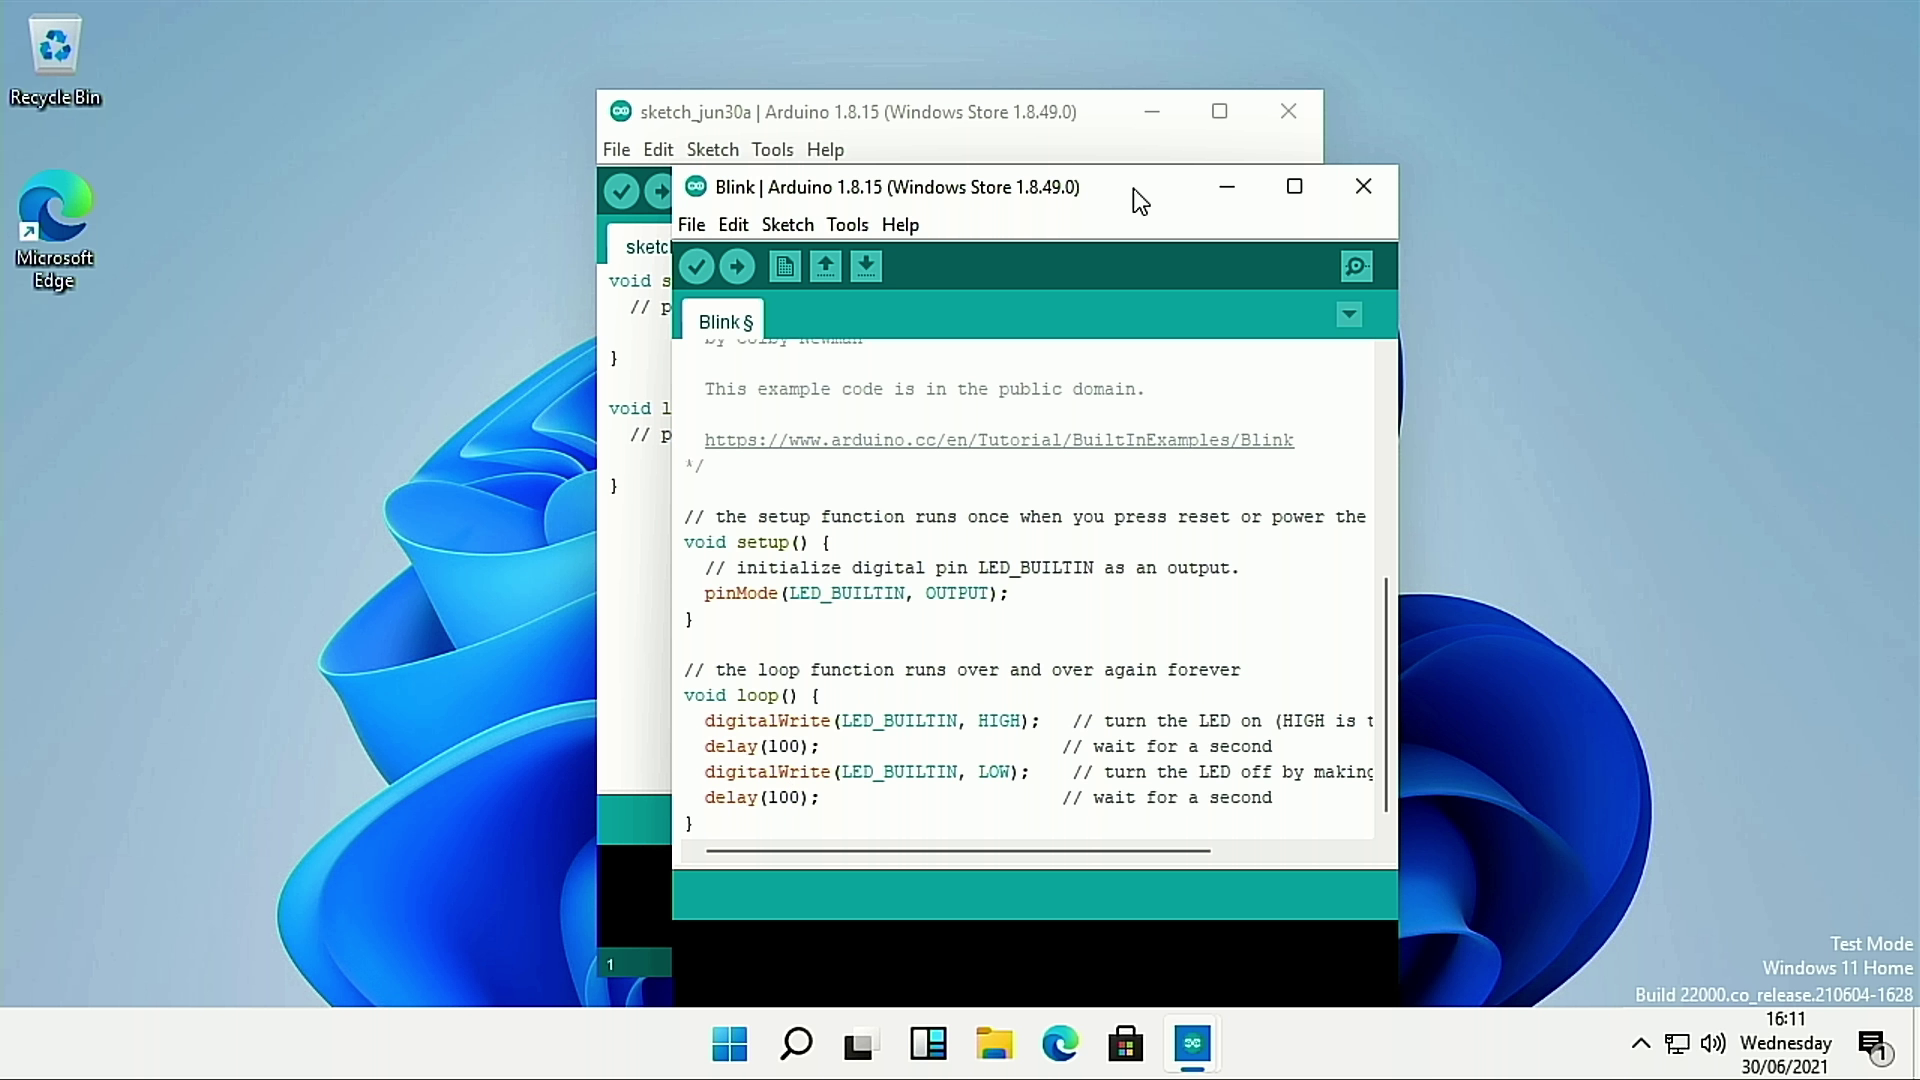
We ran a brief test to install applications. First we installed the Arduino IDE via the Microsoft Store, and the installation was successful, but did take some time.
The Arduino IDE successfully loaded, and we were able to open one of the included examples to flash to our Arduino Uno board. Here is where we hit a snag, we couldn’t locate a COM port for the Arduino. Nothing was listed in the device manager, so we rebooted and tried again, nothing. Uninstalling an app is not done via the store, rather we have to go into Settings and then add / remove applications. This felt counter-intuitive. We then installed the Arduino IDE using a typical x86 .exe file and were surprised to see the app install, and open. But the COM port issue remained, and we were unable to use the Arduino IDE to control our Uno.

Les Pounder is an associate editor at Tom's Hardware. He is a creative technologist and for seven years has created projects to educate and inspire minds both young and old. He has worked with the Raspberry Pi Foundation to write and deliver their teacher training program "Picademy".
-
NeoMorpheus Thanks for the guide, very interesting.Reply
I wished that the Raspberry foundation release a Pi "Pro" device.
It should include a sata or nvme port and a beefier 4 core ARM SOC.
Yes, increase the price, it is called Pro for a reason. -
mmarks9156 I followed these instructions but keep getting a BOD upon booting anyone else?Reply
Also, I am unable to select the Set Limit RAM to 3 GB to <Disabled> in Advanced Configuration but this already set.
TIA -
andronoop The OS booted and took me into the Windows recovery screen.Reply
I have tried both the windows 11 image available on the uup site and the results are exactly the same. It indicates some corruption in sys from what I remember. Sorry, I do not have the exact error string/message handy.
Any help is appreciated. -
Lankbee Reply
I am also facing the same issue here. Image in the link belowandronoop said:The OS booted and took me into the Windows recovery screen.
I have tried both the windows 11 image available on the uup site and the results are exactly the same. It indicates some corruption in sys from what I remember. Sorry, I do not have the exact error string/message handy.
Any help is appreciated.
Error image -
BertkeTech1 I get an error report when running the uup_download_windows.cmd. It says that "SxSExtend.exe Can not be found".Reply -
AlJones Interesting all the errors that you're seeing. I followed the bouncing ball and it worked like a charm.Reply
To the folks at TomsHardware = thanks for items like these. -
steve59 The PC method worked for me, overclocking works using the normal method of editing config.txt, although I had to use gparted to change the flags on /boot , mount then edit config then change flags back. If there is an easier method please post.Reply -
rocwoof Looking as though some folks above are having failures with WoR method similar to mine. After several tries with multi-day installation attempts on an RPi 4 in a Kano touch screen (originally for RPi, not the new Kano Windows PC, which is another story re W11...) that invariably hung at one point or another on the 2nd day (or even 3rd day when I felt stubborn), I finally decided to try a brand new USB flash drive (SanDisk Dual Drive m3.0, 64GB) in place of the somewhat used USB drive that I had been trying to use, another SanDisk of some sort with 128GB, and it worked in several hours (all in the same day!!) from start to finish.Reply
That's when I discovered the reality of the fine print caveat about the unsupported RPi built-in wifi (had been using direct ethernet off a switch to spare in-home wifi bandwidth), and 2 Wifi dongles that also failed for lack of Win11 ARM drivers, which had always worked with Linux on various Windows Intel PC's. Win 11 works OK on the RPi, but without wifi, so I am not much motivated to waste more of my time with it. -
seithan Running setup #1 from a 9900k running Ubuntu, stack at :Reply
Customizing the drive's config.txt, according to the CONFIG_TXT variable
Ejecting drive.
So i went ahead and tried method#2 on a W11 installation on the same machine. Download the file, unpacked and iso-ed it. Then used WoR to load the .iso but going to the "Select Drivers" screen, choosing "Use the latest packege ", i get the error:
"Something went wrong...
Could not load file or assembly 'Newtonsoft.json, Version=12.0.0.0, Culture=neutral, PublicKeyToken=30adfe6b2a6aeed' or one of its dependencies.
The System cannot file the file specified. "
