Asus PQ321Q 4K Monitor Review: Top-Shelf Ultra HD For $3500
We recently got our hands on Asus’ highest-end Ultra HD-capable screen. The PQ321Q offers a native resolution of 3840x2160; and those 8.3 million pixels don’t come cheap. Our real-world and lab testing will tell you if this 4K display is worth $3500.
OSD Setup And Calibration Of The Asus PQ321Q
The PQ321Q’s menu system is fairly complete. Our main complaint is that it takes up most of the left side of the screen and cannot be moved or reduced in size. To measure a window pattern, you have to place the meter a little right of center. It also has the unfortunate habit of disappearing after only 15 seconds, which is major pain when you’re trying to tweak calibration settings. The timeout value is not adjustable, either.
Here’s where you’ll spend most of your time.
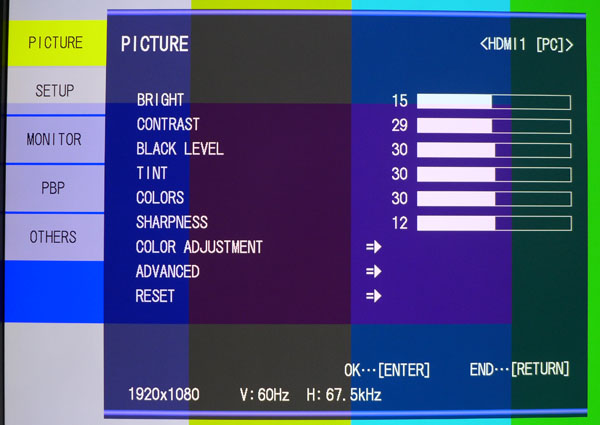
The first thing you’ll notice is a black level control. This is separate from the brightness slider, which actually sets the backlight level. We appreciate this feature and wish it were standard on all computer monitors (after all, it's very common on consumer TVs). Out of the box, the backlight is set to maximum. You’ll have to throttle it back quite a bit to match a 200 cd/m2 output level. It also has very poor resolution. Each click represents about 12 cd/m2, which makes setting a precise luminance point very difficult. The upside is it has a very wide range.
Contrast is set to 30 by default. We backed it off one click to improve grayscale performance. Settings above 30 will clip detail. The useful minimum for the black level slider is 28. Colors and Tint will change saturations and the hue of secondary colors. These controls are best left alone. Sharpness is also best left at its default of 12. Higher settings produce visible edge enhancement.
Selecting Color Adjustment brings up the next menu.
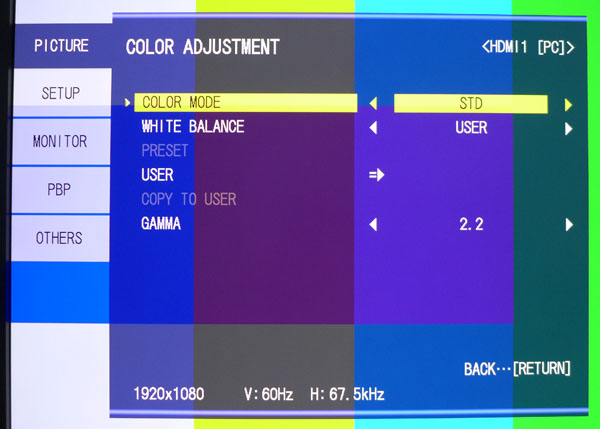
There are three color modes, Standard, Vivid, and sRGB. Vivid creates an over-saturated cartoonish look and should be avoided. sRGB is fairly accurate, but it locks out all of the color temperature adjustments. So, we performed our tests and calibration using Asus' Standard mode. Gamma is set to Standard by default, which is not ideal. Changing it to 2.2 makes the tracking much better.
You can adjust the overall color temp with the different White Balance modes. Preset opens up an option that lets you set the color temp by Kelvin value, and User unlocks the RGB sliders.
Get Tom's Hardware's best news and in-depth reviews, straight to your inbox.
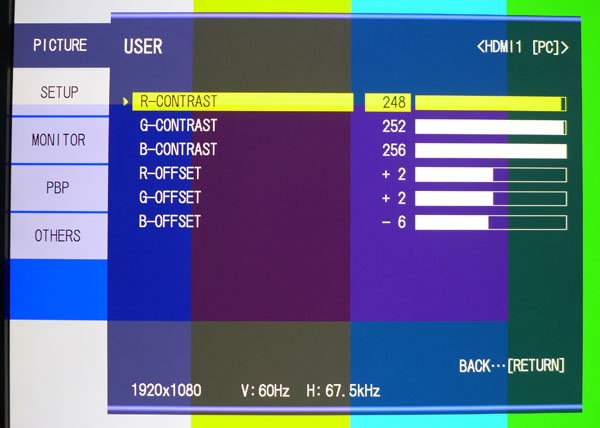
We’re glad to see both high and low RGB adjustments included. This, combined with extremely fine resolution, allows precise control of the white point at every brightness level. The out-of-box grayscale performance is quite excellent. But we were able to make it even better using this menu.
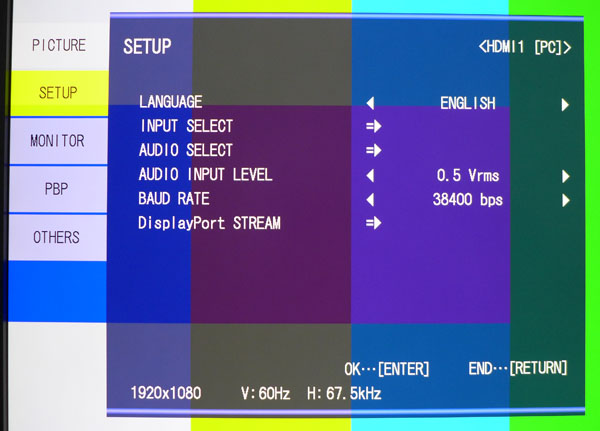
The OSD is available in seven different languages. Input selection can be done here or with the bottommost side control key. Audio Select specifies the sound source (either HDMI or 3.5 mm mini-plug). The Audio Input Level worked fine for us at the .5 V setting. Baud Rate refers to the RS-232 control port. Its setting depends on the device you're connecting it to. DisplayPort STREAM is important. It’s set to multi by default, which is required when sending a native 3840x2160 signal from your computer.
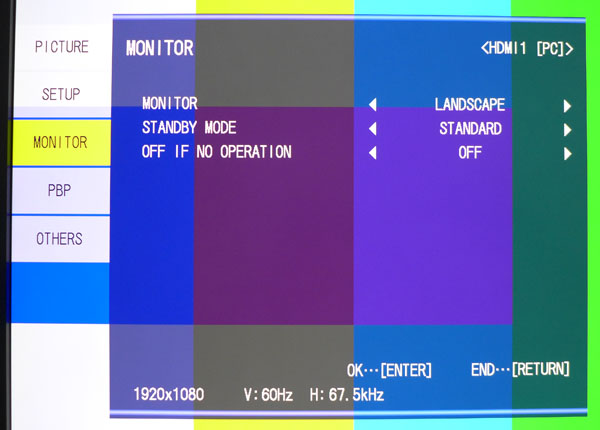
You can use the PQ321Q in portrait mode if you attach it that way to the included base. Then, you have to reorient the image manually. Standby Mode can reduce power consumption in standby when set to Low Power. If you do this, it will take longer for the monitor to power on. To maintain access to the RS-232 interface, you need to leave Standby Mode set to Standard. Off If No Operation turns the display off after four hours of inactivity.
We didn’t take a shot of the PBP menu because we didn’t have two sources connected to activate it. When you use the picture-by-picture function, the images are shown side by side using the source resolution. If one source is connected via DisplayPort, you have to set that input to Single Stream mode.
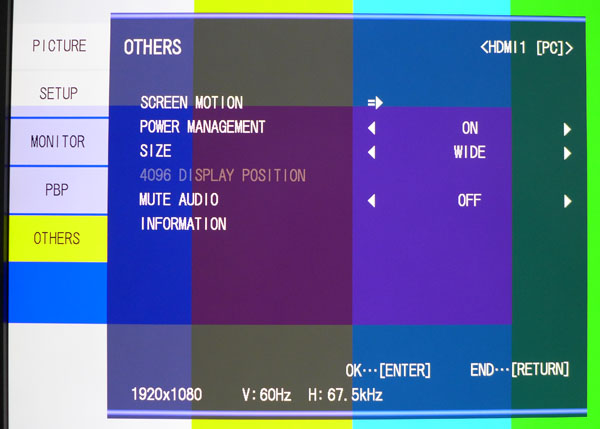
Screen Motion offers two patterns to combat image retention. This isn’t really an issue for LCD displays. Size determines the aspect ratio of the image. In Wide mode, the PQ321Q scales all incoming resolutions to 3840x2160. In our resolution test patterns, we were impressed with how well it accomplished this. Most monitors roll off the one-pixel pattern so it looks distorted. With a 1920x1080 signal from our pattern generator, this monitor rendered it perfectly.
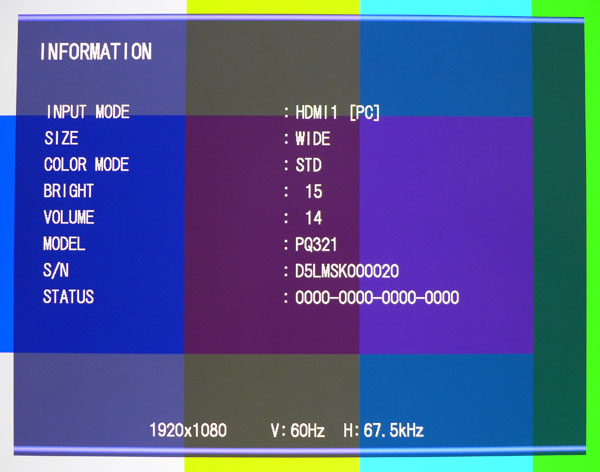
Selecting Information brings up the final screen.
This gives you a quick look at key settings and indicates the input resolution and refresh rate at the bottom.
Asus PQ321Q Calibration
This monitor barely needs a calibration since its out-of-box grayscale and gamma are pretty good. If you don’t have a meter, we recommend you set Color Mode to Standard, White Balance to Preset, and Gamma to 2.2. Then reduce the Brightness (backlight) to taste.
If you want to achieve near-perfection (as we did), it will take some back and forth work between the Brightness, Contrast, and Black Level controls. They affect each other, so you’ll need to exercise patience to find the right balance. The RGB sliders include both high and low adjustments, and these interact as well. While the PQ321Q is fairly easy to calibrate, it does require a bit more effort than most screens because of its fine control resolution.
| Asus PQ321Q Calibration Settings | |
|---|---|
| Brightness | 15 |
| Contrast | 29 |
| Black Level | 30 |
| Color | 30 |
| Tint | 30 |
| Sharpness | 12 |
| Color Mode | Standard |
| White Balance | User |
| R-Contrast | 248 |
| G-Contrast | 252 |
| B-Contrast | 256 |
| R-Offset | 2 |
| G-Offset | 2 |
| B-Offset | -6 |
| Gamma | 2.2 |
Current page: OSD Setup And Calibration Of The Asus PQ321Q
Prev Page Asus PQ321Q Packaging, Physical Layout, And Accessories Next Page The Asus PQ321Q In Use
Christian Eberle is a Contributing Editor for Tom's Hardware US. He's a veteran reviewer of A/V equipment, specializing in monitors. Christian began his obsession with tech when he built his first PC in 1991, a 286 running DOS 3.0 at a blazing 12MHz. In 2006, he undertook training from the Imaging Science Foundation in video calibration and testing and thus started a passion for precise imaging that persists to this day. He is also a professional musician with a degree from the New England Conservatory as a classical bassoonist which he used to good effect as a performer with the West Point Army Band from 1987 to 2013. He enjoys watching movies and listening to high-end audio in his custom-built home theater and can be seen riding trails near his home on a race-ready ICE VTX recumbent trike. Christian enjoys the endless summer in Florida where he lives with his wife and Chihuahua and plays with orchestras around the state.
-
cynic77 "We’re sure it’s only a matter of time before an Ultra HD panel becomes available in wide-gamut form."That time is now. The Dell 24" UP2414Q and 32" UP3214Q are Ultra HD monitors that cover 100% sRGB and 99% AdobeRBG. This Asus you've reviewed has already been outclassed.Reply -
cynic77 "We’re sure it’s only a matter of time before an Ultra HD panel becomes available in wide-gamut form."That time is now. The Dell 24" UP2414Q and 32" UP3214Q are Ultra HD monitors that cover 100% sRGB and 99% AdobeRBG. This Asus you've reviewed has already been outclassed.Reply -
cats_Paw Dat Price...Good thing is you need a crazy GPU to use that resolution anyway so by the time the 4k Monitors and tvs drop down in price we might have gpus that manage them in the upper midrange of the GPU segment.Reply -
Shneiky In the last chapter of the article, last paragraph:" crop of TN-based panels were announced at CES for sub-$1000 prices, and as those become available to test, you can be we'll review them. "Shouldn't that "be" be "bet"?Reply -
lockhrt999 If they are putting that much resolution on this screen then why not make it 3D too (polarized)? I think it's perfectly doable and won't exceed budget.I'm talking from professional point of view. I bored of using anaglyph 3D for content creation.Reply -
panzerknacker For me this is just a gimmick that can't be taken seriously. The way they had to logically divide the screen in 2 because there are no scalars yet simply screams 'niche product that you pay way too much for only to be the first person on earth using it'. Also for gaming this screen is completely useless to me with a input lag of 80ms, you take this to a LAN party and get crapped upon by those using a $100 tn panel. In the end I think this screen is a step in the right direction but for me personally they could rather revert to producing crt's again.Reply -
zodiacfml Good job but too pricey. The backlight used is for cheap TN screens. There still is no single port/cable in the market. The cutting edge is too inconvenient.Reply
