Overclocking Intel's Core i9-7900X CPU Up to 5.8 GHz
Preparing To Overclock: Hardware and Software
Intel's Core i9-7900X is an incredibly fast 10-core CPU. For the privilege of owning one, expect to pay a cool grand. However, Intel's decision to slather thermal paste between the processor's die and heat spreader really put a cap on the highest frequencies most overclockers can coax from it right out of the box.
But what if you're willing to get a little (or a lot) more adventurous? We de-lidded our sample, cleaned it up really well, replaced Intel's thermal paste with a couple of third-party alternatives, and collected plenty of data to show how Core i9-7900X's overclocking headroom improves as it's cooled more effectively. The culmination of our experiments was a -7900X under the effects of liquid nitrogen, running at a screaming 5.8 GHz, yet stable enough to complete a multi-core run of Cinebench.
Prepping Our Motherboard For Extreme Overclocking
By default, most motherboards aren't equipped to handle that kind of extreme testing. So, we had to do a bit of prep work and perform a couple of modifications first. Accomplished overclockers don't just make BIOS adjustments, after all. You also have to be handy with a soldering iron, drill, razor blade, and fingernail polish.
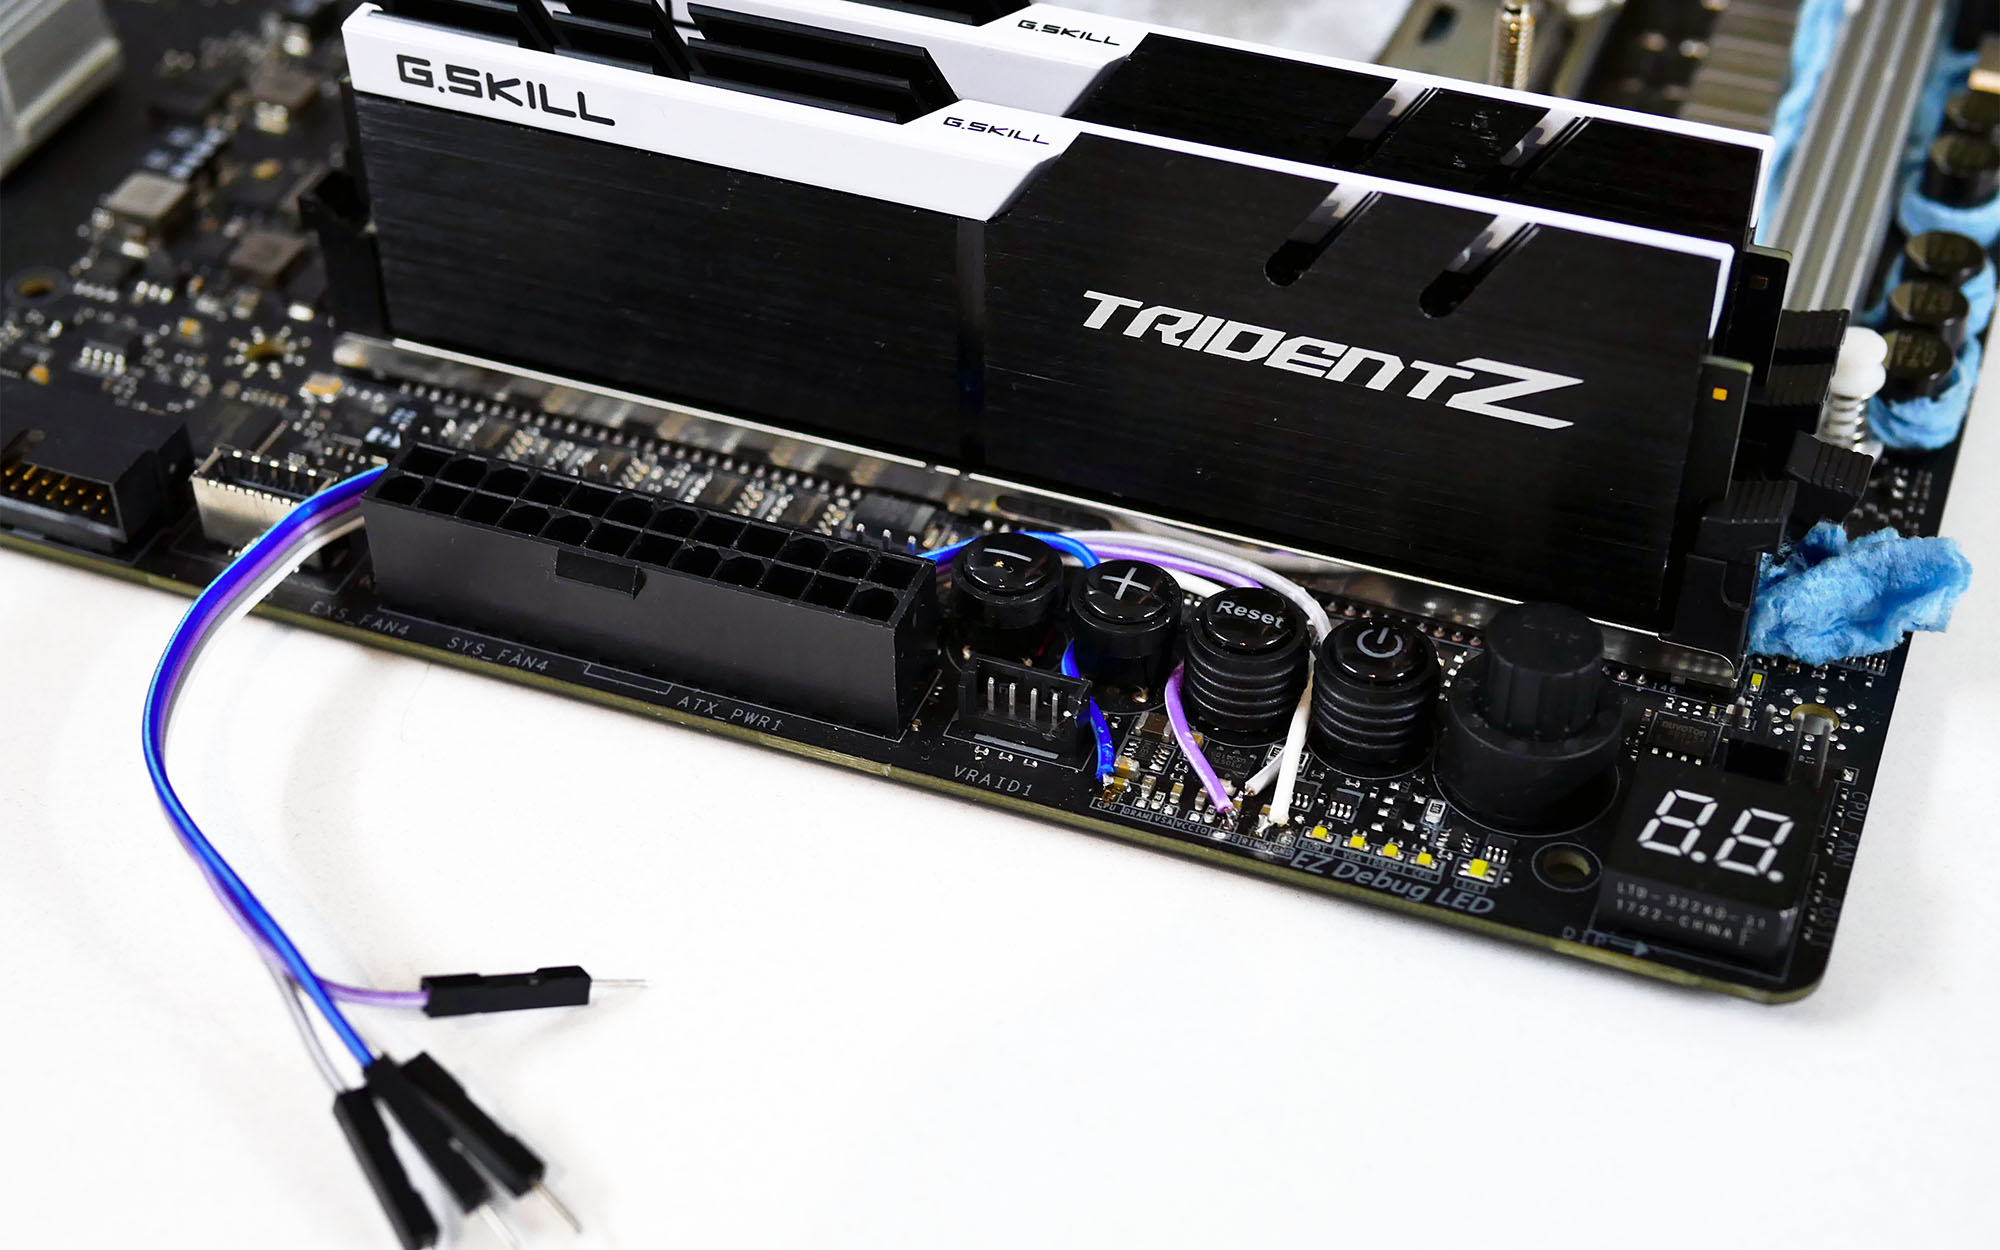
The MSI X299 Xpower Gaming AC we used is built for overclocking, so it served as the perfect platform to support our endeavor. Soldering a few wires to the board at various voltage detection points allowed us to monitor critical levels with a multimeter during our tests. While it's all well and good to dial in specific voltages through the motherboard firmware, operating at this level calls for precision only possible through verification.
BIOS: Expert Mode
We used MSI's BIOS version E7A91IMS.150, which was the latest one available when we started testing. It's the only firmware we used from start to finish, so feel free to track that one down if you want to retrace our steps. Of course, if you have an X299 board from a different manufacturer, the settings and terminology we use should still give you a good idea of what to adjust. The same principles apply from one platform to another, even if the nomenclature varies.
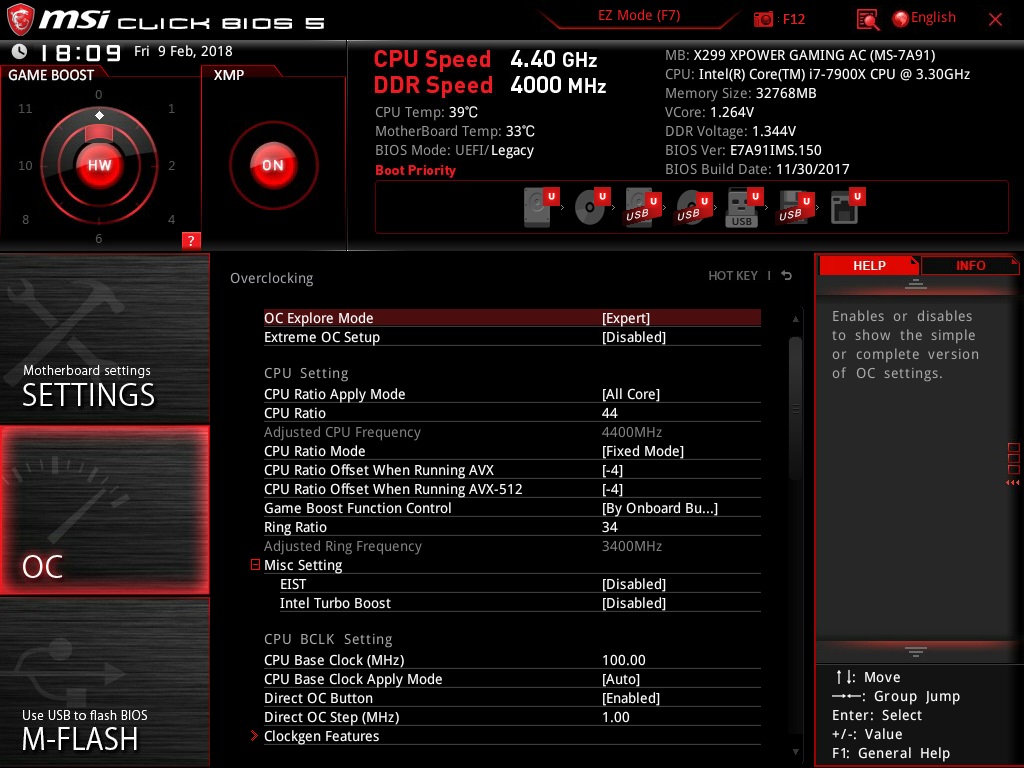
To access Expert mode on MSI's X299 Xpower Gaming AC, press F7 on the BIOS welcome screen.
The following settings come from the OC menu:
Get Tom's Hardware's best news and in-depth reviews, straight to your inbox.
- Extreme OC Setup: This toggle allows you to deactivate energy-saving options, certain protection features, and functionality that has no bearing on overclocking, such as the audio controller. This option isn't used for our ambient cooling tests, but it's mandatory for benchmarking under liquid nitrogen.
- CPU Ratio Apply Mode: The [All Core] setting ensures that all cores have the same multiplier and operating frequency.
- CPU Ratio: Set to 44 and multiplied by the 100 MHz CPU Base Clock, we get an operating frequency of 4400 MHz. The clock rate can then be adjusted via software running under Windows.
- CPU Ratio Offset: In order to limit frequency variation during our most demanding tests, we applied an offset of [-4]. This constrains throttling to four 100 MHz bins during benchmarks that utilize AVX instructions, all the while improving stability.
- Ring Ratio: A coefficient of [34] sets the ring bus to 3400 MHz.
- EIST & Intel Turbo Boost: These settings default to [Disabled] when we modify the previous parameters. Since we are going after a static frequency, and don't want the clock rate to bounce around, we leave both features deactivated.
- CPU Base Clock: We used a BCLK of 100 MHz to keep things simple for our frequency calculations. Later, we'll modify this from the operating system to fine-tune our overclock.
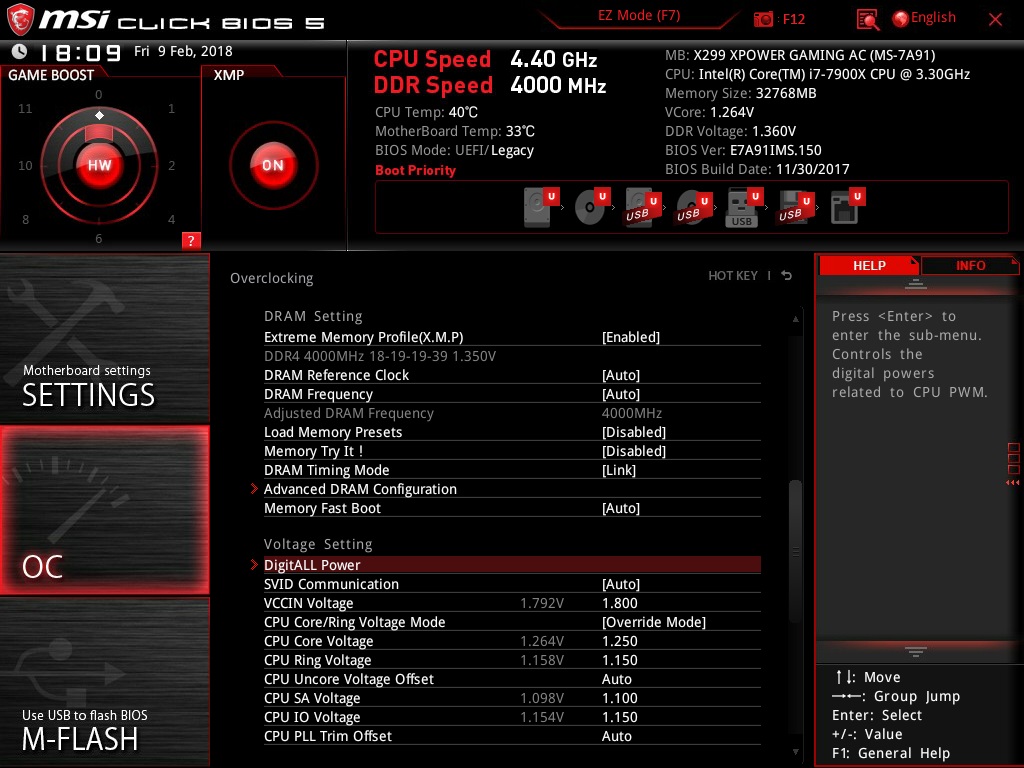
- DRAM Setting: With fast G.Skill TridentZ modules on-hand, we're able to use the memory's XMP profile for reproducible results. These 8GB sticks operate at 4000 MT/s with 18-19-19-39 timings.
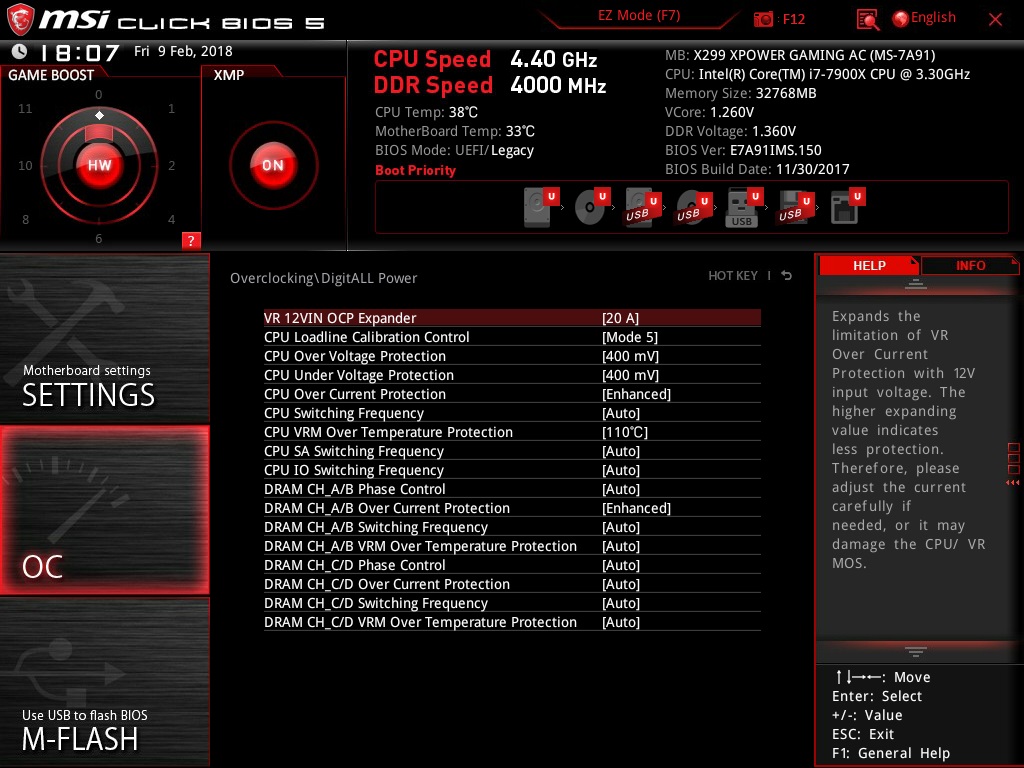
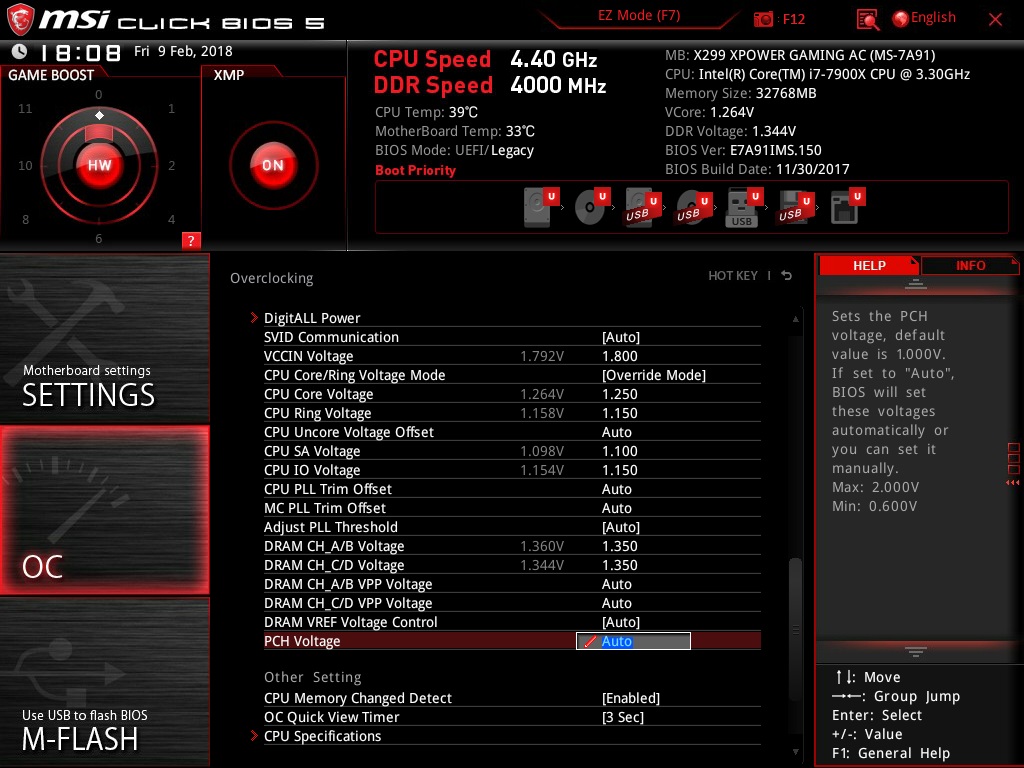
- DigitALL Power: This is a very important sub-menu on the X299 platform, and the settings we used are shown below:
Buried among all of those other options, this is one of the BIOS' most important menus. As you may know already, Core i9-7900X's power consumption ramps up quickly when it's overclocked. Without any intervention on our part, the CPU's frequency throttles back in order to keep from exceeding defined power and thermal limits.
The worst part of this is that you may not even realize what is happening. You'll see the Adjusted CPU Frequency right where it should be, but performance won't correspond. What good is it to display high clock rates if they can't be sustained? We won't tease you like that. When we say the CPU hit 4800 MHz, rest assured that we took the time to validate its stability.
- VR 12VIN OCP Expander: Increasing this value pushes the over-current limit higher. At too low of a level, maximum current is choked off and performance suffers. Moving it up to a maximum value of [20A] gives the processor more headroom when it's needed. Note that other manufacturers expose options as high as 180A. Following in our footsteps puts additional strain on your power supply, so make sure your PSU is up to the challenge first.
- CPU Loadline Calibration Control: LLC is also an important parameter that we'll cover in more depth on the following pages. The ideal setting is [Mode 5].
- CPU Over/Under Voltage Protection: OVP and UVP protect the system from over- and under-voltage conditions. Our primary interest is stability, and higher values offer more headroom.
- CPU Over Current Protection: OCP protects the system from over-current conditions; the [Enhanced] option allows us to push the platform further before it forcibly intervenes.
- CPU Switching Frequency: This is the frequency at which the voltage supply stages operate. Increasing it offers greater stability, but causes temperatures to rise. If your VRMs have a tendency to run hot, try setting this parameter to its minimum value and see if the system still runs stably.
- CPU VRM Over Temperature Protection: The voltage supply stages on X299 motherboards have a tough job to perform, so ensure that you're using a well-ventilated case and plenty of airflow. We did not set this option to its maximum value. Instead, we went with a number that'd avoid damaging the motherboard. A temperature of [110°C] seemed high enough for our tastes.
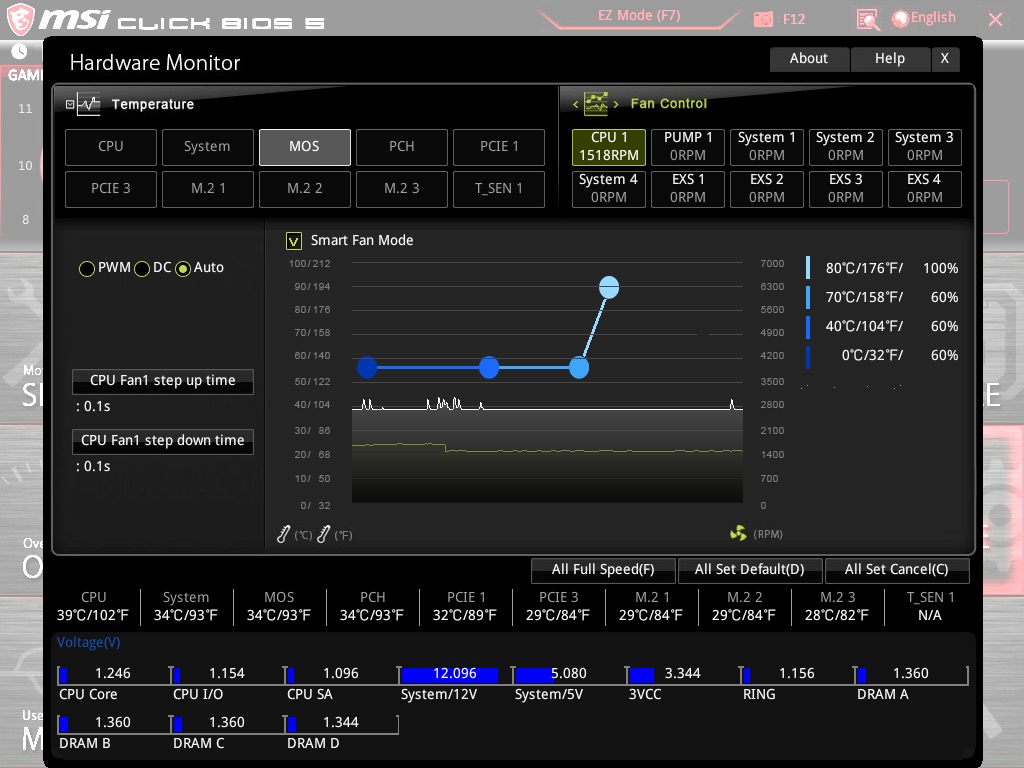
If you put a fan on the supply stage, you can regulate its speed as a function of temperature. This also works for other fans and temperatures. Simply choose the temperature you're interested in (MOS, in the image below), select the name of the channel with a fan attached (CPU1, in our example), and place the colored points for each thermal range at the desired fan speed.
Press the [F] key to set all fans to 100%.
Of course, we'll also need to make adjustments to various voltages. Remember: while overclocking isn't particularly dangerous when you're careful, it's important to be reasonable. Abusing these settings won't get you closer to your objective.
- VCCIN Voltage: This is the primary voltage responsible for supplying other parts of the processor. VCCIN feeds the Vcore, Vring, Vsa, Vio, and so on. Therefore, it's important to set this option higher than the others. Generally, we advise increasing it by 500 to 600mV. As you might imagine, a mismanaged VCCIN can have significant consequences.
- CPU Core Voltage: This is the voltage applied to each core, and it's the main setting used for CPU overclocking.
- CPU Ring Voltage: A higher Vring helps us hit higher ring bus frequencies without compromising stability.
- CPU Uncore Voltage Offset: Adjusting this parameter helps us achieve stable memory overclocks. Without an offset, our RAM kit wouldn't run at 4000 MT/s. But it had no trouble with a setting of +300mV. The kit fired right up with this option set to [Auto], so it's safe to say an automatic configuration applies at least +300mV. Of course, we want to double-check using a multimeter since automatic settings have a tendency to get aggressive.
- CPU SA and IO Voltage: Both options may also help stabilize the memory.
- DRAM CH_X/X Voltage: These settings are also used to overclock the RAM, though they can be used to fine-tune each channel's voltage.
The following table should help guide your own overclocking endeavor, per MSI's own recommendations. It indicates the "safe" voltage operating ranges. But don't crank any of these up unless you determine that there's a useful reason to do so.
| Voltage | General | LN2 |
| VCCIN Voltage | Up to 2.1V | Up to 2.6V |
| CPU Core Voltage | Up to 1.4V | Up to 1.52V |
| CPU Ring Voltage | Up to 1.4V | Up to 1.4V |
| CPU Uncore Voltage Offset | Up to +400mV | Up to +400mV |
| CPU SA Voltage | Up to 1.35V | Up to 1.35V |
| CPU IO Voltage | Up to 1.35V | Up to 1.35V |
| CPU PLL Trim Offset | Up to +200mV | Up to +300mV |
| DRAM Voltage | Up to 1.9V | Up to 2V |
MORE: Best CPUs
MORE: Intel & AMD Processor Hierarchy
MORE: All CPUs Content
Intel Core i9-7900X
Current page: Preparing To Overclock: Hardware and Software
Next Page Delidding An Intel Core i9 CPU-
vasras Another excellent article, with temp, power and voltage scaling at various cooling/contact methods. Thank you.Reply -
Reynod I bet crashman is spewing he didn't get this gig ... :) Well done ... nice work PresencePC!!Reply -
AgentLozen Very interesting article. I liked your explanations of the expert bios settings on the first page. I usually just ignore the stuff in the bios I don't understand.Reply
While I enjoyed reading all of this, it's not something that would help me personally. I leave my CPU underclocked to >1Ghz so I can feel like I'm back in the 90's again. -
10tacle Besides the obvious awesome overclock detail story and results, I like the fact articles remind us of Intel's failure to use the highest quality manufacturing/assembly principles on their top tier CPUs. Especially their x-Series chipsets. There is no excuse for a near-$1,000 chip to have such poor thermal management quality from the factory. I mean how stupid is that.Reply
One of Intel's strongest advantages over AMD for many years now has been their overclocking ability to push them beyond comparable AMD chips. But not only that, to allow future overclocking headroom for keeping the platform longer when newer and faster replacement generation chipsets are introduced. Poor thermals remove those advantages and not many people want to risk messing up their four-figure chip by de-lidding mods.
I hope Intel takes articles like these in notice and will step it up for their next generation of high end i7 and i9 models. -
g-unit1111 Reply21039131 said:Why didn't you just use the EVGA Dark?
I'm guessing because the RAM limit is only 64GB? Where every other X299 board the limit is 128GB. That would make a huge difference in getting the higher speeds. -
Giroro I don't know much about extreme overclocking, tell me more about this "cooling pot".Reply
It is there to hold the liquid nitrogen and separate it from the die? Is there a reason you don't submerge the entire die in liquid nitrogen instead and lose the thermal compound entirely?
It looks like it has a significant copper plate on it. If you are already going through such extreme lengths, then why not use silver and make the plate as thin as possible?
Also, it's pretty interesting that cleaning the processor did not help with the delid, considering that people delidding older i5/i7s say the thickness of that glue is the primary reason that a delid is effective. -
AgentLozen ReplyGiroro said:it's pretty interesting that cleaning the processor did not help with the delid
I thought the same thing. I was expecting the processor to benefit from the cleaning. -
Giroro Reply21039536 said:Besides the obvious awesome overclock detail story and results, I like the fact articles remind us of Intel's failure to use the highest quality manufacturing/assembly principles on their top tier CPUs. Especially their x-Series chipsets. There is no excuse for a near-$1,000 chip to have such poor thermal management quality from the factory. I mean how stupid is that.
One of Intel's strongest advantages over AMD for many years now has been their overclocking ability to push them beyond comparable AMD chips. But not only that, to allow future overclocking headroom for keeping the platform longer when newer and faster replacement generation chipsets are introduced. Poor thermals remove those advantages and not many people want to risk messing up their four-figure chip by de-lidding mods.
I hope Intel takes articles like these in notice and will step it up for their next generation of high end i7 and i9 models.
The cynic in me makes me think that the primary reason Intel switched to thermal paste is for planned-obsolescence and to prevent people from using old platforms for a long time. I'm pretty sure Intel wants to sell you a new processor as often as possible.
Cheaper manufacturing, reduced ability to overclock, Thermal paste that will probably dry out and slow down the CPU within a few years (which will make new models look faster by comparison) ... All these things are positives to a marketing executive.
Hopefully AMD becomes even more competitive, because workmanship isn't going to improve until Intel can correlate their drop in quality with a loss of profit. -
cryoburner Reply
Isn't that the point? If someone messes up their CPU, they have to buy a new one. And delidding voids the warranty, helping Intel more easily recognize and avoid paying for the replacement of chips that have failed as a result of high overclocks. And of course, if people are deterred from overclocking their CPU, they may have more reason to upgrade to a faster one a few years down the line. Intel doesn't want people "keeping the platform longer", and they know that those looking for the highest overclocks will currently go with them either way. Considering it can cost around $5 or so extra to solder a CPU, and most people won't be overclocking, they undoubtedly don't see much point in spending the money to do so.21039536 said:Poor thermals remove those advantages and not many people want to risk messing up their four-figure chip by de-lidding mods.
AMD is willing to, since they currently can't achieve quite the same level of clock rates on their CPUs at the high-end, and know they need to do other things to make their chips more competitive with the market leader, like adding extra cores and using solder.
