System Builder Marathon, Sept. 2010: $400 Gaming PC
Overclocking
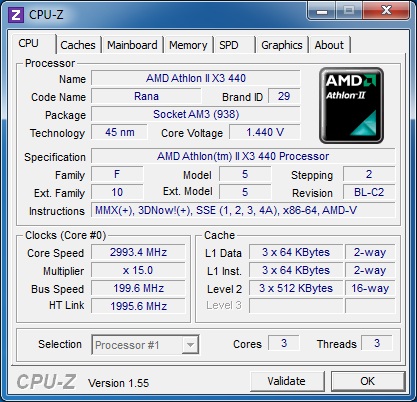
It was obvious that our little gaming system would be GPU-limited in the demanding SBM gaming suite. So, rather than overclock three cores, our first order of business was to see if this Athlon II X3 440 would successfully unlock, enabling the potential to crush our $550PC from June in the application suite.
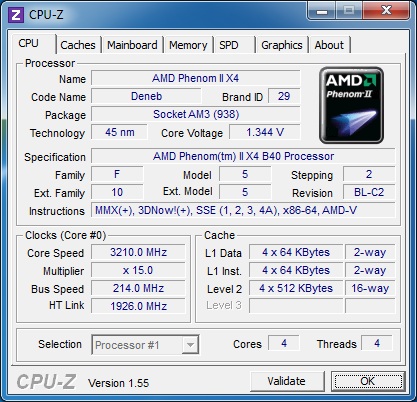
We set ACC to Auto in the BIOS, and sure enough, the X3 was recognized as an AMD Phenom II X4 B40 processor. Of course, booting is only the first step. We had to then figure out if the disabled core could actually run benchmarks stably.
More active cores mean more heat for the diminutive boxed cooler to dissipate, though. As a result, we didn't expect to make it very far before temperatures became a concern. Setting aside the likelihood of less overclocking headroom, we already know that increased cooling demands alone mean the four-core overclock is going to be more limited than a triple-core configuration.
Anytime you overclock, you assume the risk of long-term damage to hardware, so it's best to keep temperatures within reason. Unlocking an Athlon II results in a core temperature pinned at zero degrees. So, instead of reading the processor's temperature, we're forced to rely on HWMonitor v.1.16.0 to read the motherboard’s socket sensor. We added our own "finger test" for added cautiousness.
The ASRock M3A770DE over-volts our VID (Voltage ID) of 1.4 V to readings between 1.432-1.440 V at idle and 1.480 V under load. Even stock-clocked socket temperatures during load testing approached 60 degrees Celsius, with core temperatures trailing 10-12 degrees behind. Running four threads of Prime95 quickly pushed the limits of our comfort zone. So, stability testing the unlocked core actually required a touch of under-volting.
In a bit of a reversal, dialing in a four-core overclock became a process of lowering voltage, while raising the processor’s core speed and monitoring load temperatures. Maximum useful frequency was found at 3.2 GHz with CPU voltage set to 1.325 V in the BIOS. Idle voltage read 1.360 V and load voltage 1.400 V. Admittedly some performance was left on the table versus previous AMD-based builds. Given the motherboard’s basic passive cooling measures, though, there was really no point in putting more time into lowering the CPU multiplier, pushing a high reference clock, and attempting to maximize northbridge and memory frequencies.
In turning our attention to the Radeon HD 5670, we had absolutely no problem maxing out Catalyst Control Center’s available frequencies of 850 MHz core and 1050 MHz memory. We then bypassed this limitation utilizing the latest MSI Afterburner overclocking utility, finding the core had nearly 100 MHz extra in it.
Get Tom's Hardware's best news and in-depth reviews, straight to your inbox.
Before searching for a maximum memory clock, I set up overclocking profiles to see if automatic 2D/3D clock switching was functional. Readers have the luxury of switching to faster speeds manually when they fire up demanding games. Our overclock, on the other hand, has to be stable across the entire test suite for it to be considered valid. While 2D clocks would indeed idle back down on the desktop, 3D clocks did not consistently ramp back up again in all 3D applications. For instance, the feature worked fine in FurMark, but it did not when launching our Crysis benchmark. Hitting 940 MHz core and 1100 MHz memory clocks would have been nice, but an enthusiast shouldn't be forced to run overclocked settings 24x7, nor “cheat” and jump back and forth between profiles.
Leaving this extra performance boost on the table, I chose to employ CCC’s maximum 850/1050 frequencies and automatic fan speed control. These settings should be within reach of most Radeon HD 5670 owners. But they don't represent the maximum you can squeeze from our retail Radeon HD 5670 sample.
-
SpadeM ReplyGiven the motherboard’s basic passive cooling measures, though, there was really no point in putting more time into lowering the CPU multiplier, pushing a high reference clock, and attempting to maximize northbridge and memory frequencies.
+1 for making this statement, glad someone considered it at least. All in all decent build for the money. -
AMW1011 I'll be honest, I think a $450 budget is a little more reasonable than a $400 budget. At that price a 5750 or even a 5770 can be had, which would have worked fine with all of the other parts and likely would have matched the $550 June build.Reply
Even this $400 build packs a punch, you can get one HELL of a rig for the money any more. It really is insane, and that's not even considering the used or refurb market!
Awesome article, probably one of my favorite SBM, atleast the best I've seen in a long time. -
micr0be very nice build, interesting to see how much performance can be squeezed out of the budget. i was expecting worse results.Reply -
Gamer-girl ReplyIt went $1 over-budget if we substituted in a GeForce 9800 GT.
I doubt someone spending $400 can't afford to add an extra dollar. although i realize that the point in these articles is to stay under the budget, it would have been interesting to see the price/perforamce difference. -
haplo602 nice case, looks very good ... pity that rosewill does not have a downloadable manual for it ...Reply -
HibyPrime I'd be interested to know how much more overclocking headroom you could pull out of it if you left it at 3 cores - and would that net you more performance in most of the benchmarks?Reply
I'd bet if you could pull ~200 mhz more out of it, it would begin to match up with the missing core, and maybe start to pull away around 400mhz. -
Proximon The Cooler Master Elite 460 is a falsely labeled piece of crap. You can find the review (with proper testing) here: http://www.hardwaresecrets.com/article/1005/1Reply
You'll have to spend a little bit more there. Rosewill has a 430W (RG430 S12) unit or the Antec Neo 400W is almost the same price as the CM after a discount and rebate.


