Upgrading And Repairing PCs 21st Edition: PC Diagnostics
Test Equipment: Electrical, Loopback Connectors, And Meters
In some cases, you must use specialized devices to test a system board or component. This test equipment is not expensive or difficult to use, but it can add much to your troubleshooting abilities.
Electrical Testing Equipment
I consider a voltmeter to be required gear for proper system testing. A multimeter can serve many purposes, including checking for voltage signals at various points in a system, testing the output of the power supply, and checking for continuity in a circuit or cable. An outlet tester is an invaluable accessory that can check the electrical outlet for proper wiring. This capability is useful if you believe the problem lies outside the computer system.
Loopback Connectors (Wrap Plugs)
For diagnosing serial- and parallel-port problems, as well as problems with network cabling, you need loopback connectors (also called wrap plugs), which are used to circulate, or wrap, signals. The plugs enable ports to send and receive data simultaneously for diagnostic purposes.
To accommodate all the serial/parallel ports you might encounter, you need a loopback connector for the 25-pin serial port, one for the 9-pin serial port, and one for the 25-pin parallel port. Some diagnostic software products include loopback connectors with the product, or you can purchase them as an option. Note that there are some variations on how loopback connectors can be made, and not all versions work properly with all diagnostics software. You should therefore use the loopback connectors recommended by the diagnostics software you will be using.
Ethernet loopback connectors are very useful for quickly diagnosing network cable runs, as well as for identifying which network jacks or cable ends are connected to which ports on a router or switch. With a loopback connector attached to a functioning cable, the corresponding port on a router or switch will show a device connected. For example, say you have an 8-port switch with cables connected to each port, but you don’t know exactly which remote jacks in the home or office network they are connected to. Merely attach the Ethernet loopback to a jack or cable end you want to diagnose, then look at the switch to see which port lights up, thereby identifying the port in question.
USB wrap plugs are also available. However, these are active bus-powered devices that require compatible drivers and software from the plug manufacturer.
Note: Serial, parallel, and USB loopback plugs and testing software are available from PassMark Software, and Ethernet loopback connectors are available from Smartronix.
Get Tom's Hardware's best news and in-depth reviews, straight to your inbox.
Meters
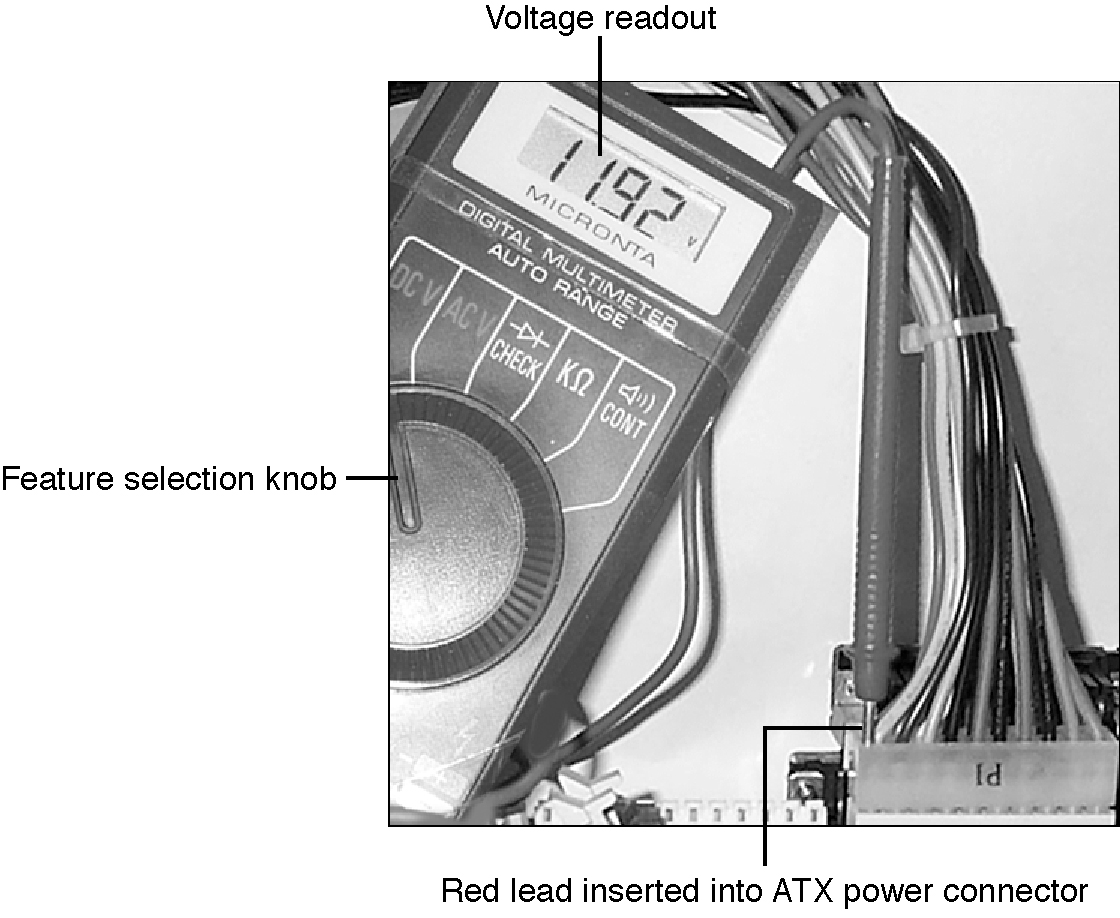
Some troubleshooting procedures require that you measure voltage and resistance. You take these measurements by using a handheld digital multimeter (DMM). The meter can be an analog device (using an actual meter) or a digital-readout device. The DMM has a pair of wires called test leads or probes. The test leads make the connections so that you can take readings. Depending on the meter’s setting, the probes measure electrical resistance, direct-current (DC) voltage, or alternating-current (AC) voltage. Figure 20.6 shows a typical DMM being used to test the +12 V circuit on an ATX motherboard.
Usually, each system-unit measurement setting has several ranges of operation. DC voltage, for example, usually can be read in several scales, to a maximum of 200 millivolts (mV), 2 V, 20 V, 200 V, and 1000 V. Because computers use both +5 V and +12 V for various operations, you should use the 20 V maximum scale for making your measurements. Making these measurements on the 200 mV or 2 V scale could “peg the meter” and possibly damage it because the voltage would be much higher than expected. Using the 200 V or 1000 V scale works, but the readings at 5 V and 12 V are so small in proportion to the maximum that accuracy is low.
If you are taking a measurement and are unsure of the actual voltage, start at the highest scale and work your way down. Most of the better meters have autoranging capability—the meter automatically selects the best range for any measurement. This type of meter is much easier to operate. You simply set the meter to the type of reading you want, such as DC volts, and attach the probes to the signal source. The meter selects the correct voltage range and displays the value. Because of their design, these types of meters always have a digital display rather than a meter needle.
CautionWhenever you are using a multimeter to test any voltage that could potentially be 50 V or above (such as AC wall socket voltage), always use one hand to do the testing, not two. Either clip one lead to one of the sources and probe with the other or hold both leads in one hand.If you hold a lead in each hand and accidentally slip, you can very easily become a circuit, allowing power to conduct or flow through you. When power flows from arm to arm, the path of the current is directly across the heart. The heart muscle tends to quit working when subjected to high voltages. It’s funny that way.
I prefer the small digital meters; you can buy them for only slightly more than the analog style, and they’re extremely accurate and much safer for digital circuits. Some of these meters are not much bigger than a cassette tape; they fit in a shirt pocket. RadioShack sells a good unit in the $25 price range; the meter (refer to the image above) is a half-inch thick, weighs 3 1/2 ounces, and is digital and autoranging, as well. This type of meter works well for most, if not all, PC troubleshooting and test uses.
CautionYou should be aware that many older analog meters can be dangerous to digital circuits. These meters use a 9 V battery to power the meter for resistance measurements. If you use this type of meter to measure resistance on some digital circuits, you can damage the electronics because you essentially are injecting 9 V into the circuit. The digital meters universally run on 3–5 V or less.
Upgrading and Repairing PCs: 21st Edtion
Current page: Test Equipment: Electrical, Loopback Connectors, And Meters
Prev Page Safety Next Page Test Equipment: Logic Probes, Outlet Testers, And Memory Module TestersTom's Hardware is the leading destination for hardcore computer enthusiasts. We cover everything from processors to 3D printers, single-board computers, SSDs and high-end gaming rigs, empowering readers to make the most of the tech they love, keep up on the latest developments and buy the right gear. Our staff has more than 100 years of combined experience covering news, solving tech problems and reviewing components and systems.


