


Setting Up A VPN Connection, Continued
In the window that now opens up, you can see a list of all the user accounts on your computer. Select the user(s) to be permitted to connect to your computer - if you want to restrict access to your computer to yourself only, then only check your own user name. Click "Next". In the next dialog box, select the "Via the Internet" option, and confirm using "Next". Now we need to select the network protocols that are to be supported by the VPN connection. "Internet protocol version 6" and "QoS package planner" can both be deselected.
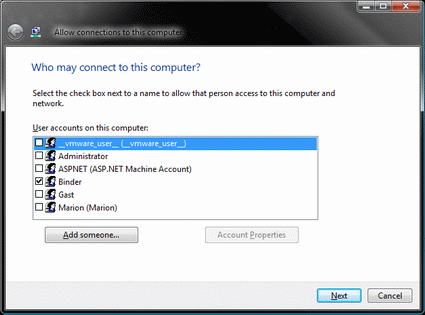
Selecting users
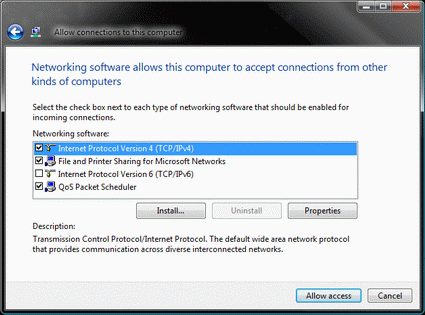
Selecting supported protocols
Choose "Internet protocol version 4" and then click "Properties". If you not only want to access your desktop computer via VPN connection, but also want to access other devices in your home network (such as network printers or routers), select the option "Allow Callers to Access My Local Area Network". Select "Enter IP address" to assign the IP address. Here, you should enter two consecutive IP addresses that are to be used for the VPN connection between your desktop computer and your laptop. You must ensure that the IP address range is in the same sub-network as your local home network. The specification of an entire IP range does not make sense, because Windows Vista only accepts a single VPN connection at any one time - multiple connections are not possible.
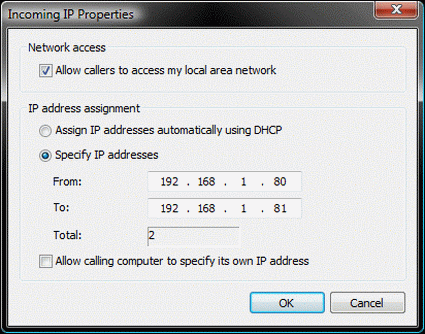
Selecting IP addresses and permitting access to the local area network
If your router has the IP address 192.168.1.1 and your desktop has the IP 192.168.1.2, you must enter an IP address range that starts with 192.168.1. The last number can be selected freely, with one restriction: it should not already be assigned to objects in the network. Thus, in our example, the IP addresses 192.168.1.1 and 192.168.1.2 may not be used.
The IP address in the "From" field is assigned to your desktop computer when a VPN connection is established. The IP address in the "To" field is assigned to your laptop. Now click "OK" and confirm the settings you have just made by selecting "Allow access". Windows Vista subsequently modifies the settings of the Windows Firewall in order to permit connections to Port 1723. Should you wish to make further changes to the settings you have just entered, you can open the settings dialog via the "Manage network connections" menu entry in the Network and Sharing Center.
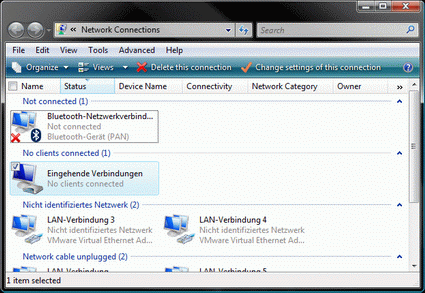
Creating the incoming connection
