Acer Predator XB271HK 27-inch UHD G-Sync Monitor Review
Gamers seeking Ultra HD resolution have few choices but an excellent new G-Sync monitor has just appeared from Acer, the XB271HK sporting a 27-inch AHVA screen. We’re checking it out in our lab today.
Why you can trust Tom's Hardware
OSD Setup And Calibration
OSD Tour
Pressing any bezel key brings up a quick menu. The big G stands for Game Mode which has three memory settings. The user can easily change presets. The second icon controls overdrive, the third volume, the fourth input, and the last brings up the full OSD.
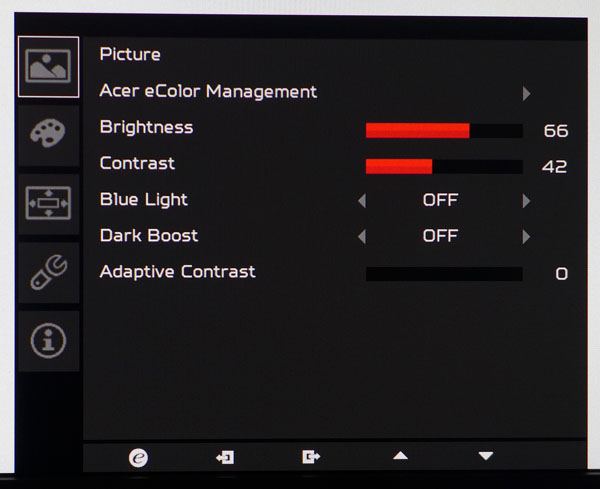
Acer eColor Management refers to the five picture modes. All are fixed except the User preset. If you attempt to make changes in another mode, the XB271HK automatically switches to User. Brightness throttles the backlight through a large range of over 235cd/m2. The Contrast control comes set to 50 but we found that to be too high. Check out our calibration notes below for more detail.
Blue Light comes in four levels that warm the white point in an effort to reduce eye fatigue. Dark Boost will increase low-end gamma to make shadow detail more visible. Finally, Adaptive Contrast will increase perceived dynamic range based on actual content. It can crush detail in highlight and shadow areas, but used sparingly it does improve image depth. It has 100 steps to allow very fine control.
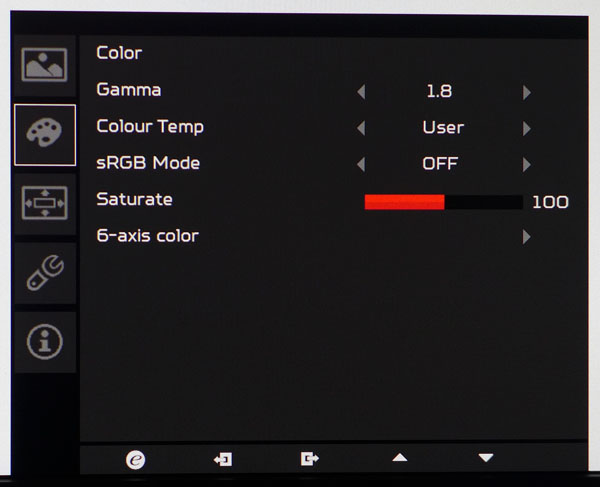
There are two gamma presets, 1.8 and 2.2. Although 2.2 is the default, we found better accuracy using 1.8. Color Temp has Cool, Warm and Blue Light settings plus a User mode. sRGB mode is an on/off toggle that does little to affect color that’s already pretty good out of the box. The Saturate slider will increase or decrease saturation of all six colors at once.
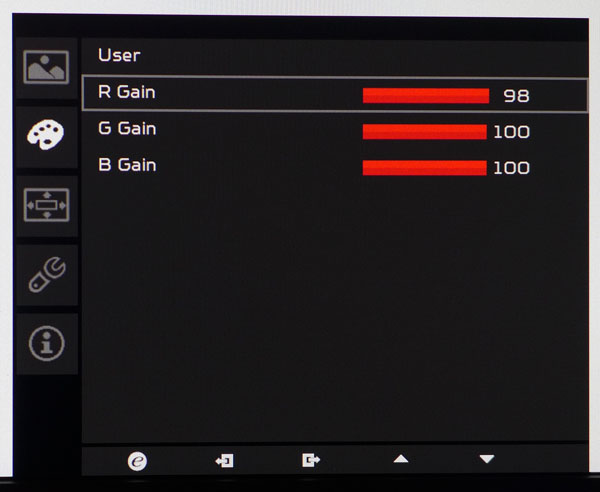
The RGB gain sliders begin at their maximums so you’ll give up just a bit of contrast when making adjustments. Fortunately only a tiny change was needed on our sample.
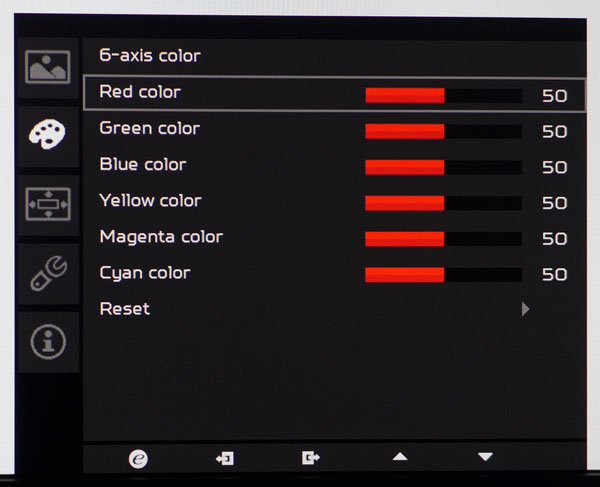
The 6-axis controls affect only the luminance of each color. Once we dialed in grayscale and set contrast correctly, we found no need to adjust these.
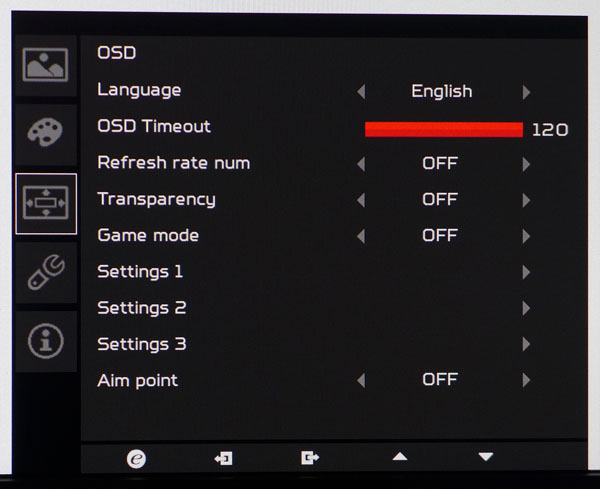
The OSD is available in 15 languages and can be kept on-screen for as long as two minutes. Refresh Rate Num is a handy fps counter that sits in the upper-right corner. Transparency refers to the OSD itself. Game Mode offers three memory slots that can be saved by using the Settings 1-3 options directly beneath. Lastly, you can place an aiming reticule in the center of the screen; just the thing for FPS newbies.
Get Tom's Hardware's best news and in-depth reviews, straight to your inbox.
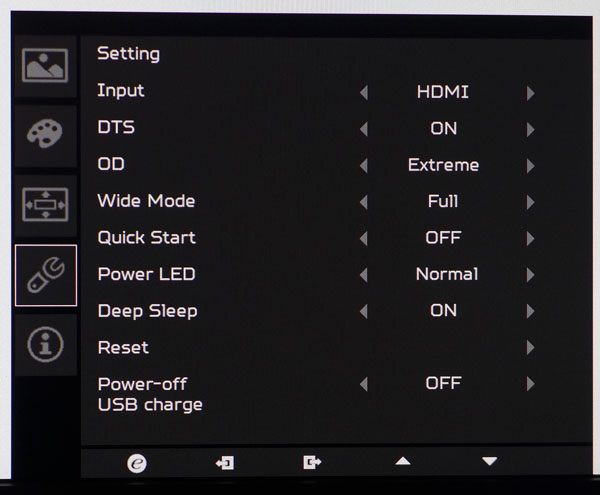
Here we have an input selector, a toggle for the DTS audio (leave it on for best results) and three overdrive settings (Off, Normal, Extreme). Normal provides the best image quality with no ghosting and a visible reduction in motion blur.
Wide Mode will either stretch signals to fit the screen or map them 1:1. Lower-res images will then be windowed. The Power LED can be dimmed or turned off. Deep Sleep will turn the XB271HK off after a 12-minute no-signal condition. To continue charging devices when the monitor is off, set Power-off USB Charge to on.
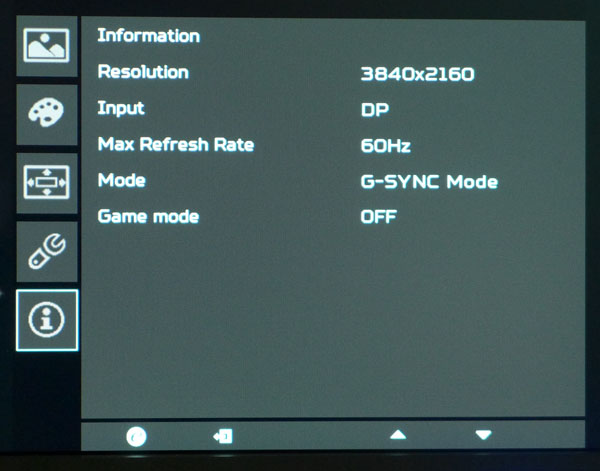
The info screen shows input, resolution and the refresh rate plus G-Sync status. If you’re using the Game Mode presets, it’ll also indicate which slot is currently active.
Calibration
The XB271HK doesn’t require calibration in its default Standard mode, although there are a couple of settings we recommend changing for optimal picture quality. Adjusting anything, including brightness, kicks you over to the User mode. Once you dial in your preferred output level, change gamma to 1.8 and lower the contrast slider to 42. This will level out gamma tracking and cure a small color over-saturation issue. We’ll tell you about both of these during the tests. Here are the settings we used for this review.
| Acer Predator XB271HK Calibration Settings | |
|---|---|
| Brightness 200cd/m2 | 66 |
| Brightness 120cd/m2 | 32 |
| Brightness 100cd/m2 | 24 |
| Brightness 80cd/m2 | 16 |
| Brightness 50cd/m2 | 5 |
| Contrast | 42 |
| Gamma | 1.8 |
| Color Temp User | Red 98, Green 100, Blue 100 |
| Overdrive | Normal |
Current page: OSD Setup And Calibration
Prev Page Packaging, Physical Layout And Accessories Next Page Brightness And Contrast
Christian Eberle is a Contributing Editor for Tom's Hardware US. He's a veteran reviewer of A/V equipment, specializing in monitors. Christian began his obsession with tech when he built his first PC in 1991, a 286 running DOS 3.0 at a blazing 12MHz. In 2006, he undertook training from the Imaging Science Foundation in video calibration and testing and thus started a passion for precise imaging that persists to this day. He is also a professional musician with a degree from the New England Conservatory as a classical bassoonist which he used to good effect as a performer with the West Point Army Band from 1987 to 2013. He enjoys watching movies and listening to high-end audio in his custom-built home theater and can be seen riding trails near his home on a race-ready ICE VTX recumbent trike. Christian enjoys the endless summer in Florida where he lives with his wife and Chihuahua and plays with orchestras around the state.
-
chumly Bummer about the response times. The other Predators, the x34, z35, and the smaller 16:9 XB270 variants were all on point (less than 15ms absolute input lag).Reply
The world is still not ready for 4k (but getting closer). 2 more years, 2 more years. -
chumly actually now that I'm comparing tom's review to another review on the same monitor, the response time numbers are not adding up. lag of 16 - 32ms, is one to two frames of lag at 60Hz, according to TFT central, they call this class 2; class 1 (less than 16ms) being optimal for gaming. They have this same exact monitor with only 4ms between signal process and pixel post (much much faster). What's up? Your response time numbers seem to be a lot higher than they should be.Reply -
picture_perfect ReplyWe think motion quality is more important than resolution. When you move up to 75Hz and beyond, things like motion blur fade into the background. Those kinds of artifacts no longer distract from gameplay. With adaptive refresh, tearing is a thing of the past at any resolution, but we’d still rather have those high framerates. So do those extra pixels make up for this? We’d have to say no at this point.
YES. This is an opinion gamers need to know before buying a 4K monitor and one that has been missing from your previous reviews. KUDOS for finally dishing out some common sense. These resolutions are too high. -
eklipz330 Reply
that prediction falls in line with mine... but for me, that means it's an excellent time to buy a "stop gap" monitor now.18177986 said:Bummer about the response times. The other Predators, the x34, z35, and the smaller 16:9 XB270 variants were all on point (less than 15ms absolute input lag).
The world is still not ready for 4k (but getting closer). 2 more years, 2 more years.
3440x1440, 120hz, OLED HDR 34" monitors with low latency to be a thing in 2-3 years. but until we have the hardware to drive that resolution, it makes no sense to wait. i think a 35" 2560x1080 144hz VA panel is amazing right now (for gaming).
-
Sam Hain For me (and this is just my opinion and gaming needs), I cannot justify 4K 60Hz, regardless of price-point, monitor size, response times, manufacturer, etc. at the moment...Reply
Perhaps 4K w/GSync, hitting 100Hz and we have a winner... But of course, then comes that killer price tag. -
ubercake I had this monitor for a day and returned it because of the backlight bleed. It was equivalent of the poor viewing angles you see on a TN monitor because the bottom right corner was very bleached out unless you physically moved your head to center on the bottom right corner.Reply
I then picked up a PG279Q which has less backlight bleed.
I found both monitors to have great performance, but found the backlight bleed on both to be distracting.
I really don't think either Asus or Acer is where they need to be when they charge $800 for a 1440p IPS monitor. These panels may perform well, but they are not great IPS panels from a backlight bleed standpoint. They should be priced around $500 because of the low-end IPS panels. You know what I mean if you've used a good IPS panel.
Hopefully, they'll stop ripping people off one day. -
Sam Hain Reply
In your XP, would Asus build-quality stand as being "better" or does another manufacturer in this realm of gaming-spec monitors stand out in your opinion? I'm not in the market yet... BUT am getting close. Thanks!18179002 said:I had this monitor for a day and returned it because of the backlight bleed. It was equivalent of the poor viewing angles you see on a TN monitor because the bottom right corner was very bleached out unless you physically moved your head to center on the bottom right corner.
I then picked up a PG279Q which has less backlight bleed.
I found both monitors to have great performance, but found the backlight bleed on both to be distracting.
I really don't think either Asus or Acer is where they need to be when they charge $800 for a 1440p IPS monitor. These panels may perform well, but they are not great IPS panels from a backlight bleed standpoint. They should be priced around $500 because of the low-end IPS panels. You know what I mean if you've used a good IPS panel.
Hopefully, they'll stop ripping people off one day.
-
AlistairAB At bestbuy.ca this monitor is $1288 after tax in Canada and the LG 27UD68 is $616. Swap freesync for gsync and save over 600 dollars and you get the same quality panel (or is the LG a higher quality one?) I wish I could spread the gospel of the LG monitor faster, as hardly any sites are mentioning the first inexpensive freesync 4k monitor has arrived, making the price points of all the older ones obsolete.Reply
