System Builder Marathon Q3 2014: Budget Gaming PC
The Trials (And Tribulations) Of Overclocking
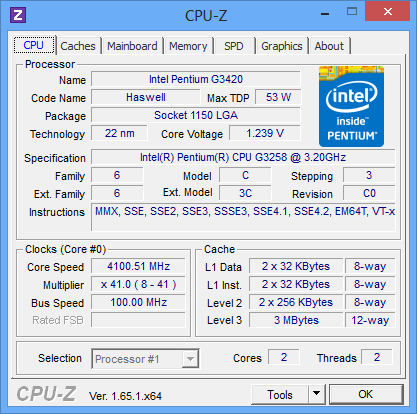
Overclocking with the H81M-P33 is fairly straightforward. The shipping UEFI, version 1.4, had no problem booting up and recognizing the Pentium G3258. I grabbed the latest BIOS file directly from MSI and used the built-in MFlash utility to update to v.1.7, which also updates the Intel Management Engine. After a couple of reboots, the CPU multiplier was adjustable from 8 to 80 using the number pad’s '+' and '–' keys. For fun, I set the ratio to 40x with automatic voltages and it fired up at 4.0 GHz at 1.200 V. The configuration was stable under Prime95, so if I didn't want to push any further, the overclock would have been that easy.
I already knew some enthusiasts were having a hard time getting the G3258 beyond 4.0 GHz with the stock cooler, while others lucked-out with chips able to reach 4.5 GHz. There are no guarantees in overclocking, but I was quietly hoping for at least 4.2 GHz at 1.2 V. That turned out to be overly optimistic; this CPU needed lots of voltage to pass 4.1 GHz.
Determined to reach 4.2 GHz, I jumped to 1.275 V, which crashed within minutes under load. At 1.29 V, the overclock lasted over 20 minutes in Prime95, but temperatures were peaking at 80 degrees. That's where I quit, knowing I was already above the voltage level I'd use for testing. So, I started looking for the lowest stable voltage at 4.1 GHz.
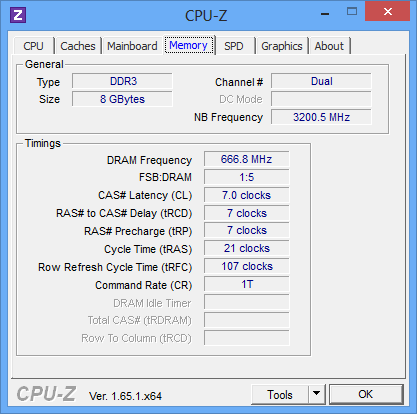
The highest RAM frequency available with the Pentium installed was 1400 MT/s, but I left it at 1333 MT/s and fought for lower latencies. Increased to 1.545 V, numerous passes of MemTest 86+ ran error-free at 7-7-7-21 1T.
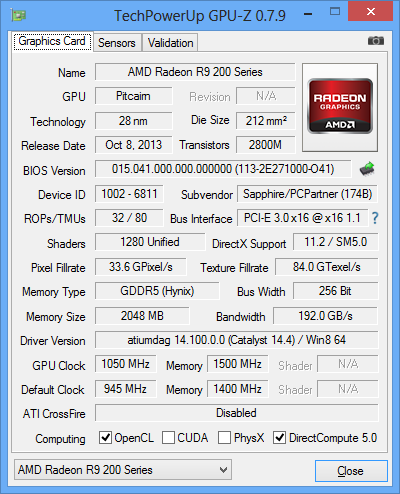
As mentioned, Sapphire’s Dual-X R9 270 has a slightly overclocked core, reaching up to 945 MHz out of the box, while its 2 GB of GDDR5 memory operates at a reference 1400 MHz. To start, I fired up the latest version (4.8.6) of Sapphire’s Trixx tweaking utility.
The core topped out at 1030 MHz using its default voltage. Reaching stability at R9 270X speeds of 1050 MHz required a bump to 1.225 V. I then set the graphics fan to 100%, gauging maximum frequency at a pegged 1.300 V, finally giving up stability when the GPU hit 1070 MHz. Given such modest gains, I dropped back to 1050 MHz.
Next, I started bumping up the GDDR5, eventually reaching a stable 1510 MHz. I dialed this back down to 1500 MHz (6000 MT/s), and put the final overclock through more than an hour of real-world gaming without issues.
Get Tom's Hardware's best news and in-depth reviews, straight to your inbox.
Unfortunately, the story doesn’t end there. After completing Far Cry 3’s most demanding benchmark runs, I dropped to 1280x720 and the system blue-screened. Minor voltage bumps and clock reductions didn’t solve the issue. I had to individually re-test the CPU, RAM, and graphics overclocks over again, encountering no problem. As soon as I put them back together, the random reboots returned under light gaming loads.
Based on the event ID, I suspected the graphics card wasn’t getting sufficient voltage. But was it the power supply, motherboard, the single 6-pin power lead, dynamic voltage control, or some combination? I wanted to force a constant voltage under 3D loads, but had already discovered that the Trixx utility shut down any time I touched the settings tab. So I tried MSI AfterBurner. But it was unable to adjust or monitor the voltage. While I hate admitting defeat, I was out of time and had to move on. I dropped back to stock graphics clock rates for their guaranteed stability, and counted on Intel's Pentium for the largest gains. Then I ran all of my single-screen tests before calling it a night.
The next morning, I wanted to try one more idea before hooking up my triple-monitor setup. Considering that I reverted back to an older version of CPU-Z to properly read the Pentium’s voltage, how about trying an older version of Trixx? Lo and behold, build 4.8.2 gave me a functioning settings tab, which opened up the option to Force Constant Voltage and Disable ULPS (Ultra-Low Power State). ULPS was already disabled, but forcing a constant voltage solved the problem. I could now happily run lighter-load tests without fail.
Current page: The Trials (And Tribulations) Of Overclocking
Prev Page Assembling Our Gaming Box Next Page How We Tested Our Q3 2014 Budget Gaming PC Build-
g-unit1111 I would personally love to get a Pentium G3258 for my HTPC, it's only like $50 at Micro Center and the motherboard is $70 at Newegg. Hmm... decisions, decisions. :lol:Reply -
ScienceGuy3 What about the Frame Times? Isn't this processor notorious for bad frame times in heavily threaded games like BF4?Reply -
elbert Replyserves up to 30 A across its +12 V rails.
Its rated to serve up to 30 Amps but can do far more. Tests on this little gem shows it can output 22amps on each rail and maxes out around 38~39 Amps on both. Im paraphrasing a popular power supply testing site. Max wattage is about 553ish which is a good deal more than rated. This power supply can't be certified due to it lacks a circuit required but exceeds 80 percent efficiency. -
de5_Roy a lot of things went right for this build: amd introduced the full pitcairn/curacao gpu based r9 270 under 150w, needing single 6 pin pcie power connector, cryptocurrency craze was over and gfx card prices came down, hdd prices came down to sane levels, cpu-overhead-reducing gfx card drivers came out, intel released an unlocked dual core cpu and allowed o.c. bioses....Reply -
jdwii I'm just not sure for one they didn't show latency times. I'm pretty sure this build will suck for future gaming to such as GTA5.Reply
http://www.tomshardware.com/reviews/pentium-g3258-overclocking-performance,3849-5.html
When toms reviewed this CPU it was shown to have poor latency
For a 500$ build i would probably do a 6300+265 build. 600$ i would probably jump the build up to a I5+265 or 8320+270X. -
Onus No stuttering? Very interesting; looks like more testing might be needed, but perhaps settings can also be adjusted.Reply -
akula2 Since this CPU is super performer on various fronts (single core), so why not this config?Reply
Pentium G3258 - $69.97
NZXT Kraken X31 - $73.98
Asus MAXIMUS VII HERO - $203.99
G.Skill Trident X Series 16GB (2 x 8GB) DDR3-2133 - $184.99
Crucial M550 1TB 2.5" SSD - $447.98
Asus GeForce GTX 970 4GB STRIX - $349.99
NZXT Phantom 530 (White) - $121.98
EVGA 650W ATX12V - $64.99 (not sure about its power good signal value?)
Asus DRW-24B1ST/BLK/B/AS DVD/CD Writer - $16.99
Asus VG248QE Monitor - $264.99
D-Link DWA-171 802.11a/b/g/n/ac USB 2.0 - $29.27
Logitech MK550 w/Laser Mouse - $49.99
Corsair Vengeance 2100 - $79.99
Logitech Z506 155W 5.1ch - $69.99
Microsoft Windows 8.1 Professional (32/64-bit) - $170.99
Total: $2200
What you guys think? Usage? Racing Games at homes, audio/video encoding etc. I don't need K CPUs because I'm not in a hurry in this case.
Power source: 100% green aka Solar energy. -
alchemy69 Very similar to the system I just put together for myself except that I felt a 260X was more than enough power for the GPU and put the savings towards a small SSD for the boot drive.Reply


