Tom's Hardware Verdict
Cooler Master’s MasterLiquid 240 Atmos is one of the best 240mm AIOs on the market. It offers premium aesthetics, strong cooling performance, and quiet noise levels for $135.
Pros
- +
Low noise levels in common workloads
- +
Extremely strong performance for a 240mm AIO
Cons
- -
Noise levels vary slightly at full speed
Why you can trust Tom's Hardware Our expert reviewers spend hours testing and comparing products and services so you can choose the best for you. Find out more about how we test.
Cooler Master has had a busy summer, updating its ample lineup of cooling products. Earlier this summer we examined the MA824 ,Hyper 622 Halo, and most recently the 360 Atmos, providing improvements and innovations on its previous-gen coolers.
With today’s review we’ll be looking at Cooler Master’s 240 Atmos, a smaller 240mm sized version of the 360 Atmos we tested (and liked a lot) earlier this year. Our standards for 240mm AIOs have increased since testing Lian Li’s Galahad II 240, which was the first 240mm AIO I’ve tested capable of handling the full heat of Intel’s i7-13700K. Does the 240 Atmos AIO have what it takes to best its tough competition and earn a spot on our Best AIO coolers list? We’ll have to put it through our performance testing to find out. But first, here are the cooler’s specifications, direct from Cooler Master.
Cooler Specifications
| Cooler | Cooler Master MasterLiquid 240 Atmos |
| MSRP | $134.99 |
| Radiator Material | Aluminum |
| Pump Speed | Up to 3200 RPM |
| Pump MTTF | >210,000 hours |
| Socket Compatibility | Intel Socket LGA 115x/1200/1700 AMD AM5 / AM4 |
| Base | Copper |
| Max TDP (Our Testing) | ~250W on Intel i7-13700K |
| Installed Size (with fans) | 277mm (L) x 119.6 mm (W) x 52.2mm (D) |
| Warranty | 5 years |
Packing and Included Contents
Like the 360mm version of this product, the packaging of Cooler Master’s 240 Atmos deserves special mention. This is one of the classiest packages I have seen from any cooler. When you open the box, you’ll find the cooler neatly tucked and protected with molded cardboard and plastic peel and fans already installed to the radiator for convenience. All necessary parts for installation on AMD or Intel systems are neatly organized in three accessory boxes. This organization is particularly handy if you may want to move the cooler to a different PC down the line. So long as you keep the packaging around, you should easily be able to swap the cooler onto a different platform moths or years after purchase.

In addition to packaging the contents, the boxes also serve as instruction manuals, with easy-to-understand instructions printed on the sides. Alternatively, a QR code provides a link to a PDF version of the manual. This is at least a better alternative than MSI's MAG CoreLiquid E360, which lacks any kind of printed installation manual at all.


Included in Cooler Master's box are the following:
- Two Sickleflow Edge 120 fans, pre-installed
- 240mm radiator
- CryoFuze thermal paste and application tools
- PWM splitter cord
- ARGB splitter cord
- ARGB hub
- Mounts for all modern CPU sockets (including AM5 & LGA1700)
- Cable Management clips

LGA 1700 Cooler Installation
Installation of the 240 Atmos is easy on Intel LGA 1700 systems.
1. I would advise securing the radiator to your caseprior to other installation steps. It generally makes the rest of installation easier – unless perhaps you are building in a space-constrained SFF case.
2. Intel users should begin by pressing the backplate against the motherboard and securing it by screwing in the mounting standoffs from the front side of the motherboard.

3. Next you’ll need to apply thermal paste to the CPU – and if you're unsure how to do that, see our How to Apply Thermal Paste primer. Cooler Master includes a 5-point applicator which can optionally be used to assist with ideal application.
4. Attach the mounting bars to the CPU block (Ryzen mounting bars shown in picture).

5. Place the CPU block against the mounting bars, then secure it with the included thumbscrews.

6. Connect the PWM and ARGB headers, and don’t forget to take off the plastic peel before turning on your computer.

Features of Cooler Master’s MasterLiquid 240 Atmos
● Copper contact plate with Grease tool

The 240 Atmos includes a large copper CPU contact plate, along with the 5-point thermal paste stencil tool to assist with optimal application.
● Tube of thermal paste
While most manufacturers are stingy and only include pre-applied thermal paste, Cooler Master includes a tube of its CryoFuze thermal paste, with enough paste for multiple applications. It would be a good idea to keep this in the box after you’re done, along with the other accessories.

● Fully rotatable braided tubing

Not only can the tubing connected to the CPU block be adjusted, but the tubes are fully rotatable to ease installation around things like tall RAM or other components. The tubes feature braiding for durability and longevity, while also making them look nice inside your case.
● Full RAM compatibility
As the CPU block does not impede or overhang the DIMM slots on a motherboard, all sizes of RAM – no matter how tall – are compatible with this cooler.

● 27mm-thick radiator
The 360 Atmos includes a radiator that’s 27mm thick. With fans installed, the thickness is a total of 52mm.

You shouldn’t need to refill the unit at any time during Cooler Master’s comprehensive 5-year warranty. But should you desire to do so after the warranty has expired, a refill port is accessible. Regrettably, Cooler Master includes a “warranty void when removed” sticker, which is technically illegal in the US, under the Magnuson-Moss Warranty Act. However, in the rare chance you were to have the need to refill it before the warranty has expired, there’s probably a bigger problem that refilling alone won’t solve and you would be well advised to RMA.

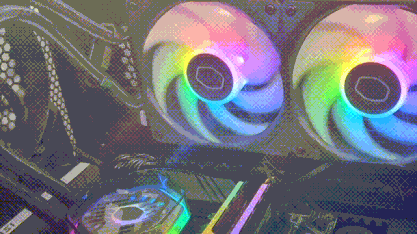
● Two 120mm Sickleflow Edge fans
There’s more to a cooler than just the heatsink or radiator. The bundled fans have a significant impact on cooling and noise levels, as well as how the cooler looks in your case. Cooler Master includes its latest Sickleflow Edge fans with the 240 Atmos. Many competing fans are rated for as little as 40,000 hours, but Cooler Master indicates its confidence with the quality of its fans with a rated lifespan of over 160,000 hours.
Many companies include stronger fans with their 360mm AIOs, but a weaker set of fans with 240mm AIOs – and companies confusingly often give these different fans the same names. The fans included with the 240 Atmos, on the other hand, provide the same quality and performance as those included with the 360 Atmos.

| Model | Sickleflow Edge |
| Dimensions | 120 x 120 x 25mm |
| Fan Speed | 690- 2500RPM ± 10% |
| Air Flow | Up to 70.7 CFM |
| Air Pressure | Up to 3.61 mmH2O |
| Bearing Type | Loop Dynamic Bearing |
| Lighting | ARGB |
| MFFT | >160,000 hours |
● (Optional) MasterPlus software control and ARGB hardware controller
Manufacturers of AIO coolers tend to fall into one of two extremes when it comes to cooler control: Either they force you to use bloated software to control the device, or they don’t include any software and make you rely only on motherboard PWM and ARGB controls.
With Cooler Master, you have a choice. You can use the default motherboard controls if you prefer, but the company also offers optional MasterPlus software for a more customized experience. A hardware ARGB controller is also included with the AIO, making it easy to connect multiple RGB devices.


As with other lighting software, Master Plus offers a variety of preset lighting functions which can be customized. The GIF below shows the default action of the individual presets.
The MasterPlus software also allows for fine control of the individual LEDs of a connected RGB device. The screenshot below shows the settings for the CPU block being set to a mixture of red, white, and blue and I’ve included a photo of how the CPU block appears with those settings applied.


Cooler Master’s software provides the ability to control and customize your AIO cooler – but that’s not where it ends. It can also notify you of leaks, potentially averting a disaster. The company promises more feature updates to its software are coming in the not-too-distant future, with the help of an API, which will hopefully allow the software to control many other products as well.
LGA1700 Socket Bending
There are many factors other than the CPU cooler that can influence your cooling performance, including the case you use and the fans installed in it. A system's motherboard can also influence this, especially if it suffers from bending, which results in poor cooler contact with the CPU.
In order to prevent bending from impacting our cooling results, we’ve installed Thermalright’s LGA 1700 contact frame into our testing rig. If your motherboard is affected by bending, your thermal results will be worse than those shown below. Not all motherboards are affected equally by this issue. I tested Raptor Lake CPUs in two motherboards. And while one of them showed significant thermal improvements after installing Thermalright’s LGA1700 contact frame, the other motherboard showed no difference in temperatures whatsoever! Check out our review of the contact frame for more information.
Testing Methodology
Today's highest-end CPUs, whether Intel or AMD, are difficult to cool in intensive workloads. In the past. reaching 95 degrees Celsius or more on a desktop CPU might have been a cause for concern. But with today’s top-end CPUs, this is considered normal operation. Similar behavior has been present in laptops for years due to cooling limitations in tight spaces.
All testing is performed with a 23C ambient room temperature. Multiple thermal tests are run on each CPU to test the cooler in a variety of conditions, and acoustic measurements are taken with each result. These tests include:
1. Noise normalized testing at low noise levels
2. “Out of the box”/Default Configuration Thermal & Acoustics Testing
a. No power limits enforced
b. Because CPUs hit Tjmax in this scenario, the best way to compare cooling strength is by recording the total CPU package power consumption.
3. Thermal and Acoustics testing in Power Limited Scenarios
a. Power limited to 175W to emulate a medium intensity workload
b. Power limited to 125W to emulate a low intensity workload
The thermal results included are for a 10-minute testing runs. To be sure that was sufficiently long to tax the cooler, we tested both Thermalright’s Assassin X 120 R SE and DeepCool’s LT720 with a 30-minute Cinebench test with Intel’s i9-13900K for both 10 minutes and 30 minutes. The results didn’t change much at all with the longer test: The average clock speeds maintained dropped by 29 MHz on DeepCool’s LT720 and 31 MHz on Thermalright’s Assassin X 120 R SE. That’s an incredibly small 0.6% difference in clock speeds maintained, a margin of error difference that tells us that the 10-minute tests are indeed long enough to properly test the coolers.
Testing Configuration – Intel LGA1700 Platform
| CPU | Intel Core i7-13700K |
| Motherboard | MSI Z690 A Pro DDR4 |
| Case | Be Quiet! Silent Base 802, system fans set to speed 1 setting. |
| Monitor | LG 45GR95QE |
| PSU | Cooler Master XG Plus 850 Platinum PSU |
| SSD | 2TB TeamGroup Z540 PCIe 5 SSD |