Pimp My Console
Case Modding
Here's where we separate the men from the boys. Joe across the street may be able to order a custom skin, but is he willing to give his system a whole new case? You're looking at about 5-10 minutes of install time to unscrew and take apart the case for the mods listed below, but then you'll have a thing of beauty not found at Best Buy.
Note: Not a single console manufacturer endorses this, and it voids the warranty. You must decide if the look is worth the possible damage to your console. The Xbox is simpler to do, because its power cables are easier to reach. There are detailed instructions below and at the manufacturer's website for informational purposes only.
PS2 Case Mods
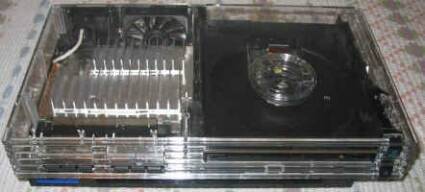
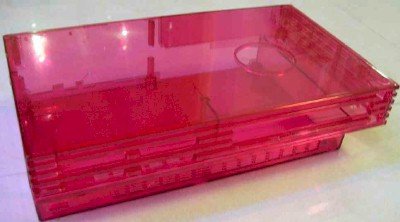
For the non-top-loading PS2, there are a few options from OriginalCase
Clear Model PS2
In Red Sox Red
Tools Needed:
- 1 - #2 Philips Head Screwdriver (check the fit on the case screws)
- 1 - 2.0 mm #0 Philips Head Screwdriver
- 1 - 1.4 mm #0 Philips Head Screwdriver
*Note: The PS2 Model you have determines the number of screws you need to remove.
Get Tom's Hardware's best news and in-depth reviews, straight to your inbox.
How to Remove: For the Top portion, flip the console over so the PS2 logo is facing down. You should see a pattern of 10, 8 or 6 plugs that cover the screws to open up the console. Using a small flat tip screwdriver, pull these all off and store them safely - that means away from your dog - as you'll need them later. Next you'll see a bunch of Philips head screws; don't take all of these off at once. Use the #2 Philips to unscrew the lower area (where the control ports, DVD drive and power board are located). After those small screws are out, you'll need to remove two long screws from the upper right area. This allows the cover to be taken off. Store the screws and flip it over, holding the top onto the system securely.
The diagram (courtesy of http://www.ps2fliptop.net) shows this process.
Now for the bottom. Remove the screws for the controller ports, then lift out the ports. Remove the other two for the AC power and fan cover. Lift out the AC plug and lift the fan out of the cover; now you can take it off. Slide the AC unit to the back cover. Next, slide the fan inside the fan cover and assemble the whole unit to the back of the bottom cover. Make sure to re-fasten the screws you took off. Re-install the controller port, and put two screws back on.
The PCB switch will slide into place in a firm manner. After that, place the cover back on and use the screws to secure it.
Congrats, one pimped out PS2.

