Wall-Sized 3D Displays: The Ultimate Gaming Room
Installation
Installation, fortunately, is the easy part. We're assuming that your hardware (like the videocard) is all pre-installed in your PC, and the projector is hooked up to the PC with a VGA cable. Remember, a DVI cable won't work.
Step 1: Install The Stereoscopic Drivers
First, we install the stereoscopic drivers. This might be the eDimensional driver, but in our test bed it will be the Nvidia beta 93.71 stereoscopic drivers.
The Nvidia 93.71 stereoscopic drivers will only work in conjunction with the Nvidia 93.71 Forceware drivers. First you have to uninstall any Nvidia drivers you have on your machine; then install the regular Nvidia 93.71 Forceware drivers.
With the regular 93.71 Forceware driver installed, reboot. Now you can install the beta 93.71 stereoscopic driver on top of the regular driver. Once installed, you will have new stereoscopic options in the control panel.
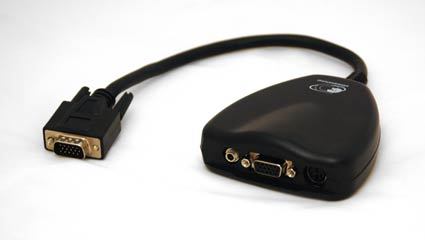
Step 2: Install The EDimensional Dongle Between The Videocard's VGA Output And The Projector's VGA Input
The eDimensional dongle must attach directly to the videocard's VGA output. The monitor's VGA cable then connects to the eDimensional dongle. Pretty simple stuff.
Get Tom's Hardware's best news and in-depth reviews, straight to your inbox.
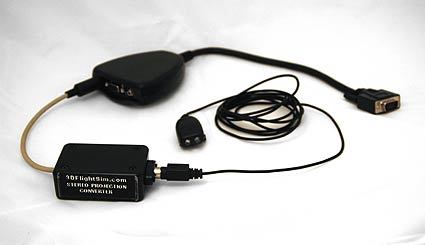
Step 3: (for The Nvidia Stereoscopic Driver Only) Install The 3D Stereo Inverter Between The EDimensional Dongle And EDimensional Transmitter / Glasses
If you're using the Nvidia stereoscopic driver like we did, you will need to attach a 3D stereo inverter to the eDimensional dongle. Wired glasses will plug directly into the inverter, but if you're using wireless glasses the transmitter must be plugged into the inverter.
Step 4: Ensure The Stereoscopic Glasses Are Set Up To Receive The Signal From The EDimensional Dongle
If you are using wireless glasses, you must ensure that the wireless transmitter is placed somewhere that the glasses can easily receive the signal. Remember that using the Nvidia stereoscopic drivers requires both wireless glasses and the 3D stereo inverter.
Current page: Installation
Prev Page 3D Stereo Inverter (for The Nvidia Stereoscopic Driver) Next Page Step 5: Configure The Stereoscopic Driver For Use And Test OperationDon Woligroski was a former senior hardware editor for Tom's Hardware. He has covered a wide range of PC hardware topics, including CPUs, GPUs, system building, and emerging technologies.
-
myrsati I bought the Acer P1303W its awsome for the price. You do have to go through a computer to get the 3D to work. I have a AMD FX 6 core proccesor and ATI 6770HD card that supports 3D. I then bought a Blu Ray 3d Internal Burner from LG for 77 bucks which is really nice. I got the Expand x102 Active glasses they are price well and look great. I thought i was screwed when the 3d didnt work when i put a blu ray 3d movie in and played it thru my Projector. My resolution was correct and at 120hz. I found out after messing around for about an hour that the software that came with my Blue Ray 3d player didnt work with my projector which is POWER DVD 9. I found a program called TotalMedia Theatre 5! As soon as i installed it and played the blu ray 3d movie and turned the glasses on everything worked!!! I had to adjust a few settings but nothing major. Dont forget not all projectors have to go thru a computer to work but you will prob pay more for them.Reply

