Blu-ray 3D On The PC: The Tom's Hardware Review
Tom's Hardware has an exclusive first-look at Blu-ray 3D technology running on a notebook and HTPC leveraging Nvidia's 3D Vision technology, CyberLink's PowerDVD 10 Ultra Mark II software, and an Acer display. Might this setup be in your future, too?
Get Tom's Hardware's best news and in-depth reviews, straight to your inbox.
You are now subscribed
Your newsletter sign-up was successful
The 3D Blu-ray User Experience: Installation And Use
The systems sent to us for testing were pre-configured and good-to-go on arrival, but we are also trying our hand at making things work on our own test system. We chronicle that here.
The first step, of course, is to install the graphics driver. In this case, it is a pre-release 257.01 driver that includes 3D Vision support. The install ran without a hitch, and after a reboot, we made sure that the monitor is set to its native 1920x1080 resolution with a 120 Hz refresh rate.
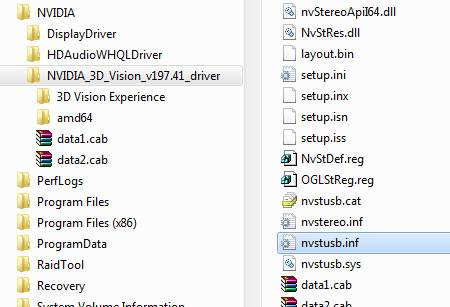
After this, we ran the 3D Vision wizard to make sure the 3D hardware was playing nice, but we had a slight problem with the 3D Vision IR emitter in that it refused to be detected, and the system would not assign a driver to it. However, we manually worked around this issue by downloading a separate 3D Vision driver from Nvidia’s Web site: Nvidia_3D_Vision_v197.41_driver.exe. We extracted the archive's files into a folder so we could apply the specific emitter USB driver to the device. The file we were looking for was nvstusb.inf. It can be manually assigned as the 3D Vision IR emitter's driver through the Windows device manager.
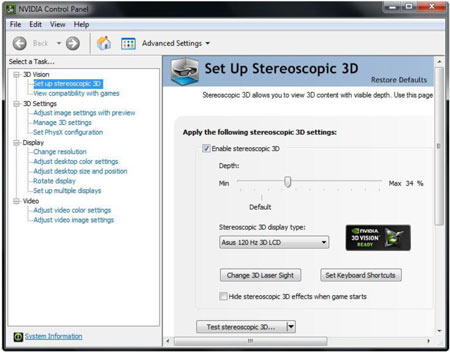
With the emitter working, we were able to test 3D Vision through Nvidia's driver panel, and sure enough, everything worked. After that, we were left to install CyberLink's software; that process went off without a hitch.
Before we rock a Blu-ray 3D disc, we need to set the appropriate options in PowerDVD's 3D settings. We made sure that 3D playback was enabled, and that the display type was set to the appropriate 120 Hz page-flipped option.
It was smooth sailing after that. We did notice an occasional bug where PowerDVD sometimes hiccups when a disc is started by flashing a blank black screen. But the tests went smoothly. For the most part, the Blu-ray 3D infrastructure appears to be on the verge of readiness for the early adopters.
Get Tom's Hardware's best news and in-depth reviews, straight to your inbox.
Current page: The 3D Blu-ray User Experience: Installation And Use
Prev Page Requirements For A Full-Resolution Blu-ray 3D PC Next Page Test Systems And BenchmarksDon Woligroski was a former senior hardware editor for Tom's Hardware. He has covered a wide range of PC hardware topics, including CPUs, GPUs, system building, and emerging technologies.
-
Annisman The big issue I have with Blu-Ray on the PC is this: There is no free, or reasonably priced software to play Blu-Ray disks. I was pretty much forced to purchase Power DVD 10 Ultra for 110$, as there is no other application that I have found to watch Blu-Ray with. Of course you can 'screw the man' and go pirate Power DVD, but that's probably the main reason I have to shell out over a hundred bucks for the software in the first place. We need an integrated software solution for BD as it is becoming more mainstream. What happened to Blu-Ray playback being included with WMP for Windows 7 ? VLC doesn't even have a solution, what is the reason we don't have 3rd party BD software yet ? Until that is addressed, I can't see Blu-Ray on the PC being viable.Reply -
joytech22 I gotta say i own Nvidia's 3D vision kit + a BD drive + a GTX470 and i just cant wait until the 3D Blu-Ray's are released but first i need to replace my Samsung 2233RZ since the top 15-20% is no longer in 3D.Reply
So far i have had a Very positive experience with Nvidia's solution! -
ajy0903 And also we need to have bigger 3D monitor for PC then what they have currently!!!!!!!!!Reply -
jrazor247 seems most 3d movies are cg currently. probably the entire tool chain to edit and post process digital film has to be upgraded. adding stereoscopic cameras to production is probably the easiest. in a computer generated movie, all the processing can be converted to 3d almost natively in the rendering software. I went to a see the 3d vision setup at a blockbuster near my house. it showed games and animated movies in 3d. the real wow effect came watching footage of people skydiving in 3d. once 3d video production ramps up, its here to stay. i would be addicted to watching sports and performances in 3d. the next road block would be distribution, as the cable and sat providers would have to double bandwidth - artifacts from over compression would def ruin 3d.Reply -
johnb4467 If the hardware settles 7 stabilizes, this is something I would be interested in, whether it's for the PC or the upcoming PS3 firmware update.Reply
I do agree, however, that there needs to be more built-in support for software. I'm sure that will find its way into apps such as XBMC and Plex eventually.
This is going to be hardest for consumers to adopt who have sunk a lot of money into existing HDTV's...especially ones who 'claimed' 120hz refresh rates -- but won't work with 3D. My own TV is a low-end Westinghouse 1080p, so down the road I wouldn't mind upgrading...if the material and quality is there!
FYI: I had older shutter glasses on my old PC & CRT display -- with a fast enough refresh rate...no headaches; it's really not an issue (current demos have confirmed this). -
toxxel I wear glasses already, wearing another pair of glasses over my own is an annoyance. I've never really been a fan of 3D since my eyesight mostly keeps me from seeing anything 3D. I can see nearly perfect out of one eye but the other is another story. My first experience of a 3D polarized movie was Avatar. What I saw didn't impress, blurriness, strange effects from pronounced objects on the screen, felt distracted and ruined many scenes. I understand it's my eyesight that caused problems but I feel 3D won't become main stream simply because of the glasses, but if it were to I'd feel completely alienated seeing I don't have the same experience.Reply -
gti88 Unfortunately, I don't expect the 3d to come to Formula 1 soon. At least, until Ecclestone is no longer in charge.Reply -
jsm6746 this is mostly a rehash of the article you posted by cyberlink's tom vaughan yesterday... i must say i found his article much more informative... the benchmarks were all that was needed in this... the opinion piece was unnecessary... O_oReply
http://www.tomshardware.com/reviews/blu-ray-3d-3d-video-3d-tv,2632.html -
cleeve jsm6746this is mostly a rehash of the article you posted by cyberlink's tom vaughan yesterday...Reply
I disagree with you there. Tom's article is a great Blu-ray 3D white paper, but it's not a Blu-ray 3D review. We did have to duplicate some of the information briefly so this article could stand on its own, but the focus of either article is quite different.
-
cknobman 3d at home can suck it.Reply
New tv's, special glasses, limited viewing angles, new media, new monitors, special software to play them, new blue ray players, etc.., etc...
Not to mention the general discomfort associated with having to watch things in 3d, the fact that 3d is NOT suitable for all situations, many people in the general public have an impairment that wont allow them to enjoy 3d, etc.., etc...
Let this fad fade away and quickly!!! Im not reinvesting thousands and thousands of dollars into this new marketing gimmick. Its another way for the entertainment industry to make even more money off us. Now the push it to make all movies 3d and charge a mandatory 15-20 bucks per ticket to see it.
Its just sad there is such a large portion of the population that mindlessly follows anything presented to them and like zombies will pay what they are told without regard to the cost/benefit ratio.

