NEC PA272W 27-Inch Monitor Review: Accuracy And Flexibility
We’ve reviewed a lot of professional-class monitors, NEC's PA272W may be the most accurate and capable one ever to hit the Tom's Hardware lab. At almost $1300, it’s expensive for a 27-inch QHD screen. But there are features here you won’t find elsewhere.
OSD Setup And Calibration Of The NEC PA272W
There are two distinct menu systems on the PA272W. The main one is similar to what we’ve seen on other NEC monitors, but it looks a little more modern. It accesses most functions and is arranged like most OSDs with multiple submenus for image controls, PIP, and ergonomic functions.
The real fun begins in the Advanced menu, which is accessed from the third submenu denoted by a little “RGB” icon. We’re going to focus on that because it has all the same tools from the main OSD plus quite a few more.
OSD Tour
Press Menu on the bezel to bring up the OSD. Click Right twice and Up once, then Select to enter the Advanced menu.
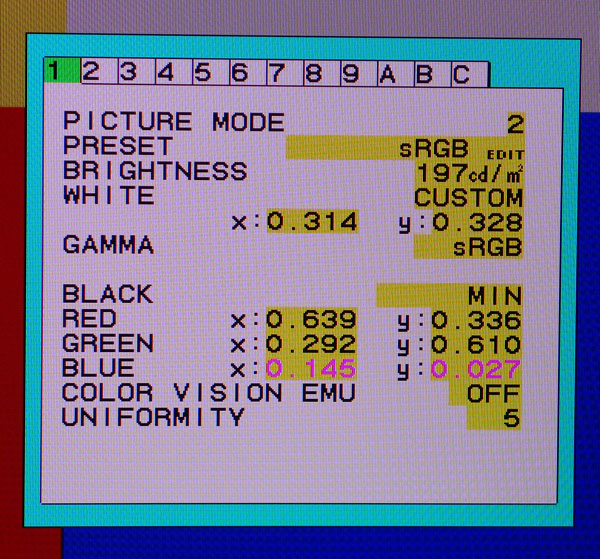
It looks a lot like a service menu to us. But with simple and logical labels, it’s just as easy to use as a graphical OSD. The picture modes number five: Adobe RGB, sRGB, DCI, High Bright, and Full. They are all fully adjustable; no parameters are locked out in any mode. The second field shows the preset’s name and a little edit icon pops up when you make changes. Clicking the up/down rocker switch changes fields and left/right adjusts the value.
Brightness is set by 1 cd/m2 increments, and the stepping proved accurate in our testing. If you set the display to 200 cd/m2, it comes within about two cd/m2 of that.
The White field is another way to adjust color temp, though it’s easier to use the RGB sliders in the main menu.
Gamma presets are extensive. In addition to the indicated sRGB, there is L Star, DICOM, Programmable, and Custom. When you choose Custom, the value can be from .5 to 4.0 in .1 steps.
Get Tom's Hardware's best news and in-depth reviews, straight to your inbox.
Black refers to black level and the PA272 is one of the rare few computer monitors that lets you change it. Minimum works fine for PC-format signals, but if you hook up a video source component like a Blu-ray player, you may need to adjust the black threshold.
The Red, Green, and Blue fields are the color management system (CMS). You can alter the primaries using x and y values rather than the traditional hue, saturation, and luminance controls. This works very well, allowing us to achieve superb color accuracy in our tests.
Color Vision EMU is a fascinating feature. The PA272W can actually simulate the images seen by users with specific types of color blindness. The options are Protanopia, Deutanopia, Tritanopia, and Grayscale. You’d be hard pressed to find that anywhere else!
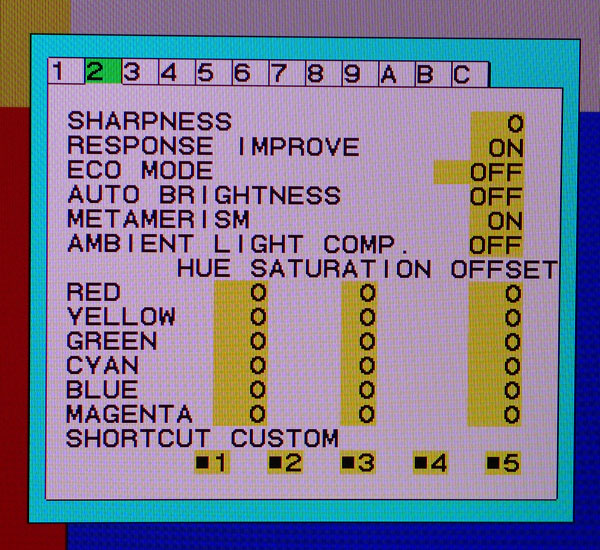
Screen 2 has the remainder of the image controls. Sharpness is best left at zero to avoid edge enhancement.
Response Improve can reduce the ghosting sometimes seen behind moving objects on the screen. It can also create a slight color fringing artifact in vertically-scrolling text.
Eco Mode caps backlight intensity. Mode 1 limits you to 200 cd/m2 and Mode 2 has a 100 cd/m2 peak.
Metamerism is something we had to look up. It refers to the difference in the perception of white by measuring instruments versus the human eye. It’s meant to correct discrepancies between the PA272W and standard (sRGB) gamut monitors when they’re used side by side. In practice, calibrating all of your screens to D65 achieves the same result with greater precision.
Ambient Light Comp will change the backlight level depending on the light in your room using the sensor on the bezel.
The CMS fields that come next repeat the functions of the main OSD. They are best left alone in favor of the x and y coordinate system on the previous menu screen.
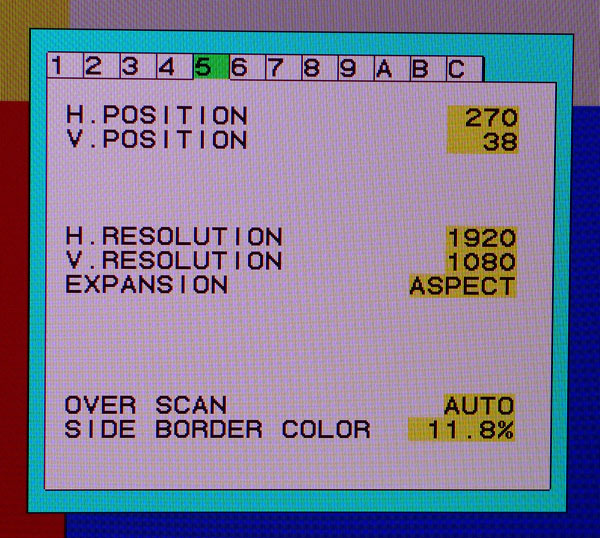
If you choose an aspect ratio other than full-screen 16:9, this menu can position and size the image to your liking. You can also change the brightness level of the side borders.
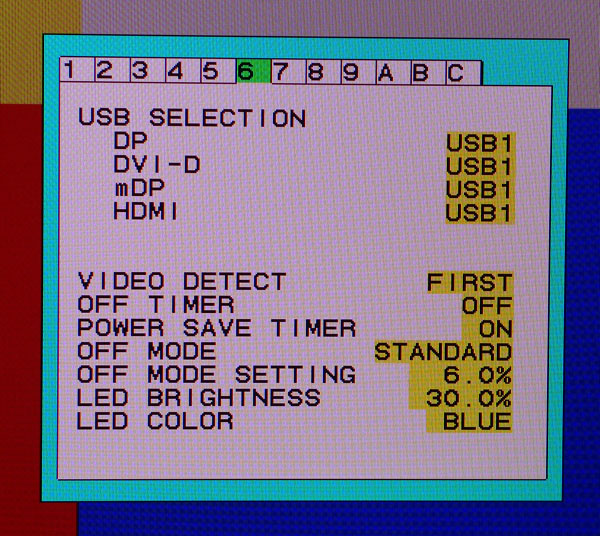
The PA272W has two upstream USB ports that can be assigned to their own video inputs in this menu.
Video Detect changes the order in which inputs are polled when searching for an active source.
Off Timer shuts down the monitor, regardless of signal status, after a user-specified time. Power Save Timer powers off after a two-hour no-signal condition. If you want finer control of this parameter, Off Mode and Off Mode Setting give you a few more options, including dimming of the image rather than a complete power down.
The last two fields control the bezel’s power LED. I’m personally not a fan of the bright blue LEDs that come on most electronics today. Green is much easier on the eyes, and this monitor lets me reduce the intensity too.
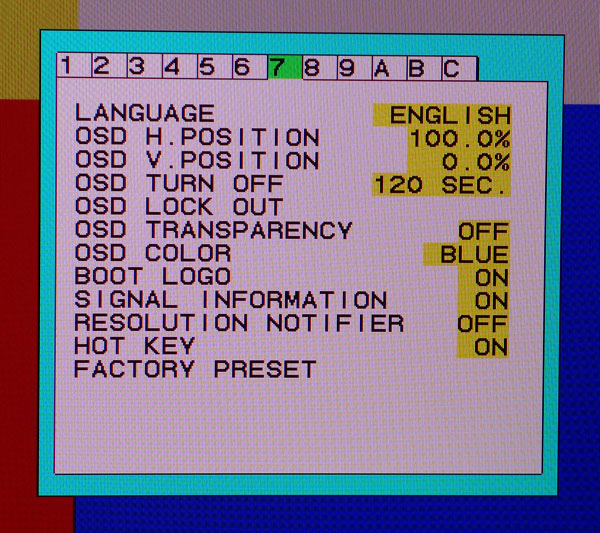
These are fairly standard OSD controls. We moved it down to the lower-right corner to make way for our test patterns. You can view the menus in one of nine languages. The Lock Out function is pretty cool; it lets you specify which controls are blanked so users can still change things like brightness or picture mode. Or you can eliminate the OSD entirely.
The final field, Factory Preset, returns all OSD settings to their factory defaults.
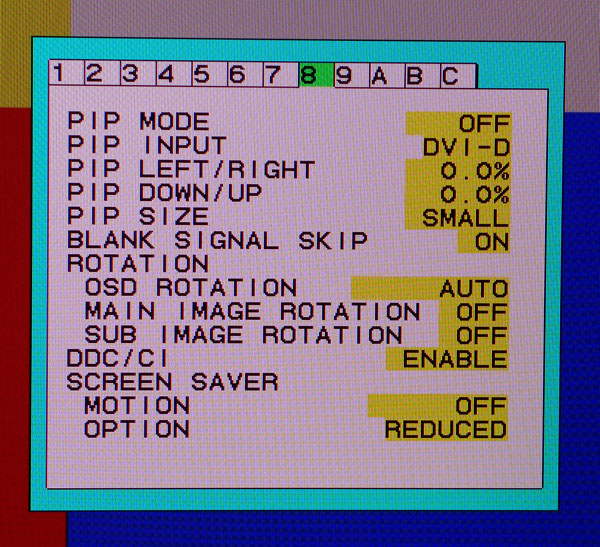
The PA272W can display images from two inputs simultaneously using either picture-in-picture or picture-by-picture. This menu allows full control over each window's size and placement. You can even use the feature in portrait mode, which is something we haven’t seen before.
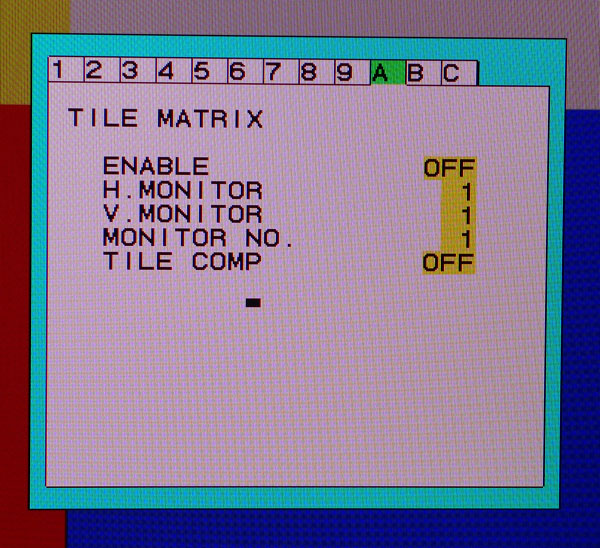
We saw a menu like this on NEC's V801 presentation monitor. It allows the PA272W to be part of a video wall of up to 25 screens. You’ll need to use a distribution amplifier, and only a single image can be displayed.
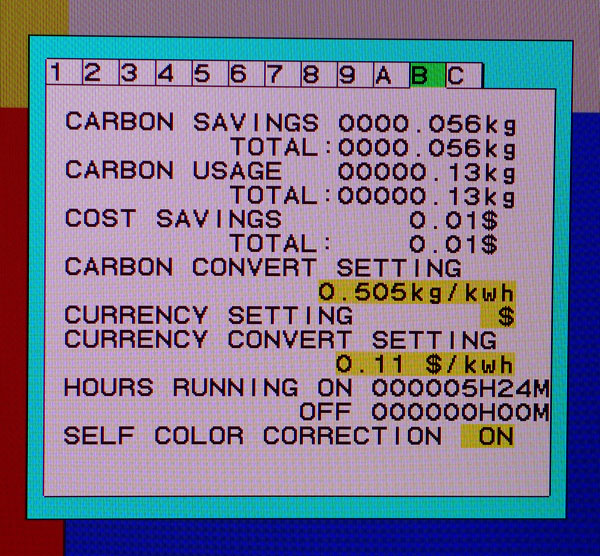
The PA272W wouldn’t be an NEC monitor without the company's famous carbon footprint menu, which allows you to track energy use. While individual users may see this as a novelty, large enterprises can undoubtedly benefit from that data.
The last option, Self Color Correction is designed to compensate for the “natural color shift that occurs with age.” That’s a quote from the user manual. We believe it’s better to leave such adjustment to the user and a proper set of calibration instruments.
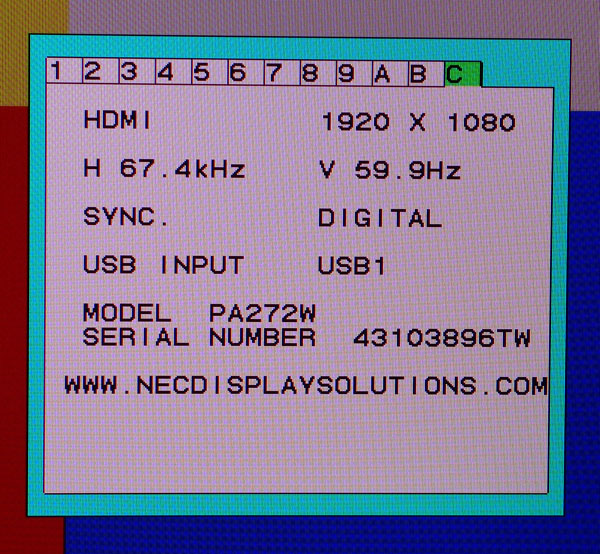
The last screen contains the signal information and tells you which USB input is currently active. Even though firmware updates on monitors are not common, it would be nice if the version information were shown here.
NEC PA272W Calibration
The PA272W is extraordinarily easy to calibrate because every picture mode is fully adjustable. No parameters are locked out even in the High Bright or Full presets. We set up the Adobe RGB, sRGB, and DCI modes for our tests.
Out of the box, grayscale and gamma are pretty much spot-on in all three modes. But the color gamut required adjustment for blue and magenta. There are effectively two color management systems here. One is the traditional hue, saturation, and lightness (NEC calls it offset) setup, and the other lets you dial in the primaries via x and y coordinates. The HSL controls don’t work properly, mainly because saturation starts at the bottom of its range. Using the x and y options, however, rewarded us with just about perfect color. To tweak the grayscale, we used the RGB sliders in the main OSD.
Finally, there is no contrast control, which we didn’t miss at all. We never had a problem with white clipping or accuracy at the highest output levels. Brightness controls the backlight as you’d expect. There is an additional black level control, though. Leave it set to minimum for PC signals.
| NEC PA272W Calibration Settings: Adobe RGB | |
|---|---|
| Brightness | 198 |
| RGB | Red 122, Green 118, Blue 119 |
| xy Coordinates | Red .642 .335, Green .187 .732, Blue .152 .030 |
| NEC PA272W Calibration Settings: sRGB | |
| Brightness | 198 |
| RGB | Red 121, Green 119, Blue 120 |
| xy Coordinates | Red .639 .336, Green .292 .610, Blue .145 .027 |
| NEC PA272W Calibration Settings: DCI | |
| Brightness | 202 |
| RGB | Red 113, Green 127, Blue 102 |
| xy Coordinates | Red .685 .325, Green .265 .690, Blue .152 .032 |
Current page: OSD Setup And Calibration Of The NEC PA272W
Prev Page Packaging, Physical Layout, And Accessories Next Page Calibration With SpectraView
Christian Eberle is a Contributing Editor for Tom's Hardware US. He's a veteran reviewer of A/V equipment, specializing in monitors. Christian began his obsession with tech when he built his first PC in 1991, a 286 running DOS 3.0 at a blazing 12MHz. In 2006, he undertook training from the Imaging Science Foundation in video calibration and testing and thus started a passion for precise imaging that persists to this day. He is also a professional musician with a degree from the New England Conservatory as a classical bassoonist which he used to good effect as a performer with the West Point Army Band from 1987 to 2013. He enjoys watching movies and listening to high-end audio in his custom-built home theater and can be seen riding trails near his home on a race-ready ICE VTX recumbent trike. Christian enjoys the endless summer in Florida where he lives with his wife and Chihuahua and plays with orchestras around the state.
-
SuckRaven Every time Tom's Hardware reviews monitors, I keep posting in the comments that they should review NEC and EIZO for accuracy in comparison to the usual suspects. Finally my prayers have been answered. (Not that there are not other places that have not already done a good job of including reviews of high-end monitors with color accuracy, and uniformity as the main focus), but Tom's has always been a preferred resource. Anyways, you guys should do a shootout with the top flagships from HP, Dell, NEC and and EIZO, perhaps the CG277). Nice review.Reply -
Pikker I've recently purchased this monitor with calibration tools and hood for a discounted price, needless to say it looks incredible, putting to shame an older 27" IPS display that I had.Reply
Regarding the NEC 272 vs. Eizo 277, I think they are more same than different... the Eizo has an integrated calibrator, 16-bit LUT, bigger color space, and a bunch of other tweaks that should objectively make it a better display, but not ~$1000 better IMO. If you have that kinda money to burn, get two PA272W's instead. -
ubercake Good review.Reply
I think everyone should notice the low-cost IPS monitors offer sub-par contrast. Who cares about color accuracy if you can't see the in-betweens? Aren't the shades/hues just as important? This is something people don't realize when they pick up that $400 IPS display. Heck, contrast is better on the BenQ TN display than on the less expensive IPS displays in the review. Color without good contrast is a waste. Contrast is what you compromise at the lower end of the IPS monitor scale.
You have to spend money to get a quality IPS monitor. It's good to see that you can get this kind of performance at a lower price point now.
This NEC monitor is definitely impressive. It has great color accuracy AND contrast. Great for photography and graphic arts/design applications. This is a pro monitor and why you spend money on an IPS monitor. -
ceberle Reply13488868 said:Every time Tom's Hardware reviews monitors, I keep posting in the comments that they should review NEC and EIZO for accuracy in comparison to the usual suspects. Finally my prayers have been answered. (Not that there are not other places that have not already done a good job of including reviews of high-end monitors with color accuracy, and uniformity as the main focus), but Tom's has always been a preferred resource. Anyways, you guys should do a shootout with the top flagships from HP, Dell, NEC and and EIZO, perhaps the CG277). Nice review.
Look for a review of the HP Z27x in a few weeks. It's in our lab now.
-Christian- -
PapaCrazy Bought one of these and ended up with a display that had several dead pixels and a couple hot pixels. Exchanged it, got a display with even more deal pixels, I stopped counting in the teens. For $1400, seems offensive. Dell was offering a zero dead pixel guarantee for half the price with the u2711. Calibrated, it seems to do quite well in color accuracy, I never get complaints after file deliveries, but the Dell is made like a piece of shit. Has a major heating problem which effects the top (where the heat collects) of the display's color output after intensive usage. I'm sick of this over-inflated display market. They are either under-engineered or overpriced.Reply -
Pikker ReplyBought one of these and ended up with a display that had several dead pixels and a couple hot pixels. Exchanged it, got a display with even more deal pixels, I stopped counting in the teens. For $1400, seems offensive.
That's some bad luck... I got mine from B&H and the display was perfect out of the box. Otherwise, the thing is built like a tank with an all-metal frame under the plastic outer shell, and it doesn't flex no matter what, if anything, I'd say it's over-engineered. -
PapaCrazy Reply13514585 said:Bought one of these and ended up with a display that had several dead pixels and a couple hot pixels. Exchanged it, got a display with even more deal pixels, I stopped counting in the teens. For $1400, seems offensive.
That's some bad luck... I got mine from B&H and the display was perfect out of the box. Otherwise, the thing is built like a tank with an all-metal frame under the plastic outer shell, and it doesn't flex no matter what, if anything, I'd say it's over-engineered.
Got mine from B&H too. NEC released an upgraded model w/ improved colorimeter shortly after my purchase. It could very well have been an accumulation of old stock, the backwash of sorts, that I drank from. When studying up, I found the only way to get a guarantee of zero dead pixels on NEC displays, you need to pony up for the ultra-expensive medical grade displays. It is well made though, I thought the portrait mode was a great feature and the stand was far more solid than the Dell's. Ran cooler as well. (thermally I mean)
