How To Overclock AMD Ryzen CPUs
BIOS Options
Overclocking Options
Overclocking through Windows is convenient, but we still prefer locking in new settings through the BIOS. This is doubly important, we think, when it comes to a brand new platform like AMD's Ryzen.
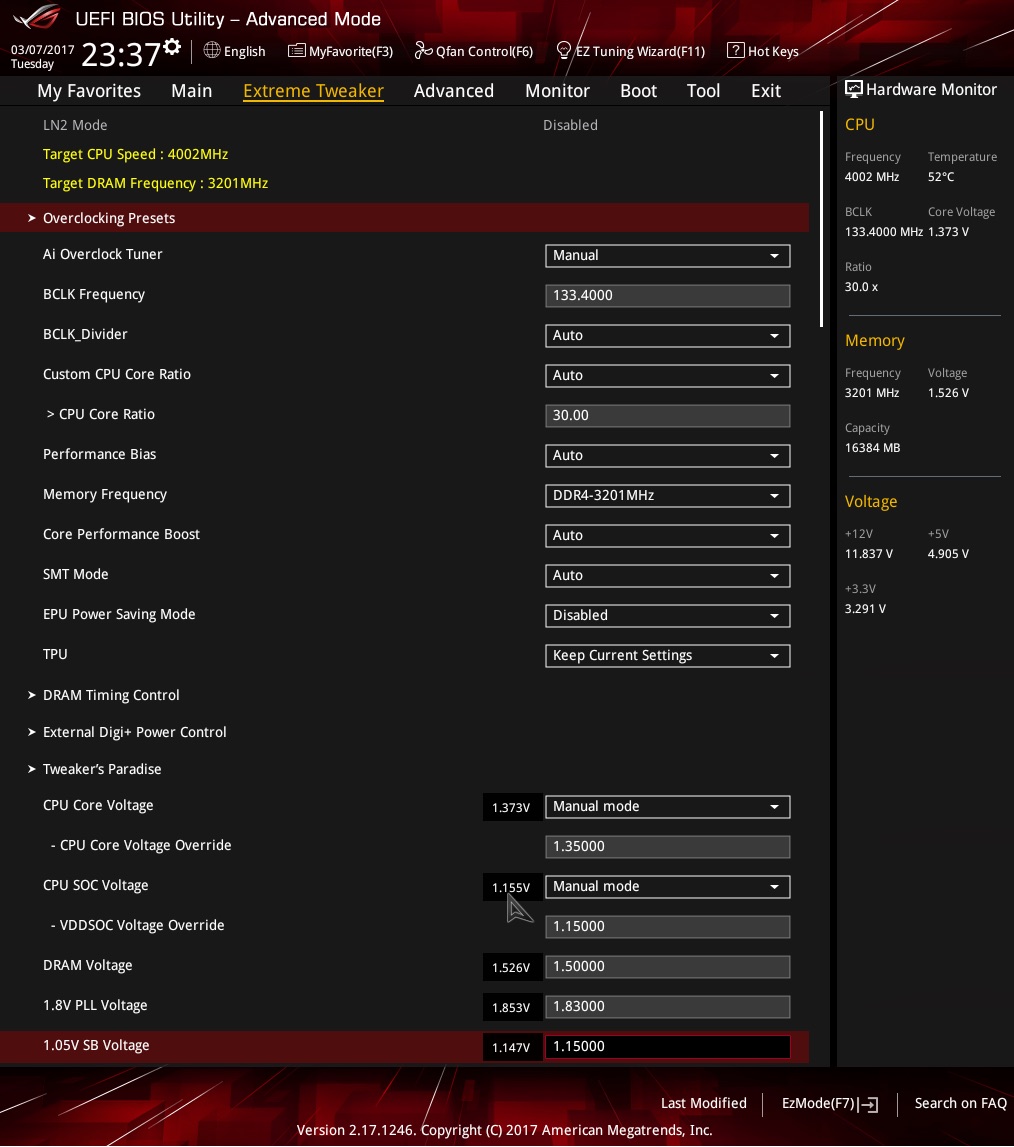
What follows are the most notable settings from our Asus board's BIOS:
- Ai Overclock Tuner: Set this to manual for access to reference clock adjustments, or set it to D.O.C.P. to pick a memory overclocking profile (related parameters are adjusted automatically).
- BCLK Frequency: We'll come back to this very important setting later in the article. It can be adjusted from 85 to 145 MHz, according to the settings. By default it should be near 100 MHz, but we have recommendations of our own.
- CPU Core Ratio: This is a multiplier used to determine the processor frequency. Raise it to overclock your CPU. Be careful, though. When the ratio is not set to Auto, AMD's XFR technology is deactivated. The processor switches automatically to overclocking mode and all power-saving features are deactivated. It is adjustable in increments of 0.25x.
- Memory Frequency: System memory frequency, from 1333 to 3200 MT/s. You can go even further using the BCLK Frequency field. This is a very important parameter for optimizing performance, and we'll go into more depth on it shortly.
- SMT Mode: Simultaneous Multi-Threading is similar to Intel's Hyper-Threading. Be careful; we had trouble with our motherboard when this option was set to Activated. Leave it on Auto; SMT will still be activated and you won't run into the bugs we did.
- CPU Core Voltage Override: This allows you to regulate your processor's core voltage. Asus advises against exceeding 1.4V. AMD recommends a 1.35V maximum voltage for long-term overclocks, and although the company says Ryzen can withstand 1.45V, longevity may be affected.
- DRAM Voltage: Raising the RAM voltage can help stabilize an overclock. A value of 1.35V is generally sufficient. For lofty overclocks coupled with aggressive timings, this can be raised up to 1.8V without additional cooling if you're using Samsung B-die chips.
- PLL Voltage: We recommend manually locking this to 1.8V. If you leave it set to Automatic, there's a risk that your motherboard will raise it, resulting in a temperature increase. It's a useful knob to have when overclocking under liquid nitrogen (notably for the RAM).
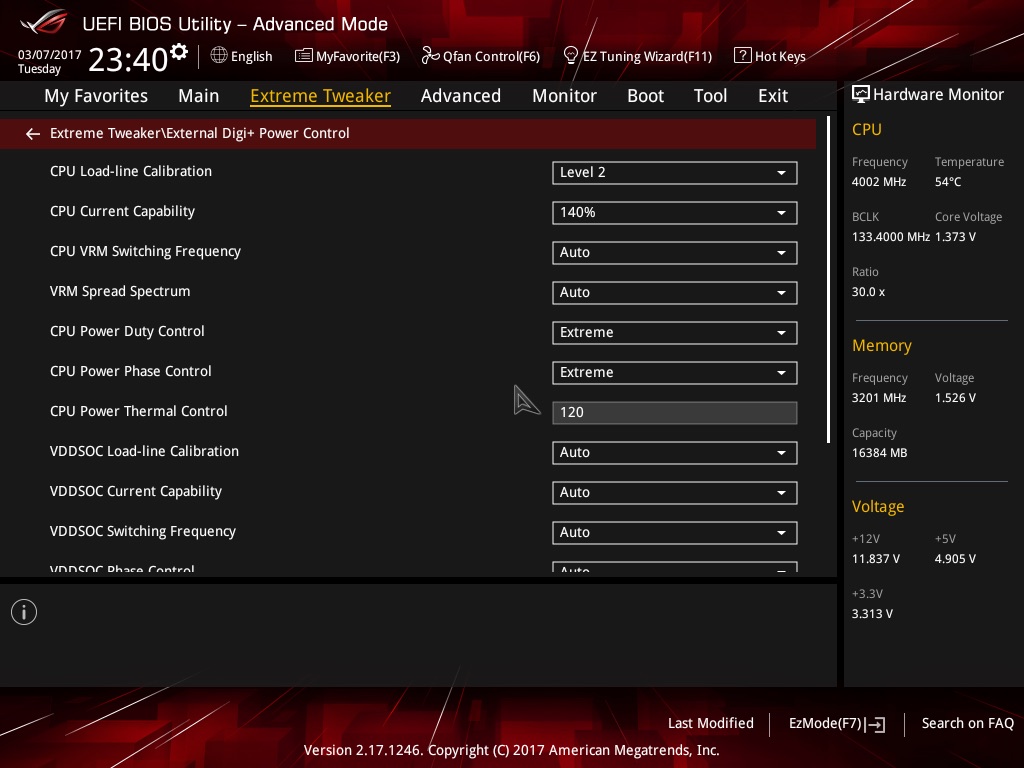
If you click on the External Digi+ Power Control sub-menu, you get these options:
- Load-line Calibration: According to our testing, Level 1 yields the best results.
- CPU Current Capability: To avoid overclocking limitations, we recommend raising this to 140%.
As a reminder, LLC helps stabilize the core voltage under taxing CPU loads. When the processor is at rest (idle), it consumes little energy; therefore, the 1.35V it needs is easily supplied. Once the workload intensifies, though, voltage drops a bit (to 1.3V, for example). Obviously this is not good for stability. Motherboards equipped with load-line calibration functionality can increase core voltage under load to offset this effect.
LLC Testing
We tried a number of the modes offered by Asus' Crosshair VI Hero, and recorded their results using our voltmeter.
With the CPU set to 1.35V, all of these profiles fed our sample close to 1.357V at idle. Under load, however, they can increase significantly.
| Setting | Idle | Load |
| LLC 1 (Auto) | 1.357V | 1.36V |
| LLC 2 | 1.357V | 1.37V |
| LLC 3 | 1.357V | 1.4V |
| LLC 4 | 1.357V | 1.42V |
| LLC 5 | 1.357V | 1.44V |
It looks like the LLC setting is a little aggressive, given the voltage overshoot at idle. At Level 1, the increase under load is reasonable and won't cause any problems. Our testing showed the Auto mode's results to be similar, but lock in Level 1 just to be sure.
Get Tom's Hardware's best news and in-depth reviews, straight to your inbox.
The last level is fairly crazy, pushing 1.44V instead of 1.35V.
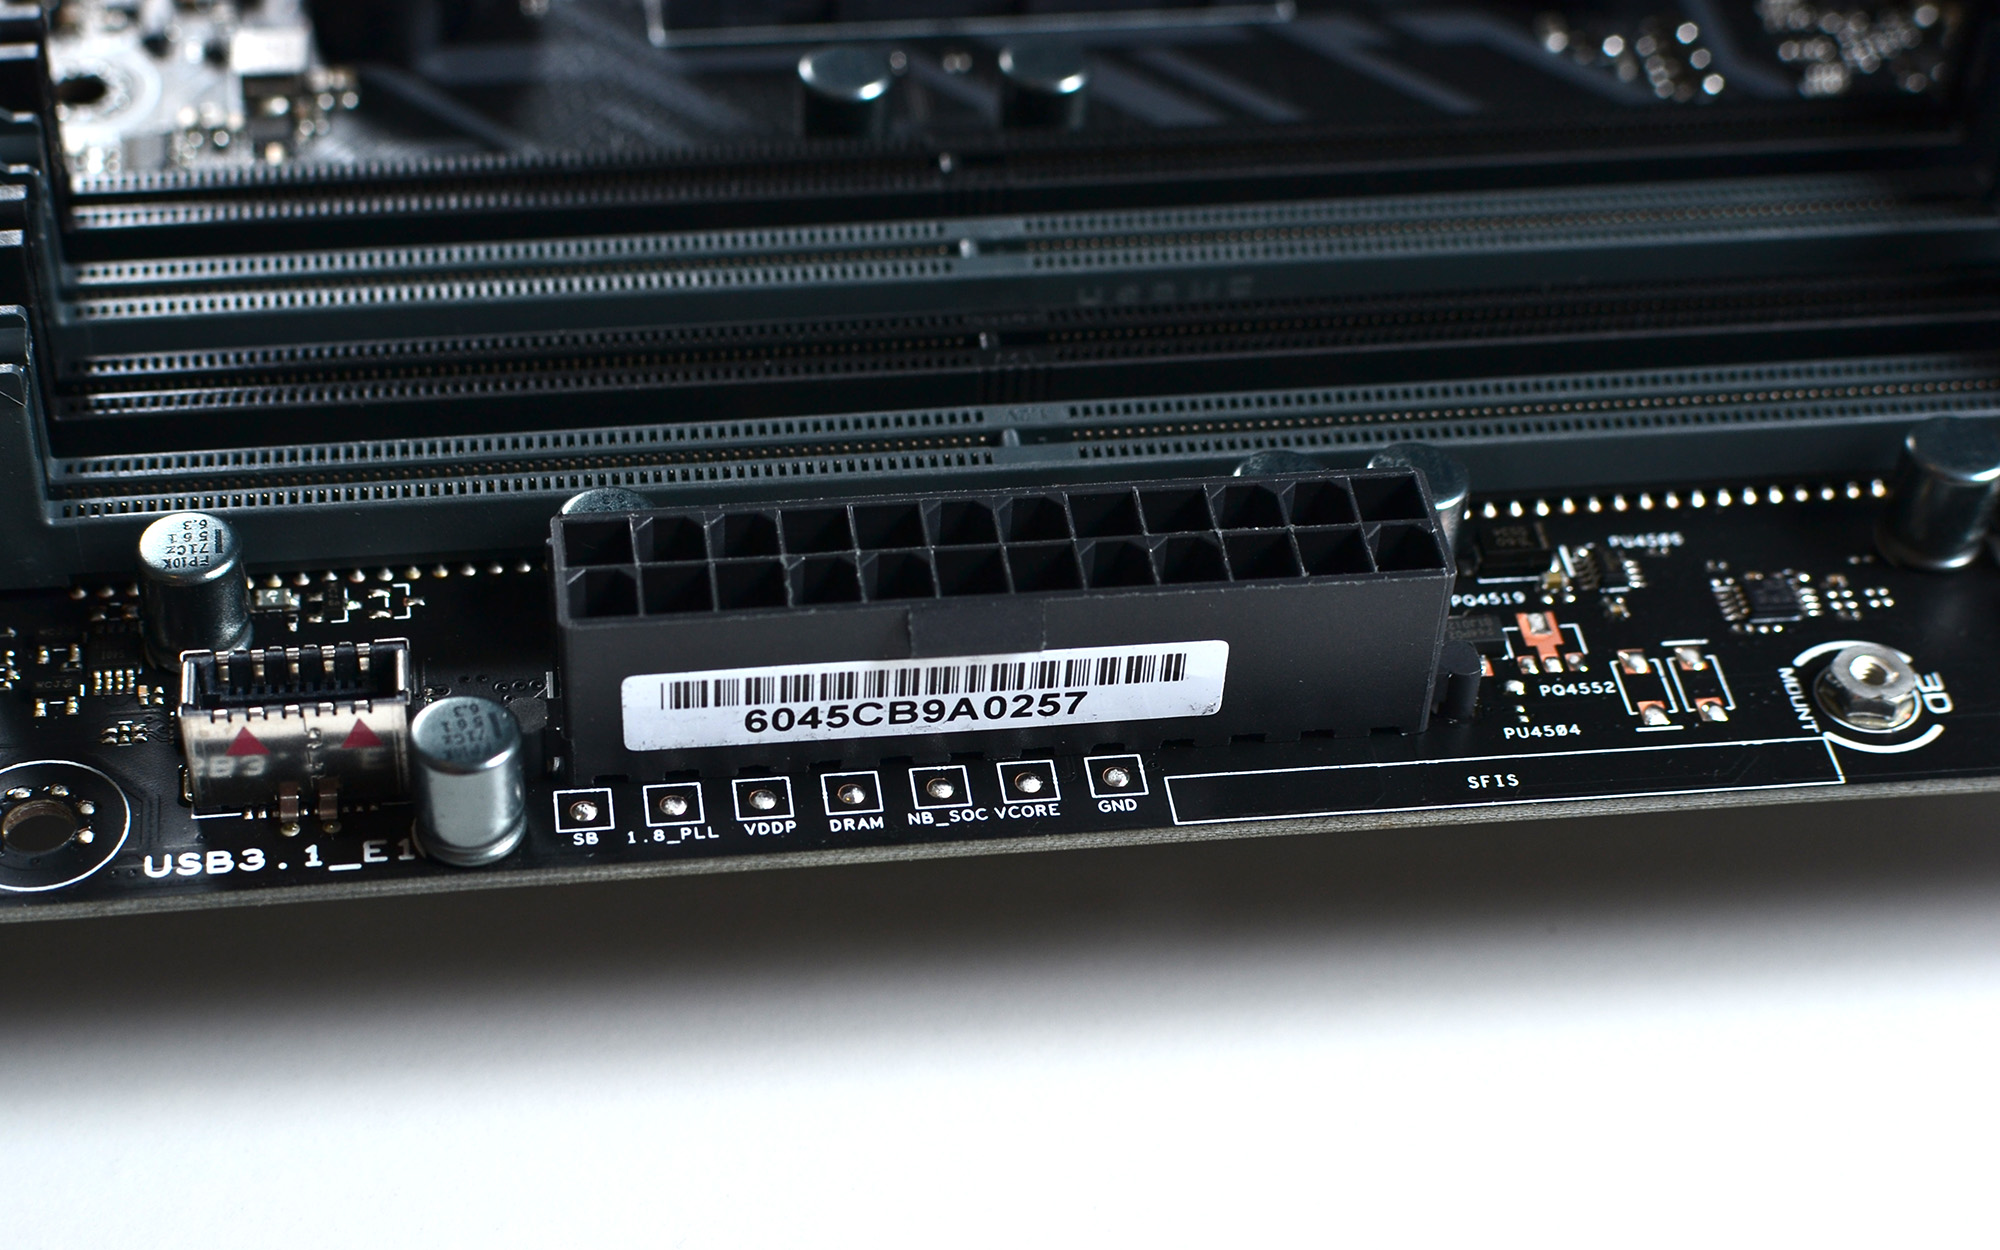
Be careful with CPU voltage. Setting 1.35V in the BIOS does not mean the processor receives this voltage, proven here with LLC 5, which adds nearly a tenth of a volt. For the remainder of today's story, the values we're reporting are verified with help from Asus' test points.
Maximum Voltages Recommend by Asus
| Header Cell - Column 0 | Ambient Recommended | Ambient Maximum | LN2 Recommended | LN2 Maximum |
|---|---|---|---|---|
| CPU Core Voltage | 1.40V | Up to 1.45V | 1.80V | Up to 1.95V |
| SOC Voltage | 1.15V | Up to 1.30V | 1.20V | Up to 1.40V |
| DRAM Voltage1 | 1.40V | Up to 1.90V | 1.80V | Up to 1.90V |
| 1.8V PLL Voltage | 1.80V | Up to 2.10V | 3.00V | Up to 3.20V |
| 1.05V SB Voltage | 1.05V | Up to 1.40V | 1.30V | Up to 1.40V |
| 1.8V Standby Voltage | 1.80V | Up to 2.10V | 2.10V | Up to 2.30V |
| 2.5V SB Voltage | 2.50V | Up to 2.80V | 2.70V | Up to 2.80V |
| 1 Depends on the DRAM sticks; the limit is considered from CPU IMC side. |
DRAM Timings
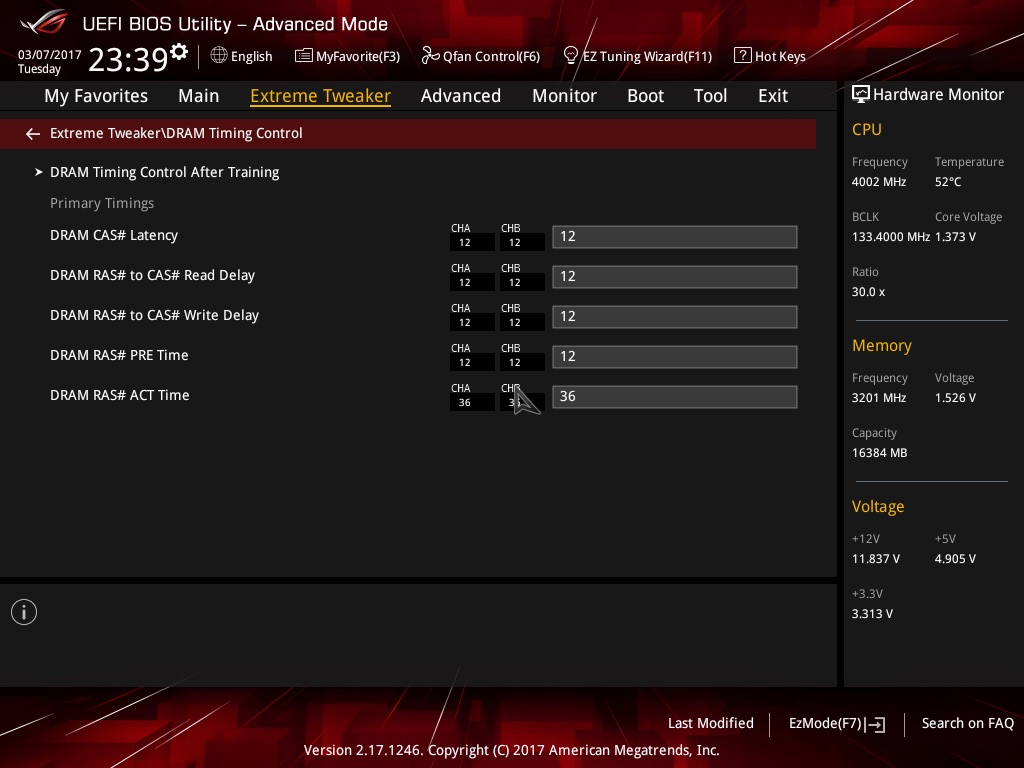
The DRAM Timing Control sub-menu grants access to memory timings. No, you aren't seeing things; there are currently only five options. The right memory settings are very important on this platform, so we'll dedicate an entire page to optimizing them properly.
Not all of the other parameters available in the DRAM Timing Control After Training menu are applied. At least, that's the case in firmware version 5803, which we used. Perhaps AMD will allow motherboard manufacturers to unlock these settings in future BIOS releases.
A BIOS Cheat?
To improve performance in Windows, AMD recommends using the High performance power plan. What impact does this have? In order to answer that question, we tried it out.
Also, we turned on the BIOS-based “Performance Bias” option and ran Geekbench 4. This option purportedly allows overclockers to score more points in competitions. Our Geekbench scores are the average of three consecutive runs.
Geekbench 4
| Configuration | Single-Core | Multi-Core | Mem. Copy | Mem. Latency | Mem. Bandwidth |
|---|---|---|---|---|---|
| Mode: NormalBias: Auto | 4705 | 23774 | 8183 | 5878 | 7276 |
| Mode: PerformanceBias: Auto | 4729 | 24240 | 8278 | 5885 | 7312 |
| Mode: PerformanceBias: Geekbench 4 | 4756 | 24739 | 8528 | 6004 | 7369 |
Setting the power plan to High performance does yield a speed-up (a small one in our case). But it's going to have more of an impact on a CPU that hasn't been overclocked, and can drop its frequency lower at idle.
The “Performance Bias” option found in the BIOS adds even more performance to Geekbench, even set to the default Auto mode. By changing it from Auto to Aida/Geekbench, we record gains in each of the five values tested. Certain motherboard reviewers may see this as cheating, but it'll be a blessing during overclocking competitions.
MORE: How to Overclock a CPU
Current page: BIOS Options
Prev Page Our Ryzen Overclocking Platform Next Page Overclocking BCLK Frequency & PCIe-
drinkingcola86 Page 4 third paragraph.Reply
"Also, we observed that this this offset of 20°C is a loose approximation,"
Needs correcting. One "this." -
jkhoward Dang-it guys. The 1080 doesn't freaking work well with the new AMD CPU. You know this. Why would you not choose an AMD card? Trying to make AMD look bad again?Reply
<edited for language> -
MeanMachine41 Reply19647716 said:Dang-it guys. The 1080 doesn't freaking work well with the new AMD CPU. You know this. Why would you not choose an AMD card? Trying to make AMD look bad again?
<edited for language>
I have evidence to the contrary and the GTX-1080 works well with new Ryzen 7 1800X.
-
Kenneth_72 AMD's is missing it's opportunities. They better start hitting the ground running if they want to compete AND WE NEED THEM TO COMPETE!Reply -
JamesSneed For anyone looking to OC Ryzen this video from an AMD engineer is pretty interesting.Reply
https://www.youtube.com/watch?v=vZgpHTaQ10k


