Display Calibration 101: Step-By-Step With Datacolor's Spyder4Elite
In every monitor review, we recommend that enthusiasts calibrate their screens. The benefits are many, but how can achieve this without spending thousands of dollars on exotic gear? Today, we’ll show you how, and for less than the price of your monitor!
Spyder4Elite How-To: Setting Up
The Calibration screen splits off into three sub-sections: Choose Settings, Ambient Light, and Place the Sensor.
Choose Settings
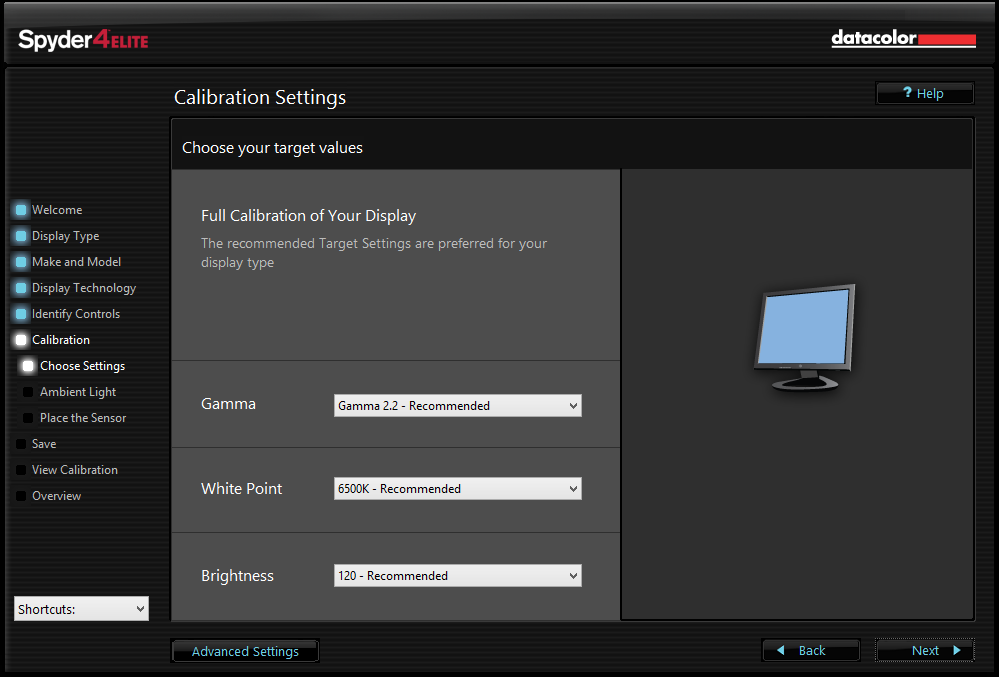
Assuming this is the first time you're running the Spyder4Elite software, you must perform a full calibration.
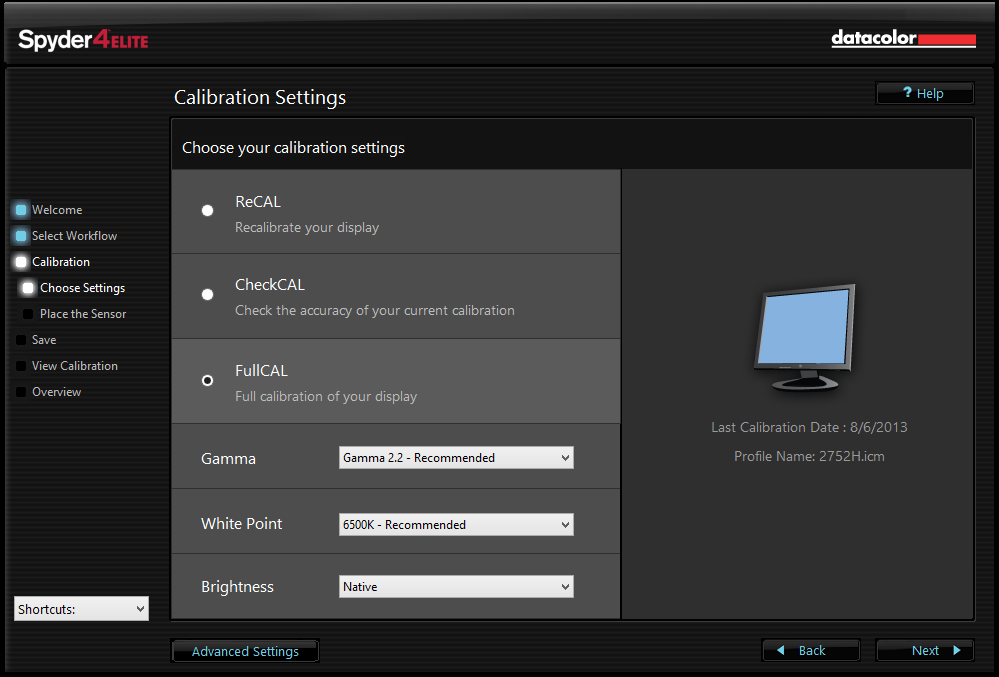
If this isn't the first time you're running the Spyder4Elite, your screen will appear as the screenshot below, with options for ReCAL, CheckCAL, and FullCAL. ReCAL is a regular recalibration, while CheckCAL measures your current calibration. To continue following this guide, check FullCAL.
On this screen, you can specify the desired Gamma, White Point, and Brightness levels. By default, the Spyder4 software recommends a Gamma of 2.2 and White Point of 6500K (as do we), and a Brightness setting of 120 nits. However, you are free to manually adjust all three of these options, and each has a handful of typical settings handily available in the dropdown menus. Should you choose the Native option for brightness, the following ambient light reading will be skipped, as will the additional brightness-adjustment stage during the actual calibration.
After settling on your Gamma, White Point, and Brightness, click Next.
Ambient Light
Get Tom's Hardware's best news and in-depth reviews, straight to your inbox.
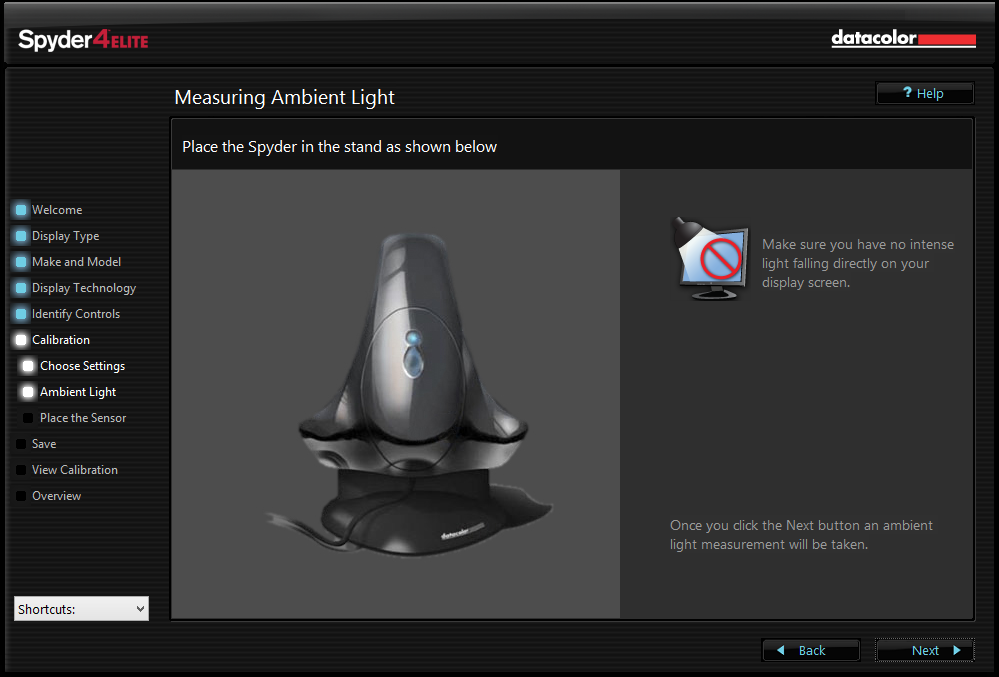
Since the Spyder4Elite is equipped with an ambient light sensor, the software can make custom Gamma, White Point, and Brightness recommendations based on your specific working environment.
Here you are instructed to place the Spyder4 in its cradle/mount and adjust the room lighting to your typical working level. Clicking Next, initiates the ambient light reading.
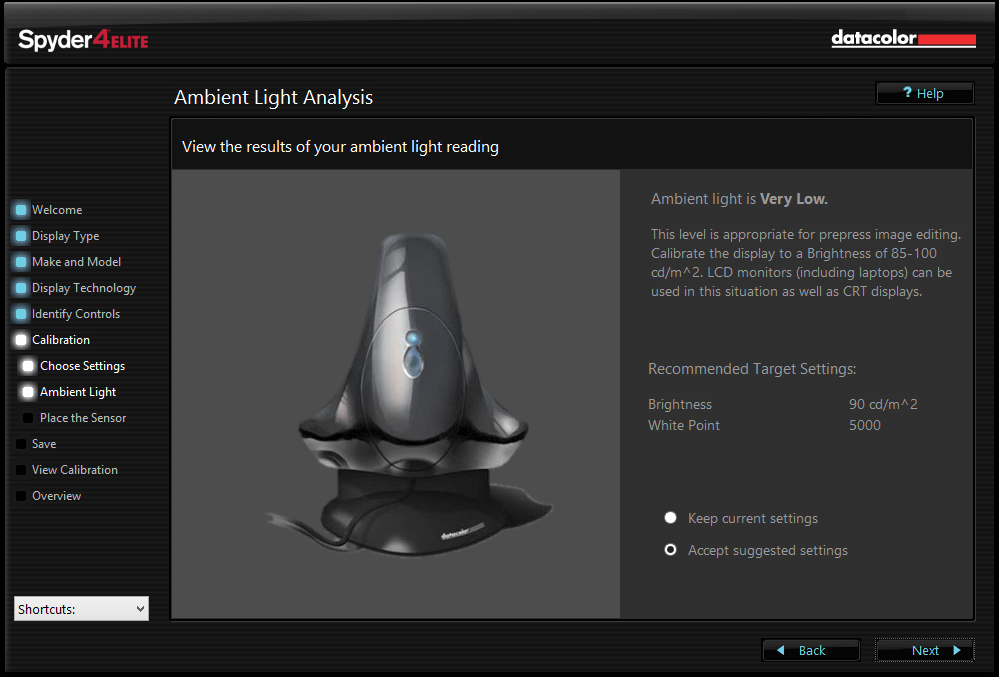
Once completed, the software will rate the ambient light in your work environment, with a short description of how good or bad it is for graphics production.
Depending on your ambient lighting, the Spyder4 software may recommend adjusting the target Brightness, White Point, and/or Gamma settings that you chose in the previous step. At this point, it’s up to you whether to Accept suggested settings, or Keep current settings. Check the appropriate radio button and click Next.
Place the Sensor
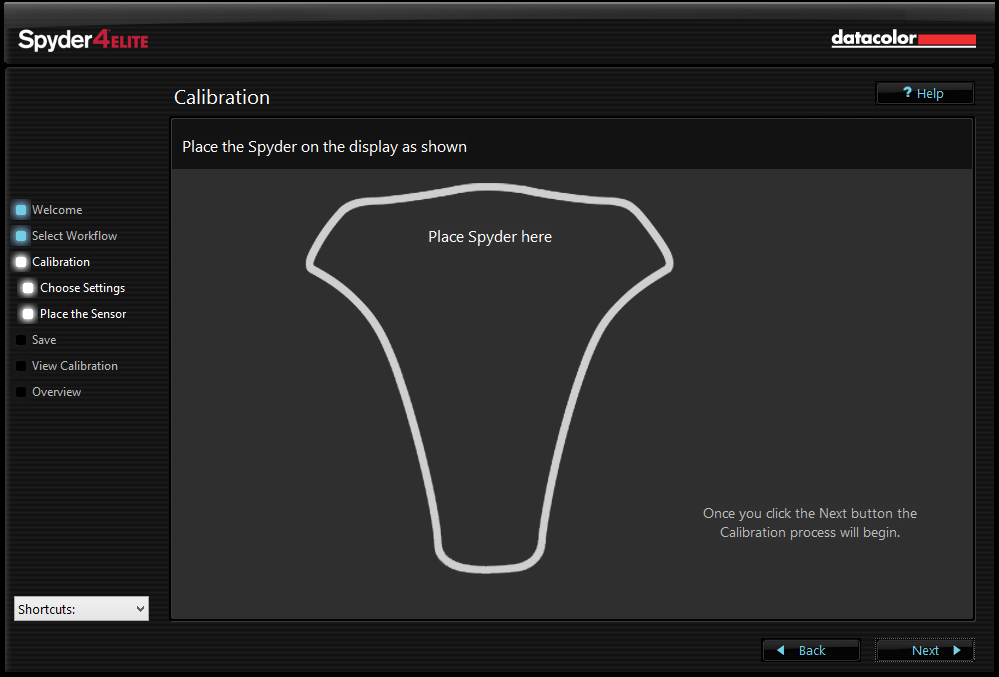
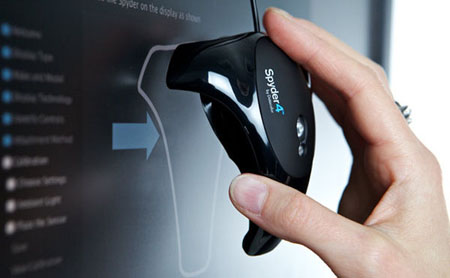
This screen displays a target in the outline of the Spyder4 sensor and instructs you to place the Spyder inside the outline. Depending on the size of your display, you may need to adjust the weight either higher or lower on the USB cord. Even then, we suggest tilting your monitor back so that the sensor lays flat against the screen.
Keeping stray light out from the sensor head is critical to accurate measurements. If you can’t get it to lay flat on its own, gentle hand pressure is OK. The measurements only take a few minutes and the payoff in correct readings is worth it. You will not be happy with a calibration performed by a dangling sensor.
Once the Spyder4 is secured atop the on-screen outline, click Next to begin the calibration process.
Current page: Spyder4Elite How-To: Setting Up
Prev Page Spyder4Elite How To: Getting Started Next Page Spyder4Elite How-To: Overview
Christian Eberle is a Contributing Editor for Tom's Hardware US. He's a veteran reviewer of A/V equipment, specializing in monitors. Christian began his obsession with tech when he built his first PC in 1991, a 286 running DOS 3.0 at a blazing 12MHz. In 2006, he undertook training from the Imaging Science Foundation in video calibration and testing and thus started a passion for precise imaging that persists to this day. He is also a professional musician with a degree from the New England Conservatory as a classical bassoonist which he used to good effect as a performer with the West Point Army Band from 1987 to 2013. He enjoys watching movies and listening to high-end audio in his custom-built home theater and can be seen riding trails near his home on a race-ready ICE VTX recumbent trike. Christian enjoys the endless summer in Florida where he lives with his wife and Chihuahua and plays with orchestras around the state.
-
Someone Somewhere I've been doing this for years.Reply
However, I wouldn't recommend Colorvision - their support for open source software is pitiful.
It would be nice to have the option to calibrate the monitor instead of just using colour profiles though. It can get irritating to run the same test on multiple OSs or computers attached to the same monitor. -
envy14tpe Thank you so much for doing this article. I think calibrating a monitor (at home) is very important for accuracy.Reply
I use the Spyder Express 4 and love the results. There are 3 models of the Spyder 4 and buyers need to choose which is best for their use.
Would it be possible to make the images a larger file so people can see the difference more clearly? -
daglesj I have a Spyder 3 Pro.Reply
Great device when you first unbox it, then not so good when you find the colours and visuals look far worse after you finish with odd tinges and hues.
Then you read up and find the the devices are not actually calibrated and set properly when they leave the factory.
Pretty useless. I wouldn't buy another spyder. Look elsewhere for proper results. -
Traciatim I've been looking at picking up a calibration tool set for a while so I liked reading this article. My question though is that I want to use my setup to calibrate TV's for friends, Monitors, Laptops, multi monitor setups, TV's with PCs and Multiple other devices attached . . . I was looking at getting the Spyder4 Elite and the TV HD upgrade but it seems like if I calibrate a TV with a PC attached using the TV HD version and then try to do the PC with the software then is that going to mess up the previous settings?Reply
If anyone has any experience with these tools in multi-use and multi-display scenarios or has a better option on what tools to get I would really appreciate any info.
-
WyomingKnott "All modern fixed-pixel displays create images in RGB format." Sharp states that their Aquos line has a yellow sub-pixel. It might be interesting to compare one of their TVs to a similar RGB panel.Reply -
Someone Somewhere None of the connections allow it to receive data with a yellow channel though, so it's all interpolated in the display.Reply -
ddpruitt Great article, I always try to do this with monitors and displays. Most are set up so horribly out of the box and people always use what feels good instead of what's right. I have never used a color calibrator because there's so little factual information. I'll probably ending getting one of these now.Reply -
ojas I wish you could cover some free/open source software, $249 is still a bit much for some like me...plus exchange rate is getting painful these days :(Reply
