System Builder Marathon, Q2 2014: A Balanced High-End Build
Installing Thermaltake's NiC-L32 CPU Cooler
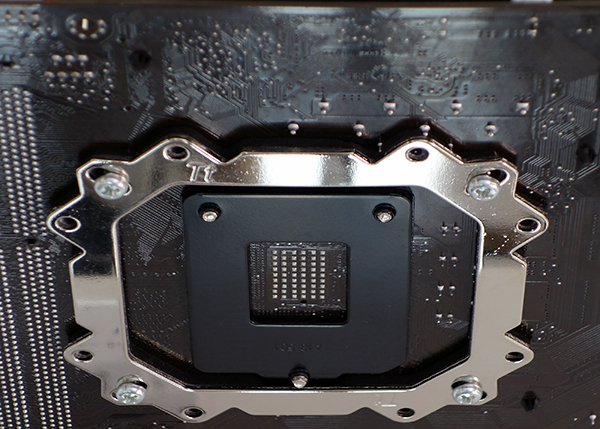
Thermaltake’s NiC-L32 CPU cooler uses two large mounting rings in a sandwich design. It's easiest to install with the motherboard removed from the case.
Foam is supposed to prevent short-circuits on the base plate, but the legs of some capacitors appear to poke all the way through. Just to prove that they could be shortened without special tools, I trimmed the longer leads with a pair of fingernail clippers.
The screws seen in the above photo engage top-side standoffs in the photo below. Each standoff has a foam ring on one side to protect the surface of the motherboard. Screws then attach the top-side mounting ring to the standoffs.
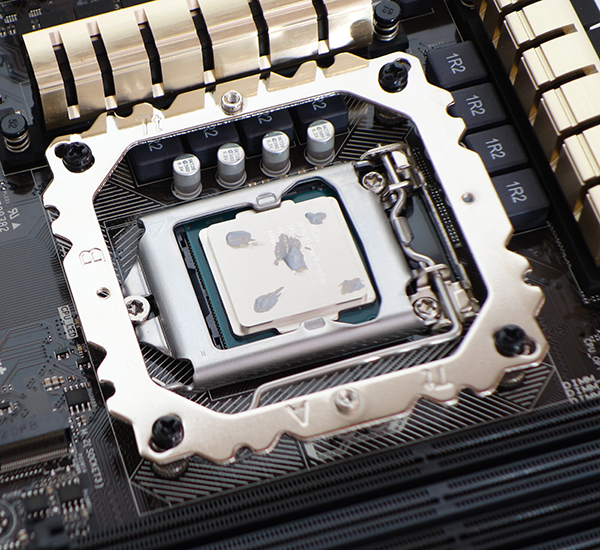
A large dab of paste in the middle makes a large circle about the size of the CPU heat speader. I like to add a smear next to each corner to maximize contact area.
Also notice the orientation of the top mounting ring. The two threaded nubs act as spacers to prevent over-tightening of the next piece in the installation puzzle.
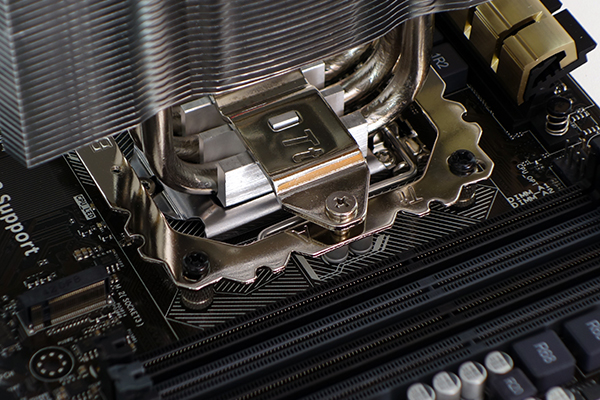
The NiC-L32’s heat sink is secured with a cross-brace, which uses two shoulder screws to connect to the previously-described top ring. A diagram is provided in the cooler’s installation instructions.
Get Tom's Hardware's best news and in-depth reviews, straight to your inbox.
Current page: Installing Thermaltake's NiC-L32 CPU Cooler
Prev Page Mass Storage, OS, And Optical Drive Next Page Completing Hardware Installation-
mrmike_49 Only 8GB RAM for a high end PC? Just plain too much money spent on graphics card. Also, too much money spent on "yuppie" power supply/caseReply -
de5_Roy thermaltake nic L32 doesn't seem well suited for the cpu for stock operations. at stock settings, the cpu's load temp is 57c over ambient according to the temp. chart. the q1 $1600 pc has a hyper 212 evo and it ran the stock i7 4770k under 40c over ambient. from the looks, the tt nic cooler seemed a better performer than the hyper 212 evo.Reply
was multicore enhancement enabled for both the q1 $1600(asrock z87 pro3) and this quarter's high end pc(asus z97-a)? did it affect the heat output? asus keeps m.c.e. enabled by default. i can't see any other factors atm.
all 3 builds look very well-performing this quarter. looking forward to the perf-value analysis. -
Taintedskittles Reading the reviews on newegg about that PowerColor 290x you chose was hilarious. So whoever win's this thing can look forward to many many rma's in the future. Apparently its plagued with artifacts, bad fans, bios issues, & performance degradation. I would have chosen another brand at the very least.Reply -
pauldh To be fair though, look at the dates of those negative Newegg reviews. All but one of the complaints appeared after this system was ordered mid-May. Prior available feedback WAS almost all positive. And a manufacturer rep jumped in to resolve that one.Reply
-
Crashman Reply
A yuppie power supply...OK...13586826 said:Only 8GB RAM for a high end PC? Just plain too much money spent on graphics card. Also, too much money spent on "yuppie" power supply/case
The last time I checked the "Samsung 840 EVO MZ-7TE250BW" wasn't an HDD, and nobody wanted us to run OS/2 on a modern gaming system. Please read the charts, wabba13587011 said:kidding me, hdd and windows 8, pls, read up on hardware toms hardware.....and software.
-
crisan_tiberiu Make this "competition" global please... :( You have "Tom's Hardware" in every major region in the world... :) Also FedEx and DHL ships everywehere in the world :) make all readers happy :) Our traffic is good for your site, but we never get something special :((Reply -
rush21hit If I had a specs like this, I don't want it to be encased. I'd stick it to my wall even if it means I had to figure out how to do it.Reply -
Realist9 I think the author hit his mark for the intent of the build/article based on the budget limit and provides a good starting point for us. However, if I was actually building and buying for myself, I would make some changes to add headroom and compatibility.Reply
I would go with 16 GB of memory for $85 more, since that’s only $85/$1600=5% more cost. I’d also go ahead and get the Asus 780 for $520. (Side note: I disagree that most would go AMD in a 780 vs 290x, but I know better than to open that can of worms). SLI was mentioned but not used, and I also would not get SLI unless I KNEW it worked with the game I was most interested in. The posts on various forums about SLI causing problems in most games, along with SLI “issues” dating back to 3dFX Voodoo2 cards, keeps me away from SLI.
I also would stay away from “generally stable, but usually not stable in the games I want to play most” (not quoting the author here) overclocking of the system/video card. It’s nice to see it in the charts, but I read about way too many problems in games caused by overclocking for me to rely on it to get my ‘value’.
Lastly, I think the pendulum has swung too far towards “value” for the high end build. I suggest tweaking that a little for future high end builds (eg..780Ti, 16 GB memory, 500GB SSD, but continue to stay away from $1000 CPU, $1200 SLI, etc).


