Extreme Overclocking: 10 Ryzen CPUs Under LN2
BIOS Settings
New BIOS features allowing the adjustment of RAM timings, which were previously greyed-out, became available during our testing. Unfortunately, those updates started rolling out too late. Given that there is only one BIOS chip on our test platform, and that we had already generated quite a bit of data beforehand, we decided to continue with BIOS version 0083 in order to maintain our methodology.
While some overclockers saw improvements from BIOS version 1201, this wasn't the case for everyone. Memory controller quality played a big role, too.
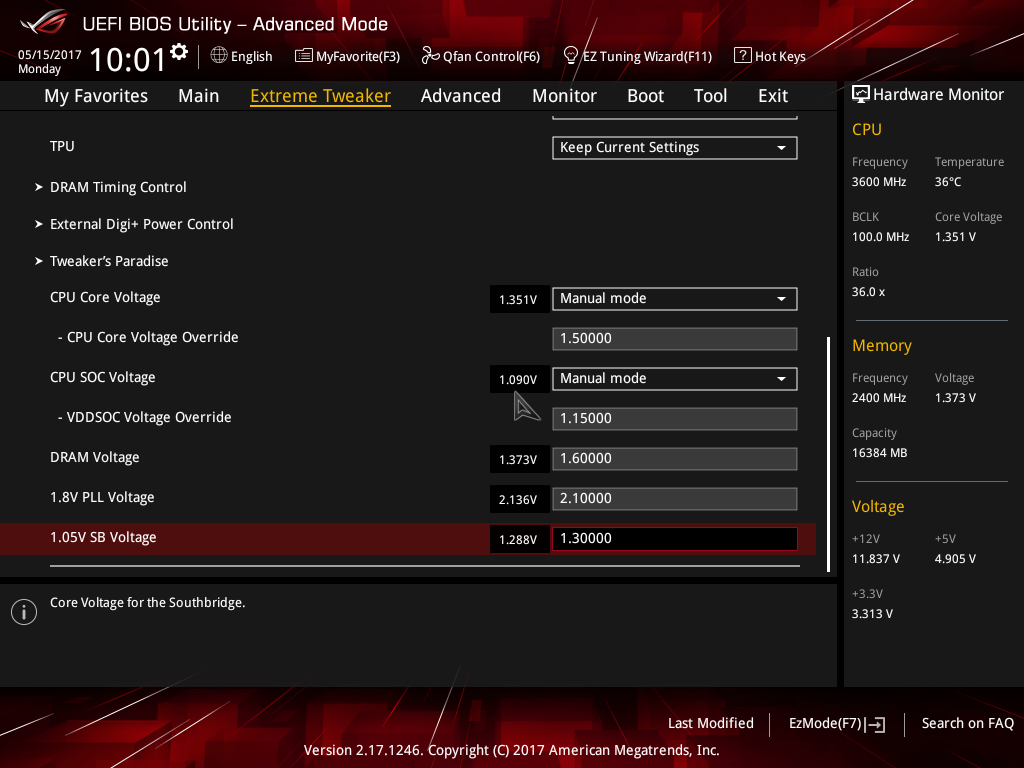
We already explained the BIOS settings in our previous guide, so we won't dive back into the details. Here's what the voltages we used look like, though:
- CPU Core Voltage: Set to 1.5V on our sample. It can be raised to 1.8 or even 1.9V without worry when the cooling pot is at -196°C. During our first tests, we started at 1.5V in the BIOS and then stepped higher through the operating system. After a while, we determined it was safe enough to simply start off with the desired value.
- VDDSOC: As with air cooling, avoid setting this any higher than 1.25V. For example, you can set VDDSOC to 1.2V, find the maximum stable frequency for your RAM, and then try to lower the setting to 1.18 or 1.15V. In short, seek the minimum value necessary.
- DRAM: For our memory sticks, 1.6V was sufficient for 3200 MT/s at 12-12-12 timings. The most important variable is the quality of processor's memory controller, but aside from switching processors, there is no silver bullet!
- 1.8V PLL: We didn't see any gains when increasing the PLL voltage. The LN2 mode jumper adjusts this to 2.1V, but you can leave it at 1.8V without risking any problems.
- 1.05V SB: 1.3V does not seem to pose a problem; however, we didn't realize any performance gains by increasing this parameter.
The Case For LLC
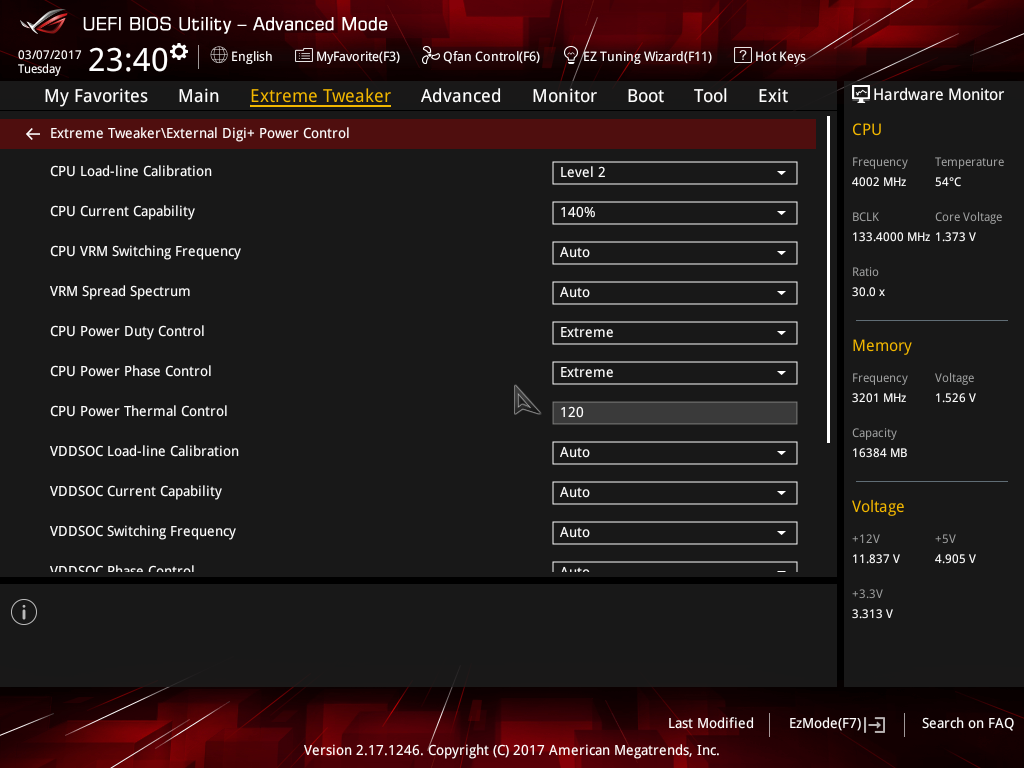
In the “External Digi+ Power Control” sub-menu, you find the CPU Load-line Calibration option. We tried multiple modes available on Asus' Crosshair VI Hero and recorded their voltages with a multimeter. With a voltage setting of 1.8V in our BIOS, we observed the following values under load:
- LLC 2: 1.78V
- LLC 3: 1.83V
- LLC 4: 1.85V
During our test under air cooling, we were surprised to see that even the lowest level of LLC was already too high. With LN2 and higher voltages in play, Level 1 and 2 are no longer sufficient, though. But also be careful not to overdo it, since Level 4 and 5 were too severe. Therefore, we recommend LLC 3 for voltages near 1.8V.
MORE: Best CPUs
MORE: How To Overclock AMD Ryzen CPUs
Get Tom's Hardware's best news and in-depth reviews, straight to your inbox.
MORE: De-Lidding and Overclocking Core i7-7700K
MORE: CPU Overclocking Guide: How (and Why) to Tweak Your Processor
Current page: BIOS Settings
Prev Page Lapping The CPU Next Page AM4_PCRATIO: A Frequency For Each Core!-
InvalidError It isn't surprising that the highest-end CPUs have the highest and least troublesome overclocks as that's what chip binning is for - the best dies go to the premium SKUs first, lower tiers get what is left over.Reply -
-Fran- Reply19937674 said:It isn't surprising that the highest-end CPUs have the highest and least troublesome overclocks as that's what chip binning is for - the best dies go to the premium SKUs first, lower tiers get what is left over.
Even more, it's very interesting since it gives some credibility that AMD is not binning due to defects, but electrical properties, hence, making the rumour mill of being able to unlock some 4C and 6C to higher core counts not that far-fetched.
Cheers! -
Wisecracker Très bon!Reply
(hope I used this correctly)
Just wondering ... would it be considered a 'faux pas' (or, an insult to AMD) to release the batch numbers?
-
theyeti87 Reply19937697 said:19937674 said:It isn't surprising that the highest-end CPUs have the highest and least troublesome overclocks as that's what chip binning is for - the best dies go to the premium SKUs first, lower tiers get what is left over.
Even more, it's very interesting since it gives some credibility that AMD is not binning due to defects, but electrical properties, hence, making the rumour mill of being able to unlock some 4C and 6C to higher core counts not that far-fetched.
Cheers!
Wasn't that a similar case with the Phenom X4, X3, and X2's? Or were those 3's and 2's disabled cores due to defect? -
-Fran- Reply19937706 said:19937697 said:19937674 said:It isn't surprising that the highest-end CPUs have the highest and least troublesome overclocks as that's what chip binning is for - the best dies go to the premium SKUs first, lower tiers get what is left over.
Even more, it's very interesting since it gives some credibility that AMD is not binning due to defects, but electrical properties, hence, making the rumour mill of being able to unlock some 4C and 6C to higher core counts not that far-fetched.
Cheers!
Wasn't that a similar case with the Phenom X4, X3, and X2's? Or were those 3's and 2's disabled cores due to defect?
They were a mix of both. If you were lucky (and could track down some of the batches) you were able to unlock the CPU with little worry, but there were defective ones that when unlocked, would not work. I came across both myself.
To be honest, I just catalog it as "interesting", because I will pay the difference to always get the full working version, but I do know there's people out there that like gambling and can track batch numbers :P
Cheers! -
InvalidError Reply
The relatively low defect rate has been a given since launch IMO: half of each CPU core is L2 cache and half of the CCX die area is the L3, so you have a 50% chance that defects within a CCX will land in L3. If the defect rate had been significant, cache defects would have forced AMD to launch models with 8MB of L3 long before the 1400.19937697 said:Even more, it's very interesting since it gives some credibility that AMD is not binning due to defects, but electrical properties -
-Fran- Reply19937880 said:
The relatively low defect rate has been a given since launch IMO: half of each CPU core is L2 cache and half of the CCX die area is the L3, so you have a 50% chance that defects within a CCX will land in L3. If the defect rate had been significant, cache defects would have forced AMD to launch models with 8MB of L3 long before the 1400.19937697 said:Even more, it's very interesting since it gives some credibility that AMD is not binning due to defects, but electrical properties
True. It's just nice to have more non-validated statistical-irrelevant proof! Haha.
Cheers! :P -
Gregory_3 This is all kind of cute, but the real market success will be played out in conventional liquid cooled and air cooled environments. Nobody is going be running high end software with condensation dripping all over.Reply -
InvalidError Reply
There wouldn't be condensation issues if OCers used the nitrogen gas boiling out of the pot to displace air and the moisture it contains around the motherboard to keep it off of it. Instead of circulating the boil-off around the motherboard though, LN2 OCers use fans to suck it away, drawing more moisture-ladden air in the area.19938043 said:Nobody is going be running high end software with condensation dripping all over.
-
gasaraki "It isn't surprising that the highest-end CPUs have the highest and least troublesome overclocks as that's what chip binning is for - the best dies go to the premium SKUs first, lower tiers get what is left over."Reply
While it might not be surprising, it shows the immaturity of the Ryzen processors in that the build quality is not the same between different CPUs or even CCXes and binning is what they do for the lower cored versions. If your build process was mature ALL your chips would come out mostly the same and "awesome" then at that point your forced to just shutdown cores to make the lower cored processors.

