KVM Switches that do DVI from Aten
Overview Of Hotkey Sequences
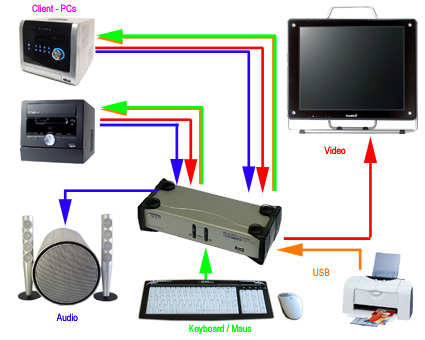
You can switch among clients by pushing buttons on the switchbox itself, or by entering hotkey sequences at the console keyboard. Striking the Scroll Lock key twice gets the KVM's attention, and additional keys allow individual client ports to be managed and selected directly. Hotkey sequences make it possible to route video, audio and USB signals separately through the KVM, and to access USB devices attached to KVM on a per-client basis. This can, however, sometimes lead to unexpected results. You could wind up watching video from client 1, listening to sound from client 2, yet be able to access USB devices attached to the KVM only on client 3. For an easy reset, simply push a button to switch all connections to the next KVM port in sequence. At that point, all prior settings are irrelevant and all point to the same client.
| Hotkey | Switch KVM, USB hub, and audio to next port |
|---|---|
| [Scroll Lock] [Scroll Lock] [Enter] | Switch only KVM to the next port |
| [Scroll Lock] [Scroll Lock] [K] [Enter] | Switch KVM, USBN hub, and audio to Port n |
| [Scroll Lock] [Scroll Lock] [n] [Enter] | Switch only KVM-Signal to Port n |
| [Scroll Lock] [Scroll Lock] [n] [K] [Enter] | Switch USB focus to Port n |
| [Scroll Lock] [Scroll Lock] [n] [U] [Enter] | Switch audio signal to Port n |
| [Scroll Lock] [Scroll Lock] [n] [S] [Enter] | Switch KVM and USB focus to Port n |
| [Scroll Lock] [Scroll Lock] [n] [K] [U] [Enter] | Switch KVM and audio signal to Port n |
| [Scroll Lock] [Scroll Lock] [n] [K] [S] [Enter] | Switch Audio and USB focus to Port n |
| [Scroll Lock] [Scroll Lock] [n] [S] [U] [Enter] | Switch all signals to Port n |
| [Scroll Lock] [Scroll Lock] [n] [K] [S] [U] [Enter] | Switch only USB focus to next port |
| [Scroll Lock] [Scroll Lock] [U] [Enter] | Switch only audio signal to next port |
| [Scroll Lock] [Scroll Lock] [S] [Enter] | Reset autoscan function (5 second intervals) |
| [Scroll Lock] [Scroll Lock] [A] [Enter] | Reset autoscan function to n second intervals (1 ? n ? 99) |
Legend:[n] is an integer from 1 to 4 inclusive
[K] KVM signal (Keyboard / Video / Mouse)
[U] USB-devices attached to KVM
[S] Audio signal
History Of The KVM Principle
The whole phenomenon started with a simple switchbox for printers. A user sitting next to the printer had to flip this switch by hand to select an input source, when someone else wanted to print. That way, it wasn't necessary to have two or three printers in an office. The idea remains a good one, only it works much more easily for networked devices (including printers). These days, in fact, you can save a lot more by using a switch box than just the cost of another printer.
All cables congregate at the KVM switch
Get Tom's Hardware's best news and in-depth reviews, straight to your inbox.
Current page: Overview Of Hotkey Sequences
Prev Page Basic Switch Box For USB Devices Next Page KVM Switch Details
