RAID Scaling Charts, Part 1
Get Tom's Hardware's best news and in-depth reviews, straight to your inbox.
You are now subscribed
Your newsletter sign-up was successful
RAID Modes Explained
It’s very easy to create a high speed RAID array that provides both high I/O performance and fantastic throughput: all you need is a stripe set with as many hard drives as you want, or as many as your controller can support. Motherboards have four to six SATA ports with basic RAID support, while professional RAID controllers are available with 8, 12, 16 or even 24 ports. However, bear in mind that a RAID 0 array will lose all of its data if even one of its member hard drives fails, so make sure that it is for temporary use and not permanent storage.
The common approach to achieve both high performance and data safety is either RAID 0+1, which is a mirrored stripe set of two or more drives, or RAID 5. The latter distributes data across all but one drive; the controller then calculates parity redundancy information for the entire stripe set, and stores it on the remaining drive. To avoid this drive becoming a bottleneck, the parity information is cycled across the drives as well. (If this were not the case, we’d be using a RAID 3 array.) In this article we will stick to looking at RAID 0, RAID 1 and RAID 0+1.
RAID 0: Striping (High Performance)
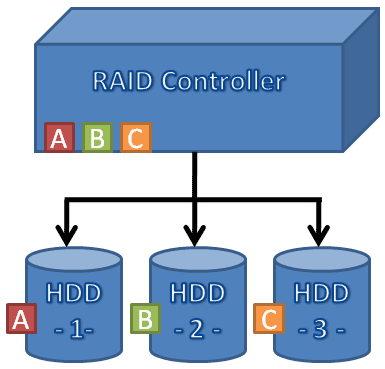
A, B and C are different blocks of a file. In a RAID 0 stripe set, the controller will cycle blocks of selectable size (typically 8-32 kB) across all available RAID 0 hard drives. This helps to accelerate both read and write performance, but a RAID 0 is susceptible to drive defects. RAID 0 works with two or more hard drives.
Get Tom's Hardware's best news and in-depth reviews, straight to your inbox.
Current page: RAID Modes Explained
Prev Page RAID Testing With 2-8 Drives Next Page RAID 1: Mirroring (High Safety)
Patrick Schmid was the editor-in-chief for Tom's Hardware from 2005 to 2006. He wrote numerous articles on a wide range of hardware topics, including storage, CPUs, and system builds.
