Join Tom’s Hardware today


The Monitor Is A Real Energy Hog: 23 Watts When In Use, Continued

Soldering of the cables

Soldering the connection

Resoldering the 12 V Monitor cable

Using our rebuilt monitor cable, we were able to attach directly to the PC's power supply

The LG1900R-BF attached to our solar-powered PC
Our redesign let us omit the use of the monitor's own power supply, so we eliminated the energy losses associated with its use, and lowered overall energy consumption significantly.
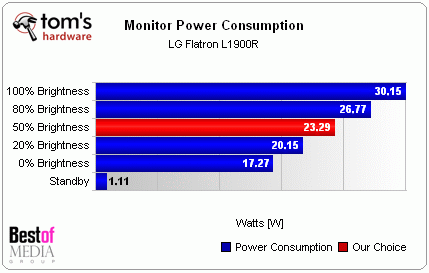
Energy Consumption: LG FlatronL1900R-BF
At maximum brightness and a resolution of 1280x1024, our 18" monitor draws 30.15 W. As we reduced brightness levels, energy consumption went down as low as 17.27 W. We decided to go with 50% brightness, at which setting the monitor consumes 23.29 W. In standby mode, however, this monitor consumes just 1.1 W!
| 12 Volt Solar-PC-System | ||
|---|---|---|
| Component | Idle | Max load |
| PSU | 5.00 W | 14.20 W |
| CPU | 8.49 W | 38.66 W |
| Cooler | 1.00 W | 1.00W |
| Motherboard | 7.78 W | 19.71 W |
| RAM | 6.06 W | 6.23 W |
| HD | 5.93 W | 7.59 W |
| DVD | 3.68 W | 4.92 W |
| Monitor | 23.29 W | 23.29 W |
| Total: | 61.23 W | 115.60 W |
| max. 160 Watt Custom PSU |
This particular monitor comes equipped only with a DVI interface, so that's what we used to connect it up to our Gigabyte motherboard.
Total Cost for the Solar-Powered PC: $1,011
| Pricing for Solar-Powered PC Components | |
|---|---|
| Power Supply | $80 |
| Processor | $95 |
| Motherboard | $85 |
| RAM | $215 |
| Hard disk | $56 |
| DVD player | $45 |
| Monitor | $400 |
| Keyboard & mouse | $35 |
| TOTAL | $1,011 |
There are other, much higher costs involved in putting an all-solar rig together, of course. We provide those details in the third installment of this article series.