Making Digital Home Movies, Part 2
Introduction

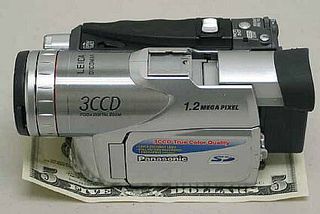
Panasonic GS70 triple CCD camera
If you followed our suggestions in Part 1 , you now have a camcorder, software and host of other gadgets. So after spending the money, how do you put it all to use?
We now outline the necessary steps to make a home movie. This includes shooting the video all the way to rendering the final product for your friends to watch. Moving titles, particle effects and chromakey are added to spice things up.
Shooting The Video
Camcorders have enough buttons and switches to rival a jumbo jet, so it pays to read the manual before jumping into your first video shoot. You could pop in a tape, hit record, and the camcorder will do its business. For most people this would be ok and the resulting video is good. For perfectionists, taking a little more time and learning how a camcorder works will produce an even better video.
Mother Nature has given us the gift of sight. We walk into a dark room and our eyes will automatically enlarge our pupils. If we stare at a far away object, our eyes will refocus. A camcorder tries to duplicate our eyes and under most conditions it does a fine job. The two things that a camcorder does not do well is focusing and distinguishing colors.
Focusing
With only the lens the camcorder does not know how far away an object is, so it must use another method to find the range. If you set a camcorder on automatic focus, which is the default, it will shoot out an infrared beam that reflects off the object. The camcorder then guesses the range and refocuses the lens. However, there are problems with this method.
Lag time between refocusing is one problem. It takes time for the camcorder to adjust to new ranges and you might have difficulty shooting fast moving objects. The camcorder will tend to play catch up and be late to focus.
Stay on the Cutting Edge
Join the experts who read Tom's Hardware for the inside track on enthusiast PC tech news — and have for over 25 years. We'll send breaking news and in-depth reviews of CPUs, GPUs, AI, maker hardware and more straight to your inbox.
Certain materials will make the rangefinder go crazy. Chromakey cloth, which is usually green or blue, is well known for this. Since the cloth is saturated, the camcorder can pinpoint a spot to focus on. If you have ever been on the ocean and tried to spot a far away ship, you know what I mean.
Manual focus is the answer to our problems. Every camcorder should have a switch that turns off the auto focus. You will then have to manually focus either by turning a focus ring, or pushing/pulling a switch. Looking through the viewfinder, rather than looking at the LCD screen, will help you focus. Another trick is to carry around a sheet of large text and tape it to the object. Focus until the letters come out clear. Voila! It takes the guesswork out of focusing.
White Balance
Our eyes can distinguish an almost infinite number of colors. Camcorders have a tougher time. Trying to get blue to look blue and red to look red can be maddening. All camcorders when set on automatic will try to guess the white balance.
So what is white balance? When you start recording, the camcorder will look at all the colors that are coming into the lens. It will try to figure out what white is. Now you may be saying, "I know what white is." Sure you do, but the camcorder does not. After the camcorder decides what white is, it will adjust all the other colors. Chances are it will guess wrong.
Most camcorders will have a manual white balance function. Simply place a white sheet of paper in front of the camcorder and then set the white balance. This will calibrate the camcorder so that all the colors are true. Here is the catch; your normal office paper is not truly white. Most paper is also a little shiny. To do a good white balance, you should purchase a white balance card from your local photo/video shop.
Shooting Technique
Your shooting technique will be determined by your environment. Moving shots are done differently than stationary shots. In either case you must stabilize the camera. Tripods will work if you are stationary. Monopods are great for crowded areas, or when you have to move quickly. If you have LOTS of money, a Steadi-Cam will give you the ultimate in smooth video recording.
It is possible to get stable video with using a tripod or monopod. It all comes down to how you hold the camera and how you move. Hold the camcorder with two hands. This will lessen the shaking that comes from using just one hand, which should be considered a sin. You should think of your legs as shock absorbers. Bend your knees a little more than usual and lower your center of gravity. Rent the movie SWAT and watch how the SWAT officers move with their guns. That is how you should move.
If your camcorder has an external audio jack, use it! You will be amazed at how different the audio sounds after it has passed through the camcorder. It can also help if you have a friend listen to the audio feed, just like the professional video teams that employ two people, one to use the camcorder, and another to use the microphones and audio gear.
Don't worry about shooting too much video. Remember that tape is cheap and you can always cut it out later.
Label your tape as soon as it ejects. If the tapes are not labeled, you will spend lots of time later on trying to find the tape with the footage that you want.
Shooting: Rookie Mistakes
One rookie mistake is to use the zoom too much. Zooming in and out will make the resulting video nauseating. Instead use your feet to zoom. Actually move the camcorder closer to the object. If you watch COPS, an American law enforcement reality show, you see this technique used very well. There is almost no zooming in COPS, as the camera person actually runs with the police officers.
The second rookie mistake is not looking at the LCD or viewfinder when you are shooting. The camcorder is a WYSIWYG (What You See Is What You Get) device. If you see it in the LCD/Viewfinder, then it will be recorded. Rookies tend to look up at the video subject and let the camcorder wander off. Keep the target in frame and always look through the LCD/Viewfinder. This will seem awkward at first, because of the possibility of walking into something. Have a friend stand behind you and guide you by GENTLY pulling/pushing you into the right direction.
Capturing Using Movie Maker Or Vegas

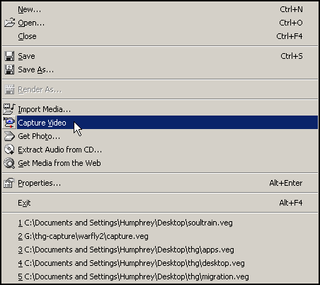
Capture Video option in Sony Vegas
Now, the video has been recorded on the Mini-DV tape, but how do we get the video into our computer for editing? FireWire, along with capture programs have made this easy. Simply connect the camcorder and PC together with a FireWire cable. Fire up your capture program (Windows XP Movie Maker or another program like Vegas) and you can control the reverse/forward/play completely from the computer without having to touch the camcorder.

Rewinding the tape in Sony Vegas.
Rewind the tape to the beginning, then depending on the program you are using, select either Capture Video or Import Video. Walk away and enjoy your favorite carbonated beverage. In about one hour the whole tape will be transferred to your PC. Hopefully your PC has enough hard-drive space as the resulting .AVI files will be two GB for every ten minutes of video. Defrag your drives before capturing, because a severely fragmented drive will cause dropped frames.

Video is separated into clips
During your filming, you probably stopped and started recording many times. The capture program will automatically split the video into clips at the spots where you stopped. This will make editing much easier.
Most Popular

