Printing Your Own CDRs With Ink
The Printing Process On The Models 900 & 960
The process of preparing the media for printing with both the 900 and 960 varies slightly. The manual that is included with the 900 and 960 Epson models covers the process in detail with an illustrated step by step format to help the user achieve the best results. It should be pointed out that Epson recommends that the printable optical media be 'written to' prior to the printing process; and that once printing is completed, the printed optical media be allowed to dry for 24 hours prior to use. Epson also recommends that once printed, the printed optical media should not be exposed to direct sunlight or water. This is really no surprise, as these are recommended safeguards suggested for all media that the printer prints to, as well.

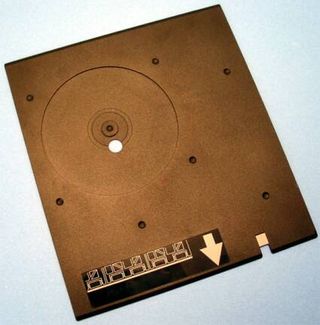
This is the tray that is used to hold the optical media for printing on the 900.
Once the media is placed in the tray, the lid is then opened on the Model 900 so that you can see the alignment marks that printed on the printer's paper path. The roller release lever is then placed in the alignment mode. The tray that contains the media is then fed into the 900 from the back of the printer. With the lid of the printer open, you can now attempt to align the media tray and the alignment marks. This process is not very complicated. Once alignment as been achieved, then the roller release level can be placed in CD/Thick Media mode, which secures the tray in place for printing. Consistent alignment is important for consistent quality results each time that you print onto the media. With a little practice, this process isn't hard to master. However, since the media tray has to be fed in from the rear of the 900, you will have to keep the area behind the printer clear. This means that you cannot place the printer against a wall or in a confined space on your desk, since you will need room to feed the tray from the rear.
Stay on the Cutting Edge
Join the experts who read Tom's Hardware for the inside track on enthusiast PC tech news — and have for over 25 years. We'll send breaking news and in-depth reviews of CPUs, GPUs, AI, maker hardware and more straight to your inbox.
Current page: The Printing Process On The Models 900 & 960
Prev Page What Is The Real Secret To Being Able To Print On This Media? Continued Next Page The Printing Process On The Models 900 & 960, ContinuedMost Popular

