Tom's Hardware Verdict
The Tryx Panorama SE 360 has better software support, a lower price, and runs more quietly than its competition from Thermalright.
Pros
- +
Impressive 6.67-inch wrap-around display
- +
Low noise levels
- +
Good noise-normalized performance
- +
Strong software support
Cons
- -
High price (but cheaper than the equivalent Thermalright option)
- -
No tube clips included
Why you can trust Tom's Hardware Our expert reviewers spend hours testing and comparing products and services so you can choose the best for you. Find out more about how we test.
The Panorama SE 360 ARGB is from cooling newcomer Tryx, which was only founded two years ago in 2023. In short, it’s a cheaper, more refined version of the previously reviewed Tryx Panorama 360 ARGB.
The new model lacks the VRM fan of the original version and incorporates a different pump: the codename “Adela” pump from Asetek. This pump seems to be exclusive to the Panorama SE – at least, I can’t find any other AIOs using this pump. More importantly, it has a saner price of $279.99 USD, and believe it or not, it’s actually cheaper than Thermalright’s competing $330 Wonder Vision UB 360, which we’ll be comparing it to in today’s review.

Will this new cooler make our list of best CPU coolers on the market? Let’s go through the features and benchmarks of the cooler, and you can decide for yourself if this curved-screen cooler is worth the investment.
Cooler specifications
Cooler | Tryx Panorama SE ARGB 360 |
Colors | Black or White |
MSRP | $279.99 |
Lighting | ARGB |
Warranty | 6 years |
Socket Compatibility | Intel Socket LGA 1851/1700/1200/115x AMD AM5 / AM4 |
Radiator Dimensions | 394 (L) x 120 (W) x 27mm (H) |
Maximum TDP (Our Testing) | >258W with AMD’s Ryzen 9 9950X |
Packing and included contents

The cooler arrives in a sleek black box, with a pretty fancy (for an AIO) design.

The inner contents are protected with molded foam and cardboard, as well as plastic coverings.

Included with the product are the following:
- 360 mm radiator with pre-installed fans
- CPU block with pre-applied thermal paste
- Extra tube of thermal paste
- 6.7-inch AMOLED screen
- Mounting for AMD and Intel platforms
- Installation manual

Features of Tryx Panorama SE 360 ARGB
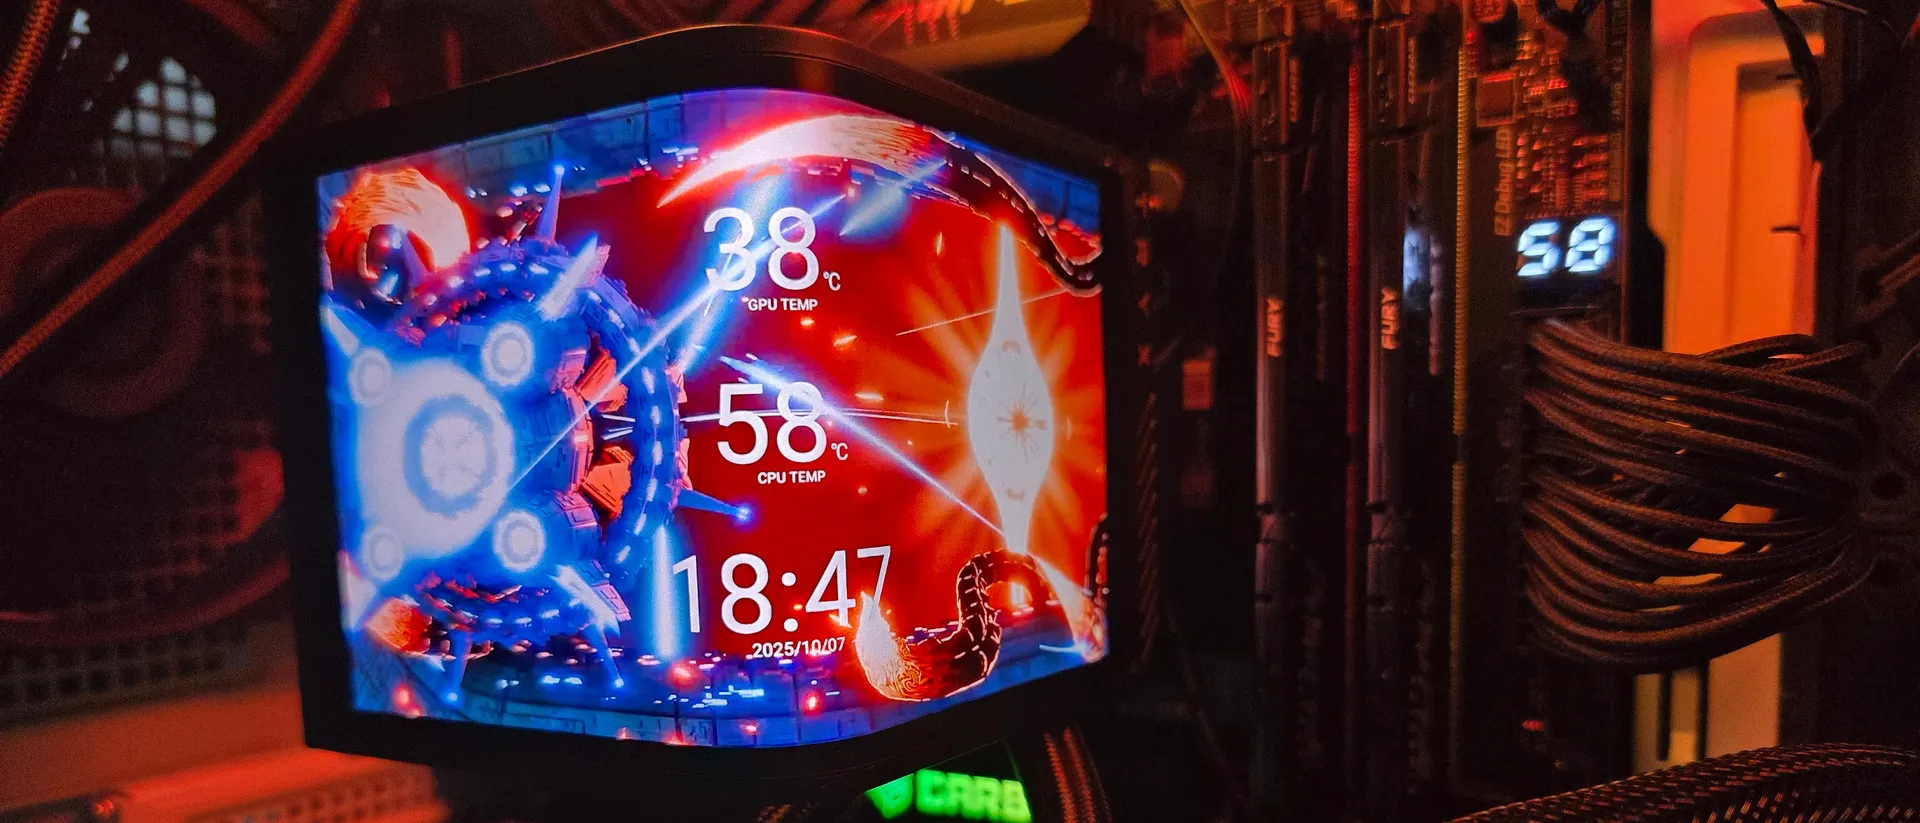
▶️ 6.7-inch AMOLED Display

The most distinctive feature of Tryx Panorama SE 360 is its vibrant 6.7-inch AMOLED display, which has a 60 Hz refresh rate and a 2240 x 1080 resolution. To describe this display as merely “eye-catching” is a bit of an understatement. The default pre-loaded visual options cleverly utilize the “true black” panel and curvature of the display to create a striking anamorphic 3D effect.

You can get an idea of how this effect works by looking at the image above, but this is one of those things you have to see in real life to understand just how striking it is, as it doesn’t totally translate to 2D imagery.
I’ll primarily be comparing this AIO to Thermalright’s competitor, the Wonder Vision UB. I’ve included a photo of its similarly sized screen below, to give users an idea of how they are different. The biggest immediately noticeable difference is that Thermalright allocates a larger portion of the screen area to the front, and only a small portion to the side.

There are pros and cons to both Thermalright’s and Tryx’s approach to the screens. As the Panorama SE incorporates an AMOLED screen, it may be prone to burn-in with static images, but I suppose that’s one of the reasons all of the presets feature anamorphic animations with lots of movement! This display will look best when you’re looking at it from an angle.
Thermalright’s screen isn’t as bright as Tryx’s, but it has a slightly oversaturated look, which makes images feel a bit more vibrant. Thermalright’s screen will be better if viewed at a more direct angle, and will be better for users who prefer static media content instead of animations, as there will be less risk of screen burn-in.
One last thought on the Panorama SE’s screen: You could technically put this screen anywhere you want, inasmuch as the USB cable allows for. You could place it in another part of your PC case, or even place it outside of your case if you can route the cable properly.
▶️ Tryx Kanali software
To customize the display, you’ll need to download the company’s Kanali software suite. You can set the screen to display a variety of pre-loaded 3D animations, or use your own media.

Kanali is better-designed than what Thermalright offers with its TRCC software. While it has a lower number of presets available, those it has are of higher quality and offer vivid 3D animations. On the other hand, while Thermalright’s software features less sophisticated preset themes, it also has a much larger set of themes to choose from.

The Tryx display is supported in multiple orientations, and you can even activate a “split-screen” mode that displays a different image on each half of the screen.

One thing I’d like to see added to the Kanali software is the capability to load streaming media, like a YouTube video, as the source video.
▶️ Asetek Adela pump

The Tryx Panorama SE is the only AIO – to my knowledge – which incorporates the Asetek “Adela” pump. It appears to be a third revision of Asetek’s seventh-generation pumps.
▶️ Pre-applied and additional thermal paste
The base of the CPU plate is pure copper and includes pre-applied thermal paste.

In addition to the pre-applied material, Tryx also includes a 2g tube of its alpha-01 thermal paste.

▶️ Full RAM compatibility

As neither the CPU block nor the AMOLED screen interfere with or overhang the DIMM slots, all sizes of RAM, no matter how tall, are compatible with this cooler. This is true of most AIOs.
▶️ Pre-installed 120mm fans with quick-connect

The fans for the AIO arrive pre-installed and feature a quick-connect system that limits cable clutter.
Size (L x W x D) | 120 mm x 120 mm x 25 mm |
Bearing | Fluid Dynamic Bearing |
Fan Speed | 500-1850 RPM ±10% |
Air Pressure | Up to 1.8 mmAq |
Airflow | Up to 66.09 CFM |
AM5 installation
The installation of this cooler is slightly different than most others I’ve installed. These instructions will assume you’ve already mounted the radiator to the top of your case.
- AMD users will remove the default mounting mechanism, but hold on to the screws!
- Take the mounting brackets and place them on top and below the CPU, using the screws from the default mounting mechanism to secure them in place.

- Place the heatsink on top of the CPU, and secure it with the included screws.

- Connect the cables for the fans and pump to your motherboard.
- Attach the included screen to the four holes on the CPU block, and then connect the USB cord to a motherboard header.

- Power on your computer, and installation is complete!

Real-world testing configuration – AMD AM5 platform
My results may differ from others because I emphasize results that are comparable to real-world use.
This means that I test CPU coolers inside of a closed desktop case, which increases cooling difficulty compared to other testing methods - many will test CPU coolers outside of a case, on an open test bench. Open benches have lowered ambient temperatures, which in turn makes weak coolers appear stronger than they really are. Some publications have used generic thermal plates to test cooling solutions.
CPU | AMD Ryzen 9 9950X |
GPU | MSI Ventus 3X RTX 4070 Ti Super |
Motherboard | MSI X870E Carbon Wifi |
Case | MSI MAG Pano 100R PZ |