How To: Building Your Own Render Farm
Rolling Your Own Render Node
A popular option for the freelance artists out there is building your own nodes. The advantages are similar to the benefits of building your own PC rather than buying an off-the-shelf system: direct control over the components that go into the build and lower per-unit costs. However, the disadvantages are also the same: you have to support the failure of individual pieces yourself or pay someone else to come in and work on them when they break.

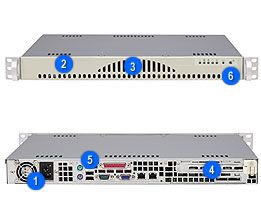
These days it really makes sense to go ahead and use rack-mounted enclosures. You'll spend a little more, but the space and power savings will be well worth it. A 1U chassis, like the Supermicro CSE-512L-260, retails for around $100 and includes a 260 W power supply. More than likely, a node will use its own onboard graphics rather than a discrete graphics card, so there's a significant power savings right off the bat. Most 3D animation and compositing renderers rely on the CPU instead of GPU, while the possibility of GPU-based rendering will be discussed below. If your nodes are going to be mission-critical, you may want to look for units with redundant power supplies, but this will significantly increase the per-unit cost.
For the rack itself, you can either spend the money and buy a professional unit (Ed.: I have one of these in my garage) or you can instead convert pieces of furniture with the correct dimensions to house your nodes. The RAST or EINA bedside tables from IKEA, for example, plus a pair of Raxxess rack rails (which you can find, oddly enough, at music stores) do the job at a budget price.
Instead of using rackmount enclosures, it is also entirely possible to use traditional cases with MicroATX motherboards, such as the Antec NSK-1380 or a barebone cube like one of Shuttle's XPC chassis. A cube chassis is small, can be purchased with low-wattage and high-efficiency power supplies, and in some cases can be stackable. You can't get quite the processing density available through rackmount units, but you can use less-specialized components for cooling, while no riser card is needed to add a discrete graphics. Plus, the system can perform other functions by serving as a secondary workstation, home-theater PC (HTPC), and so on.
Picking a motherboard for the system is actually an easier prospect (you can even choose from the sub-$100 motherboards that we reviewed here). It should be noted, however, that only one of these boards has onboard graphics, which you should consider necessary for these nodes (think G41/G43/G45 instead of the non-integrated graphics versions of those chipsets). In fact, if you don't intend to ever put a graphics card in any of these nodes, you can get an even cheaper motherboard that doesn't have a PCI Express (PCIe) x16 slot on it (instances in which you may put a graphics card in a render node will be discussed below). It is likely, though, that you'll want to pick a board with four memory slots instead of two.
For memory, 4 GB is a good start. With the availability of inexpensive 4 GB kits (reviewed here), there's no reason not to. If you are using a dual-core processor and your renderer is a 32-bit application, then 4 GB means you'd have just short of the maximum RAM for each core (which is a good idea if your renderer doesn't multi-thread properly). If you're using a 64-bit renderer, then more memory will likely be better. We are, of course, discussing using DDR2 memory because in this type of system configuration, there is no real advantage to using DDR3 memory, and the price difference increases the cost of your nodes without a significant performance benefit.
Stay on the Cutting Edge
Join the experts who read Tom's Hardware for the inside track on enthusiast PC tech news — and have for over 25 years. We'll send breaking news and in-depth reviews of CPUs, GPUs, AI, maker hardware and more straight to your inbox.
Current page: Rolling Your Own Render Node
Prev Page Introduction Next Page Hardware Component Selection For Each NodeMost Popular

