Plug In The Module And Your NAS Server Is Ready To Go
Both modules are operated in exactly the same way. Simply plug the Open-E flash module into the first IDE port of the motherboard and you can get right down to the configuration. The NAS server's hardware requirements are fairly modest. The manufacturer recommends a CPU speed of at least 600 MHz, 128 MBytes RAM and a network card. The hard drive capacity is up to the individual user. Since the Soho module does not support an additional IDE or RAID controller, only two extra hard drives at most can be connected to the second IDE channel. If the IDE controller supports hard drives in excess of 128 GBytes, these are recognized and integrated by the Soho server without any problem. Thus, for example, it is possible to use two Samsung 160 GByte hard drives that together go for less than $250. More capacity requires using the slightly more expensive NAS-2.0 solution. This flash module supports a wide range of standard RAID controllers for IDE, SCSI or serial ATA hard drives.

The flash module is simply plugged into the first socket of the IDE interface.
Configuring The NAS Server
After booting up for the first time, all you need to do is allocate the NAS server with an IP address. If the network has a DHCP server or an Internet router, the module can be automatically routed to the network environment. Using the key combination CTRL+Alt+N, you can manually input the IP address as well as the submask and gateway. After resetting the system, the NAS server will then work with the predefined network environment and you can get down to the actual configuration of the hard drive and users.
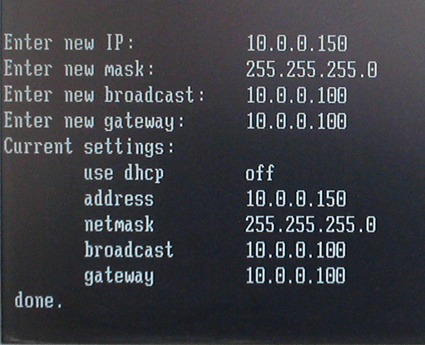
The first network setting has to be made on the server.
