A Beginner's Guide For WaterCooling Your PC
Test System & Benchmarks
Now that we've gone through all this trouble to set it up, let's see what advantages this water-cooling system has afforded us.
| System Hardware | |
|---|---|
| Processor(s) | Intel Core 2 Duo e43001.8 GHz (overclocked to 2250 MHz), 2 MB L2 Cache |
| Platform | Biostar T-Force 965PT (socket 775)Intel 965 chipset, BIOS vP96CA103BS |
| RAM | Patriot Signature Line1x 1024 MB PC2-6400 (CL5-5-5-16) |
| Hard Drive | Western Digital WD1200JB120 GB, 7,200 RPM, 8 MB cache, UltraATA/100 |
| Networking | On-board 1 Gb Ethernet |
| Graphics Card | ATI X1900 XTX (PCIe)512 MB GDDR3 |
| Power Supply | Koolance 1200 W |
| System Software & Drivers | |
| OS | Microsoft Windows XP Professional 5.10.2600, Service Pack 2 |
| DirectX Version | 9.0c (4.09.0000.0904) |
| Graphics Driver | ATI Catalyst 7.2 |
We used a Core 2 Duo platform in our test bed because the e4300 CPU is a great overclocking candidate. This let's us push the CPU a bit and see how high the temps will go with stock air-cooling versus water-cooling.
Our methodology is simple: push the e4300 as far as it will go with its stock air cooler, then benchmark it with the water cooling system and compare results. As it turned out, the e4300 was willing to go much higher than its stock 1.8 GHz. With the CPU frequency increased from a stock 1800 MHz to an overclocked 2250 MHz, the e4300 easily handled the 450 MHz over clock without a voltage increase or other problems. However, the stock cooler proved it wasn't up to the task, with the CPU temperature rising to an uncomfortable 62 degrees Celsius under load. While the core would have gone higher, we weren't happy increasing the temperature at this point so we recorded the results and installed the water-cooling system.
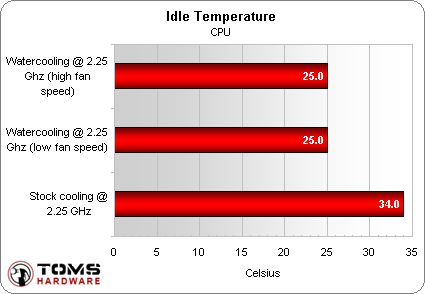
Before we dig in to the load temperatures in detail, let's have a look at the idle temperatures:
Idle Temperature Graph
At idle, we're seeing a respectable decrease of about 10 degrees in CPU temperature when using water-cooling. This doesn't seem like a big deal at all when we consider that the stock cooler is a low-end part and that a premium aftermarket air cooler would probably be more effective. But we have to keep in mind that water cooling cannot bring the temperature down any lower than the ambient temperature, which in our case was about 22 degrees Celsius.
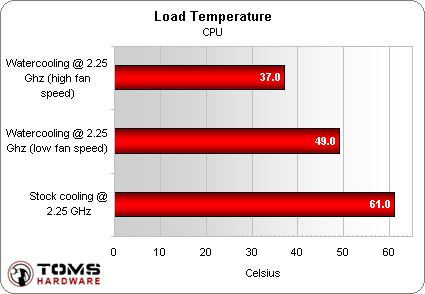
When we put the system under load-a 10 minute run with the Orthos stress tester-the water-cooling setup really shows its stuff:
Get Tom's Hardware's best news and in-depth reviews, straight to your inbox.
Load Temperature Graph
Now things are getting really interesting. The stock air cooler can't even keep the CPU below an uncomfortably high 60 degrees Celsius, but the water-cooling setup is under 50 degrees at its lowest fan speed. Not only are we running cooler, but things are much quieter than the stock CPU cooler's fan.
With the water-cooling system running fans at full tilt, the CPU is kept under 40 degrees! This is 24 degrees cooler than the stock cooler at load, and is even on par with the temperature the stock cooler provides at idle. This is a very impressive result, although at this fan speed the water-cooling system produces more noise than I'd like. The fan speed is adjustable in 10 steps however, and I can't imagine needing to run it at full power in a real-world situation. Orthos pushes the CPU harder than anything I'd use on my PC other than benchmarking, but it's interesting to see how well the water-cooling system can theoretically perform.
Finally, let's focus on the results we've had with the video card. The X1900 XTX is generally a very hot beast, but we had one of the best air coolers money can buy on it: the Thermalright HR-03. After a 10 minute stress test with Atitool's artifact tester, what advantage did water-cooling provide?
Current page: Test System & Benchmarks
Prev Page Planning & Installation, Continued Next Page Video Card Temperature GraphDon Woligroski was a former senior hardware editor for Tom's Hardware. He has covered a wide range of PC hardware topics, including CPUs, GPUs, system building, and emerging technologies.
-
ComputerCustomizer What an absolutely useless article. Why any enthusiast would choose Koolance over a custom setup that would give twice the performance at the same cost is beyond me.Reply -
tailgunner07 I have to disagree with the above comment, as a novice to water-cooling I found the article useful and informative. While I would not choose the Koolance kit, due to cost, I now have a better idea of how to proceed.Reply
I would however recommend using a kit as a starting point and modify it as needed rather than ordering a collection of parts and finding that they do not meet your requirements. -
JDMH22 I agree tailgunner07. I'd use a kit and then start adding more cooling blocks and accessories to meet my needs. I did learn more about water cooling in this article.Reply -
to ComputerCustomizer look before speaking this article was written over a year a go when people were shit scarred of water cooling setups.Reply
There weren't too trusty names in the market either. They used the koolance system as it was the easiest for n00bs at the time. -
Koolance also the best water cooling system that are around, there's nothing wrong with this usefull review, don't use water cooling if don't have more buck for it.Reply
-
Invid I agree with Tailgunner, if one is a novice and feels they do not want to delve too deeply into the realm of water cooling then something like this is perfect and the article is helpful in that sense.Reply
For custom cooling and purchasing of individual items then this article will not help you but then again this isn't about picking and choosing individual components for custom cooling options.
- Invid -
Bot Series What ever happened to the Cray idea of just dropping your PC into a fish tank full of Mazola?Reply -
coolronz well looks like everyone agrees with tailgunner.. lol i was kind of concerned more about fittings and sizes.. i just got a HAF 932. theres enough room for an internal tri rad 120mmx3 on the top of the case, and a single 120mm rad on the back. i do like how they showed to T off after the CPU. i bought a TT pump, res and front temp gauge off eBay and am in the works of buying the rest of the parts. one thing that confused me is what the heck is a G1/4 fitting? now i get it, its just a common pipe thread size. and then you go to a 3/8" or 1/2" ID hose. would have been nice to get a little into that a little... but then again its a beginners article.. great job!!!Reply -
This is very useful. I believe all who indead would love to ave better and faster cooling will go for a kit like this, despite the cost.Reply

