A Beginner's Guide For WaterCooling Your PC
Planning & Installation, Continued
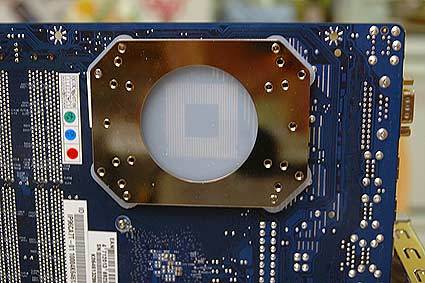
With the preliminaries out of the way, we can install our water-cooling blocks. The Koolance CPU block we're using requires a metal support bracket to be installed behind the CPU socket. The support bracket comes with a plastic flange to prevent electrically shorting out the motherboard, which is really quite good. We begin by detaching the motherboard from the case and installing the support bracket:
The CPU block support bracket on the back of the motherboard
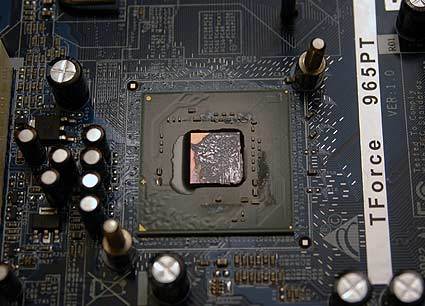
With the motherboard detached, we can also remove the stock heat sink that is attached to the motherboard's chipset. In our case, the motherboard is a Biostar 965PT, and the chipset is cooled with a passive heat sink that is held on with plastic pegs.
The motherboard's chipset with the heat sink removed, ready for the water block
Once it's removed, we must attach the mounting hardware that comes with the chipset water block.
During this installation, we noted that the chipset cooler's mounting hardware - specifically a plastic washer - appeared to pressure a resistor on the back of the motherboard. This is the kind of thing you have to watch out for during an install of custom equipment. Simply tightening the bolts for this mounting hardware might have done irreparable damage to the motherboard, so pay attention and take care!
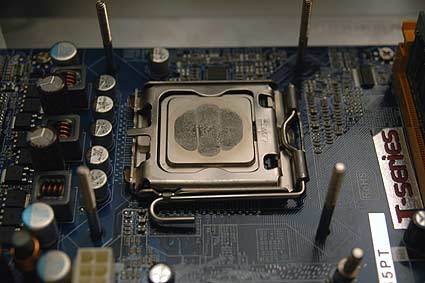
With the CPU and chipset mounting hardware attached, we can re-attach the motherboard to the PC case and start thinking about attaching the water blocks to the CPU and chipset. Make sure to clean the CPU and chipset of old thermal paste before applying a thin layer of new thermal paste for the water blocks.
Get Tom's Hardware's best news and in-depth reviews, straight to your inbox.
The CPU with the water block mounting hardware
You may want to attach the liquid coolant tubes to the water blocks before mounting them to the motherboard. Although it's a bit more difficult to work with this way, I was more comfortable twisting on the compression fittings - which take a bit of torque and force - before they were attached to the vulnerable CPU and chipset. Just make sure you've given yourself enough hose to play with and you can trim it to fit later.
Current page: Planning & Installation, Continued
Prev Page Planning & Installation Next Page Planning & Installation, ContinuedDon Woligroski was a former senior hardware editor for Tom's Hardware. He has covered a wide range of PC hardware topics, including CPUs, GPUs, system building, and emerging technologies.
-
ComputerCustomizer What an absolutely useless article. Why any enthusiast would choose Koolance over a custom setup that would give twice the performance at the same cost is beyond me.Reply -
tailgunner07 I have to disagree with the above comment, as a novice to water-cooling I found the article useful and informative. While I would not choose the Koolance kit, due to cost, I now have a better idea of how to proceed.Reply
I would however recommend using a kit as a starting point and modify it as needed rather than ordering a collection of parts and finding that they do not meet your requirements. -
JDMH22 I agree tailgunner07. I'd use a kit and then start adding more cooling blocks and accessories to meet my needs. I did learn more about water cooling in this article.Reply -
to ComputerCustomizer look before speaking this article was written over a year a go when people were shit scarred of water cooling setups.Reply
There weren't too trusty names in the market either. They used the koolance system as it was the easiest for n00bs at the time. -
Koolance also the best water cooling system that are around, there's nothing wrong with this usefull review, don't use water cooling if don't have more buck for it.Reply
-
Invid I agree with Tailgunner, if one is a novice and feels they do not want to delve too deeply into the realm of water cooling then something like this is perfect and the article is helpful in that sense.Reply
For custom cooling and purchasing of individual items then this article will not help you but then again this isn't about picking and choosing individual components for custom cooling options.
- Invid -
Bot Series What ever happened to the Cray idea of just dropping your PC into a fish tank full of Mazola?Reply -
coolronz well looks like everyone agrees with tailgunner.. lol i was kind of concerned more about fittings and sizes.. i just got a HAF 932. theres enough room for an internal tri rad 120mmx3 on the top of the case, and a single 120mm rad on the back. i do like how they showed to T off after the CPU. i bought a TT pump, res and front temp gauge off eBay and am in the works of buying the rest of the parts. one thing that confused me is what the heck is a G1/4 fitting? now i get it, its just a common pipe thread size. and then you go to a 3/8" or 1/2" ID hose. would have been nice to get a little into that a little... but then again its a beginners article.. great job!!!Reply -
This is very useful. I believe all who indead would love to ave better and faster cooling will go for a kit like this, despite the cost.Reply


