How To Record in OBS
Become the star of your own show
Learning how to use OBS (Open Broadcaster System) isn't only for streamers. OBS can do a lot more than stream live content. It is a virtual broadcast studio capable of mixing audio and video elements together. It's easy to use and with it we can create an instructional video, talk, or the next viral sensation. Best of all, it's free software. With OBS you can record or stream your gaming sessions, your screen, or yourself.
At first OBS can be a bit confusing to use. Even with its recent updates the user interface still has a learning curve. But underneath this interface is a user-friendly application that, unlike the Etch A Sketch I never got for Christmas, has a ton of features beyond streaming. I’ve created YouTube videos with OBS, MP3 recordings, and I’ve even made voice over tracks for my demo reel.
The first set of instructions is for recording video.
In this how-to we will learn the basics of the OBS user interface with the end goal being to create our own video that mixes audio and video elements into one recording.
Setting Up OBS
OBS is a free download and it has clients for Windows macOS and Linux. Our goal here is to download the application and prepare our work environment before we record any content.
1. Download and install OBS for your operating system.
2. From the Start menu, open OBS.
Get Tom's Hardware's best news and in-depth reviews, straight to your inbox.
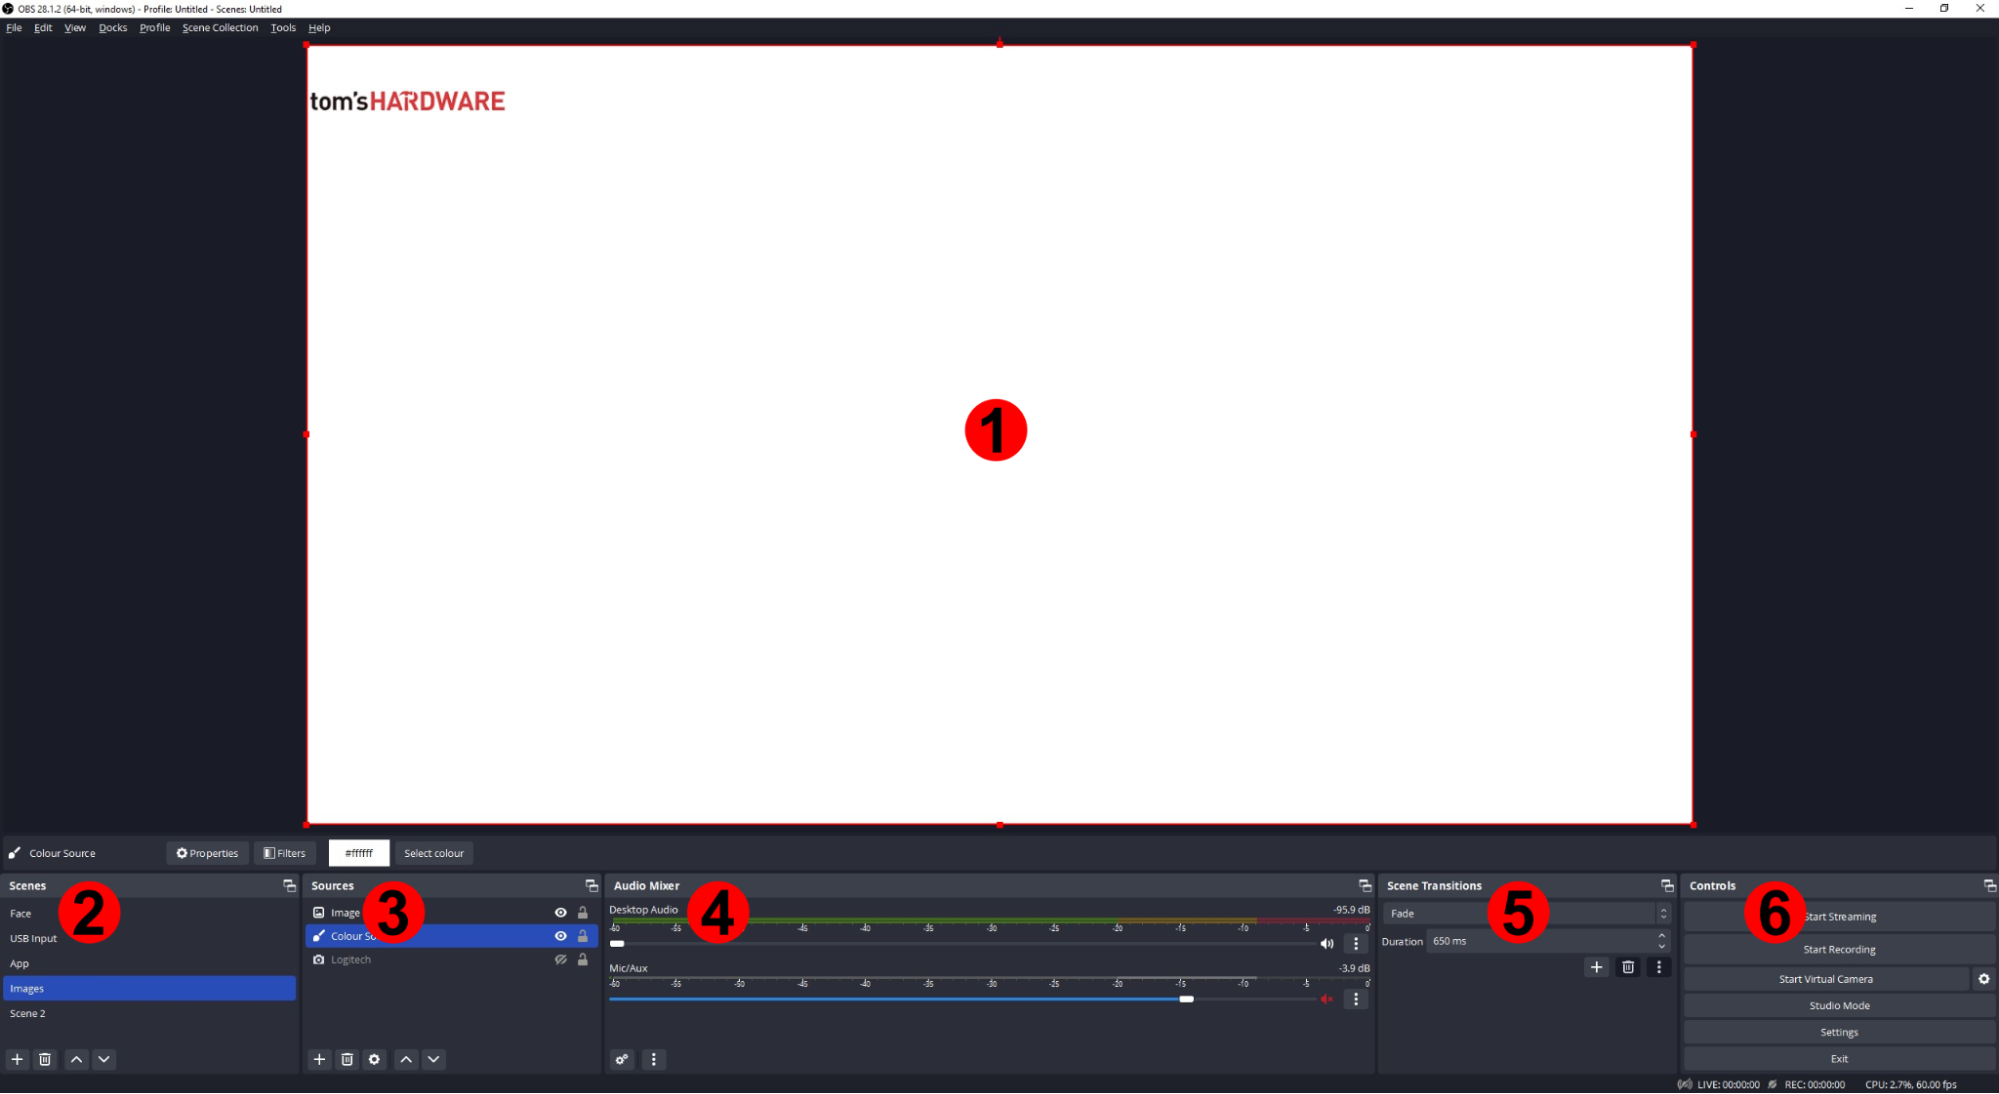
The OBS user interface is broken down into sections, each has a specific role.
1. The output. Here is where the video output is displayed. It can be a mixture of webcam, game footage, text overlays etc. All of these elements are visible in the final video.
2. Scenes. Scenes are sets of sources grouped together. An example would be one scene for a piece to camera, another scene for an alternative camera angle and a further scene with an application window open.
3. Sources. Sources are the individual elements that make up a scene. We can mix different audio and video sources such as external game capture devices, application windows, microphones and instruments. Sources can be placed on top of one another by moving the order in the Sources list. This enables us to add graphics and video on top of our camera feed.
4. Audio Mixer. The audio mixer shows a live reading of each enabled audio device. We can monitor the levels of each device, tweaking them with the slider to ensure that the audio is clear.
5. Scene Transitions. When moving between scenes, a short fade is applied to ease the viewer. The duration can be changed, or completely replaced with a quick cut.
6. Controls. Here we can start / stop a recording / streaming session, tweak our settings and in advanced use we can create a virtual camera that mixes the OBS output for use in livestreams.
Setting the Output Folder
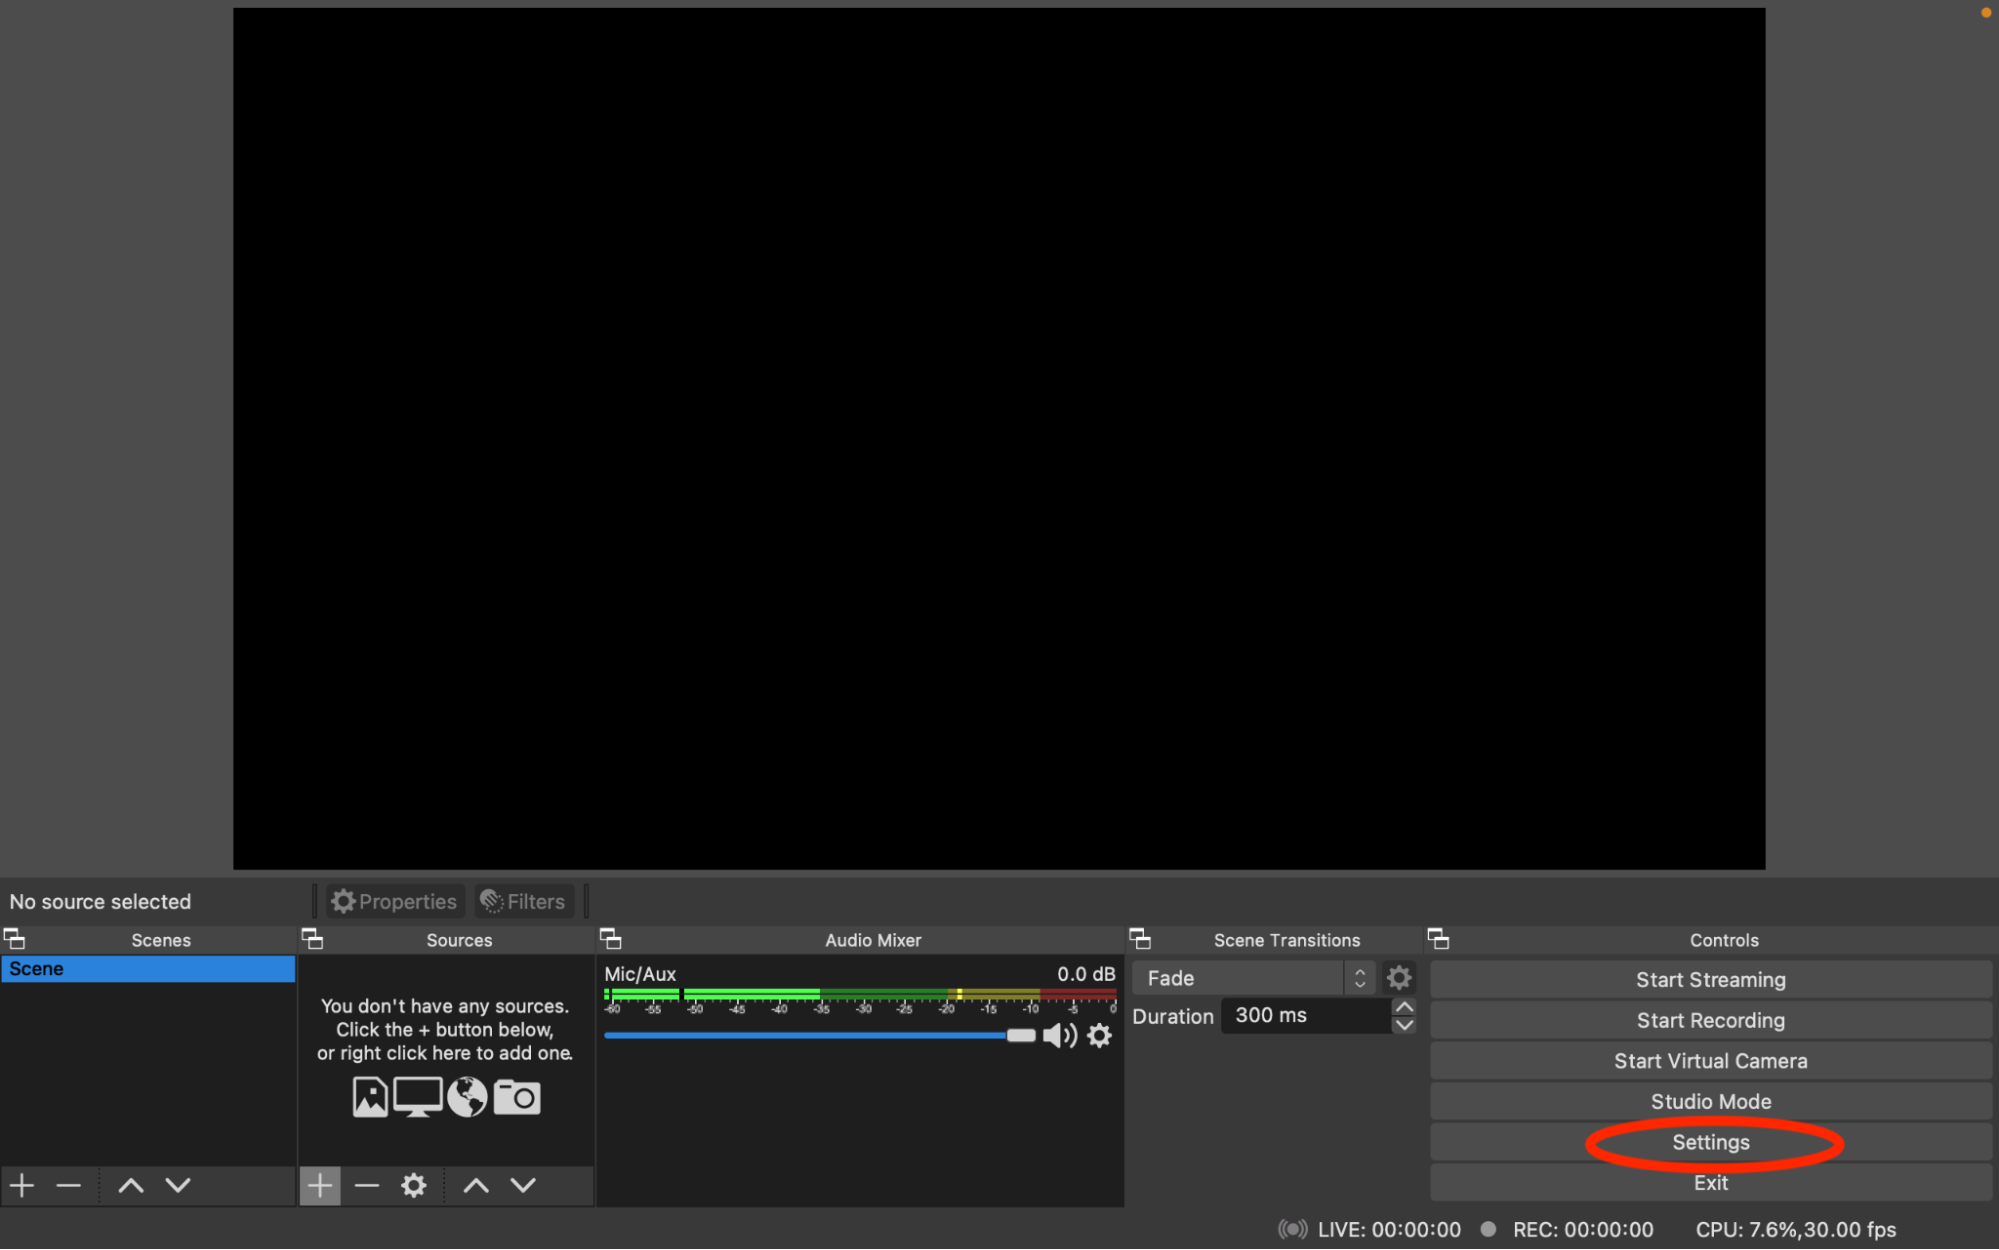
It is good practice to save your output to a certain location. In OBS we can do this via the Settings menu.
1. Under Controls, click on Settings. Alternatively, you can go to File > Settings.
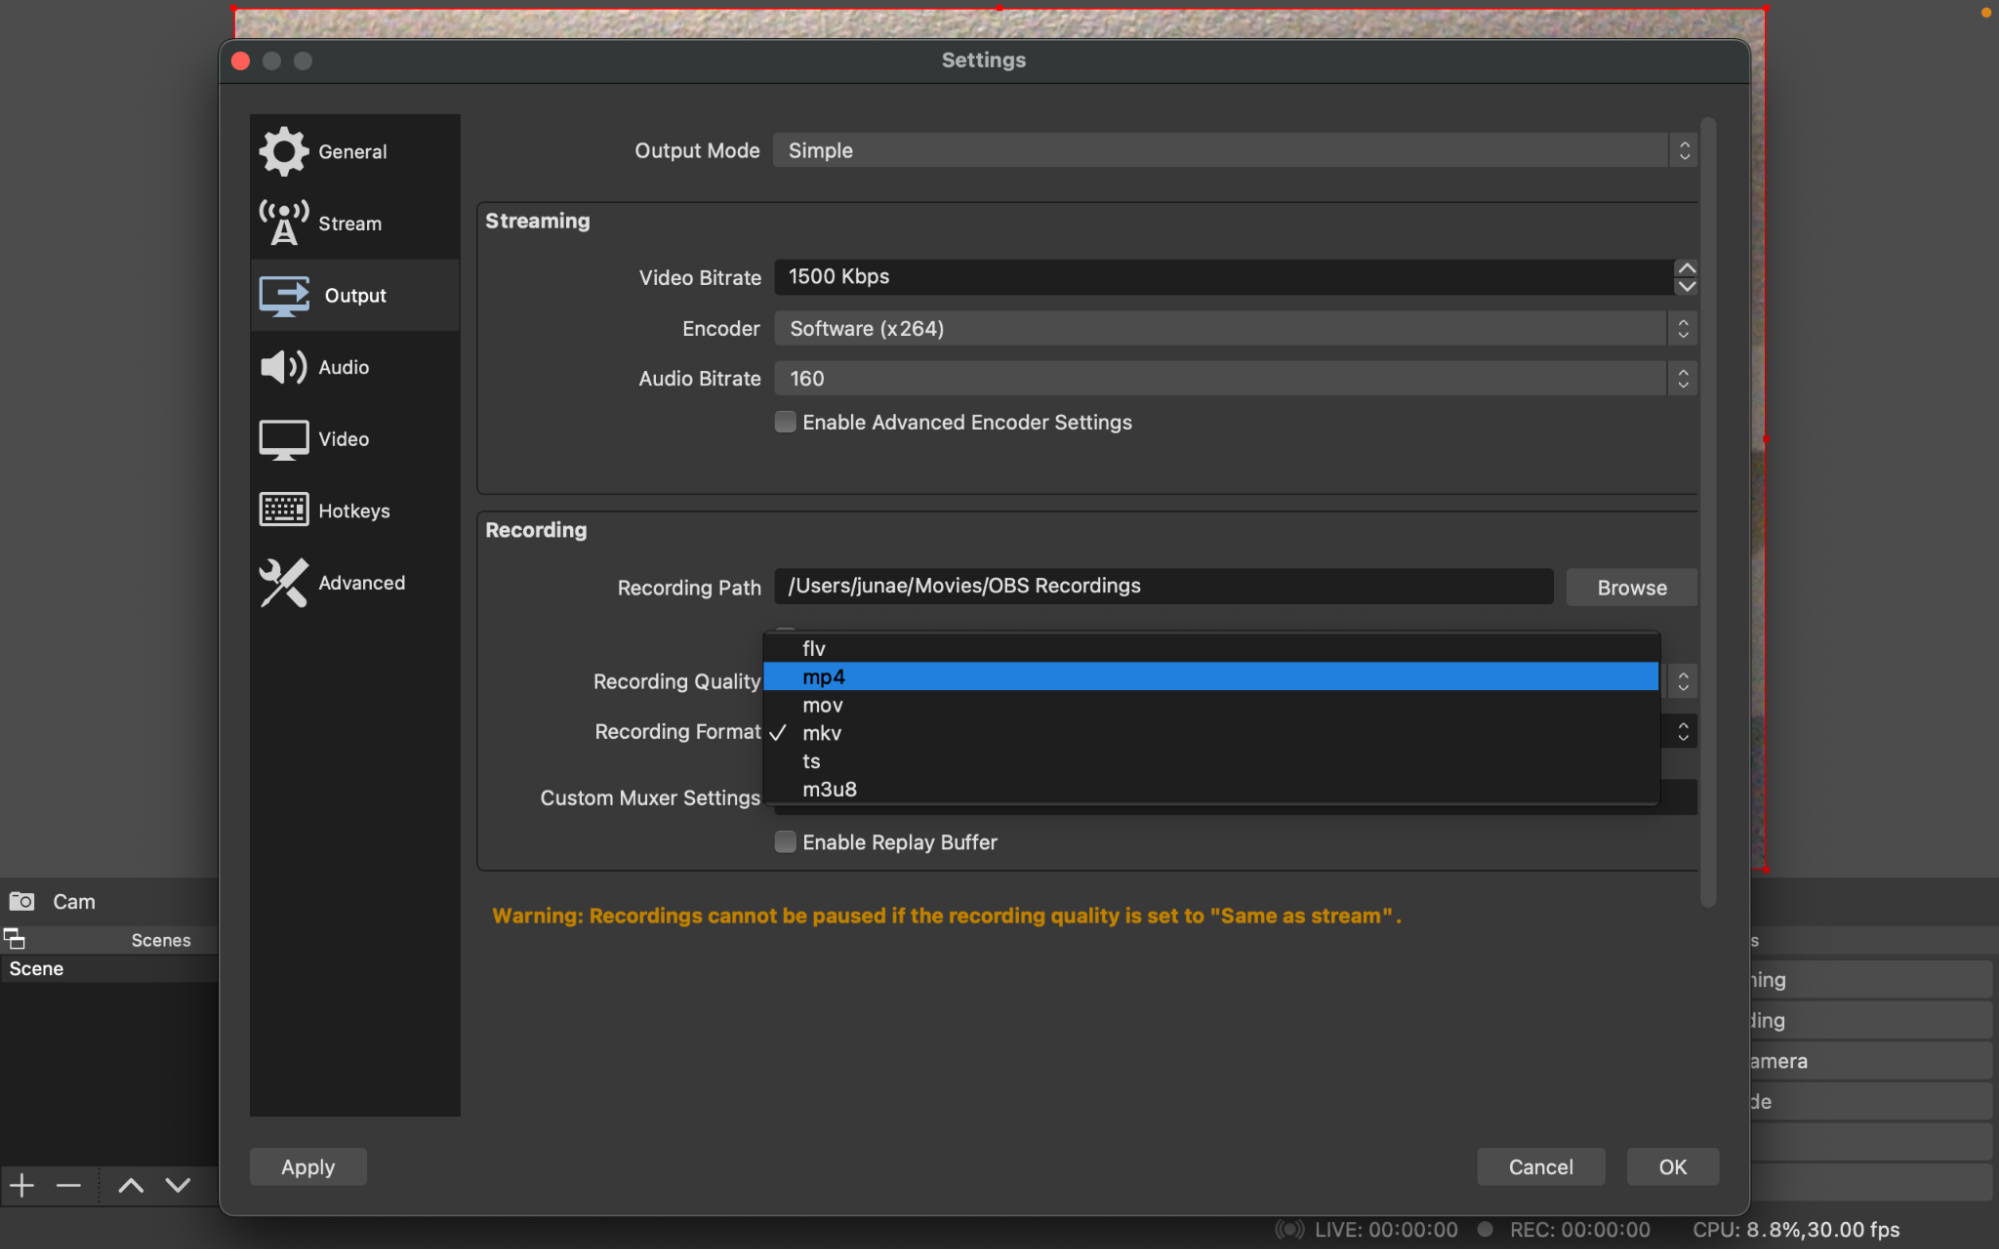
2. Under Recording Path, click on Browse and set the folder to save your output.
3. In the Output menu, click on the Recording Format menu to change the Recording Format. This will change the format of the video file. Changing the Recording Format will bring up a warning — if you know how to navigate and convert different formats, you can play around with test recordings to determine the best one for your situation. Otherwise, go with MP4, which is the standard format for video and audio. Click OK to close the Settings dialog.
Setting Up to Record
With the configuration complete, we can now start adding sources to our scene. Sources are a mix of audio and video inputs. We will start by adding a video source and then add an audio source.
1. In the sources section, click on “+” to see a drop-down menu of source types. Alternatively, right-click in the sources section and select “Add”. OBS has many different sources. We can show images, slideshows, embedded videos (via VLC), add basic text and show application windows directly in a scene. Any video / image sources can be resized to show multiple sources in one scene, which is useful for video tutorials.
2. From the list select Video Capture Device.
3. Create a new video capture device and rename it accordingly. Click OK to save.
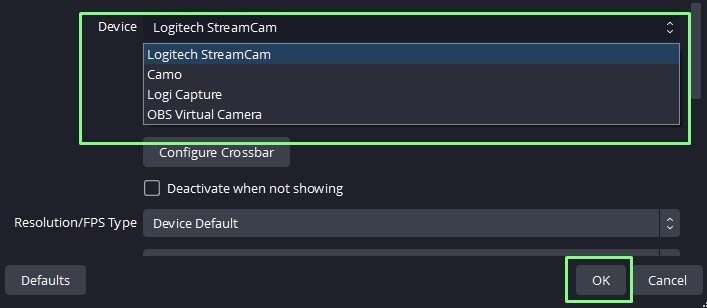
4. In the new dialog, under Devices, select the camera and Click OK. Your setup may consist of more than one camera. They will appear as options in the dropdown list. OBS allows you to add more than one video capture device to a scene. Camera settings (such as focus, exposure, white balance) can be changed by clicking on Configure Video, but modern day webcams are able to auto-adjust for the best image quality.
5. In the output window, grab the corners of the source to resize and reposition your camera. We can tweak the layout and size to exactly how we would like it to look.
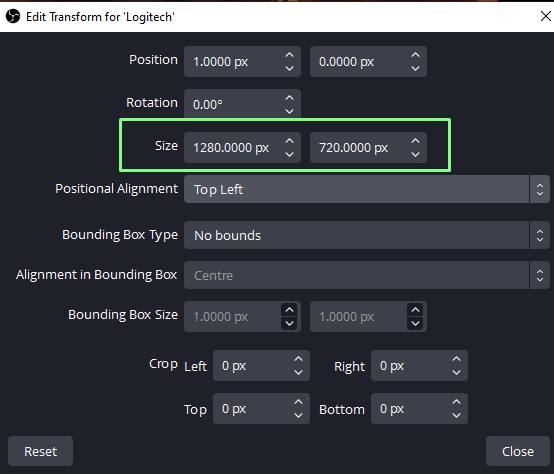
6. For a video source with specific dimensions, right Click on the Source and select Transform >> Edit Transform.
7. Change the size to 1280x720, or to a resolution that suits your requirements. Click Close to save. This menu gives us precise control of the position, size and alignment of the video source.
We have a video source and now we need to add an audio source to our recording.
1. In the sources section, click on “+” to see a drop-down menu of source types. Alternatively right click in the sources section and select “Add”. Multiple audio sources can be added to a scene, for example a microphone and electric guitar can be mixed. Just pay careful attention to their volume levels in the mixer. Vocals should be clear against any background instruments.
2. From the list, select Audio Input Capture.
3. Create a new audio input capture device and rename it accordingly. Click OK to save.
4. In the new dialog, under Devices, select the audio input and Click OK.
5. Tweak the volume settings for the audio input device. Keep the levels out of the red as clipping (distortion) will occur. Aim for a value in the low yellow range. This will ensure consistent audio levels for the listener.
Recording a Video
Now it’s time to hit record!
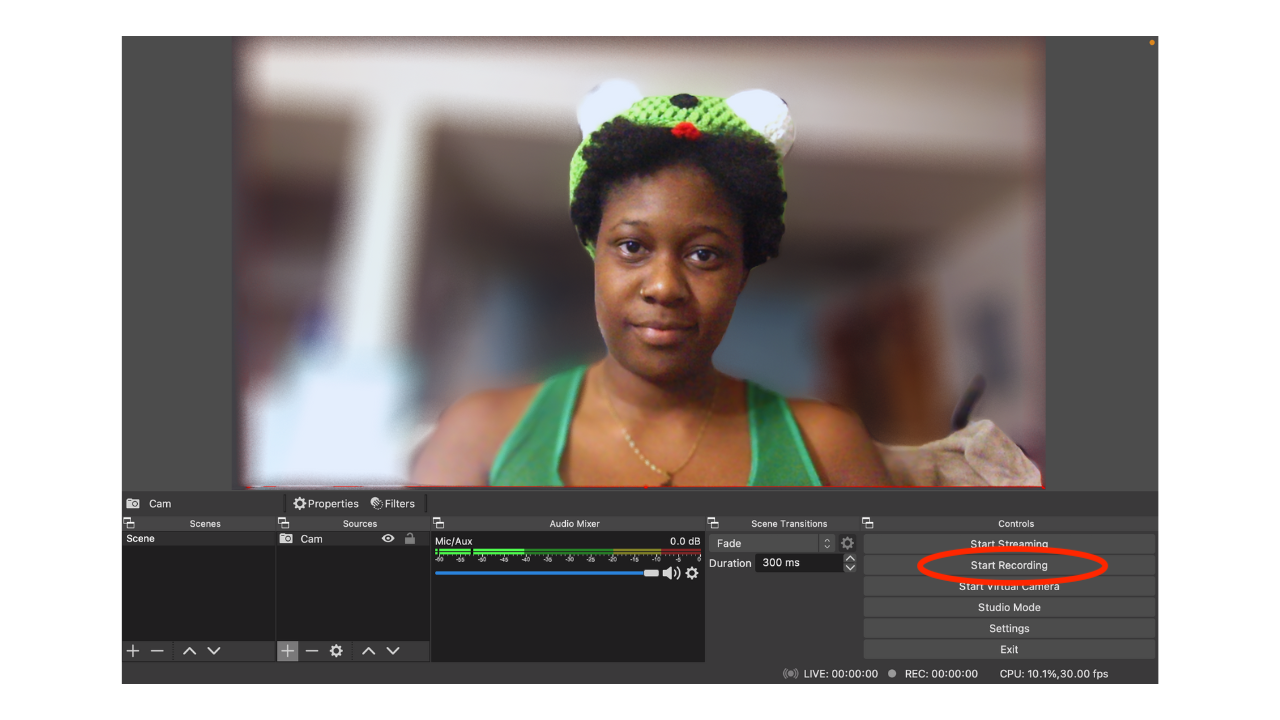
1. Click on Record, found in the Controls section. If you need to pause, click on the pause button to the right of Stop Recording.
2. Record 30 seconds of video and then click Stop Recording.
3. Go to the folder containing the video and play it using your preferred media player. Check the video for correct framing and sound levels. Ideally, the presenter should be in the center of the frame, and audio levels should be comfortable for viewers listening at half volume. If that is not the case, go back into OBS and reframe the shot, and tweak the audio levels until you find the right mix.
Wrapping Up
OBS is a great tool to experiment with. We can use it to add “lower thirds” (graphics to add extra information, such as news tickers) or design elements such as logos and animated graphics. Adding a background to a video is as simple as adding an image source and using the sources list to place it behind you.
Now that you know how to record in OBS, go forth and make great content! May the bandwidth be with you.

Junae Benne is a freelance writer for Tom's Hardware US. She reviews gaming peripherals and covers streaming tutorials.
-
PlaneInTheSky No talk about NVENC?Reply
The most important thing about OBS you should know...is that you need to turn on NVENC hardware recording. -
jkflipflop98 Actually you should use QuickSync over NVENC. QuickSync has far better quality and it has 0 impact to your game as the main GPU is now 100% utilized for gaming.Reply
The last time I installed OBS I simply could not get it to record video no matter what I did. Finally uninstalled and then reinstalled and everything works like a charm now. -
Exploding PSU I wonder if there's a way to reduce CPU/GPU usage in OBS. I use OBS to record zoom calls and meetings on my laptop but it sucks out the battery very quickly. Not to mention the laptop would overheat so much it sometimes shuts down on its own.Reply -
PlaneInTheSky ReplyActually you should use QuickSync over NVENC. QuickSync has far better quality and it has 0 impact to your game as the main GPU is now 100% utilized for gaming.
Quicksync over NVENC? Are you taking the piss?
No one should be using QuickSync when NVENC is available.
NVENC has no impact on your game's FPS, because it is a dedicated encoding chip on the GPU that has nothing to do with game performance. Turning on NVENC has 0 effect on your game's performance.
The last time I installed OBS I simply could not get it to record video no matter what I did.
So why are you giving terrible advice to people if you can't even get the software to work and don't understand that NVENC is a dedicated separate chip, why give out your advice? -
Str8Chillaxin ReplyPlaneInTheSky said:Quicksync over NVENC? Are you taking the piss?
No one should be using QuickSync when NVENC is available.
NVENC has no impact on your game's FPS, because it is a dedicated encoding chip on the GPU that has nothing to do with game performance. Turning on NVENC has 0 effect on your game's performance.
So why are you giving terrible advice to people if you can't even get the software to work and don't understand that NVENC is a dedicated separate chip, why give out your advice?
Actually, since QuickSync uses the chip's dedicated hardware encoder (just like NVidia has), it uses very little CPU resources to encode. In most cases less than 5% CPU even when trying to squeeze out some fine tuning. The FPS loss is practically unnoticed and nearly lossless. QuickSync is a hardware encoder and could potentially be better quality than NVENC at the moment, according to EposVox who has performed tests recently comparing H264 Quicksync to NVENC and x264 slow.
