From Hyper To Giga ... Or Was It The Other Way Around?
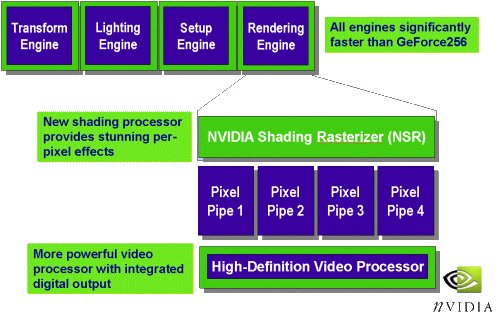
The next big and new thing implemented into GeForce2 is the ominous 'NVIDIA Shading Rasterizer'.
Before I will get into what that really is, we should first realize some important numbers. We all remember that GeForce comes equipped with four parallel rendering pipelines. Those four pipelines can either produce one pixel per clock each or they can work together for stuff like multi texturing. GeForce is clocked at 120 MHz, thus the pixel fill rate of GeForce is four pixels times 120 million per second = 480 Mpixels/s. The texel fill rate, a term that was invented by 3dfx and then raped by virtually every marketing person in the 3D-business, describes the amount of texture-pixels (short 'texels') that can be applied in the rendering process. In case of GeForce each pipeline can either apply one texel to each pixel that its rendering or several (up to four obviously) pipelines can apply several texels to one pixel in parallel. Therefore GeForce's texel fill rate is 480 Mtexels/s.
Things are a lot kewler with GeForce2. What NVIDIA 'modestly' calls 'Hyper Texel Pipeline' is supposed to reflect GeForces's ability to apply TWO texels per pixel in each of its four pipelines. ATi will have a hard time to top the word 'hyper', since Radeon256 will be able to apply THREE texels per pixel in each of its two pipelines, but let's get back to GeForce2. Now since GeForce2 is clocked at 200 MHz, four pixel pipelines sum up to a pixel fill rate of an impressive 800 Mpixels/s . Due to the 'Hyper Texel Pipeline' however, the texel fill rate of GeForce2 is even better. If two texels can be applied to each pixel in each pipeline we get to 2 texels x 4 x 200 million per second = 1600 Mtexels/s or 1.6 Gtexels/s ! We all have realized that 2000 is the Giga-year, so we should not hesitate and congratulate NVIDIA for being the first chipmaker in the mainstream 3D graphics business to reach the mystic Giga. You know how much I fancy the word 'Giga' and Giga-NVIDIA was nice enough to do me a Giga-favor by putting 'Giga' into GeForce2's name. 'GTS' stands for 'Giga Texel Shader', not for 'Grande Tourismo Speziale'. Still I would have simply called it 'Giga GeForce', short 'GG', sounding like 'Gigi', which would still have left the Italian touch in GeForce2's name and Enzo Ferrari wouldn't have to spin in his grave, wondering what the heck a 'texel shader' is.
Getting back to the impressive fill rate numbers of GeForce2 GTS we should realize that it does not only mark the leader in the 3D arena for some time to come, but also that it represents an improvement of 66% in pixel fill rate and 333% in texel fill rate over its predecessor GeForce. I only wish that there were an adequate improvement in memory bandwidth too.
NSR - NVIDIA Shading Rasterizer
NVIDIA is very proud on their 'Shading Rasterizer'. As a matter of fact it is supposed to be the technological key feature of GeForce2 GTS.
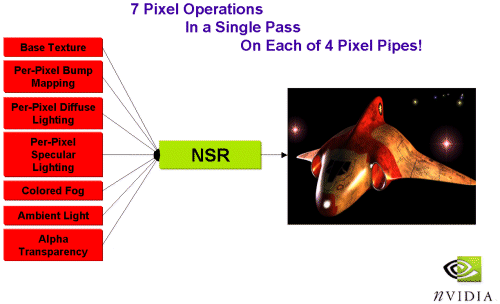
GeForce2's 'HyperTexel Pipelines' are supposedly able to do 7 different pixel operations in one pass per pipeline. GeForce and even earlier chips could do most of them in one pass already. The three exceptions are Per-Pixel Bump Mapping, Per-Pixel Diffuse Lighting and Per-Pixel Specular Lighting. Although it's a great idea to list those three as if they were all something different, each one is simply one way of using Per-Pixel Lighting. We'll get to that later.
The question now is, how many of those operations together can be done by NSR in one pass. The basic texture and the three per-pixel lighting operations can all be done in one pass, since they only depend on the texture and normal map that need to be applied. I wonder however, if colored fog, ambient light and alpha transparency can be applied in the same pass as well.
Per-Pixel Lighting - The Secret Behind NSR
Now that we've talked so much about transforming, wire frames and more in the GeForce review last year it is really time to look into lighting a bit more closely. We know one thing. Without light the world would be dark, an experience many of us had when they've ever encountered a major power outage at night. Obviously it's just the same with the virtual 3D world created by our favorite 3D game. To get light into it, and realistic light at that, there have been two common techniques so far. The first, most widely used, and by T&L (what do you think the 'L' stands for?) supported lighting technique is 'vertex lighting'. The other well-known technique is the usage of 'light maps', which are applied in the texturing process.
Vertex Lighting Or Gouraud Shading
First of all I would like to point out that there's nothing wrong with vertex lighting! Only because NVIDIA has added a new funky lighting technique, we should not think that vertex lighting will go away. As a matter of fact it is still the most important lighting technique and it is always used on every 3D object before other lighting techniques kick in.
You certainly remember the 'wire frame' model, which is the basis of a 3D scene. Any object in this wire frame model consists of a certain amount polygons, may it be a car or just a flat wall. The 'corners' of each polygon are called 'vertices' and the singular is 'vertex'.

You can see the ball in the above example. It consists of many polygons and thus of many vertices. Each vertex of a scene has got information about its location, its color and finally, which is very important, about its orientation relative to a light source, easier said, the direction it is actually facing.
'Lighting' means making an actual solid looking object out of the wire frame. In vertex lighting or 'gouraud shading' the light and color information is taken from each vertex and the lighting and color of pixels in between the vertices are interpolated. You can imagine that the lighting and color of those pictures depends on their distance from each of the three vertices, their color and lighting. This way of lighting is exactly what the 'L' in the T&L-engine of GeForce and GeForce2 GTS does.

As you can see, the lighting can look perfectly realistic as long as an object consists of enough polygons or vertices. In case of that ball it makes perfect sense to let it consist of many vertices, just to make sure it's got a smoothly round surface. The story is very different for flat objects. Theoretically a flat wall could consist of only four vertices, marking the corners of the wall, so that we've got two triangles representing the object 'wall'.
You can certainly imagine that lighting this object with only four points of light and color reference information won't produce a very realistic lighting at all. The only way around that problem would be to let the flat wall consist of many vertices and thus many triangles.
Once that's done the lighting would become realistic again. However, many vertices put a high strain on the 'transform' part of the 3D-rendering process and it puts a high strain on the bus, since each vertex has to be sent to the graphics chip. It would simply be a waste of resources to let a boringly flat wall consist of more vertices than necessary to define its shape.
In summary we can say that 'Vertex Lighting' or 'Gouraud Shading' is a good and valid technique for objects that consist of many polygons, but it's not good enough for objects that consist of only few polygons. This is how NVIDIA puts it: "Vertex lighting is of limited use in some scenarios because its base unit is the triangle ."
Light Maps
After what we've just learned about 'vertex lighting' it's not that difficult to imagine scenarios where vertex lighting is definitely not good enough to create the light appearance that the developer desires. A typical example would be a lamp or torch that sticks out from a wall. To make the light appear right on the wall and on the floor, those two shapes would again have to consist of many polygons, the torch would be used as the light source and then the vertex lighting process could calculate the lighting values of each pixel on the wall and on the floor. Especially before the days of integrated hardware T&L, but still now, letting simple shapes consist of many polygons just to ensure the right lighting is a bad waste of CPU and T&L-engine power. That is why the idea of 'light maps' was developed.
The principle of a light map is very simple. The wall, consisting of as few polygons as it takes to define a flat object, is first lit by vertex lighting, since this is the scenario every 3D object is always going through. Then in the rendering pipeline, a texture map is applied to this wall, e.g. showing bricks or whatever else you like.

After that, in a second rendering pass, another map, obviously the light map, is applied to the wall, giving each pixel of the already textured wall a certain light value.

Light Map

The result looks very realistic, but light maps have several down sides. First of all light maps require an additional rendering pass. You might remember GLQuake, which was pretty much the first game that made heavy use of light maps. At the time of GLQuake, very few 3D chips had more than one rendering pipeline and the pipelines back then were only able to apply one texture per pass. On top of that the clock of those good old 3D chips was rather low, somewhere in the 50-100 MHz range. The result of GLQuake's use of light maps was that only very few 3D chips could run it at acceptable frame rates, simply because the anyway low fill rate of the old 3D chips was halved due to the fact that each pixel had to go through the rendering process twice, once for the texture and once for the light map. This situation created the need for 3D chip solutions that could render two textures (and a light map is nothing else than just a special kind of texture) in one pass. Quantum3D's first Obsidian board using the good old Voodoo1 chip was the first one that could render two textures in one pass. The first mainstream solution with this feature was 3dfx's Voodoo2 cards, where simply two texelfx2 chips worked in parallel. The first one-chip solution came from NVIDIA in form of their TNT chip. You have certainly realized that the whole enchilada I am talking about is the once mysterious 'multi texturing', which used to be a big thing these days. Today there's hardly any modern 3D chip anymore that would not at least have two pipelines to process two textures in one clock, but still light maps mean a performance impact, because those two pipelines could produce two simply textured pixels in one clock, instead of only one that's textured with a texture and light map. GeForce2 does not suffer from this issue though, since, as you remember, each of its rendering pipelines can apply two textures to a pixel in one pass. Thus light maps have no performance impact on GeForce2's rendering engine, although we shouldn't forget that they require an additional amount of memory and bus bandwidth.
The second issue with light maps is that they need to be produced by the developer. If you think of my example with the torch on the wall, you can imagine that the developer needs to create a light map for the wall and one for the floor. That's the way it's done in GLQuake, Quake2 and Quake3 for example.
Third and most importantly, light maps cannot give any acceptable impression of depth to an object. With light maps you cannot produce bump mapping effects, because the lighting of a flat bump mapped object changes with the viewing angle. Light maps cannot represent that; they appear the same from any angle that you look at them.
Per-Pixel Lighting
Let me first express that the name 'per-pixel' is not a very lucky choice. Sorry to do that, but I've got to show you why. I recently stumbled across those two sentences: "The difference between ATI's EMBM solution and Matrox's is that, instead of forcing developers to create a separate bump map texture in order to achieve the effect, the Radeon 256 applies the effect on a per pixel basis. The result is an easier time for developers and a more efficient way of performing EMBM than Matrox's solution. " No offence to the person who wrote it, but the above said only proves that the writer had no good idea what he was talking about. The reason is quite simple, 'per-pixel' doesn't say or explain anything about this feature and as you can see above, it can easily be misunderstood.
First of all, light maps are also 'per-pixel'. As you can see if you have another look at the light map from above, each texel of the light map applies a certain level of light to the pixel it is combined with, thus it is a 'per-pixel' operation as well of course. The same is valid for any kind of texture map, including the environment map of Matrox' Environment Mapped Bump Mapping. You cannot say "well, the great thing about 'per-pixel' lighting is that you needn't produce a map of any sort, because the effect is applied on a per-pixel basis", because it's the same as saying "I don't need power stations, because in my house the electricity comes out of the power sockets". Per-Pixel Lighting does of course require data that can be applied at this ominous 'per-pixel basis' and this data comes out of a map which needs to be created by the developer of the 3D scene.
Now here comes the beef about 'Per-Pixel Lighting'. The trick is to use a map that contains the information about the direction each pixel is facing, or - officially - information about their orientation relative to a light source . It's as simple as that, or at least it sounds that simple. The maps required for 'per-pixel lighting' are called 'normal maps'. A 'direction normal' is like a vector that points into a certain direction. Unlike with light maps, the lighting information for the pixel is not contained in the 'normal map', but the 'direction normal' enables the chance to calculate the lighting for each pixel, depending on your view angle. Unlike vertex lighting, where each vertex has a 'direction normal', the normal map gives detailed information for each pixel, so the lighting for each pixel is not interpolated but calculated from a defined value.
Technically it works like this: "The NSR provides hardware support through its register combiner functionality for the texture blending operation called a dot product that makes per-pixel calculations possible. Available to developers in the Microsoft DirectX 6 API and above (D3DTOP_DOTPRODUCT3) as well as OpenGL (via the NV_register_combiners extension), dot product texture blending operations allow diffuse, specular, spot, and point light effects to be calculated dynamically on a per-pixel basis. "
Of course a flat wall does not benefit much from per-pixel lighting, because each pixel in this wall is anyway facing the same direction. However, if you want to give the bricks in this wall a more realistic appearance, you could model a 'normal map' that contains the direction normal of the edges of each brick, giving the flat wall a 3D effect by showing the protrusion of each brick. This gets us right to 'Per-Pixel Bump Mapping'. By creating a normal map that contains 3D information of special shapes on a surface, you can offer 3D impression of details on that surface and it will always look realistic, regardless which viewing angle you chose, although you have not increased the geometry of the object by adding more polygons to it.

This is a big advance over the other two older bump mapping techniques, because Per-Pixel Bump Mapping is independent from the viewing angle.
Per-Pixel Lighting offers more than just bump mapping though. It can add any kind of 3D-effect to any surface, so that it can e.g. smoothen the edges of polygons.
Theoretically it could almost make a ball out of a simple cube. Thus 'Per-Pixel Specular Lighting', 'Per-Pixel Diffuse Lighting', 'Per-Pixel Bump Mapping', Per-Pixel Spot Lighting' and 'Per-Pixel Point Lighting' are only different variations of the normal map. Of course they can be done in one pass altogether, because it's just this one normal map that needs to be used for the dot product 3 calculation. However, somebody please show me one poor harmless little pixel that is bump mapped and diffuse, specular, spot and point lit at the same time. So far about applying all those methods to one pixel at the same time. It does not require any additional maths here and there, it simply requires the direction normal for the pixel, but there won't ever be a pixel that can take advantage of all those 5 different ways of lighting at the same time, because it simply doesn't make sense.
Full Scene Anti Aliasing
When 3dfx announced their upcoming VSA100 architecture last year, one big new feature of their upcoming product was FSAA or 'full scene anti aliasing'. FSAA is indeed something that can improve the quality and realism of a 3D-scene by quite a large amount and so NVIDIA implemented it as well. There's still a lot of discussion going on about if it is a hardware or software implementation. Some claim it's software, NVIDIA insists that it is hardware implemented. I can only say that I couldn't care less what of the two it really is, as long as it works, doesn't cost much performance and you can turn it off if you wish.
What is Anti Aliasing anyway? If you compare the look out of your window with the look at your monitor you might realize that your monitor picture consists of a lot of small units called a 'pixel'. Depending on your screen resolution those pixels can easily be spotted or not, but even if they are very small you can still spot the difference between the view through your window and the image on your screen. One of the reasons for that is the screens inability to show any details beyond the size of a pixel. An example for the limitations of a rasterized image would be drawing a thin black line from the upper left corner of your screen to the lower right corner. If you look close enough you can see that this is no actual line, but a succession of pixels that are building some kind of stair step appearance, which is called 'aliasing'.

The higher you crank up the screen resolution the less your eye and brain is bothered about it, but even at lower resolutions this line could look a lot better by using 'anti-aliasing.

Anti Aliasing is adding some different shades of gray to the original line, cheating your eye to the impression that it is a straight line without the stair step effect.
3D games are suffering from aliasing or the stair step effects a lot, especially when you are playing at a rather low resolution. FSAA is there to remove those stair step effects, but it comes at a prize.