Tom's Hardware Verdict
Gigabyte’s Aorus Z590 Master is a well-rounded upper mid-range motherboard with a VRM rivaled by boards that cost twice as much. Between the Wi-Fi 6E and 10 GbE, three M.2 sockets and six SATA ports for storage, plus its premium appearance, the Z590 Master is an excellent option to get into the Z590 platform if you’re willing to spend around $400.
Pros
- +
+ Fast Networking, Wi-Fi 6E/10 GbE
- +
+ Superior 18-phase 90A VRM
- +
+ 10 USB ports
Cons
- -
No PCIe x1 slot(s)
- -
Audible VRM fan
- -
Price
Why you can trust Tom's Hardware
Editor’s Note: A version of this article appeared as a preview before we had a Rocket Lake CPU to test with Z590 motherboards. Now that we do (and Intel’s performance embargo has passed), we have completed testing (presented on page 3) with a Core i9-11900K and have added a score and other elements (as well as removing some now-redundant sentences and paragraphs) to make this a full review.
Gigabyte’s Z590 Aorus Master includes an incredibly robust VRM, ultra-fast Wi-Fi and wired networking, premium audio, and more. While its price of roughly $410 is substantial, it’s reasonable for the features you get, and far from the price of the most premium models in recent generations. If you don’t mind a bit of audible VRM fan noise and like lots of USB and fast wired and wireless networking, it’s well worth considering.
Gigabyte’s current Z590 product stack consists of 13 models. There are familiar SKUs and a couple of new ones. Starting with the Aorus line, we have the Aorus Xtreme (and potentially a Waterforce version), Aorus Master, Aorus Ultra, and the Aorus Elite. Gigabyte brings back the Vision boards (for creators) and their familiar white shrouds. The Z590 Gaming X and a couple of boards from the budget Ultra Durable (UD) series are also listed. New for Z590 is the Pro AX board, which looks to slot somewhere in the mid-range. Gigabyte will also release the Z590 Aorus Tachyon, an overbuilt motherboard designed for extreme overclocking.
On the performance front, the Gigabyte Z590 Aorus Master did well overall, performing among the other boards with raised power limits. There wasn’t a test where it did particularly poorly, but the MS Office and PCMark tests on average were slightly higher than most. Overall, there is nothing to worry about when it comes to stock performance on this board. Overclocking proceeded without issue as well, reaching our 5.1 GHz overclock along with the memory sitting at DDR4 4000.
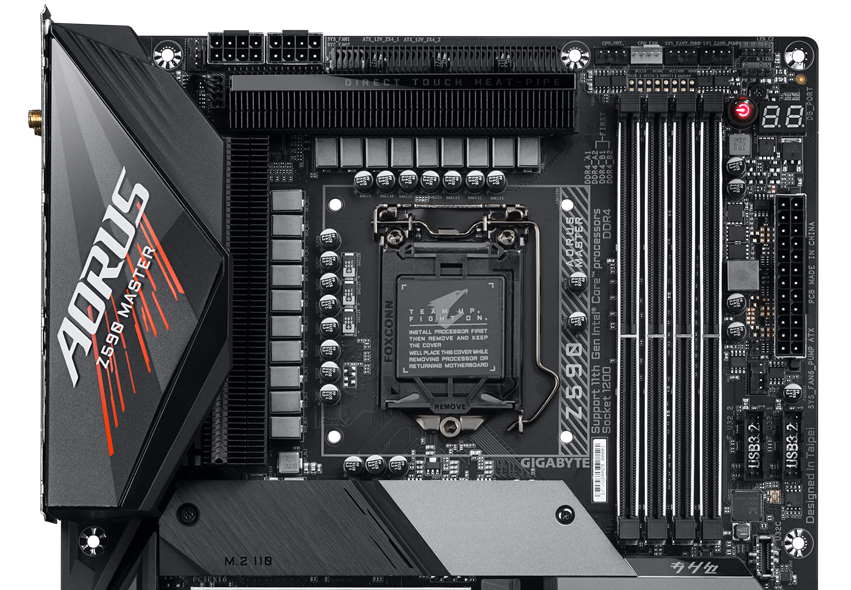
The Z590 Aorus Master looks the part of a premium motherboard, with brushed aluminum shrouds covering the PCIe/M.2/chipset area. The VRM heatsink and its NanoCarbon Fin-Array II provide a nice contrast against the smooth finish on the board’s bottom. Along with Wi-Fi 6E integration, it also includes an Aquantia based 10GbE, while most others use 2.5 GbE. The Aorus Master includes a premium Realtek ALC1220 audio solution with an integrated DAC, three M.2 sockets, reinforced PCIe and memory slots and 10 total USB ports, including a rear USB 3.2 Gen2x2 Type-C port. We’ll cover those features and much more in detail below. But first, here are full the specs from Gigabyte.
Specifications - Gigabyte Z590 Aorus Master
| Socket | LGA 1200 |
| Chipset | Z590 |
| Form Factor | ATX |
| Voltage Regulator | 19 Phase (18+1, 90A MOSFETs) |
| Video Ports | (1) DisplayPort v1.2 |
| USB Ports | (1) USB 3.2 Gen 2x2, Type-C (20 Gbps) |
| (5) USB 3.2 Gen 2, Type-A (10 Gbps) | |
| (4) USB 3.2 Gen 1, Type-A (5 Gbps) | |
| Network Jacks | (1) 10 GbE |
| Audio Jacks | (5) Analog + SPDIF |
| Legacy Ports/Jacks | ✗ |
| Other Ports/Jack | ✗ |
| PCIe x16 | (2) v4.0 x16, (x16/x0 or x8/x8 |
| (1) v3.0 x4 | |
| PCIe x8 | ✗ |
| PCIe x4 | ✗ |
| PCIe x1 | ✗ |
| CrossFire/SLI | AMD Quad GPU Crossfire and 2-Way Crossfire |
| DIMM slots | (4) DDR4 5000+, 128GB Capacity |
| M.2 slots | (1) PCIe 4.0 x4 / PCIe (up to 110mm) |
| (1) PCIe 3.0 x4 / PCIe + SATA (up to 110mm) | |
| (1) PCIe 3.0 x4 / PCIe + SATA (up to 110mm) | |
| U.2 Ports | ✗ |
| SATA Ports | (6) SATA3 6 Gbps (RAID 0, 1, 5 and 10) |
| USB Headers | (1) USB v3.2 Gen 2 (Front Panel Type-C) |
| (2) USB v3.2 Gen 1 | |
| (2) USB v2.0 | |
| Fan/Pump Headers | (10) 4-Pin |
| RGB Headers | (2) aRGB (3-pin) |
| (2) RGB (4-pin) | |
| Legacy Interfaces | ✗ |
| Other Interfaces | FP-Audio, TPM |
| Diagnostics Panel | Yes, 2-character debug LED, and 4-LED 'Status LED' display |
| Internal Button/Switch | Power, Reset, BIOS switch, SB switch |
| SATA Controllers | ✗ |
| Ethernet Controller(s) | (1) Aquantia AQC107 (10 GbE) |
| Wi-Fi / Bluetooth | Intel WiFi-6E AX210 (802.11ax, 2x2, MU-MIMO, OFDMA, BT 5.2) |
| USB Controllers | Realtek RTS5411E, ASMedia 1074 |
| HD Audio Codec | Realtek ALC1220-VB |
| DDL/DTS Connect | ✗ / DTS:X Ultra |
| Warranty | 3 Years |
Features
As we open up the retail packaging, along with the board, we’re greeted by a slew of included accessories. The Aorus Master contains the basics (guides, driver CD, SATA cables, etc.) and a few other things that make this board complete. Below is a full list of all included accessories.
- Installation Guide
- User’s Manual
- G-connector
- Sticker sheet / Aorus badge
- Wi-Fi Antenna
- (4) SATA cables
- (3) Screws for M.2 sockets
- (2) Temperature probes
- Microphone
- RGB extension cable
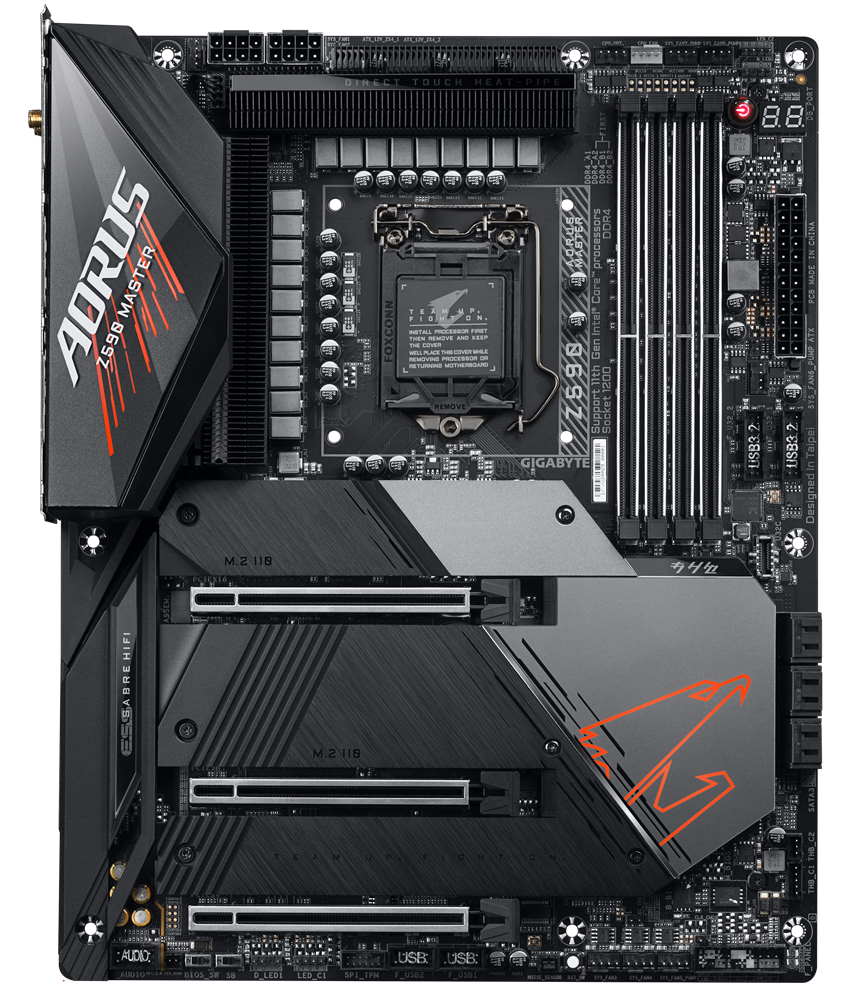
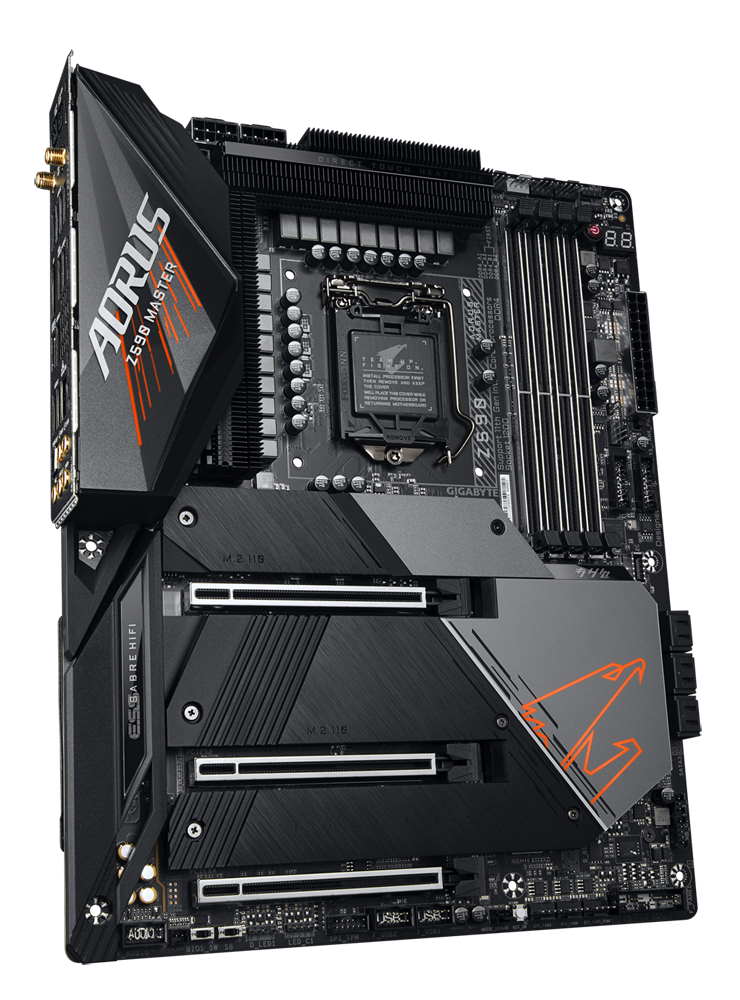
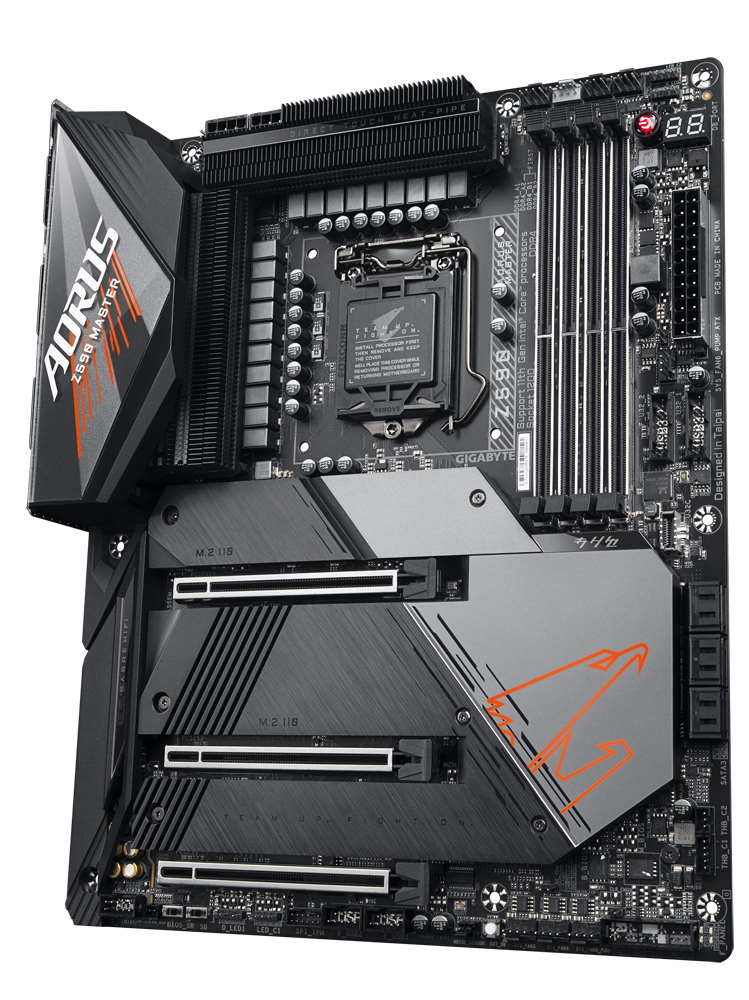
After taking the Z590 Aorus Master out of the box, its weight was immediately apparent, with the shrouds, heatsinks and backplate making up the majority of that weight. The board sports a matte-black PCB, with black and grey shrouds covering the PCIe/M.2 area and two VRM heatsinks with fins connected by a heatpipe. The chipset heatsink has the Aorus Eagle branding lit up, while the rear IO shroud arches over the left VRM bank with more RGB LED lighting. The Gigabyte RGB Fusion 2.0 application handles RGB control. Overall, the Aorus Master has a premium appearance and shouldn’t have much issue fitting in with most build themes.
Get Tom's Hardware's best news and in-depth reviews, straight to your inbox.
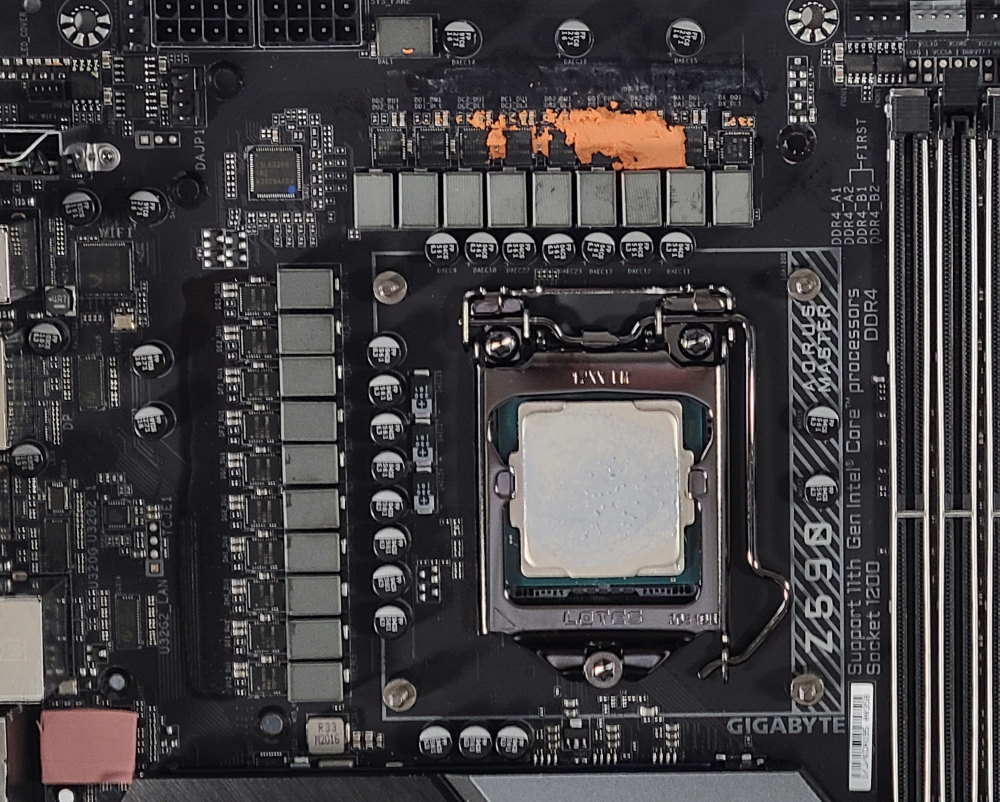
Looking at the board’s top half, we’ll first focus on the VRM heatsinks. They are physically small compared to most boards, but don’t let that fool you. The fin array uses a louvered stacked-fin design Gigabyte says increases surface area by 300% and improves thermal efficiency with better airflow and heat exchange. An 8mm heat pipe also connects them to share the load. Additionally, a small fan located under the rear IO shroud actively keeps the VRMs cool. The fan here wasn’t loud, but was undoubtedly audible at default settings.
We saw a similar configuration in the previous generation, which worked out well with an i9-10900K, so it should do well with the Rocket Lake flagship, too. We’ve already seen reports indicating the i9-11900K has a similar power profile to its predecessor. Feeding power to the VRMs is two reinforced 8-pin EPS connectors (one required).
To the right of the socket, things start to get busy. We see four reinforced DRAM slots supporting up to 128GB of RAM. Oddly enough, the specifications only list support up to DDR4 3200 MHz, the platform’s limit. But further down the webpage, it lists DDR4 5000. I find it odd it is listed this way, though it does set up an expectation that anything above 3200 MHz is overclocking and not guaranteed to work.
Above the DRAM slots are eight voltage read points covering various relevant voltages. This includes read points for the CPU Vcore, VccSA, VccIO, DRAM, and a few others. When you’re pushing the limits and using sub-ambient cooling methods, knowing exactly what voltage the component is getting (software can be inaccurate) is quite helpful.
Above those on the top edge are four fan headers (next to the EPS connectors is a fifth) of 10. According to the manual, all CPU fan and pump headers support 2A/24W each. You shouldn’t have any issues powering fans and a water cooling pump. Gigabyte doesn’t mention if these headers use auto-sensing (for DC or PWM control), but they handled both when set to ‘auto’ in the BIOS. Both a PWM and DC controlled fan worked without intervention.
The first two (of four) RGB LED headers live to the fan headers’ right. The Z590 Aorus Master includes two 3-pin ARGB headers and two 4-pin RGB headers. Since this board takes a minimal approach to RGB lighting, you’ll need to use these to add more bling to your rig.
We find the power button and 2-character debug LED for troubleshooting POST issues on the right edge. Below is a reinforced 24-pin ATX connector for power to the board, another fan header and a 2-pin temperature probe header. Just below all of that are two USB 3.2 Gen1 headers and a single USB 3.2 Gen2x2 Type-C front-panel header for additional USB ports.
Gigabyte chose to go with a 19-phase setup for the Vcore and SOC on the power delivery front. Controlling power is an Intersil ISL6929 buck controller that manages up to 12 discrete channels. The controller then sends the power to ISL6617A phase doublers and the 19 90A ISL99390B MOSFETs. This is one of the more robust VRMs we’ve seen on a mid-range board allowing for a whopping 1,620A available for the CPU. You won’t have any trouble running any compatible CPU, including using sub-ambient overclocking.
The bottom half of the board is mostly covered in shrouds hiding all the unsightly but necessary bits. On the far left side, under the shrouds, you’ll find the Realtek ALC1220-VB codec along with an ESS Sabre ESS 9118 DAC and audiophile-grade WIMA and Nichicon Fine Gold capacitors. With the premium audio codec and DAC, an overwhelming majority of users will find the audio perfectly acceptable.
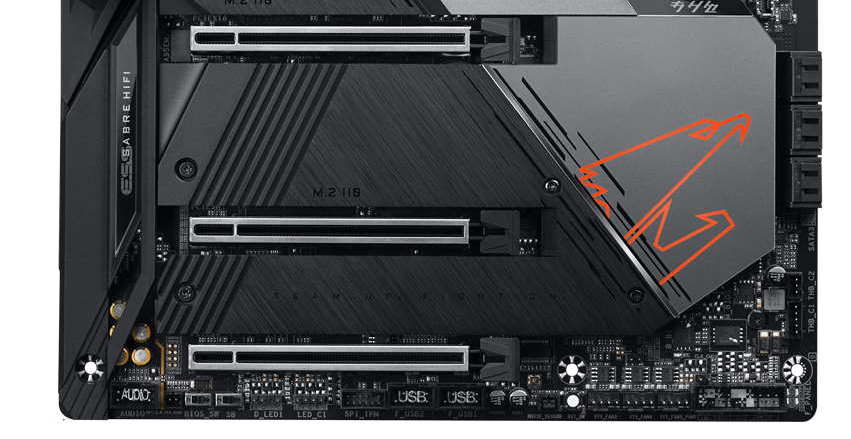
We’ll find the PCIe slots and M.2 sockets in the middle of the board. Starting with the PCIe sockets, there are a total of three full-length slots (all reinforced). The first and second slots are wired for PCIe 4.0, with the primary (top) slot wired for x16 and the bottom maxes out at x8. Gigabyte says this configuration supports AMD Quad-GPU Cand 2-Way Crossfire. We didn’t see a mention of SLI support even though the lane count supports it. The bottom full-length slot is fed from the chipset and runs at PCIe 3.0 x4 speeds. Since the board does without x1 slots, this is the only expansion slot available if you’re using a triple-slot video card. Anything less than that allows you to use the second slot.
Hidden under the shrouds around the PCIe slots are three M.2 sockets. Unique to this setup is the Aorus M.2 Thermal Guard II, which uses a double-sided heatsink design to help cool M.2 SSD devices with double-sided flash. With these devices’ capacities rising and more using flash on both sides, this is a good value-add.
The top socket (M2A_CPU) supports up to PCIe 4.0 x4 devices up to 110mm long. The second and third sockets, M2P_SB and M2M_SB, support both SATA and PCIe 3.0 x3 modules up to 110mm long. When using a SATA-based SSD on M2P_SB, SATA port 1 will be disabled. When M2M_SB (bottom socket) is in use, SATA ports 4/5 get disabled.
To the right of the PCIe area is the chipset heatsink with the Aorus falcon lit up with RGB LEDs from below. There’s a total of six SATA ports that support RAID0, 1, 5 and 10. Sitting on the right edge are two Thunderbolt headers (5-pin and 3-pin) to connect to a Gigabyte Thunderbolt add-in card. Finally, in the bottom-right corner is the Status LED display. The four LEDs labeled CPU, DRAM, BOOT and VGA light up during the POST process. If something hangs during that time, the LED where the problem resides stays lit, identifying the problem area. This is good to have, even with the debug LED at the top of the board.
Across the board’s bottom are several headers, including more USB ports, fan headers and more. Below is the full list, from left to right:
- Front-panel audio
- BIOS switch
- Dual/Single BIOS switch
- ARGB header
- RGB header
- TPM header
- (2) USB 2.0 headers
- Noise sensor header
- Reset button
- (3) Fan headers
- Front panel header
- Clear CMOS button
The Z590 Aorus Master comes with a pre-installed rear IO panel full of ports and buttons. To start, there are a total of 10 USB ports out back, which should be plenty for most users. You have a USB 3.2 Gen2x2 Type-C port, five USB 3.2 Gen2 Type-A ports and four USB 3.2 Gen1 Type-A ports. There is a single DisplayPort output for those who would like to use the CPU’s integrated graphics. The audio stack consists of five gold-plated analog jacks and a SPDIF out. On the networking side is the Aquantia 10 GbE port and the Wi-Fi antenna. Last but not least is a Clear CMOS button and a Q-Flash button, the latter designed for flashing the BIOS without a CPU.
MORE: Best Motherboards
MORE: How To Choose A Motherboard
MORE: All Motherboard Content

Joe Shields is a staff writer at Tom’s Hardware. He reviews motherboards and PC components.
