An industrial designer with a love for old computers has created a working prototype of a Commodore 64 laptop. This is kind of an alternative history remake device. By that, we mean Commodore never made a laptop, the closest it came was the SX64 luggable (~22 pounds) computer. However, Kevin Noki has drawn inspiration from the original C64 "bread-bin" design melded with an era-appropriate Apple Macintosh Lisa portable.
The above video shows Noki’s journey from concept to working prototype. In the intro, he sums up the idea behind this work as a plan to create a “fully functional custom design C64 laptop, built like it could have existed in the 1980s, but powered by modern hardware.”
To begin this journey in hardware and software, Noki used 3D design software to model the Portable 64. He decided to split the finished design into parts for 3D printing on his Bambu Lab P2S. In total, there were about 30 parts, resulting in a total print time of 38 hours using a 0.4mm nozzle.
Next up, we see the designer and maker put the case together using superglue and metal pins. Subsequently, it is sanded, primed, spray-painted. It starts to look great already, with the original C64 reference colors – a kind of sandy beige.
The keyboard chosen to fit this computer wasn’t an off the peg design, and would constitute a major effort to build. For 3D printing, the keycaps alone took 24 hours to output. Noki used a finer 0.2mm nozzle to reduce layer lines on the final print.
For accurate legends, the maker scanned and vectorized an original C64 keyboard. Making a light on dark design, waterslide transfers with white laser toner was the method chosen. Waterslide transfers are quite fragile, so once in-place and dried, they were protected by several coatings of a clear acrylic lacquer spray.
PCBWay made the custom keyboard PCB. Noki had to solder 60+ small diodes to the board, and slotted in a Raspberry Pi Pico microcontroller – flashed with the well-known QMK customizable keyboard firmware, to act as an interface between the switches and the Raspberry Pi 5. One of the last processes the keyboard required was the soldering of the key switches. Noki chose a switchlock caps lock key for an authentic feel.


With the keyboard out of the way, the Portable 64 designed turned to building up the structure and supports for various PCBs and I/O plates. Knurled brass inserts pressed into pre-positioned holes with a soldering iron laid much of the foundations. It was also interesting to see the implementation of a push-latch magnetic mechanism for the retractable laptop handle.
The heart of the Portable 64 was a Raspberry Pi 5 running the VICE emulator. Noki wanted the option to use original hardware, so for this project leveraged the open-CBM library and custom-made adaptor(s). The 1541 .25 inch floppy adaptor would be quite easy to get working using the library and interface board. Joystick adaptors were prepared and mounted, including a custom 3D printed cover to mimic the original C64 look. However, the Datasette, the cassette tape storage device, took more work, as the client software had to be modified to stream the .TAP file into the emulator. “A bit of a hacky setup, but it works perfectly for this setup,” concluded Noki.
For the battery, a $10 UPS, which didn’t come with the required 18650 cells, was repurposed. Noki made a 3D printed part to allow cell access from a trapdoor under the laptop. A nice touch was a Python app, designed to show the battery status on ‘C64’ screen.
On the topic of the screen, a 10-inch 4:3 screen was selected for this project. It sat central with era-appropriate massive bezels. After mounting the screen and its PCB, a small mod was needed to wire brightness to a wheel on the side of the laptop. An audio volume wheel was positioned there, too. Ever the perfectionist, Noki decided to tamper with the screen firmware to banish on-screen messages regarding input sources and other features.
The final assembly steps were now ready to complete, with sprung latches added to the laptop lid. Torque hinges were used for easy, smooth, laptop screen angle adjustments. And now, the keyboard and screen were attached to the system PCB and all the panels screwed or snapped into place.
Testing time
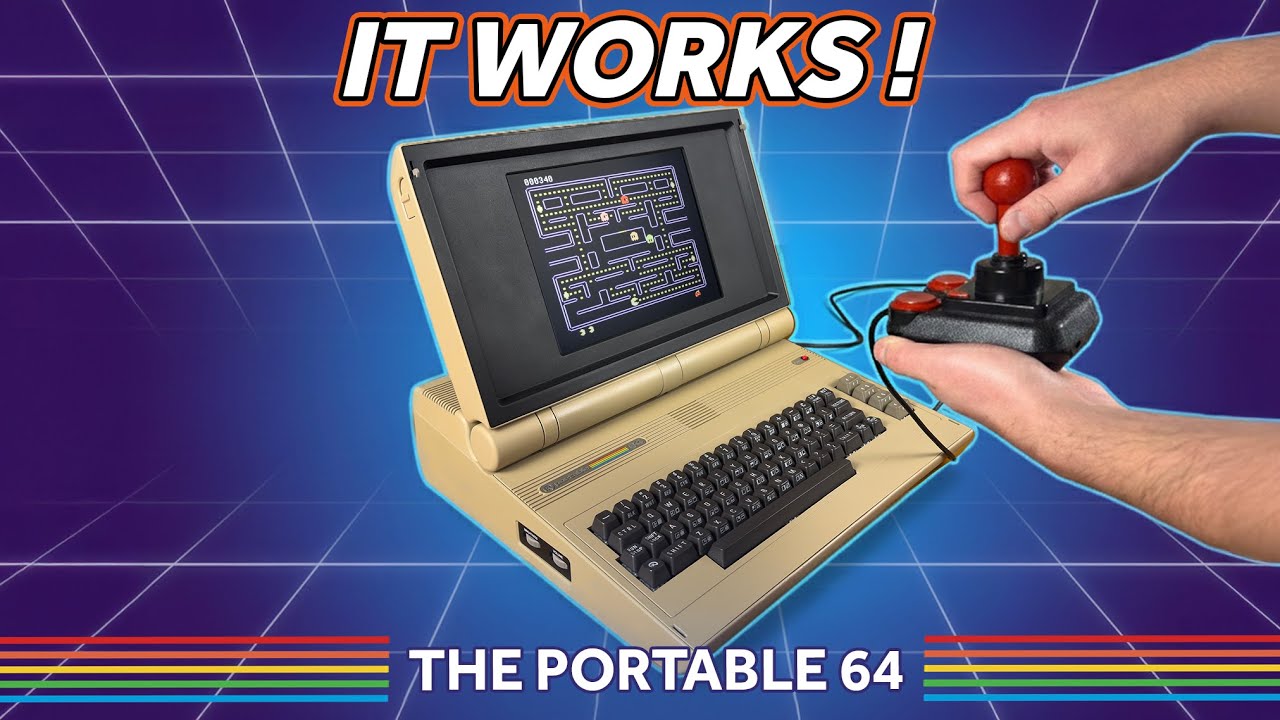
The finished prototype as shown in the video takes 11 seconds to boot to the Commodore 64 BASIC screen. Our intrepid tech adventurer found the system satisfying to use. He could load original software from the 1541 floppy, and an original ‘Pac-Man’ game of unknown provenance still worked. Even the Datasette test worked nicely, but slowly, of course.
The legendary Competition Pro 9-pin joysticks worked as intended. A Python program running in the background converted joystick input, wired to the Pi 5’s GPIO, to the appropriate key presses.

If you were to take the Portable 64 on the road, you’d probably eschew original media, though. For truly portable C64 fun, an SD card packed with games and apps was Noki’s preferred choice. Apparently, this prototype weighed about 4kg, or about 8 pounds. We didn’t hear anything about untethered battery life.
Previous notable projects by Kevin Noki include a 1980s beige Apple iPad.

Follow Tom's Hardware on Google News, or add us as a preferred source, to get our latest news, analysis, & reviews in your feeds.