Camera Phone Technology 101
From sensors to optics to features, we'll run down the basics of mobile digital camera technology in this primer.
Features
Autofocus: Contrast, Phase or Laser
Mobile devices use three main types of autofocus (AF): contrast detect autofocus (CDAF), phase detect autofocus (PDAF), and laser autofocus. Contrast detection is the most common method employed due to its lower cost. Like its name implies, this AF method measures the difference in light intensity or contrast between adjacent pixels. The image is in focus when the contrast is maximized. Because this method has no way of measuring the distance between the camera and subject, the lens needs to sweep through the entire focal range to find the point with maximum contrast and then move back to that position. This motion is obvious when looking at the preview screen and watching the image move from blurry to sharp to blurry and back to sharp. All of this excess lens motion makes contrast AF rather slow. It also does not work well in low-light conditions.
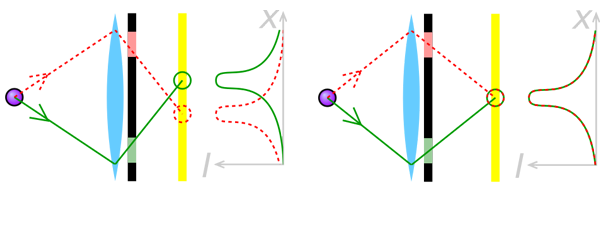
Phase detect AF is widely used in expensive hand-held cameras, and it’s now making its way to mobile devices as well. PDAF is a passive system like CDAF, but it’s capable of actually measuring distance. It works in a manner similar to an optical rangefinder. Incoming light is refracted by microlenses and the resulting images are superimposed on the AF sensor. If the object is too close or too far, the light rays will be out of phase. By measuring the distance between light intensity peaks, along with the known geometry of the camera, the image signal processor (ISP) determines the precise location of the lens to bring the image into focus. Because the lens only makes one small adjustment, rather than sweeping through the full focal range, PDAF is significantly faster than the contrast method and is better suited for tracking moving objects. The downside is PDAF costs more to implement and still has difficulty in low-light conditions.
[CREDIT: Cmglee (Licensed under CC BY-SA 3.0) Modified by Tom’s Hardware]
Laser AF, used in LG’s G3 and G4 smartphones, is an active time-of-flight system where an infrared laser beam is projected from the phone, reflects off an object, and is captured by the phone’s sensor. Since the speed of light is known, the distance is calculated based on the time between when the beam is emitted and detected. The speed and accuracy of this method is comparable to PDAF, with the additional benefit of working well in low-light situations. Laser AF has its own pitfalls, however. It cannot see through glass, it gets confused by absorbent or reflective surfaces, and it has trouble outdoors where long distances and high levels of background IR nullify the laser. In these cases, the camera falls back to the contrast AF method.
Hybrid AF systems are also possible, combining two or more different methods to deliver quick and accurate performance in all conditions. Combining a Laser AF system with PDAF is an obvious choice which would deliver quick performance in all lighting conditions, indoors or out. The only limitations on hybrid AF systems are cost and ISP performance.
HDR: High Dynamic Range
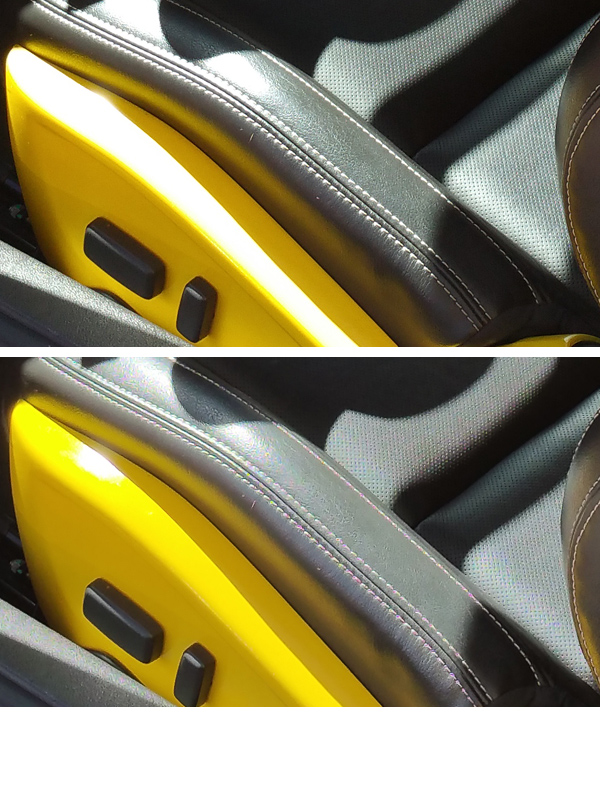
The human eye perceives brightness in a nonlinear way according to a gamma or power function; we are more sensitive to changes in dark tones than light ones. This gives our visual system a higher dynamic range and helps keep us from being blinded by bright sunlight outdoors. A CMOS camera sensor, however, records light linearly (one incident photon produces one electron in the well), restricting its total dynamic range (the difference between the darkest and brightest luminance values that produce a change in voltage in the pixel) to the pixel’s full-well capacity. The shutter speed used by the camera also impacts the captured image’s dynamic range. A slow shutter speed allows more light to enter the lens, brightening up dark areas but overexposing lighter areas like a brightly lit sky. Conversely, a fast shutter might get the exposure correct for the sky, but leave the areas in shadow far too dark.
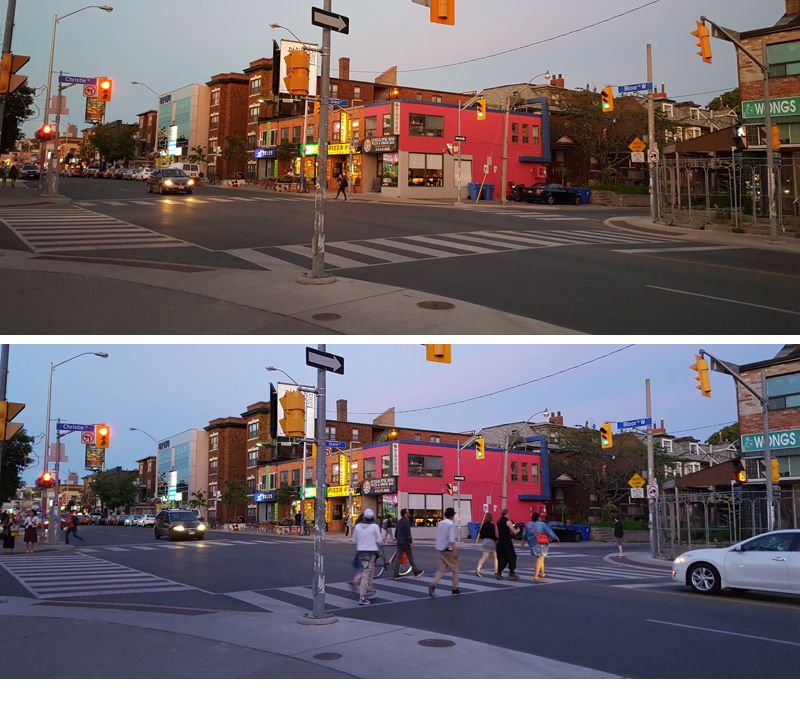
There are several ways to extend a CMOS sensor’s dynamic range, including larger full-well capacities (larger pixels) and decreasing the noise floor. Neither of these solutions are practical, however, since the industry is moving to ever smaller pixels. Instead, cameras are using multiple exposures and post-processing to generate high dynamic range (HDR) images. The simplest approach is exposure bracketing, where two or more separate images are captured, one underexposed to capture the detail of the brighter regions and another overexposed to capture the detail in the shadowed regions. These images are then combined and filtered with software algorithms to create the final HDR image. If the exposure time for each pixel can be controlled individually, then the camera does not need to capture multiple full-frame exposures. This technique increases the speed of HDR capture by monitoring each individual pixel, performing a conditional reset if the pixel is close to saturation. This does increase cost, however, because additional local memory is required to store the exposure time for each pixel.
Get Tom's Hardware's best news and in-depth reviews, straight to your inbox.
The benefit of using the exposure bracketing technique is that all of the magic happens in software and does not require any modification at the pixel level, unlike solutions that use a lateral overflow integration capacitor and multiple photodiodes with different sensitivities. One drawback, however, is the need to read and process several exposures quickly, requiring high bandwidth from the image sensor and more processing power from the ISP/DSP. If the HDR process is too slow, image capture time increases which the user perceives as camera lag. Also, motion—either from camera movement or from movement of objects within the scene—can create ghosting artifacts if the time between frame captures is too long.
Combining multiple images in post-processing can lead to additional artifacts. To better match the dynamic range of the HDR image to the contrast ratio of common displays, a tone-mapping algorithm is used. A linear transformation algorithm reduces the contrast of the image everywhere without regard for objects or already low contrast zones within the scene, resulting in a washed-out image. This technique is commonly used in less expensive devices because of its simplicity and lower processing requirement.
More sophisticated techniques analyze the content of the image and adapt the tone mapping algorithm to better preserve local details. One method uses a low-pass Gaussian filter to blur the image, subtract the result from the original image, and then recombine this with a globally tone mapped version. While this method produces a more natural looking image, it can cause halos or purple fringes to appear along edges in high contrast zones (dark object against a bright background or vice versa). Avoiding edge artifacts requires additional edge detection algorithms to break the scene into different zones to be filtered independently, which requires additional computing power.
EIS & OIS: Image Stabilization
The goal of both electronic image stabilization (EIS) and optical image stabilization (OIS) is to improve the sharpness of an image by reducing blur caused by the motion of the camera. EIS is a software post-processing technique applied to video which shifts individual frames, using the extra pixels beyond the visible border of the video (most image sensors contain more pixels than necessary to record 1080p or 4K video). There are also post-processing techniques, separate from EIS, for reducing blur caused by moving objects (not the camera) which work with both still images and video.
Where EIS is entirely software based, OIS is a hardware feature. Using gyroscopes, the camera senses its movement and uses an actuator in the camera module to adjust either the lens stack or the camera sensor to compensate and keep the light path steady. OIS can be used for video, but its best application is for shooting still images in low light, where longer exposures increase motion blur.
AWB: Automatic White Balance
One of the interesting features of the human visual system, dubbed color constancy, allows the color of objects to remain relatively constant, even when viewed under different light sources. Unfortunately, a camera’s image sensor does not have this ability. In order for the sensor to capture color accurately, the camera needs to adjust its white balance to account for the color temperature of light within a scene. Put another way, the camera needs to know what a white object looks like under a particular light source. For example, a white sheet of paper lit by an incandescent bulb with a color temperature of 2700 K will appear a yellowish orange. The same sheet of white paper lit by an LED bulb will take on a bluish tint. Since color temperatures below 6500 K, the color temperature of sunlight on an overcast day, tend to have more red content, we describe them as being “warm.” Color temperatures above 6500 K skew towards blue, so we describe them as being “cool.” If the camera sets white balance incorrectly, images will have an unnatural color tint which skews the hues of other colors in the image.
Most cameras will have white balance presets, usually labeled with pictograms of a fluorescent light, incandescent light, sun, clouds, etc., which roughly correspond to the color temperature of light under those conditions. Some cameras may allow you to set the white balance manually, providing greater flexibility. Since most of us do not want or need to be bothered by this, cameras also come with an automatic white balance (AWB) adjustment feature.
There are several different AWB algorithms but most fall into two categories: global and local. Global algorithms, such as the gray world and white patch methods, use all of an image’s pixels for color temperature estimation. Local algorithms use only a subset of pixels based on predefined selection rules (like a human face) for this task. Hybrid methods are also used, either selecting the best algorithm based on image content or using one or more methods simultaneously.
We have yet to find an algorithm that works as well as our visual system, however. Global AWB algorithms have trouble with images showing little color variation, a picture of a blue ocean with a blue sky, for example. Local AWB algorithms break down if the image does not contain any objects that meet its selection criteria or that contain a lot of noise. Regardless of which method is employed, having a white or neutral colored object in the scene will help the camera’s AWB select the appropriate value. If all else fails, you can usually correct the white balance with image editing software, especially when using the RAW image format.
-
wtfxxxgp ReplyThanks for the informative article. You might have just cured my insomnia.
Geez. That was a cruel comment! hahaha
Seriously though, that article was very informative for those of us who like to know a bit about everything :) -
David_118 Great article. Very Informative. It would be useful, knowing these concepts, if there was a studio that took mobile cameras and used them on some standard set of scenes, either photographing paper with test patterns, or constructed scenes in low light, or whatever, that could measure things like signal-to-noise, HDR performance, optical abberations, shutter speed, etc. Anyone know of such an outfit?Reply -
MobileEditor ReplyGreat article. Very Informative. It would be useful, knowing these concepts, if there was a studio that took mobile cameras and used them on some standard set of scenes, either photographing paper with test patterns, or constructed scenes in low light, or whatever, that could measure things like signal-to-noise, HDR performance, optical abberations, shutter speed, etc. Anyone know of such an outfit?
There are several labs, such as DxOMark, Image Quality Labs, and Sofica, that perform these tests. We're considering adding some of these tests to our reviews, but they require expensive equipment and software to do it right. Hopefully, we'll be able to expand our camera testing in the future--budget and time permitting.
- Matt Humrick, Mobile Editor, Tom's Hardware -
zodiacfml Good job. Finally, someone who really knows about what's being written. The tone and some information though might be too much for someone who has not even heard of shutter speeds or aperture. I also feel there's information overload as each topic/headline deserves its own article including investigation on megapixel/resolution spec.Reply


