Extreme Overclocking: 10 Ryzen CPUs Under LN2
Preparing The Motherboard
Measurement Points
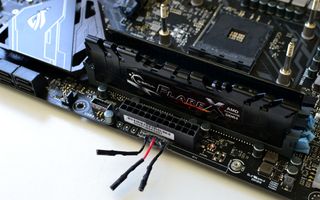
We begin with a little modification to the motherboard. Test points are available on the PCB, but Asus sadly neglects to include connectors. As a result, it's on you to precisely touch the indicated pads with a multimeter in order to take measurements.
Normally that's not an issue. But when it comes to extreme overclocking, voltages have to be watched more closely and we don't always have our hands free. Right away, we add something to plug our volt meter into for easier measurements.
LN2 mode
Some preparations are easier than others. In this step, we simply move the jumper labeled “LN2 MODE” in order to activate it. Once enabled, the motherboard automatically starts up with higher supply voltages. This will offer better support for the extreme conditions we're planning to apply. Certain hidden profiles in the BIOS are also unlocked.
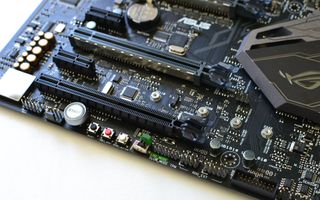
Don't enable the LN2 MODE jumper if you plan on overclocking at ambient temperatures. Following the activation of this mode, the PLL (Phase Locked Loop) will transition from 1.8V to 2.1V. If you read our previous article, we revealed that raising PLL from 1.8 to 1.9V caused an 8°C temperature increase. Raising the PLL to 2.1V on air cooling should be avoided!
Isolation
When overclocking with liquid nitrogen, special care must be taken to protect your hardware. Ice will form and you don't want to risk water droplets falling onto the electrical components. We presented a number of ways to approach this in De-Lidding and Overclocking Core i7-7700K with Water and LN2.
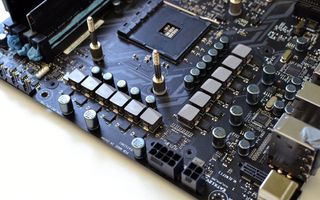
To start, we remove the heat sink covering the motherboard's VRMs. This step isn't obligatory; it most depends on the overclocker's preference. In our opinion, though, this sink is useful for extreme overclocking, so we prefer to take it off. This facilitates the insulating steps that follow, and even more important gets rid of a big metal mass. That could be a big risk for forming condensation otherwise.
Once we're down to the bare motherboard, we craft a “shield” made from shop towels. This protective layer must be fitted as tight as possible in order to prevent condensation from reaching the PCB.
Stay on the Cutting Edge
Join the experts who read Tom's Hardware for the inside track on enthusiast PC tech news — and have for over 25 years. We'll send breaking news and in-depth reviews of CPUs, GPUs, AI, maker hardware and more straight to your inbox.
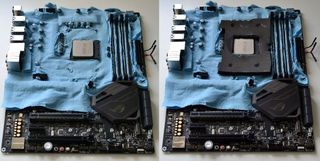
Unused RAM slots are filled with towels. The space between surface-mounted components gets the same treatment, too. To finish, a section of neoprene is fitted around the socket. This protection serves as a last defense, though we hope that condensation is stopped well before this stage.
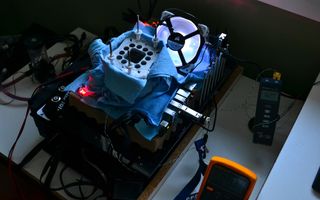
If it is properly made and placed, this ultimate protection is sufficient to shield the hardware without damaging it, and can be easily removed. Once the cooling pot (which holds the liquid nitrogen and cools the CPU) is in place, we pack on more shop towels. The pot is wrapped in neoprene, then towels, and any exposed portions of the motherboard are covered with several more layers of towels.
MORE: Best CPUs
MORE: How To Overclock AMD Ryzen CPUs
MORE: De-Lidding and Overclocking Core i7-7700K
MORE: CPU Overclocking Guide: How (and Why) to Tweak Your Processor
-
InvalidError It isn't surprising that the highest-end CPUs have the highest and least troublesome overclocks as that's what chip binning is for - the best dies go to the premium SKUs first, lower tiers get what is left over.Reply -
-Fran- Reply19937674 said:It isn't surprising that the highest-end CPUs have the highest and least troublesome overclocks as that's what chip binning is for - the best dies go to the premium SKUs first, lower tiers get what is left over.
Even more, it's very interesting since it gives some credibility that AMD is not binning due to defects, but electrical properties, hence, making the rumour mill of being able to unlock some 4C and 6C to higher core counts not that far-fetched.
Cheers! -
Wisecracker Très bon!Reply
(hope I used this correctly)
Just wondering ... would it be considered a 'faux pas' (or, an insult to AMD) to release the batch numbers?
-
theyeti87 Reply19937697 said:19937674 said:It isn't surprising that the highest-end CPUs have the highest and least troublesome overclocks as that's what chip binning is for - the best dies go to the premium SKUs first, lower tiers get what is left over.
Even more, it's very interesting since it gives some credibility that AMD is not binning due to defects, but electrical properties, hence, making the rumour mill of being able to unlock some 4C and 6C to higher core counts not that far-fetched.
Cheers!
Wasn't that a similar case with the Phenom X4, X3, and X2's? Or were those 3's and 2's disabled cores due to defect? -
-Fran- Reply19937706 said:19937697 said:19937674 said:It isn't surprising that the highest-end CPUs have the highest and least troublesome overclocks as that's what chip binning is for - the best dies go to the premium SKUs first, lower tiers get what is left over.
Even more, it's very interesting since it gives some credibility that AMD is not binning due to defects, but electrical properties, hence, making the rumour mill of being able to unlock some 4C and 6C to higher core counts not that far-fetched.
Cheers!
Wasn't that a similar case with the Phenom X4, X3, and X2's? Or were those 3's and 2's disabled cores due to defect?
They were a mix of both. If you were lucky (and could track down some of the batches) you were able to unlock the CPU with little worry, but there were defective ones that when unlocked, would not work. I came across both myself.
To be honest, I just catalog it as "interesting", because I will pay the difference to always get the full working version, but I do know there's people out there that like gambling and can track batch numbers :P
Cheers! -
InvalidError Reply
The relatively low defect rate has been a given since launch IMO: half of each CPU core is L2 cache and half of the CCX die area is the L3, so you have a 50% chance that defects within a CCX will land in L3. If the defect rate had been significant, cache defects would have forced AMD to launch models with 8MB of L3 long before the 1400.19937697 said:Even more, it's very interesting since it gives some credibility that AMD is not binning due to defects, but electrical properties -
-Fran- Reply19937880 said:
The relatively low defect rate has been a given since launch IMO: half of each CPU core is L2 cache and half of the CCX die area is the L3, so you have a 50% chance that defects within a CCX will land in L3. If the defect rate had been significant, cache defects would have forced AMD to launch models with 8MB of L3 long before the 1400.19937697 said:Even more, it's very interesting since it gives some credibility that AMD is not binning due to defects, but electrical properties
True. It's just nice to have more non-validated statistical-irrelevant proof! Haha.
Cheers! :P -
Gregory_3 This is all kind of cute, but the real market success will be played out in conventional liquid cooled and air cooled environments. Nobody is going be running high end software with condensation dripping all over.Reply -
InvalidError Reply
There wouldn't be condensation issues if OCers used the nitrogen gas boiling out of the pot to displace air and the moisture it contains around the motherboard to keep it off of it. Instead of circulating the boil-off around the motherboard though, LN2 OCers use fans to suck it away, drawing more moisture-ladden air in the area.19938043 said:Nobody is going be running high end software with condensation dripping all over.
-
gasaraki "It isn't surprising that the highest-end CPUs have the highest and least troublesome overclocks as that's what chip binning is for - the best dies go to the premium SKUs first, lower tiers get what is left over."Reply
While it might not be surprising, it shows the immaturity of the Ryzen processors in that the build quality is not the same between different CPUs or even CCXes and binning is what they do for the lower cored versions. If your build process was mature ALL your chips would come out mostly the same and "awesome" then at that point your forced to just shutdown cores to make the lower cored processors.
Most Popular


